[Review]Bluehost Backup and Restore: The Complete Guide
Bulletproof Backups for Your WordPress Website
Fortify your business continuity with foolproof WordPress backups. No data loss, no downtime — just secure, seamless operation.
Bluehost is one of the more popular website hosting services, and one of their premium features is an automated backup service. The question is: can you rely on the backups Bluehost provides?
In this article, we attempt to answer that question. We tested out the Bluehost backup and restore feature on a variety of different sites to see what worked, but more importantly what didn’t.
TL;DR: Web host backups are not bulletproof. That’s why you do not want to depend on them. Keep your WordPress websites safe with reliable backups that you can restore in seconds. It is important to have backups stored separately from your host to ensure that if your host goes down the backups are still safe.
Evaluating Bluehost backup
When trying out the Bluehost backup feature, we wanted to make sure that the backups are easy to take, reliable, and can be restored quickly when necessary. Also, good backups need to be stored elsewhere; not on the same server as the live site.
We tested three sites: one small, one large and one with a large database (size 174 MB) to see if there are differences in the way the feature works. We have summarised our findings in this section, and expanded on our process in the rest of the article.
Ways to backup your Bluehost WordPress site
The primary way for Bluehost backup is to use cPanel via your hosting dashboard. This is an on-demand backup and not an automated feature.
Therefore, you are going to need to take a backup manually every time you want one. Useful for times when you want a fresh one just before an update, for instance, but not a feasible option for the long term.
Additionally, we found that cPanel was loading very slowly and therefore, it took us a lot of time to do even simple actions on the Bluehost dashboard.
Because Bluehost cPanel took time, we explored other options for creating backups.
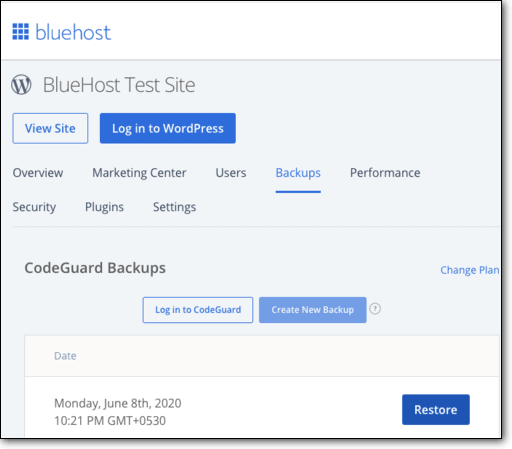
- More services from the host: Bluehost offers add-on services for creating daily automatic backups. Depending on the plan you are on, you have the option to purchase CodeGuard or Site Backups and Restore Pro.
The free version of this add-on service only lets users backup their sites to Amazon S3. You need a Pro account in case you want to restore a backup. Bluehost stores the backups for a maximum of 30 days. After this time limit, they are automatically deleted. If you use these add-on tools then you need to download the older backups before they get deleted.
- Using plugins: There are various backup plugins available for WordPress sites. You can add these plugins regardless of which web host you use. These plugins have their own pros and cons.
Therefore, they should be selected after thorough research. You can check out our list of the best backup plugins available for WordPress.
- Manual backups: You can backup and restore your site via your Bluehost account manually. However, you will have to do it in parts: files separately, and database separately. We backed up the files using the slow cPanel File Manager, and the database via phpMyAdmin.
Essentially, we ended up with 2 partial backups, which we then had to restore separately as well. Also, in our opinion, this method is not only inefficient and time-consuming, but could be daunting for someone with no knowledge of working with code. Moreover, manual methods are always prone to errors.
Our findings
Bluehost documentation suggests that a second independent backup should be taken even when using the add-on services. We at BlogVault firmly agree, having seen web host backups fail time and again. Further, though, this did not give me much confidence.
The manual methods are also not feasible for creating daily backups. Your backup service needs to be reliable as well as quick, which is not possible through options available with Bluehost.
How to backup a complete WordPress site via Bluehost cPanel?
A WordPress site consists of files and a database, and cannot function without both of these components.
This is an important point to remember when backing up your site with Bluehost manually. You can backup an entire WordPress site, but you need to download the files and database separately using cPanel tools such as File Manager and phpMyAdmin respectively.
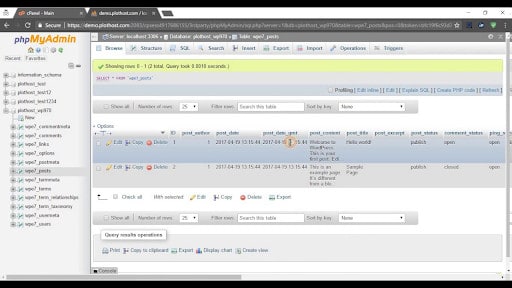
Backup database using phpMyAdmin
We started with the database, which contains posts, pages, and all the content we have created on our sites. Basically, stuff that has taken us a while to create and we definitely do not want to lose. Losing files is also not ideal, but it is not quite as irretrievable.
Downloading a backup of the database is fairly straightforward. You can access the phpMyAdmin tool via your Bluehost account. In the phpMyAdmin tool, search for your database name and click on ‘Export’ option. You will be prompted to choose between Quick and Custom export options.
Complete Database Backup: To backup the whole database, you can choose the quick option. You should always save your backups with a distinctive name so that they are easy to locate later on.
Partial Database Backup: If you have a WooCommerce site you may want to backup just your database, or even a single table from your database, such as information on orders. To do so, you can select the custom option and choose the tables which you would like to backup.
From phpMyAdmin, you can download the database on your computer or on an external hard drive. The process isn’t hard once you have located your database.
However, it can be confusing if you are using phpMyAdmin for the first time. If you don’t know the database name, then you will have to check your wp-config.php file and find the DB_NAME value. This can be done via the file manager.
You can use the phpMyAdmin dashboard while the database is being downloaded. However, you should avoid making changes to the database while you are downloading it, as it can lead to errors.
We tried this by adding a comment while the download was in process and then restored this backup. After the restoration, we realized that the comment was not captured in the backup probably because the download for that table had already taken place.
This is not limited to manual backups. In any case, the possibility that you would immediately need to restore a website after a backup is created is low. Any new data during the process will be backed up in the next backup.
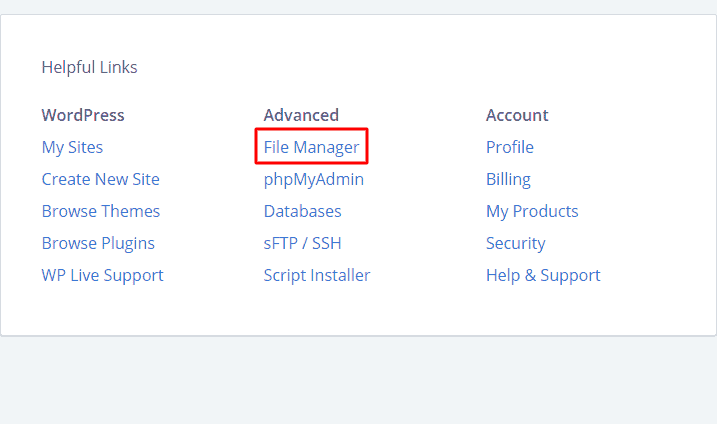
Backup files using cPanel File Manager
You can access the File Manager under the Advanced tab in your Bluehost account. Expand the public_html folder and locate your website name. Confirm that you have your core files wp-admin, wp-includes, and wp-content in that folder before backing up.
Complete file backups: In order to ensure that your file backup does not take a lot of time you should compress your files first. For the smaller site we tested, we actually did not do this. We used the ‘select all’ option to download all the files. This slowed down our website while the backup was taking place, and the download took longer than expected.
Speedy file backups: For the larger site, we compressed the files by right-clicking the website folder and choosing compress. Once the .zip file is ready, select and download it. We are recommending this because it will not overload your server. This is important if you have a dynamic website with high traffic. You do not want it to get slowed down every time you take a backup.
Partial file backup: You may in some cases need to restore a single plugin or theme. You can create plugin or theme backups so that if you want to you can restore it. As this method is manual, you can easily select the file you want to backup and download it to your computer.
Thoughts on Bluehost backups
The downloaded backups do not have meaningful file names, so we recommend you name your file backups and database backups properly.
Otherwise, if you have to restore a full backup using Bluehost from a particular day, it can be difficult to find which database backup version goes with which file backup version.
Better yet, make a folder with the date and perhaps a short note on what is in that backup, and store the files and database taken on that day in the folder. This means, you will have to create multiple folders for multiple backups, not to mention spending a lot of effort for retrieval, but it will make your life easier down the road.
Overall, our experience with manual backups was okay because we have worked with quite a few websites. However, if you are new to website management, we would suggest you to go for a plugin to automate backups and reduce potential for mistakes.
Moreover, we find that manual backups are not a sustainable option, as it takes far too long to take a backup of your site daily. In fact, if you are managing multiple websites, then just backups will take up your whole day—if not more.
Restore WordPress site using Bluehost cPanel
You can restore your website from backup on Bluehost using the same option you used to backup your site. However, this is not necessary.
If you use add-ons, such as CodeGuard or Site Backups and Restore Pro, you can restore from the tool itself. Also, most plugins allow you to restore the site yourself directly from the plugin.
In this section, we will discuss how to restore your WordPress site manually via cPanel in Bluehost. You can restore any backup you have on your computer. If you use a backup plugin that does not allow you to restore, we suggest you download the backup to your computer first and then follow the manual method.
To restore your website from backup, you have to import your files into the File Manager and the database into the phpMyAdmin dashboard. However, you need to delete the existing files and database first. That means the site goes down while restoration is in process.
Restoring backup files via File Manager
Go to the File Manager from Bluehost cPanel and locate the public_html folder for your website. Select all the files in this folder and delete them. Once the public_html folder is empty, you can upload the .zip backup file from your computer. Choose the .zip file and extract it to restore your files.
Restoring database backup via phpMyAdmin
Go to phpMyAdmin from your Bluehost cPanel and locate your website’s database. Choose all the tables in the database by selecting them and choosing ‘drop’. You may have to drop tables multiple times depending on how large your database is. Do it till you see the ‘no table found’ text.
Now choose ‘Import’ in phpMyAdmin and select the database backup file you want to restore from your computer.
Our findings
Small site: Restoring the small site or any site with less than 50 MB is not an issue. By importing both the files and database into the respective cPanel tools, your complete site will be restored.
However, we would like to reiterate that manual backups and restores can be unreliable and a risky procedure. If you delete the files in order to restore and the restoration fails due to any error, you may end up losing your site.
Even if you successfully restore the website, the downtime may be too much and will affect your site traffic.
Large site: Restoring the large site took relatively more time due to the size of its files and folders. We uploaded the files backup stored on our computer via the cPanel File Manager.
The database backup was uploaded separately via phpMyAdmin. If you have a large site, to avoid failure due to size issues you must keep in mind the maximum limits allowed for import.
Note: The File Manager only allows importing less than 500 MB. For sites larger than that, you can use an FTP client such as FileZilla to restore the files.
phpMyAdmin mentions a limit of 50 MB. That means if you have a database larger than 50 MB you should not attempt manual restoration.
Site with large database: If you have a site larger than 500 MB or database more than 50 MB then manual restores are definitely not a good solution. For instance, WooCommerce or content creation sites have a lot of data related to posts, orders, customers, etc.
In our case, we tried to restore a site of 10 GB with a database of 174 MB. We were not able to restore the files via the File Manager due to the large size. On the other hand, the dashboard crashed during database import via phpMyAdmin.
Partial restore
In case you need to restore a single file or folder—you want to rollback a plugin after an update, for instance—it is possible using cPanel on Bluehost.
Files: Instead of uploading the whole .zip folder, you can extract and select the file you want to restore. This can be tricky if you don’t actually know which file you want to restore, i.e. the data that you need to restore is located in which file.
If you do, then remove and delete just that particular file. Then upload the backup file from your computer to restore it.
We found that although complete restoration of a website is a daunting task to undertake manually, this method serves well for partial restoration. Firstly it doesn’t take that much time and the risk of losing data is comparatively less, i.e. only the items you are deleting.
Moreover, many plugins do not have the option for partial restore. It may turn out necessary at times. For example, if a plugin update crashes your website after you have added new content. You can replace the plugin with the older version from your backup, without losing the new content.
Database: You cannot do a partial restoration from the database unless you have expert knowledge of programming or you have backed up the database tables exclusively, i.e. taken partial backups.
When you backup the database manually through phpMyAdmin, you basically download a .sql file as the backup. It is not possible for you to select one table from that .sql file and upload it. This means partial database restore can only be carried out if you have the partial backup to start with.
To do a partial restore, just drop the table you want to replace and then import the backup file for restoration to complete.
Troubleshooting Bluehost backup errors
There are many things that can go wrong while creating Bluehost backup using cPanel. While the process itself is problematic and not reliable, there are plenty of other factors we saw that makes Bluehost backups go pear-shaped.
Network issues: Internet connections can be spotty at times. Often this is not a problem, but if this happens during the download process, the file may get corrupted or be incomplete.
The problem here is that you may still see the backup file downloaded, without knowledge of it being interrupted and thus, being incomplete. A good rule of thumb here is to check the size of the file.
Deletion of items: Manual site restoration requires deletion of existing files and databases. Therefore, the process of restoring the site manually can turn out to be dangerous. Any error in restoration later on, and you have lost your website completely.
That’s why we suggest you make a fresh backup before you start the restoration process.
Incomplete backup files: You may want to first ensure that the backup you are restoring is complete. This is not easy as you won’t be able to check the files and database thoroughly.
But if anything is missing then restoring the backup may result in loss of data. Again, take a fresh backup just in case. And always have multiple backups, if you choose to continue with Bluehost backups.
Failed uploads: Missing files can also be a result of failed uploads/imports. This can be due to the fact that some connections are not reliable or that the backup was faulty to start with.
There is nothing much to do here, but try again. It is tedious and your site is probably down for longer than you like, but that’s the only way to solve the failed upload issue.
Bluehost Backup and Restore Conclusion
After testing, we came to the conclusion that Bluehost backup and restore cannot be relied upon. Our overall experience with Bluehost cPanel was not positive. It was slow and not easy to use.
This only delayed tasks for us. Plus, the manual method of backup and restore doesn’t serve non-developer site admins. You may incur losses if you put your site at risk.
We know, reliable backups are the utmost priority for you because you do not want to lose your website completely. That’s why you should opt for a service that automates this process while offering reliable restoration options.
We suggest you try out BlogVault as your primary backup option. It is a backup plugin that includes offsite, encrypted, and automated backups that are easy to restore both completely or partially.
Tags:
Share it:
You may also like

How to Limit Form Submissions with Droip in WordPress
Forms are an indispensable part of any website because of their versatility, letting you collect information for various purposes! However, people with ill intentions often attempt to exploit these forms…

How To Manage Multiple WordPress sites
Management tools help agencies become well-oiled machines. Each task is completed with the least amount of effort and highest rate of accuracy. For people managing multiple WordPress sites, the daily…

PHP 8.3 Support Added to Staging Feature
We’ve introduced PHP version 8.3 to our staging sites. Test out new features, code changes, and updates on the latest PHP version without affecting your live website. Update PHP confidently…
How do you update and backup your website?
Creating Backup and Updating website can be time consuming and error-prone. BlogVault will save you hours everyday while providing you complete peace of mind.

Updating Everything Manually?
But it’s too time consuming, complicated and stops you from achieving your full potential. You don’t want to put your business at risk with inefficient management.

Backup Your WordPress Site
Install the plugin on your website, let it sync and you’re done. Get automated, scheduled backups for your critical site data, and make sure your website never experiences downtime again.


