How to Locate, Create and Edit the Default WordPress .htaccess File?
Bulletproof Backups for Your WordPress Website
Fortify your business continuity with foolproof WordPress backups. No data loss, no downtime — just secure, seamless operation.
The WordPress .htaccess file is a critical core file for your site. Generally, you never have to worry about the .htaccess file because it installs automatically with WordPress. However, on occasion, if a plugin has corrupted the file and your site has crashed as a result, you do need to restore it.
It is precisely because of these kinds of situations that we strongly recommend backups with BlogVault. If you have a backup, you can restore your site in a few clicks, rather than edit the site code.
That being said, in this article, we’ll show you exactly how to find the default WordPress .htaccess file, and how to edit it safely.
TL;DR: The .htaccess file is a powerful file that sets directives for your site server. It is absolutely essential for the operation of your site, so we recommend caution when tinkering around with it. In most cases, there are plugins that you can use instead. For instance, to keep out bots and blacklist malicious IPs, install MalCare, a top-notch WordPress security plugin with an integrated firewall. Whichever course you choose, make sure to backup your site with BlogVault beforehand.
What is the WordPress .htaccess file?
The .htaccess file is a core WordPress file for sites on Apache servers. It is created automatically when WordPress is installed for the first time, and each site will have its own .htaccess file.
Your site’s server configuration file
The .htaccess file is a server configuration file that works on a per-directory basis. This is the official definition but can be confusing to understand.
Your site server is essentially a computer system controlled by your web host. In many cases, your site will reside on a server with many other sites, in a popular form of hosting known as shared hosting. The underlying computer, and the web server software used to control it, is the same for everyone. What the .htaccess file on your site does is helps you customize certain server settings to suit your site needs. That’s the server configuration file bit explained, so what do we mean by ‘per-directory’ basis?
The .htaccess file toggles configuration settings for whichever directory it is in, and all the subdirectories within that directory as well. On a shared server, sites are partitioned into mutually exclusive directories or folders. Therefore, for .htaccess settings to be applicable to your entire site, the file must be in the root directory of your site. And thus, the settings in your site’s .htaccess file will not affect other sites on the same server.
It is also possible to have .htaccess files in individual directories to further customize server settings on a per-directory basis. Which is why you may sometimes see an .htaccess file in the wp-content directory as well.
.htaccess and WordPress
WordPress uses the .htaccess file to manage redirects and the permalink structure. When you install security plugins and caching plugins, they too will modify the .htaccess file.
If you have to repair a corrupted WordPress .htaccess file, you can replace it with the default versions. You may face an issue where, after modifying or fixing the .htaccess file, it reverts to its original corrupted state. There are two possible reasons for this: firstly, a plugin on your site is modifying the file, so the fix would be to disable all plugins to see if the behavior stops. Secondly, core files like the .htaccess file can be corrupted by malware. In this case, the best solution is to use a WordPress malware removal plugin and get rid of it immediately.
Where to locate the .htaccess file in WordPress?
Most commonly, the .htaccess file will be in your WordPress site’s root directory. As we said before, there can be multiple .htaccess files in different folders on your site. Typically though, you will want to adjust the settings in the one that affects your whole site, which should be in the root directory.
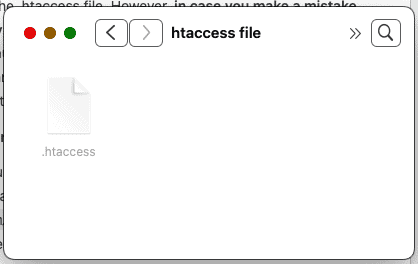
Hidden file
The .htaccess file starts with a dot, which means that most servers will treat it as a hidden file. Depending on which method you use to access your core WordPress files—cPanel, FTP, or SSH—you may need to enable the option to view hidden files to see it at all. This is also true if you download the file to your computer system.
Not all sites have a .htaccess file
If your site doesn’t have a .htaccess file, this is not immediately a cause for concern. Before panicking, find out what server software is used by your hosting provider.
The .htaccess file is used for Apache servers. Apache is a popular web server software, used by web hosts to manage their servers. If your site is hosted on an alternative to Apache, like Nginx, there will not be a .htaccess file in your WordPress site files. Nginx, in particular, uses a different type of configuration file, usually named nginx.conf to manage server configuration. It works differently from .htaccess, so advice on how to modify a WordPress .htaccess file will not work with nginx.conf.
How to create a .htaccess file in WordPress?
You may need to create or replace a WordPress .htaccess file for many reasons. Perhaps your site has crashed and you need to fix your WordPress installation, or a plugin corrupted the file and you need to restore a standard WordPress .htaccess.
Always take a full backup of the WordPress site before making any changes. Even if your site isn’t working optimally, a backup can be an invaluable safety net in case of issues later on.
The easiest way to replace a WordPress .htaccess file is to create a new one on your computer, and upload it to your site server.
1. Open up a text editor on your computer.
2. Paste one of the following code snippets depending on which type of WordPress site you have.
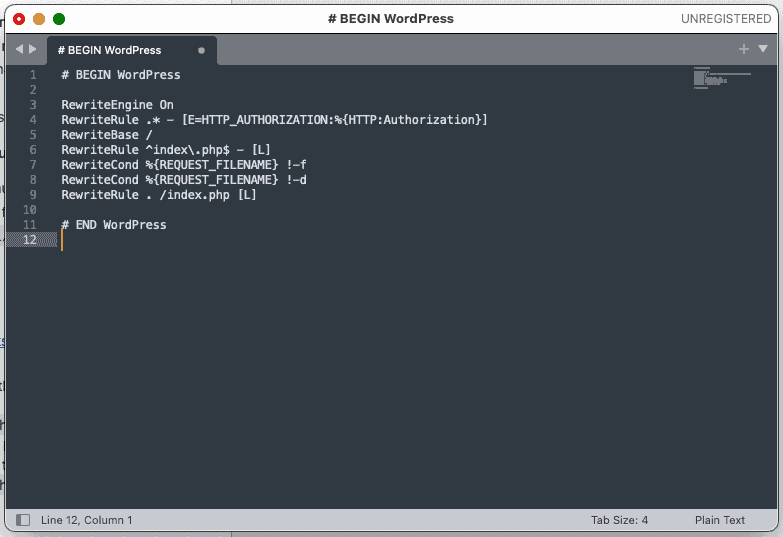
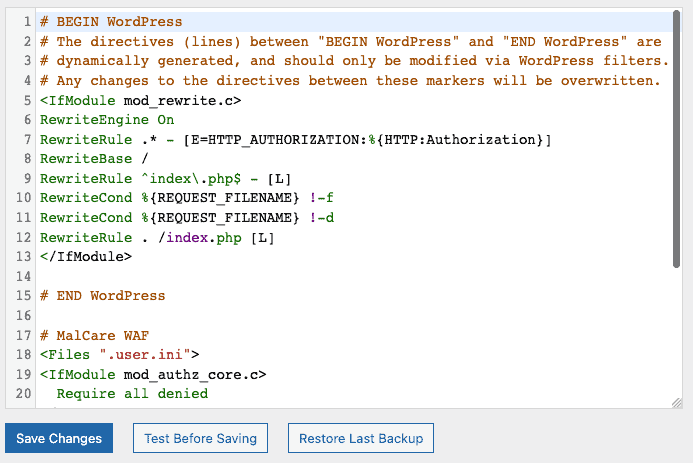
For a basic WordPress site:
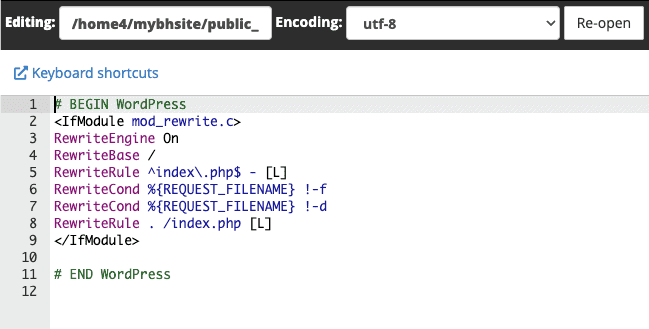
# BEGIN WordPress

RewriteEngine On
RewriteRule .* - [E=HTTP_AUTHORIZATION:%{HTTP:Authorization}]
RewriteBase /
RewriteRule ^index\.php$ - [L]
RewriteCond %{REQUEST_FILENAME} !-f
RewriteCond %{REQUEST_FILENAME} !-d
RewriteRule . /index.php [L]

# END WordPress
For a WordPress multisite:
# BEGIN WordPress Multisite
# Using subfolder network type: https://wordpress.org/support/article/htaccess/#multisite

RewriteEngine On
RewriteRule .* - [E=HTTP_AUTHORIZATION:%{HTTP:Authorization}]
RewriteBase /
RewriteRule ^index\.php$ - [L]

# add a trailing slash to /wp-admin
RewriteRule ^([_0-9a-zA-Z-]+/)?wp-admin$ $1wp-admin/ [R=301,L]

RewriteCond %{REQUEST_FILENAME} -f [OR]
RewriteCond %{REQUEST_FILENAME} -d
RewriteRule ^ - [L]
RewriteRule ^([_0-9a-zA-Z-]+/)?(wp-(content|admin|includes).*) $2 [L]
RewriteRule ^([_0-9a-zA-Z-]+/)?(.*\.php)$ $2 [L]
RewriteRule . index.php [L]

# END WordPress Multisite
3. Save the file with the name and file extension .htaccess. If your text editor doesn’t allow this, then save the file as an ordinary text file.
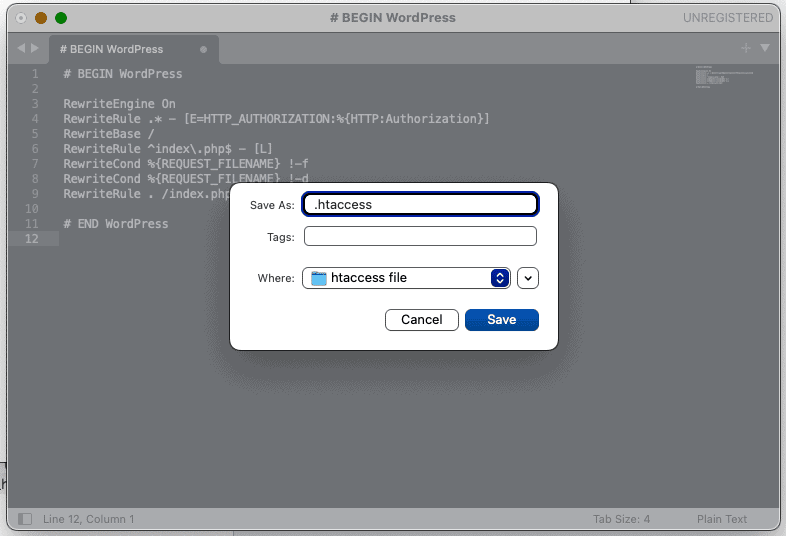
4. Use an FTP client or cPanel’s File Manager to access your site server. Delete the old .htaccess file, and upload the file you just created to your server. If it is a text file, right-click the file to rename it to .htaccess.
That’s it! You’ve successfully replaced the .htaccess file on your site. You may want to monitor the .htaccess file for a week or so to make sure the changes stay put. Otherwise you will need to troubleshoot a little more. We cover some guidelines in a later section.
How to edit a .htaccess in WordPress?
The WordPress .htaccess file is a powerful file for site owners, although many of them don’t know it. You can use the powers of the .htaccess file via plugins, which is vastly easier and frankly recommended. However, on occasion, you may need to directly edit the .htaccess file. In these cases, we’ve laid out the steps in detail to maximize your chance of success.
Best practices for editing a WordPress .htaccess file
- Always backup your site before making any changes to it. BlogVault gives you the best WordPress backups you will find, and the easiest restores as well. It is the best insurance policy you can have for your site
- Use a staging site to test out changes before making them on your live site. A staging site is an identical copy of your site, and is the perfect testing ground for changes. You can see exactly how changes would impact your site, but with none of the risk. Create an account with BlogVault and use a backup to create a staging site.
- When adding a code snippet to the .htaccess file which is copied from elsewhere, make sure not to have spaces in between the lines, or even other characters (including spaces). These snippets are known as server directives. A directive can span multiple lines, and this is usually indicated with a backslash \ as the last character of a line.
Edit WP .htaccess file using a plugin
We generally recommend using a plugin to edit any core files, as this safeguards your site from inadvertent errors. Many people have accidentally deleted characters, code, or even whole files and have had to contend with a crashed site for days. Of course, if they had backups, they could have just restored their sites.
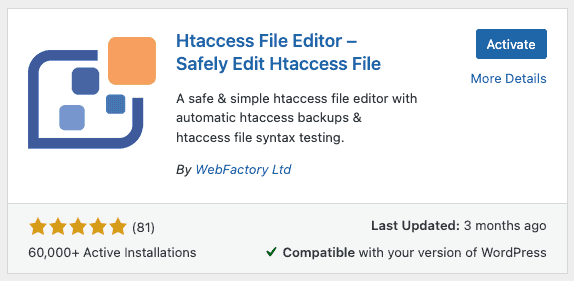
1. Find WP Htaccess Editor in the Plugins section of your wp-admin. Install and then activate it to get going.
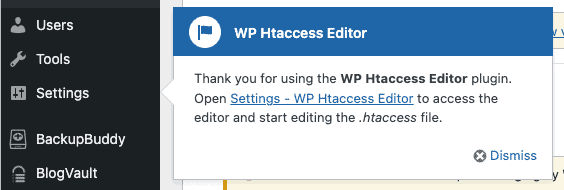
2. Click on the helpful popup to go to the plugin’s dashboard, or find the link in Settings.
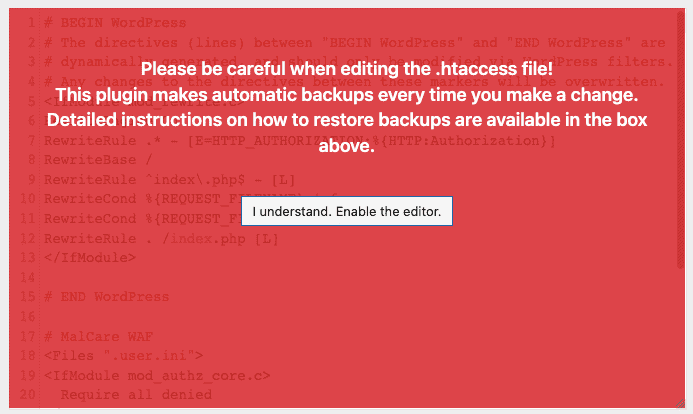
3. Read the enormous (but absolutely spot on) disclaimer carefully, and click on I understand. Enable the editor. on the red panel to continue.
4. Add directives to the file in the provided panel and click on Save Changes when done. That is all there is to it.
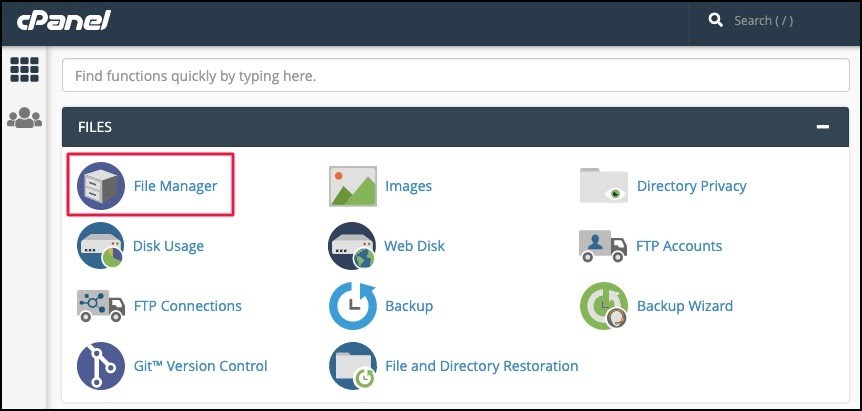
Edit the .htaccess file using a cPanel
Assuming your host uses cPanel, you can also use File Manager to edit the .htaccess file quickly.
1. Log into cPanel or navigate there from your hosting dashboard.
2. Open up File Manager. You should be in your site’s root directory by default. If not, navigate to it or the folder where WordPress is installed.
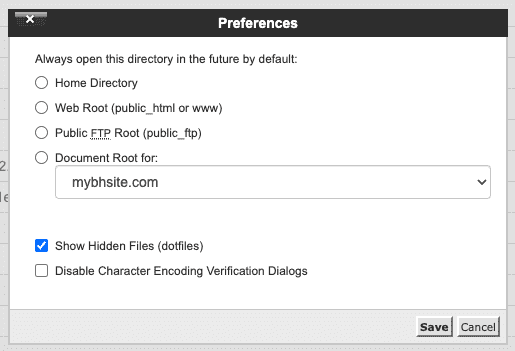
3. Since the .htaccess file is a system file, it will be hidden by default. Click on the Settings gear icon in File Manager, and check the Show Hidden Files (dotfiles) checkbox. Save to exit the dialogue box. The .htaccess file should now be visible in the main WordPress directory.
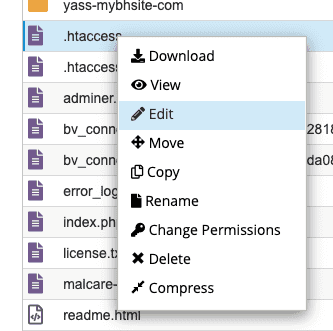
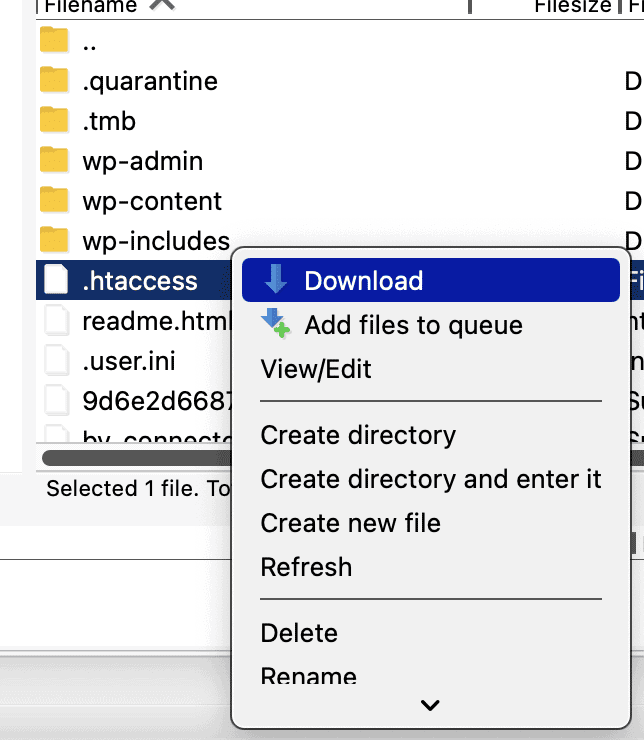
4. Right-click on the file. You can either download the file to edit it, or click on Edit to open a browser-based file editor.
5. Once you’ve made the changes, save the file, and close the tab. Your changes are saved.
Edit the .htaccess file using FTP
For WordPress sites without cPanel, FTP can be a real boon for accessing site files easily. The steps to do so are very similar to the cPanel method we’ve talked about in the previous section. So in this section, we will demonstrate how to edit a file on your computer instead, and then replace the one on your site.
1. Open up an FTP client like FileZilla or Cyberduck. Both are free to use, and user-friendly. Connect to your site server with the server IP address, FTP username, and password. You may need a port number, depending on your host settings.
2. Find the site’s root directory or where WordPress is installed. Generally, the directory will be public_html or www. Sometimes it could just be the name of your site, and this nomenclature varies by host.
3. As the .htaccess is a system file, it is hidden by default. You will have to enable the appropriate setting to view or edit it. Of course the location of this setting will vary depending on the FTP client you are using. On FileZilla, click on the Server menu tab, and select Force showing hidden files.
4. Right-click on the .htaccess file and download it to your computer.
5. Again, you may need to enable a setting to see hidden files on your computer. For macOS, you can use the keyboard shortcut Command + Shift + . to do so. On Windows machines, you would need to find the setting in Folder Options.
6. Open the file in a text editor, and add any code snippets you need to. Save and exit.
7. Go back to your FTP client, and upload the edited file to the same directory. When prompted to overwrite the existing file, agree to do so. And that’s all there is to it.
Custom code snippets for the WordPress .htaccess file
Redirecting urls
There are a few types of redirects that are possible and recommended with the .htaccess file.
301 redirect (permanent)
You have changed the domain of your site, or moved the site from a subdomain or a subdirectory. In order to keep the SEO of your site intact, you need to point visitors to your new site, in case they visit the old one. You can either use a plugin, Easy Redirect Manager, or place the following code into your .htaccess file:
RedirectMatch 301 / https://www.newdomain.com/For page-level redirects:
RedirectMatch 301 /oldpage https://www.newdomain.com/newpageTo redirect a media or PDF file, say if you have moved it to a new folder on your site:
Redirect 301 /oldfile.pdf /folder/newfile.pdf302 redirect (temporary)
Although the 302 redirect is identical to the 301 redirect, as far as users are concerned, it signals to search engines that the redirect is temporary.
RedirectMatch 302 /oldpage.html http://www.yourwebsite.com/newpage.htmlEnforce www
You may have a domain without the www, and want it to appear in your URL each time.
RewriteCond %{REQUEST_URI} !^/(robots\.txt|favicon\.ico|sitemap\.xml)$
RewriteCond %{HTTP_HOST} !^www\.askapache\.com$ [NC]
RewriteRule ^(.*)$ https://www.askapache.com/$1 [R=301,L]
Disabling directory browsing
By default, if you were to visit a directory on your site via the browser, it will list the files and directories contained within. This is a security hazard, so it is best to disable directory browsing with this snippet:
Options All -Indexes
Setting server timezone
You can manually set the timezone of your server. You’ll find a full list of supported timezones and their syntax here.
SetEnv TZ Antarctica/DumontDUrvillePrevent hotlinking
Hotlinking is a bad practice used by sites to link directly to the assets of another site. Hotlinking consumes server bandwidth of the second site, as well as causes copyright infringement in most cases.
This code will redirect any hotlinked files to Google:
RewriteCond %{HTTP_REFERER} !^$
RewriteCond %{HTTP_REFERER} !^https://(www\.)?yourdomain\.com/.*$ [NC]
RewriteRule ^.*\.(bmp|tif|gif|jpg|jpeg|jpe|png)$ https://google.com [R]
Blacklisting IPs
You can prevent access to your site from certain IPs or domains from your .htaccess file. We don’t recommend this as a regular feature, because it can get very unwieldy very fast. This snippet will block the IP 172.128.67.34 and any traffic from example.com from being able to access your site.
<Limit GET POST PUT>
	Order allow,deny
	Allow from all
	Deny from 172.128.67.34
	Deny from example\.com
</Limit>
To block a range of IP addresses which all start with the same 3 numbers:
<Limit GET POST PUT>
	Order allow,deny
	Allow from all
	Deny from 172.128.67.*
</Limit>
Whitelisting IPs
Conversely to blacklisting, which allows everyone except for those on a list, whitelisting denies access to everyone except those on a list.
<Limit GET POST PUT>
	Order deny,allow
	Deny from all
	Allow from 172.128.67.34
	Allow from example\.com
</Limit>
To allow a range of IP addresses which all start with the same 3 numbers:
<Limit GET POST PUT>
	Order deny,allow
	Deny from all
	Allow from 172.128.67.*
</Limit>
Require SSL
SSL is a de facto standard for encrypting communication to and from your site. If you have recently enabled SSL on your site, you may still see pages being served on HTTP instead of HTTPS. You can sort it out with this code snippet:
SSLOptions +StrictRequire
SSLRequireSSL
SSLRequire %{HTTP_HOST} eq "yoursite.com"
ErrorDocument 403 https://yoursite.com
Limit file upload size
Often used to combat attacks, you can use the .htaccess file to limit the file size of files that can be uploaded to your site. The number in this case is in bytes, and 10485760 is equivalent to 10 MB.
LimitRequestBody 10485760Customising error pages
It is an excellent practice to have a helpful error page if a visitor lands somewhere they shouldn’t. There are loads of tutorials on how to improve user experience by designing nice 403 or 404 pages. To enable those pages to show up, you can add the following snippet to your .htaccess file:
ErrorDocument 403 /errorpage/403.html
ErrorDocument 404 /errorpage/404.html
ErrorDocument 500 /errorpage/500.html
Password protect files
Note: We do not recommend password protecting any core directories, as it will mess up the functioning of your site in unanticipated ways. However, if you use your site server to store files, for instance, you can restrict access to those files.
<Files safefile.php>
AuthName "Prompt"
AuthType Basic
AuthUserFile /yoursite.com/.htpasswd
Require valid-user
</Files>
This code will show a login prompt with basic HTTP authentication, and is used in conjunction with the htpasswd utility.
Note: These directives are applied in the order they are found. So if you have more than one .htaccess file on your site, the ones in the root directory are applied first, and then recursively down to the last directory. It is very unlikely you will need such granular configuration, however it is interesting to know.
We’ve listed a few commonly used code snippets in this section. You can find a truly exhaustive list of code snippets and more information about the .htaccess file here.
Is it a good idea to edit the WordPress .htaccess file?
We have been waxing eloquent about how much the .htaccess file can do. It can customise the server for your site, and really does wonders. However we are also underscoring how critical the file is for your site. At the very least, the .htaccess file governs the permalinks on your site, so if you have a lot of content with SEO-optimised URLs, you could lose all that in one fell swoop with a corrupted .htaccess file.
In short, we are trying to say: don’t edit the .htaccess file if you can find another way to do the job.
According to Apache server documentation, .htaccess configuration settings slow down server performance. Mainly because the file will be loaded every time a page or asset is requested from the server. In fact, when the option is enabled for the server, the server will look for the .htaccess file in every directory. In most cases though, there is nothing you can do to prevent this performance penalty. However we still advise caution.
Additionally, although the .htaccess file is intended to give users greater control over their server settings, the fact is that it can create security loopholes. So please be careful with how you use it, and avoid making changes unless you fully understand them.
Finally, your host may change their server configuration, so it is better not to rely on the .htaccess file to get things done.
Troubleshooting .htaccess problems
Editing the .htaccess file is not for the faint of heart, as if something goes wrong, your entire site can crash in minutes. It is helpful to be aware of things that can go wrong so you can prepare for those eventualities.
The code snippets you added aren’t working
For the code snippets in the .htaccess file to work, there needs to be an AllowOverride option enabled on the server. Unfortunately, there is little you can do to fix this if you are on shared hosting, because it is a server-level setting put in place by the host. You can either contact the host’s support to ask for help, or find alternative ways through plugins to achieve your goal.
Server errors appear after changes are made
There are two reasons why a server error may appear when you load your site, after you’ve edited or created an .htaccess file.
As with the code snippets not working, this could be because of the AllowOverride option. The option explicitly must allow the operations you want to perform with the .htaccess file. For instance, if you want to blacklist IPs from your .htaccess file, there must be an explicit AllowOverride directive in the main server configuration file to allow this to work. You cannot make these changes if you are on a shared hosting plan, as those settings are controlled by the host as they affect every site on the server.
More commonly though, there may be a syntax error in the directives. Recheck the code carefully for extra or missing characters, even spaces. A directive can span multiple lines, for example, and a backslash at the end of one line indicates that it continues onto the next. Spaces mess up this precise syntax too, so double-check.
The changes you make to the file are not staying
A common issue with making changes to the .htaccess file is that sometimes the changes do not remain. Which means, in a few days—generally about 1-2 days—the .htaccess file reverts to what it was before.
There are two possible reasons for this to happen. Most commonly, a plugin is rewriting the file based on what it is supposed to do. Caching, firewall, or security plugins, for instance, need to make changes to the .htaccess file to function correctly. Try disabling all the plugins, and then re-enabling them one at a time to catch the culprit.
Once you’ve eliminated the chance of an errant plugin, there may be a more serious reason causing this issue. Your site might be hacked, and the malware is rewriting the file each time. If you are seeing other symptoms, or suspect that your site has been hacked, it becomes top priority to remove the malware with a WordPress security plugin.
Conclusion
The WordPress .htaccess file is a bit of a sleeper superhero on your site. It looks unassuming, without much code in it, but in the right hands it can be very powerful. In general though, we recommend that you only tinker around with core WordPress files if you are certain of what you are doing. Alternatively, use a staging site to try out the edits first, and only then move to your live site. As always though, make sure to take a backup of your site before doing anything.
FAQs
Where is the WordPress .htaccess file?
The WordPress .htaccess file is located in the root directory of your site, along with the other core files. To access the .htaccess file, you can either use cPanel’s File Manager or an FTP client. Make sure to enable the setting to view hidden files, as it is a system file and hidden by default.
How do I add a .htaccess file to WordPress?
To add an .htaccess file to WordPress, copy the default code from WordPress.org. Then create a file in a text editor on your computer, and save the file with the filename and extension “.htaccess”. Then connect to your site server using FTP or cPanel’s File Manager and upload the file to the root directory of your site.
What is the .htaccess file in WordPress?
The .htaccess file in WordPress is a server configuration file for sites hosted on Apache servers. WordPress uses this file for permalink settings and to manage redirects. The .htaccess file can be used to configure several settings on a server.
How do I download an .htaccess file from WordPress?
To download an .htaccess file from your WordPress site, connect to your site’s server. You can use cPanel’s File Manager or an FTP client to do so. Make sure to enable the setting that shows hidden files on your server, and right-click to download the file.
How to recover the .htaccess file?
To recover a corrupted or missing .htaccess file on your WordPress site, create a text file on your computer with the default configuration settings. Save the file with the filename and extension “.htaccess” and upload it to your site’s root directory using cPanel or an FTP client. If the existing .htaccess file is corrupted, overwrite it with your new version.
What is a .htaccess file?
The .htaccess file is a configuration file for your site’s server. WordPress uses the file to manage permalinks and redirects for your site, but it can do a whole lot more if necessary. Most caching and security plugins will add code to the .htaccess file as well, so as to function effectively
Tags:
Share it:
You may also like

How to Limit Form Submissions with Droip in WordPress
Forms are an indispensable part of any website because of their versatility, letting you collect information for various purposes! However, people with ill intentions often attempt to exploit these forms…

How To Manage Multiple WordPress sites
Management tools help agencies become well-oiled machines. Each task is completed with the least amount of effort and highest rate of accuracy. For people managing multiple WordPress sites, the daily…

PHP 8.3 Support Added to Staging Feature
We’ve introduced PHP version 8.3 to our staging sites. Test out new features, code changes, and updates on the latest PHP version without affecting your live website. Update PHP confidently…
How do you update and backup your website?
Creating Backup and Updating website can be time consuming and error-prone. BlogVault will save you hours everyday while providing you complete peace of mind.

Updating Everything Manually?
But it’s too time consuming, complicated and stops you from achieving your full potential. You don’t want to put your business at risk with inefficient management.

Backup Your WordPress Site
Install the plugin on your website, let it sync and you’re done. Get automated, scheduled backups for your critical site data, and make sure your website never experiences downtime again.


