How to Move from WordPress.com to WordPress.org – A Comprehensive Guide
Bulletproof Backups for Your WordPress Website
Fortify your business continuity with foolproof WordPress backups. No data loss, no downtime — just secure, seamless operation.
A lot of people who aspire to run their own website start with WordPress.com over WordPress.org. It’s easy to get started with it, and you don’t need to worry about hosting since it provides you with a domain name and hosts your website for free. WordPress, in general, is a great platform for creating a website. But those who start with WordPress.com soon realize its limitations and want to switch over to the more feature-rich, powerful, and self-hosted WordPress.org platform.
If you’re one of those folks, you’ve come to the right place. In this guide, I’ll show you how to properly move from WordPress.com to WordPress.org in simple, easy-to-follow steps.
TL;DR: Moving from WordPress.com to WordPress.org is a worthwhile endeavor. The latter will grant you much more power and flexibility to customize and run your site. The process is simple and quick, and once you have your site up and running on the WordPress.org platform, you can install BlogVault as a one-stop maintenance plugin. It will take backups of your site daily and inform you of any pending updates for your plugins and themes.
Before you move from WordPress.com to WordPress.org (checklist)
Before you can get started moving from WordPress.com to WordPress.org, there are a few things you need to do or have. Most of these are obvious, but it helps to have a checklist.
1. Purchase and register your domain name
A domain name is a critical part of your website’s identity. It’s a projection of your brand. If you’re using a free WordPress.com site, then you would have to buy a new domain name. If you’re using a custom domain for your WordPress.com site and you want to stick with it after the migration, then you can access its DNS records and point the domain to your new site. I’ll elaborate on the steps later in the article. You can purchase a domain name from a domain name registrar like Namecheap or a web hosting provider like Bluehost.
2. Purchase a web hosting plan
Now that you have a domain name for your WordPress.org website, you need to give it a home on the Internet. This is where a web hosting provider comes in. When you sign up with a web host, it will provide a server to host your website for the world to see. Popular web hosts include Bluehost, SiteGround, DreamHost, etc.
3. Create a new WordPress.org website on your web server
Now that you have both a domain name and a web hosting plan, all that remains is actually creating a new WordPress.org website. You’ll be migrating your WordPress.com website to this site. Most web hosts will give you the option to install WordPress.org as soon as you sign up for a hosting plan. If not, the option to install it should be easily discoverable on your hosting account’s dashboard.
How to migrate from WordPress.com to WordPress.org easily
In this section, I’ll walk you through the steps you need to take to move your website from WordPress.com to WordPress.org. Let’s get started.
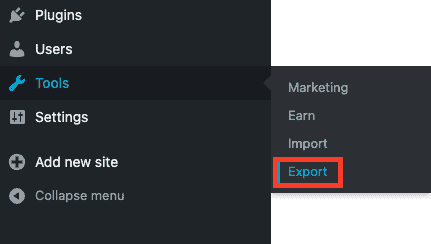
Step 1: Export your content from your WordPress.com site
To export your content, go to Tools > Export from the left-hand navigation menu on your WordPress.com site’s dashboard.
On the next page, you’ll be given the option to export both your textual content and any media files (images, videos, audio, etc.).
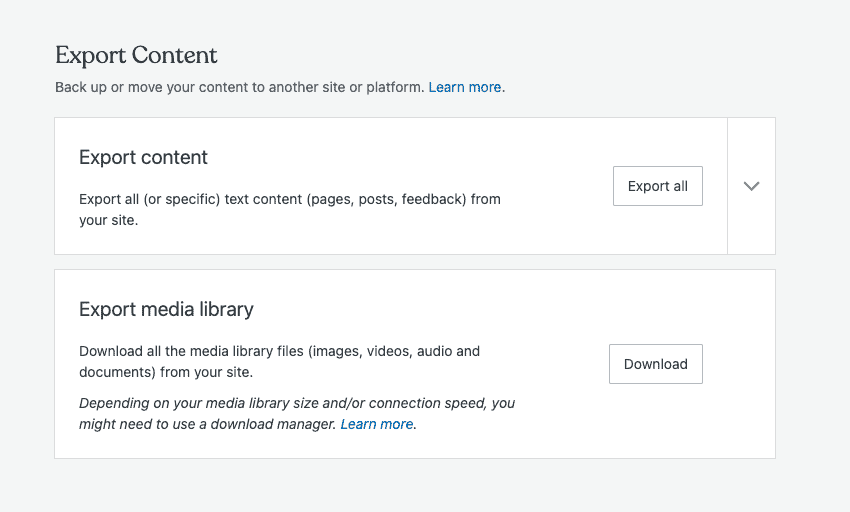
To download the textual content, click on Export all. Once the export process completes, click Download on the confirmation image to download the archive.

Once downloaded, unzip the archive and you’ll see a folder containing an XML file. You’ll need this file in the next section.
To download your media library files, click Download in the corresponding section.
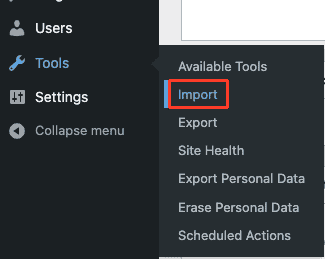
Step 2: Import your content to the newly created WordPress.org site
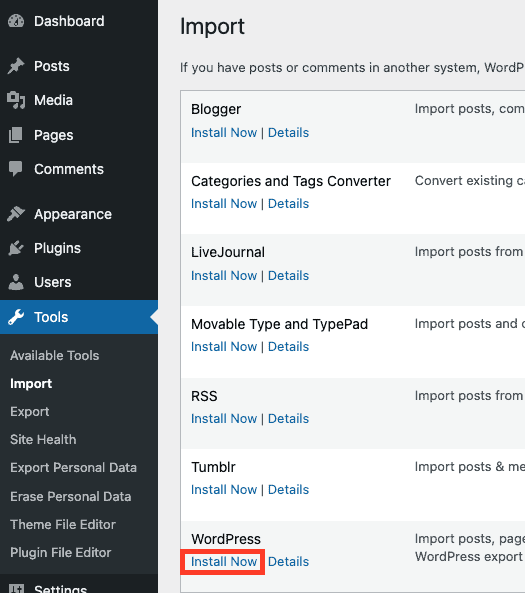
To import your WordPress.com content, log in to your WordPress.org website’s dashboard. Once you’re there, go to Tools > Import.
Now, install the WordPress importer tool by clicking on Install Now under WordPress.
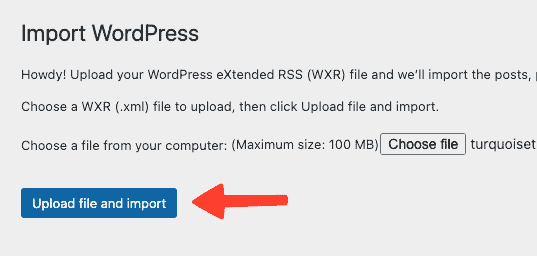
Next, click on Run Importer to start the import process. You’ll be asked to choose an XML file to upload. Click on “Choose file” and pick the XML file that you extracted in Step 2. After that, click on Upload file and import to proceed.
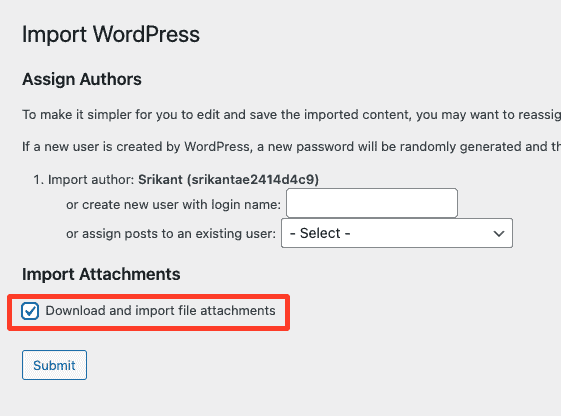
On the next page, you’ll be asked to assign authors for your new WordPress.org website. You can either keep the same authors you have for your .com site, or you can attribute all your posts to an existing user of your .org site like your primary administrator account. You can also create a new author on the fly by typing in their name in the “Create new user” field. Once you’re happy with the author assignment, tick the checkbox named “Download and import file attachments” and click on Submit to start importing.
Depending on the size of the XML file you uploaded, i.e., depending on the size of your .com website, the import will take a few minutes.
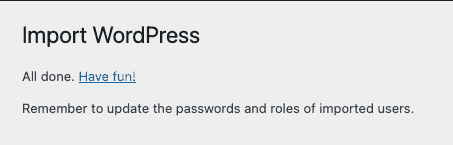
Once the import completes successfully, you’ll see a success image along with a reminder to “Update the passwords and roles of imported users.”
But you’re not done yet. You still have to import all your media files. I’ll use FTP to illustrate how you can do so, and in particular, I’ll use the popular FileZilla FTP client. Before you start, make sure you’ve extracted the contents of the archive (a .tar file) you downloaded for media files in Step 1. You should see a bunch of folders labeled by year, which in turn have subfolders labeled by month (01 for January, 02 for February, and so on). These folders contain all your media files corresponding to when you uploaded them to the media library.
- Connect to your WordPress.org website using the associated FTP/SFTP credentials. You can find those credentials in your hosting account’s dashboard.

- Navigate to the folder where you extracted the archive containing your media files in the ‘Local site’ area.
- Navigate to the public_html/wp-content/uploads directory of your WordPress.org website in the ‘Remote site’ area. This is where WordPress stores all your media files.
- Upload the extracted folder.

And with that, you’ve migrated your WordPress.com site to the WordPress.org self-hosted platform.
After you transfer WordPress.com to WordPress.org
Well, although the export from WordPress.com to WordPress.org is technically complete, there are still some things you need to take care of to ensure that your new site runs smoothly.
Update your theme
If you visit your new site now, you may see that it looks a little different because it uses a different theme. That is usually because the theme you were using for your WordPress.com site doesn’t get installed by default when you install the self-hosted WordPress.org platform. So, if you now wish to use the same theme on your new site, you’ll have to install and activate it manually, which you can do by going to Appearance > Themes from your WordPress dashboard.
Delete the ‘Hello world!’ post
You probably know that WordPress adds a ‘Hello world!’ post by default when you install it. And this post will show up on your site after the migration. Go ahead and delete it.
Update URLs
There is a possibility that during the migration process, some of the URLs associated with posts or certain media files might not have updated to the equivalent URLs associated with your new domain. This can corrupt links on your new site. For instance, when you create a new post that includes a link to an existing post, that link may lead to the existing post on your WordPress.com site instead of your new site.
This can affect your site’s SEO performance and also confuse your readers. To fix this issue, you’ll have to perform a search-and-replace operation on your new site, searching for instances of your old URL and replacing them with your new URL. Don’t do it yourself as it can be tedious and cause issues with data serialization. Use the Better Search Replace plugin instead.
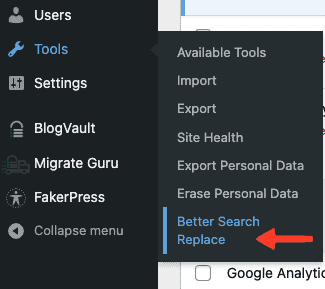
- Install and activate the Better Search Replace plugin.
- Go to Tools > Better Search Replace.
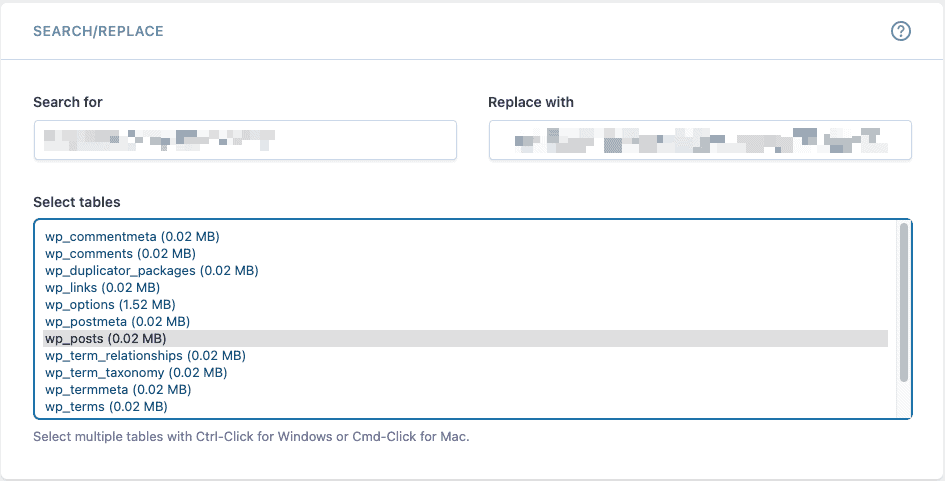
- In the Search for field, put the URL of your WordPress.com site. In the Replace with field, put the URL of your WordPress.org site. Select all the tables that have references to your WordPress.com site’s URL from the Select tables list. wp_posts is selected by default as it’s the table that is very likely to have references to your old URL.
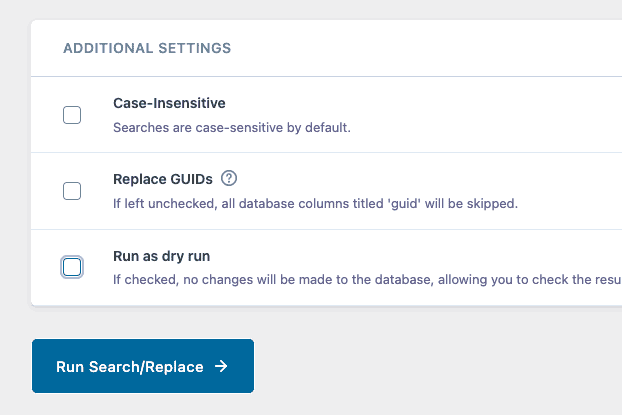
- Next, click on Run Search/Replace at the bottom. Check Run as dry run if you wish to see the proposed changes before the actual operation takes place. After you verify the proposed changes, you can uncheck the dry run option and click on Run Search/Replace again to make the changes final.
All the URLs pointing to your WordPress.com site should now point to your WordPress.org site.
Fix permalinks
With the URLs now fixed, you have to make sure that the permalinks on your self-hosted WordPress website have the same permalink structure as that of your WordPress.com site. This is necessary to ensure that a site redirect (which I’ll cover next) from your WordPress.com site to your WordPress.org site works correctly. If your new site doesn’t use the same permalink structure, then some visitors may see an error message.
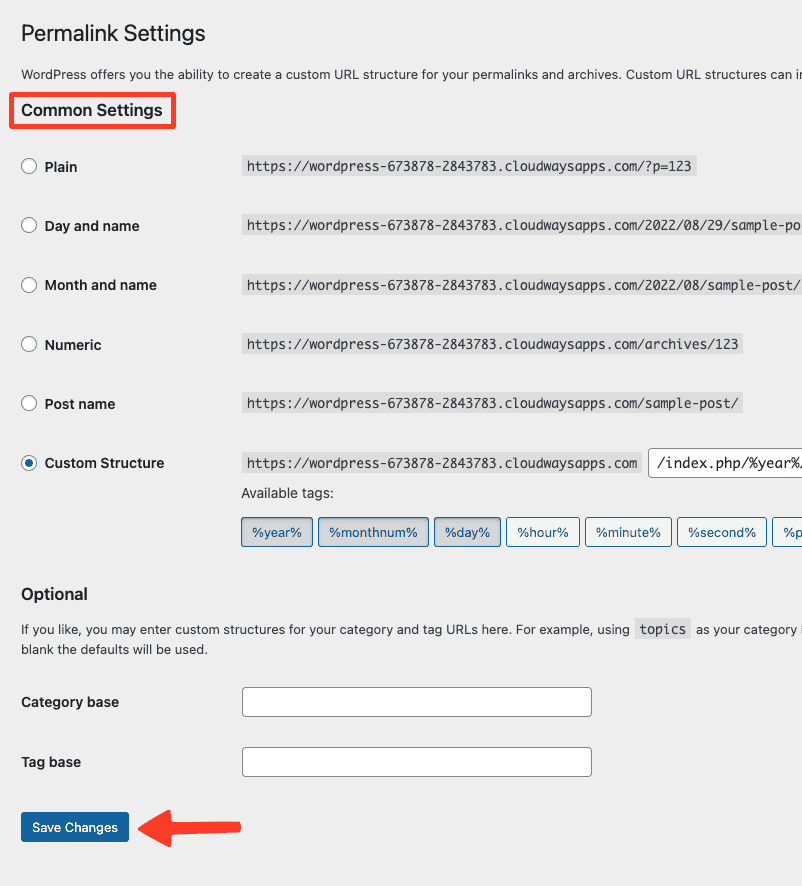
To fix permalinks, go to Settings > Permalinks from your dashboard. Under Common Settings, select the permalink structure you were using on your WordPress.com site. If you were using a custom structure, then select that option instead and type out your full permalink structure. Once you’re done, click on Save Changes at the bottom.
The permalinks on your new site will now work without any issues.
Set up redirects on your WordPress.com site
You might be wondering what to do with your .com site now that the .org version is up and running. You might be tempted to obliterate it from the Web—WordPress.com gives you that option—and send out an email informing your readers of a URL change. But I highly recommend redirecting it to your new site instead. That way, even if somebody continues to visit your site at the old URL, they’ll be automatically redirected to the new URL every single time, without affecting their experience. You should still send out that email though.
Unfortunately, WordPress.com doesn’t give you the option to redirect your site for free. It charges $13/year for it. I think it’s worth the investment, at least for the first year. This allows enough time for search engines to properly index your site so that people will find the WordPress.org version in search results and not the WordPress.com one.
To set up a redirect on your WordPress.com site, head to Settings > General from your dashboard. Under the Site address section, click on redirect.
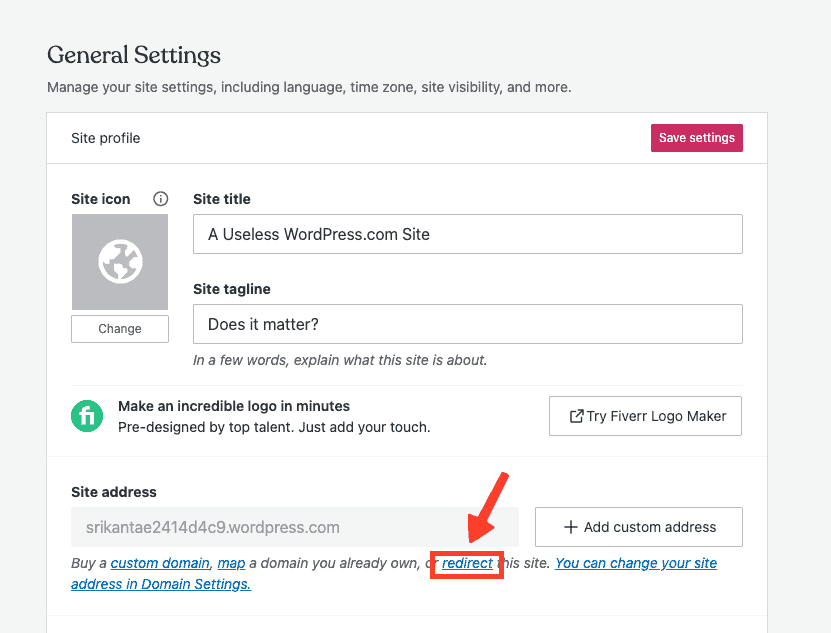
Next, enter the domain you wish to redirect to, then hit Go. Pay the required amount and you’ll see a confirmation message.
There’s one last step. You need to set the new site as the Primary Domain. Go to Upgrades > Domains. Click the hamburger icon next to your new URL, then select make primary domain.
Troubleshooting the migration issues
Some issues may arise during migration. I’ll list some of the common ones below. If your issue isn’t covered here, don’t hesitate to contact BlogVault support.
- When trying to import your WordPress.com site’s content into your WordPress.org site, you get the following error:
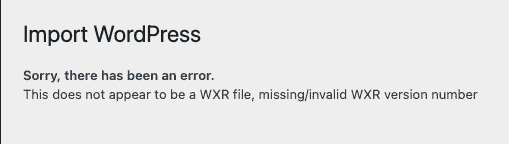
The most likely cause of this error is that you uploaded the .zip archive that WordPress.com gave you when you exported its content and not an actual XML file. Make sure you upload the XML file inside the folder that you get when you extract the archive. - Another error that may arise during the import stage is the following:
Service Unavailable
The server is temporarily busy, try again later!
This means that your web server isn’t able to handle your upload request. It could be because you’re on a shared hosting plan where your website shares server resources with other sites. Unfortunately, this isn’t something that you can fix on your own. You would have to contact your web hosting provider to get help. - Error 500 Internal Server Error: This is a common error that could occur with any website that’s hosted on a web server, but the problem is that it’s generic and doesn’t really provide any information to debug it apart from the fact that the server “was unable to complete your request.” However, common causes of this error have been found over the years.
Why move from WordPress.com to WordPress.org?
There are several reasons why a switch from WordPress.com to WordPress.org can be enticing:
- As I’ve alluded to earlier, the WordPress.com platform’s functionality is severely limited when compared to the WordPress.org platform. The latter gives you much more flexibility to customize your site to your heart’s content. With WordPress.org, you can:
- Customize the underlying code of your website.
- Modify your theme to suit your tastes, including changing the color scheme, font family, etc.
- Install as many plugins as you want.
- Purchase and install premium themes.
- You’ll have much more control over your SEO.
- No ads are forced upon your site visitors.
- Easier to scale. If you run a business, then as your business grows, the traffic to your website grows proportionally. The shared hosting provided by WordPress.com can hurt your page load times as you’re forced to share precious RAM and server storage space with other websites. With the self-hosted WordPress.org platform, you can choose to have a dedicated server for your website if you want to.
Conclusion
If you run a WordPress.com website, switching to the self-hosted WordPress.org version can be a worthwhile endeavor. The latter will give you so much flexibility to customize your site that you’ll wonder why you didn’t make the switch earlier, or start with WordPress.org in the first place. Once you’ve made the switch, you can install BlogVault on your site so that it can take regular backups of your site.
FAQs
Q – How do I move my WordPress.com to WordPress.org?
A – Moving from WordPress.com to WordPress.org is a fairly straightforward process:
- Create a new WordPress.org site
- Export your WordPress.com site’s content
- Import the content into the newly created WordPress.org site
- Update URLs
- Fix permalinks
- Change nameservers and set up redirects
Q – Why should I transfer WordPress.com to WordPress.org?
A – WordPress.com is severely limited in functionality. Sooner or later, you’ll realize that and would want to move to the self-hosted WordPress.org platform. It’s much more powerful and flexible, giving you total control over the aesthetic and functional aspects of your site.
Q – Will my website face any downtime during the migration?
A – No. If you follow the steps I’ve described in the article carefully, then downtime shouldn’t be an issue.
Q – How much would I have to pay for switching to WordPress.org?
A – The WordPress.org platform itself is totally free. However, to make your site live, you would have to pay for a domain name and a web hosting plan. The costs can vary depending on the web hosting plan you sign up for, where you buy your domain name from, and what your top-level domain is (.com domains are relatively costlier).
Q – Can I still migrate to WordPress.org if I bought and registered a domain name through WordPress.com?
A – Yes, you can. You can keep the same domain name. You only need to buy a hosting plan and would have to point the domain name to your new WordPress.org site after the migration.
Tags:
Share it:
You may also like

How to Limit Form Submissions with Droip in WordPress
Forms are an indispensable part of any website because of their versatility, letting you collect information for various purposes! However, people with ill intentions often attempt to exploit these forms…

How To Manage Multiple WordPress sites
Management tools help agencies become well-oiled machines. Each task is completed with the least amount of effort and highest rate of accuracy. For people managing multiple WordPress sites, the daily…

PHP 8.3 Support Added to Staging Feature
We’ve introduced PHP version 8.3 to our staging sites. Test out new features, code changes, and updates on the latest PHP version without affecting your live website. Update PHP confidently…
How do you update and backup your website?
Creating Backup and Updating website can be time consuming and error-prone. BlogVault will save you hours everyday while providing you complete peace of mind.

Updating Everything Manually?
But it’s too time consuming, complicated and stops you from achieving your full potential. You don’t want to put your business at risk with inefficient management.

Backup Your WordPress Site
Install the plugin on your website, let it sync and you’re done. Get automated, scheduled backups for your critical site data, and make sure your website never experiences downtime again.


