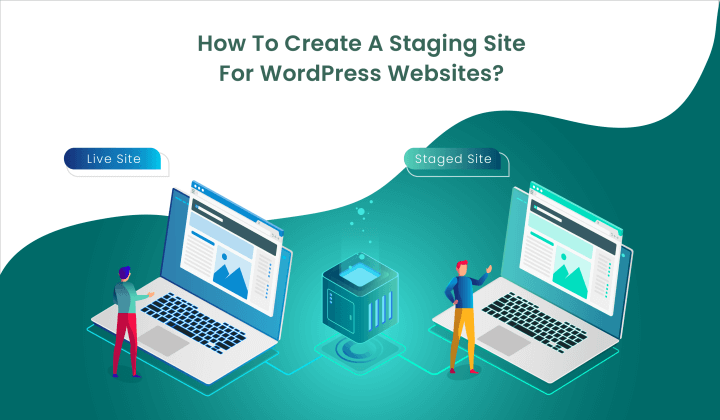
How To Create a Staging Site for WordPress Websites? (Step-by-Step)
Bulletproof Backups for Your WordPress Website
Fortify your business continuity with foolproof WordPress backups. No data loss, no downtime — just secure, seamless operation.
[Have you ever made a modification on your website to immediately regret the decision?
You won’t be the first one because it’s a fairly common occurrence.
But imagine if you had made the modification not on your original website but on a replica site, you could’ve easily evaded a disaster.
In this article, we are going to show you how to create a replica site (often called a WordPress staging site) on which you can conduct tests before making them on the live website.
[lwptoc skipHeadingLevel=”h4,h5,h6″ skipHeadingText=”In Conclusion”]
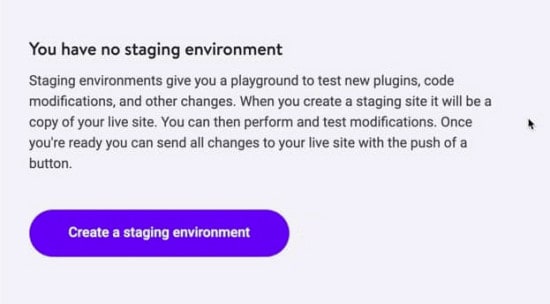
TL;DR
If you are just looking to stage your website quickly but without any hiccups, you can install our WordPress Staging Plugin. It’ll instantly create a replica of your site where you can test changes.
What is WordPress Staging Site?
In simple terms, a staging site is an exact replica of your WordPress website.
When it’s time to add or remove plugins, switch themes, add custom codes, or make any kind of significant changes on your WordPress website, it’s best done on the staging website.
Staging environments (sometimes called testing environment) can also be used to troubleshoot problems. An issue found on your original website (also often known as the live site) will be present on your staging site because it’s a replica after all.
Deactivating a few plugins or switching themes are few common ways of troubleshooting issues. When you do these things on your live website, you are exposing yourself to greater risks.
Having a staging site is a great way of tracking down issues but without the risk of breaking your website or putting it in maintenance mode.
A quick note for e-commerce website owners, for whom it’s much more important to have a staging website.
Putting your website in maintenance mode or worse serving a broken website to visitors will have a negative impact on your business. To avoid that you can check our 7 WordPress maintenance tips.
Before we move on and show you how to create a staging site, let’s look into some of the pros and cons of using a staging site.
Pros And Cons of Using a Staging Site
When you are trying to build a clone website, there’s a good chance of experiencing some drawbacks. But the advantages easily outweigh the disadvantages.
Pros
- It enables WordPress users to make significant modifications to their websites without breaking them.
- Helps discover bugs, errors, and other critical issues without risking your original website.
- Helps build better WordPress sites because you are not afraid of experimenting or testing everything thoroughly before pushing them on your original site.
- If you want to restore from a backup, then staging will enable you to find the correct backup version.
Cons
- Staging sites are an additional cost. WordPress hosts and plugins usually charge a fee.
- Staging can also be complicated and time-consuming to set up.
- Testing the changes on your staging sites and then replicating the same on the live sites is cumbersome. You may also forget what changes you made and in which order.
All these shortcomings can be overcome by using the right WordPress staging solution. Let’s take a look at the different staging options.
Top 3 Ways to Create a WordPress Staging Environment
There are several ways in which you can create a staging site. While some are complex and expensive, there are easy ways to do it. Below, we’ll cover the three main options to create a staging website:
- Creating a Staging Site With a Plugin
- Creating a Staging Site With Your Web Host
- Staging WordPress Site Manually
Let’s explore these options and you can pick the one which you find convenient.
1. Creating a WordPress Staging Site With a Plugin
There are quite a few plugins that allow you to create staging websites but you’ll want to be careful when choosing one.
- Popular WordPress staging plugins create a clone site on your site server which consumes your server resources. It has an impact on your site’s performance. You may find your website slowing down.
- Some staging plugins are incompatible with popular caching plugins. Although performance is less of an issue with staging sites for WordPress if you want to try out the caching plugins, there’s no way for you to do that.
- Many staging plugins neither support multisite networks nor translation plugins, because the plugins use subdomains (like fr.websitename.com).
If you’re a BlogVault client though, you’ll most likely never have to worry about these.
BlogVault will stage your website independently, on its own dedicated servers and it doesn’t suffer from incompatibility issues. BlogVault supports WordPress multisite networks.
If you have a particularly large website, you will realize that it’s difficult to find plugins or even WordPress hosting companies that stage large websites.
It’s worth mentioning that BlogVault is not a WordPress staging plugin. Website staging is one of the numerous features it offers and it’s available even in the free trial.
Staging a Site With BlogVault
Staging with BlogVault is literally a matter of a click. Here’s how you can do it:
Step 1: Install and activate the staging plugin on your site. Then add your website (the one you want to stage) to the BlogVault dashboard. It’ll immediately take a backup of your website. Proceed to create a staging site only after the plugin takes a complete backup.
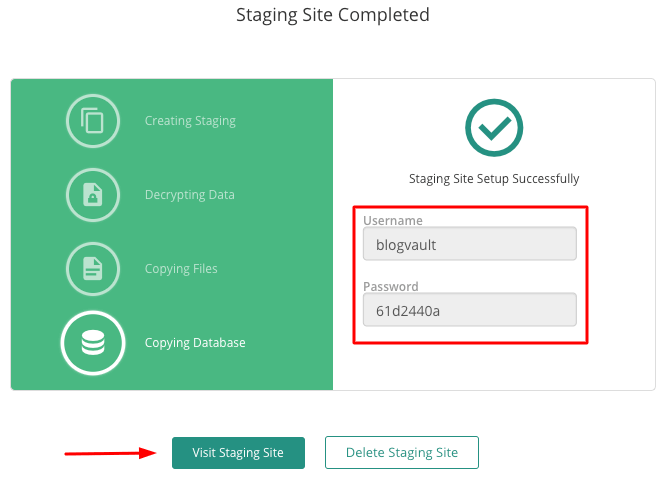
Step 2: From the dashboard, select Add Staging Site and within a few minutes, the staging website will be ready.
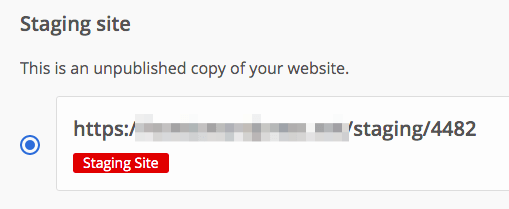
After that, open the staging site by clicking on Visit Staging Site. You won’t be able to access the site unless you use the set of new credentials (look at the image below). Therefore use the new credential to log into the staging site. Following that, you can log into your wp-admin by using your WordPress website credentials.
Quick note: Your staging site is password protected from search engine indexing so you don’t have to worry about an exact copy of your site appearing on Google.
Pushing Changes To Your Original Website
Once you are ready to push changes to the site, simply go to the BlogVault dashboard and select Merge from the Staging section.

And that’s it. You merged your staging site with the original WordPress site with the click of a button.
Creating a WordPress staging site is much easier than you think. Just follow this step-by-step guide. 🤩 Click To Tweet2. Creating a WordPress Staging Website With Your Hosting Provider
It’s common for WordPress hosting companies to offer staging facilities.
At the time of writing this, both Bluehost and SiteGround offer staging facilities with higher plans which begins at $20 per month.
FlyWheel, Kinsta, and WP Engine, on the other hand, offers staging facilities with all their plans.
Flywheel’s lowest plan is $23 per month. With Kinsta and WP Engine, you’ll have to spend $30 per month.
Note: That said, hosting plans keep changing. So we recommend speaking to the providers to learn which plans offer staging facilities.
We are going to show you how to create a staging site with the most popular hosting providers like:
- Bluehost
- Siteground
- WPEngine
- Kinsta
- Flywheel
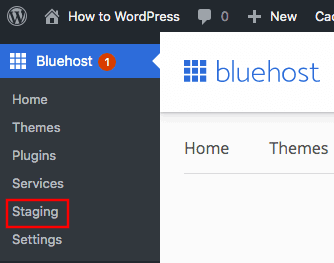
→ Creating a Staging Website on Bluehost
i. Log into your WordPress website and select Staging from the menu.
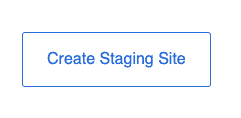
ii. Click on Create Staging Site.
iii. It’ll take a few minutes for the staging site to be formed. Once it’s ready, you can access it just by selecting the staging site.
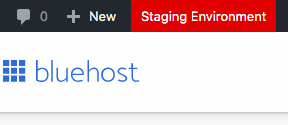
To ensure that you are working on the staging site and not the live one, Bluehost places a label on top of the dashboard.
The staging site will not expire on its own. It will remain until you delete it or merge it with your live site.
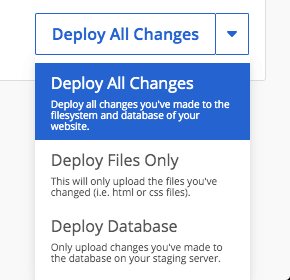
iv. To merge the staging site with your live site, you need to click on Deploy All Changes.
But if you’d rather do selective merge, you have to click on the drop-down menu and select any one of the following options: Deploy Files Only & Deploy Database.
→ Creating a Staging Website on SiteGround
i. Log into your SiteGround account and go to Site Tools > WordPress > Staging.
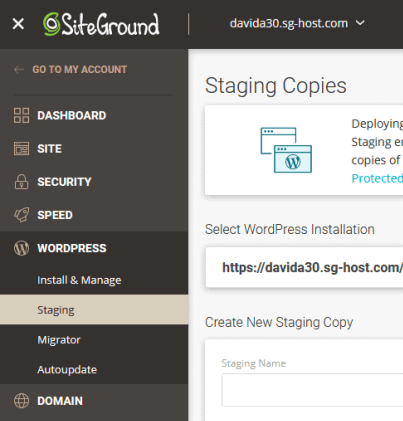
ii. Next, name your staging site and hit the Create button.

iii. To access the staging site, just click on Log in to Admin Panel. The staging site will open on a different tab.
iv. When you are ready to merge the staging site with a live site, come back to the Siteground dashboard. You should be able to see the staged site on the dashboard.
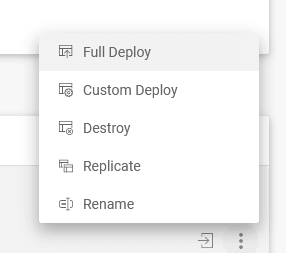
- On the right-hand side of the staged site, there are three dots. Click on it.
- To merge your website completely select Full Deploy.
- To do a selective merger, click on Custom Deploy.
That’s all folks.
→ Creating a Staging Site on WPEngine
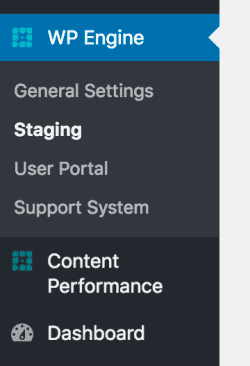
i. Log into your WordPress dashboard and navigate to WPEngine > Staging.
ii. On the next page, select Copy site from Live to Staging to create a staging site.

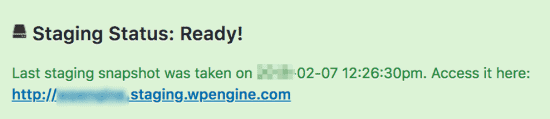
iii. You can access the site by clicking on the URL that will appear on the screen after the site is created.
iv. After fixing whatever you had to fix and testing whatever you had to test, you can merge the staging site with the live one by clicking on the Deploy site from Staging to Live button.

It’ll take a few minutes for the site to merge.
→ Creating a Staging Site on Kinsta
i. Log into your Kinsta dashboard and select your website.
ii. Next, go to Change Environment and select Staging Environment.
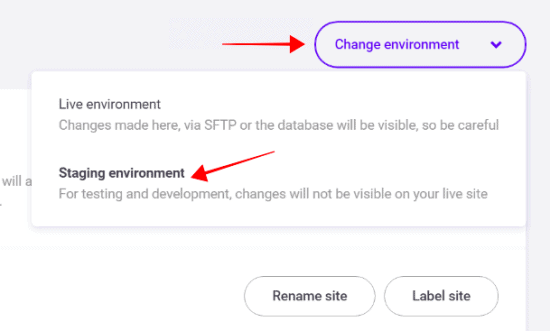
iii. Select Create a Staging Environment.
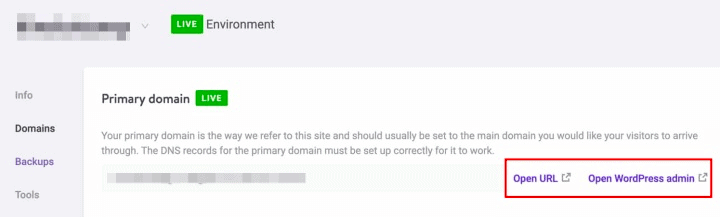
iv. To access the staging site, go to Domain and select Open URL or Open WordPress admin.
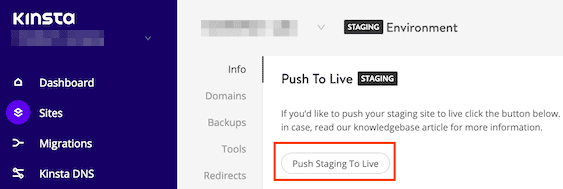
To merge your staging site with the live one, go back to your Kinsta dashboard, and go to Info.
v. You should be able to see an option for Push Staging to Live. It’ll merge the staged site with the live one.
Depending on the size of your website, Kinsta will take some time to push the changes. You will be notified when the process is complete.
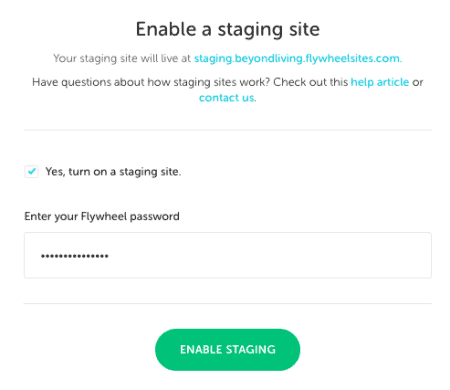
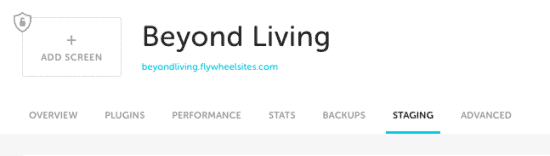
→ Creating a Staging Site on FlyWheel
i. Log in to your Flywheel dashboard and go to Sites.

ii. Select the site you want to stage. On the next page, go to Advance and navigate to Staging. Toggle the staging button on.
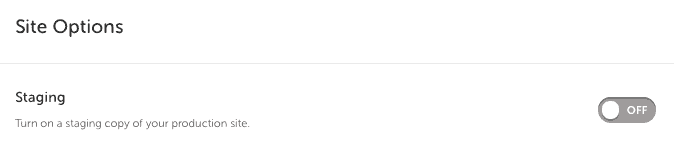
iii. Select the option Yes, turn on a staging site. Then enter your Flywheel password for verification and click on Enable Staging.
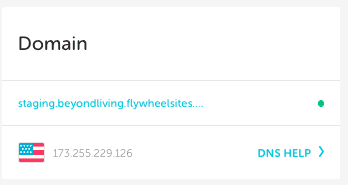
iv. To access the staging site, go to Staging.
v. You will find the staging domain URL on this page. Open it on a new tab.
With that, we have come to the end of how to stage websites with hosting providers.
If you are not using any of the hosting providers we listed, don’t worry.
Enabling a staging site should not be rocket science. Get on a quick chat with your provider to learn how to access staging.
Staging facilities are generally not extended to low plan. If you are subscribed to a low plan, then manual staging is an option for you.
3. Staging a WordPress Site Manually
Creating a staging site on your own is not a good idea for a beginner, someone who has only ever built a simple WordPress website and knows how to install themes and plugins.
Even if you are a keen learner, staging a site manually involves a number of steps and one mistake can lead to a broken staging site that you can’t use.
However, if you understand how WordPress works and have dabbled into the WordPress database, and FTP client, then give it a try.
But, before you begin, make sure you have take a backup of your WordPress blog. If you make mistakes while downloading or uploading the files and database, and your site goes kaput, you can simply restore the site back to normal.
IMPORTANT: And before we dive in, a quick summary of the process will help you understand why you are taking certain steps. A WordPress website is made up of many files and a single database. To create the staging site, you’ll need to download the database and files and upload them to the staging site.
Step 1: Create a subdomain
We’ll be storing the staging site in a folder of your live website. So the first step is to create that folder.
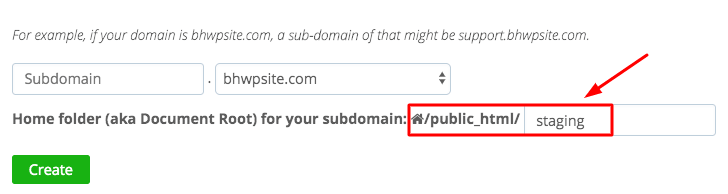
Log into your hosting provider and from the cPanel navigate to Subdomains. Create a subdomain named ‘staging’.
Now you’ll need to create an FTP account for your new subdomain. The FTP account is an enabler. It’ll enable you to upload the files of your “running” site to your staging site.
To create an FTP account, go back to the cPanel and select FTP Accounts from under Files. Enter account details and ensure that the Directory matches with the sub-domain you just created (check the image below).

Step 2: Download the files and database of your original site
Download WordPress files: You can use a File Manager (via your web host account) or an FTP client. We’ll show you using an FTP client called FileZilla. Download and install Filezilla and then enter the FTP details of your live website. You can also check our in-depth guide on how to use FTP.
(Remember to use the FTP details of your live website and not the ones that you created in the previous section. You can find FTP details with the help of these videos or you can ask your hosting provider.)
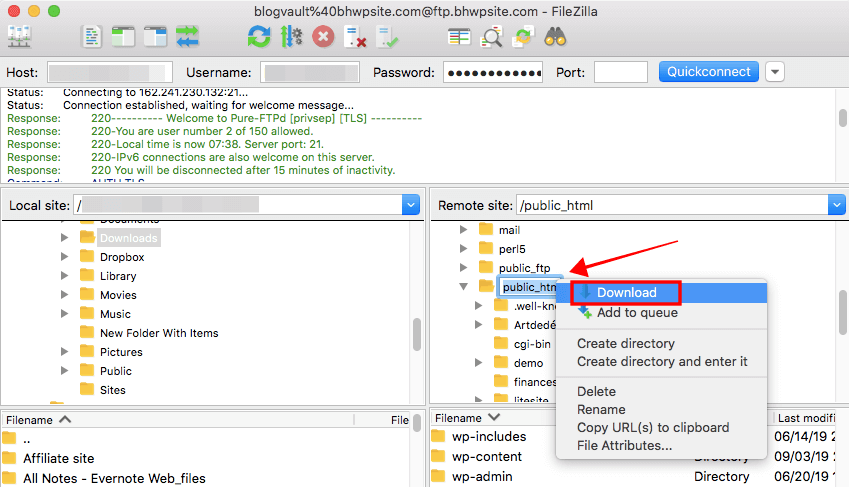
Once the connection is established, you’d want to download the root folder or the public_html folder where all your files are stored. Just right click on public_html and select Download.
Download WordPress database: Log into your hosting account and go ahead and select phpMyAdmin. On the next page, navigate to Export > Quickly.
Now you have a copy of the files and database of your website.
Step 3: Upload WordPress files & database to your staging site
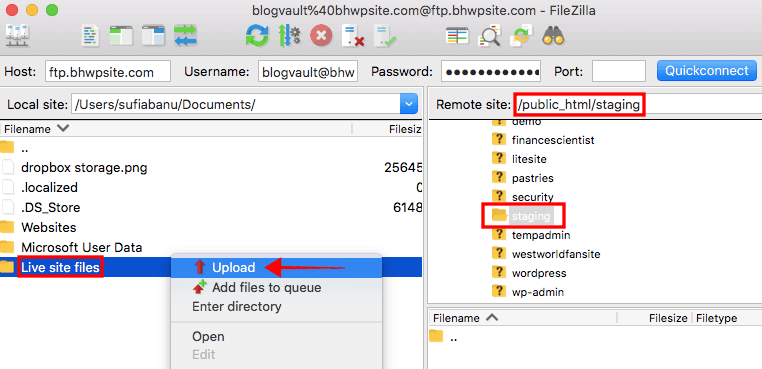
Upload WordPress files: Remember the FTP account you created in step 1? Use that to log in to your staging site. Just open Filezilla, insert the credentials and wait for the connection to establish.
After that, navigate to Remote site > public_html > staging.
The WordPress folder that you downloaded in a previous section is present on your local computer. Just select it and do a right-click then choose Upload (check the image below). Your WordPress folder will be uploaded to your staging folder.
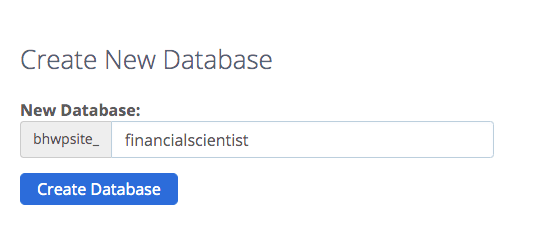
Upload WordPress database: This step involves creating a new database first and then uploading the old database in the new one.
Log in to your hosting account and then navigate to Databases > MySQL Databases > Create New Database.
Next, you need to create a MySQL user for your database. Just scroll down on the same page and create a new user.
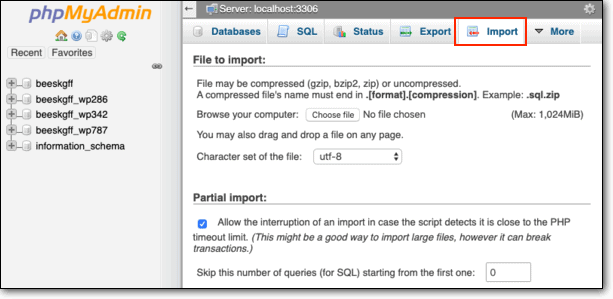
Now, it’s time to upload the database you’d downloaded in an earlier section to this new database. Just head over to phpMyAdmin from the hosting dashboard. Select the database you just created and then click on Import. This will make sure that you are importing in the right database. Then just go ahead and import the database from your computer.
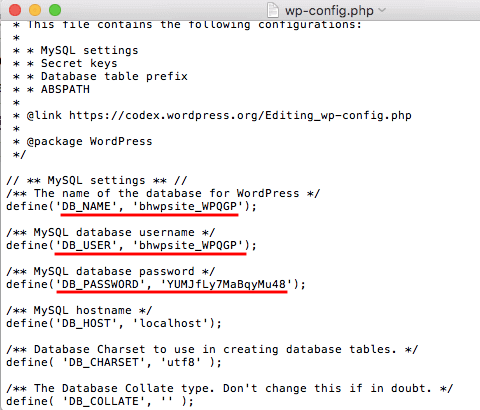
Step 4: Modify the wp-config file
This step involves modifying the wp-config file to connect the database with the staging site.
From FileZilla, navigate to Remote site > public_html > staging > wp-config.php. Right-click on the file and select Edit. The file has information on your old database (or the database of your live site). Replace it with the new database name, username, and password. Once, you’ve modified the information, save the file.
The URL of the website will appear like this: staging.yourwebsitename.com. The login credentials will be the same as on your actual website.
Step 5: Hide your staging site from search engines
Ensure that Google is not crawling your new staging site by a using plugin called Hide My Site.
Once you have activated the plugin, head over to Settings > Reading > Discourage search engines from indexing this site. Also, you can read our guide on how to block Google from indexing your website.
Pushing Changes To Your Original Site
If you were testing something on your staging sites like a plugin or a theme, you can simply go ahead and install them on your live website.
But if you are making bigger modifications, then we’d suggest you download the files and database on your staging site and then upload them to your “running” site using the same process we discussed before.
In Conclusion
While there are different ways of setting up a staging site, not all methods are worth trying.
Manual methods are time-consuming and prone to mistakes.
But creating a staging site is much easier if you do it with best WordPress staging plugin.
Create a staging site without any hiccups,
Try BlogVault’s Staging Services Now!
Tags:
Share it:
You may also like

How to Limit Form Submissions with Droip in WordPress
Forms are an indispensable part of any website because of their versatility, letting you collect information for various purposes! However, people with ill intentions often attempt to exploit these forms…

How To Manage Multiple WordPress sites
Management tools help agencies become well-oiled machines. Each task is completed with the least amount of effort and highest rate of accuracy. For people managing multiple WordPress sites, the daily…

PHP 8.3 Support Added to Staging Feature
We’ve introduced PHP version 8.3 to our staging sites. Test out new features, code changes, and updates on the latest PHP version without affecting your live website. Update PHP confidently…
How do you update and backup your website?
Creating Backup and Updating website can be time consuming and error-prone. BlogVault will save you hours everyday while providing you complete peace of mind.

Updating Everything Manually?
But it’s too time consuming, complicated and stops you from achieving your full potential. You don’t want to put your business at risk with inefficient management.

Backup Your WordPress Site
Install the plugin on your website, let it sync and you’re done. Get automated, scheduled backups for your critical site data, and make sure your website never experiences downtime again.


