You’ve put in the hard work creating great content, and now it’s time to get paid for it. Learning how to add affiliate links to WordPress is the key to monetizing your site, but just pasting long, messy URLs can look unprofessional and is a pain to manage. This guide breaks down the process into two simple methods, so you can start adding links correctly and confidently today.
Affiliate plugins are the best long-term solution, as they help you organize, track, and cloak your links into clean, shareable URLs. We’ll show you exactly how to use them, but we’ll also cover the quick manual method right inside the WordPress editor for when you’re just starting out. Let’s get your first link live.
Install a WP affiliate plugin to create short, clean “cloaked” links. This makes them easy to manage, track, and insert directly into your WordPress posts and pages.
Adding an affiliate link to your WordPress site means inserting a unique, trackable URL into your content that connects a reader’s purchase back to you. Think of it as your personal referral code embedded in a link. When a visitor clicks this link and buys a product, the company knows you sent them and rewards you with a commission. This process is the core of affiliate marketing, and it’s how you transform your valuable content and product recommendations into a revenue stream.
There are two methods to do this and we’ve gone over both of them below. But, before you get started, build a staging site. Make all of these changes to your staging site first. Test that it is working well and then push it to the live site.
Method 1: How to Add Affiliate Links to WordPress Using Plugin
A dedicated WordPress affiliate link manager plugin solves this problem entirely. These tools help you “cloak” long, ugly affiliate URLs into clean, branded links. It’s the professional way to handle affiliate marketing.
For this guide, we’ll walk through ThirstyAffiliates, one of the most popular and user-friendly options available.
Step 1: Create Your First Cloaked Affiliate Link
This is where you’ll learn how to cloak affiliate links wordpress style. Think of it like giving a long, hard-to-remember phone number a simple contact name in your phone. You’re taking that clunky affiliate URL and giving it a short, memorable address on your own domain.
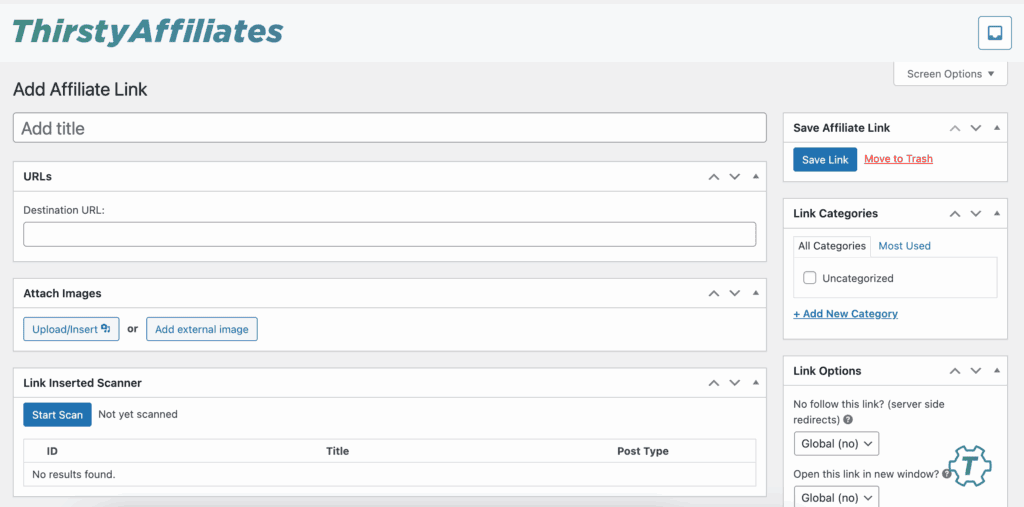
- Find the “Add New” Page. In your WordPress dashboard, navigate to ThirstyAffiliates > Add New Link.
- Give Your Link a Name. In the “Link Name” field, enter a title that helps you easily identify the link later, like “Awesome SEO Tool” or “My Favorite Coffee Maker.” This is just for your internal reference.
- Paste the Destination URL. Take your original, long affiliate URL (the one from Amazon, ShareASale, etc.) and paste it into the “Destination URL” field. This is the final destination where your visitors will land.
- Save Your Link. Click the “Save Link” button. ThirstyAffiliates will automatically generate a “Cloaked URL” for you. This is the new, “pretty” link you’ll use throughout your content.
Step 2: Insert the Link Into Your Content
Now that your cloaked link exists, adding it to blog posts is incredibly simple. You never have to find or paste that original long URL again.
- Highlight Your Text. Open a post or page in the WordPress editor and highlight the anchor text you want to turn into a link (e.g., “check out this awesome SEO tool”).
- Click the Link Icon. Click the standard link icon in the editor’s toolbar. A small box will appear.
- Search for Your Link. Instead of pasting a URL, click TA and start typing the “Link Name” you created in the previous step (e.g., “Awesome SEO Tool”). WordPress will search your ThirstyAffiliates links and find a match.
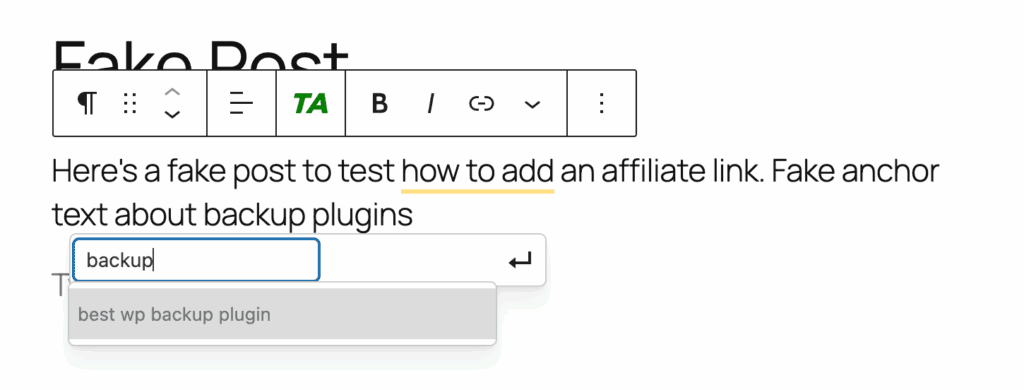
- Select and Apply. Click on the correct link from the search results to insert it. That’s it. Your clean, cloaked, and trackable affiliate link is now live in your post. If you ever need to update the destination URL, you only have to change it once in the ThirstyAffiliates dashboard, and it will automatically update everywhere on your site.
Method 2: Manual Insertion (Best for a few links)
If you’re just starting out and only need to add amazon affiliate link to post a couple of times, you don’t necessarily need a plugin. The built-in WordPress editor has everything you need to insert affiliate links directly into your content. This method is fast and straightforward, making it perfect for beginners who want to get their first links live without any extra setup.
Here’s how to do it step-by-step in the WordPress Block Editor:
- Highlight Your Anchor Text. In your post or page, select the text or image you want to turn into a link. This text is called the “anchor text.”
- Click the Link Icon. A small toolbar will appear above the highlighted text. Click the link icon (it looks like a chain link) or press Ctrl + K (Windows) or Cmd + K (Mac) on your keyboard.
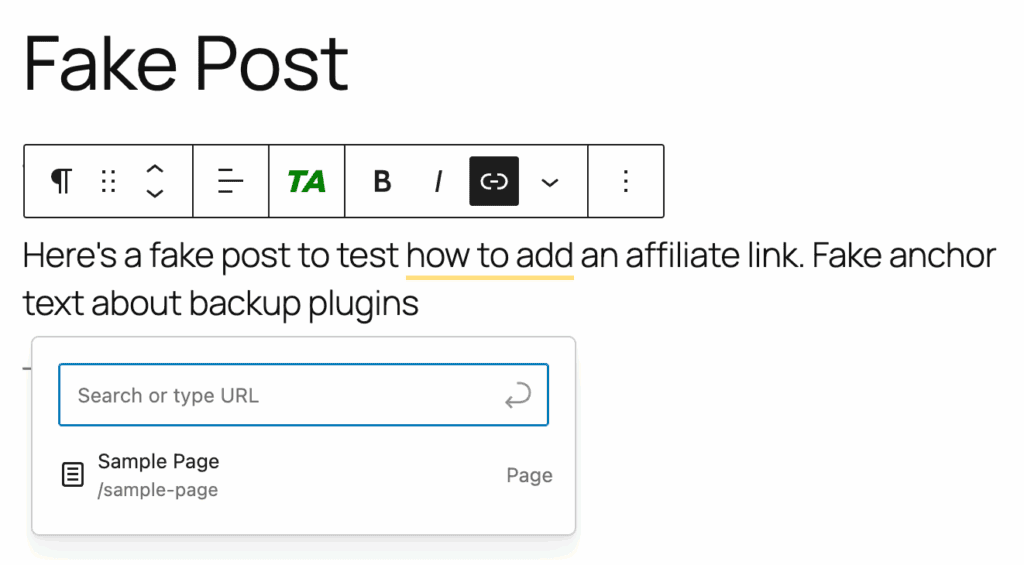
- Paste Your Affiliate URL. A box will pop up. Paste your full, original affiliate URL directly into this field and press Enter or click the submit arrow to apply it.
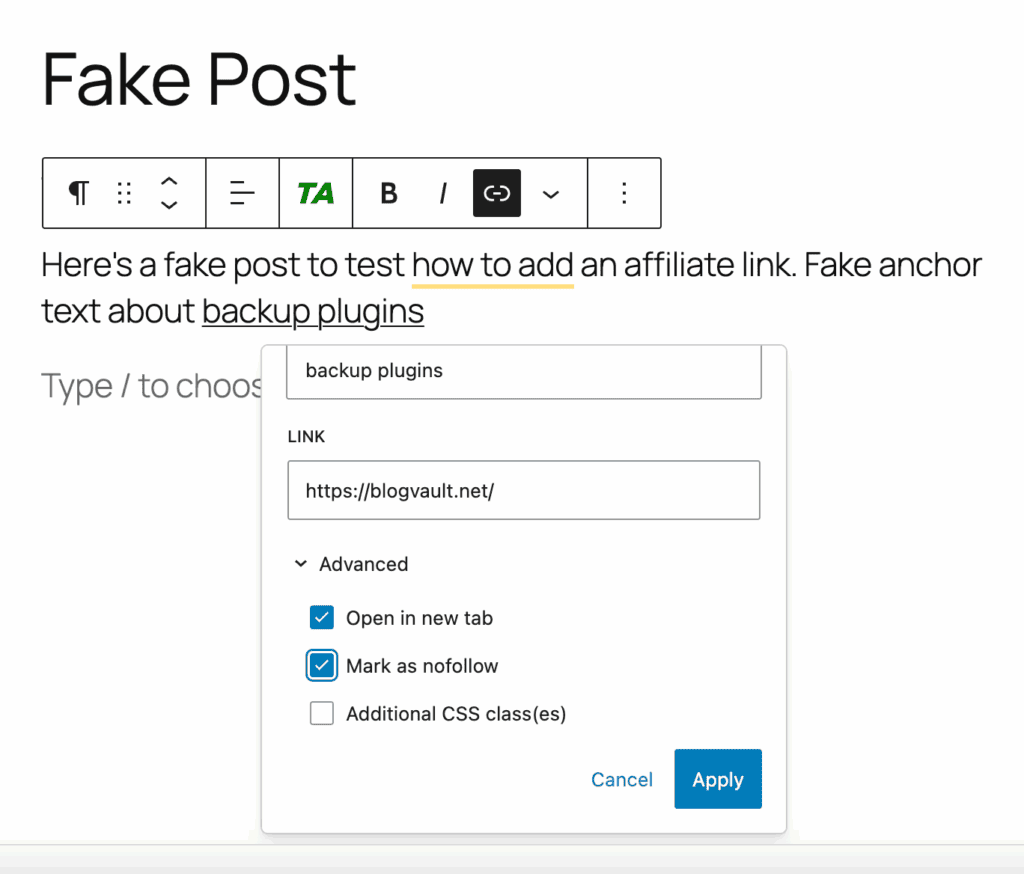
- Set Crucial SEO Attributes. After applying the link, click the link again to open the options. Click the pencil icon to edit, then click the small down arrow for “Advanced” settings. Here, you must check the boxes for “Mark as nofollow” and “sponsored.” This tells search engines like Google that it’s a paid link, which is essential for complying with their guidelines and protecting your site’s SEO.
- Open in a New Tab. In the same link settings, toggle on the “Open in new tab” option. This is a best practice for external links, as it keeps visitors on your website while they check out the product you’re recommending.
Important Best Practices
Getting your affiliate links into a post is only half the battle. To build a sustainable, trustworthy, and successful affiliate strategy, you need to follow a few critical rules. Ignoring them can harm your relationship with your audience, your affiliate partners, and even your search engine rankings. A proper affiliate link disclosure for blogs is just the start.
- Disclosure is mandatory. You must clearly tell your readers that you may earn a commission if they purchase through your links. This isn’t just good practice for building trust—it’s a legal requirement in many countries (like the FTC guidelines in the US). A simple, clear statement at the top of every post containing affiliate links is the best approach. For example: “This post contains affiliate links. If you make a purchase, we may earn a commission at no extra cost to you.”
- Be smart about link cloaking. While tools that create clean, branded links (yoursite.com/go/product) are great for trust, you have to be careful. Some affiliate programs, most notably Amazon Associates, have very strict rules about how their links can be redirected or “cloaked.” Always read the terms of service for each affiliate program to ensure you’re not violating their policies, as doing so can get you banned.
- Always use the correct SEO tags. You must signal to Google that your affiliate links are part of a commercial relationship to avoid SEO penalties. Always use the rel=”sponsored” attribute on your links. The rel=”nofollow” attribute is also acceptable, but sponsored is more specific and preferred by Google. Thankfully, most good affiliate management plugins will handle adding these tags for you automatically.
Final Thoughts
Adding affiliate links to WordPress is straightforward, but doing it right from the start will save you countless headaches. While manually inserting links is fine for your first one or two, we strongly recommend using an affiliate management plugin like ThirstyAffiliates or Pretty Links as soon as possible. This approach allows you to manage all your links from one central dashboard, so if a product URL ever changes, you only have to update it in one place.
Furthermore, using an affiliate plugin with built-in analytics is a game-changer. It allows you to see which links are getting clicked and which ones are leading to sales. This data is invaluable. It helps you understand what your audience responds to, letting you double down on what works and stop wasting time on what doesn’t. Making decisions based on data, not guesswork, is how you turn a hobby blog into a real business.
FAQs
How do I add an affiliate link into WordPress?
You have two main options. The quickest way is to highlight text in the WordPress editor, click the link icon, paste your affiliate URL, and set it to “sponsored” and “open in a new tab.” The recommended method is to use an affiliate link management plugin to first create a short, “cloaked” link, and then insert that new, cleaner link into your post.
How do I add an affiliate link?
First, you get a unique tracking link from an affiliate program (like Amazon Associates). Then, within your website’s content, you highlight a relevant phrase or word (the anchor text) and use your editor’s link tool to attach your affiliate URL to it.
Can I put affiliate links on my website?
Yes, absolutely. Putting affiliate links on your website is a very common and legitimate way to monetize your content. However, you are legally required to disclose this to your audience (e.g., with a statement at the top of the page). You must also comply with the terms of service of the affiliate program you’re promoting.
How to earn $100 per day through affiliate marketing?
Earning a consistent income like $100 per day involves much more than just adding links. It requires a solid strategy built on trust and value. This includes choosing a profitable niche, creating high-quality content that genuinely helps your audience, building targeted traffic through SEO or social media, and promoting products that are relevant and that you believe in. It takes time and consistent effort; there is no shortcut.

Shreya has been a writer for as long as she can remember. Now, she writes articles that help WordPress users manage the sites that they're proud of, with little to no coding