How To Create a Staging Site for WordPress Websites? (Step-by-Step)
Bulletproof Backups for Your WordPress Website
Fortify your business continuity with foolproof WordPress backups. No data loss, no downtime — just secure, seamless operation.
If you make changes to a live WordPress website, there is always a risk of something going wrong. Even a small design error can break your website design, whilst automatic updates for WordPress plugins and themes can crash your whole website due to compatibility issues.
To prevent this from happening, it is good practice to use a WordPress staging when making changes to your website. A WordPress staging environment is an identical copy of your live website that allows you to make changes safely in a development area. All changes can then be pushed to your live website once you have confirmed there are no issues.
In this tutorial, I will explain the importance of the WordPress staging site and show how to create a staging site for wordpress using many popular staging solutions.
TL;DR: If you are just looking to stage your website quickly but without any hiccups, you can install our Blogvault Staging Plugin. It’ll instantly create a replica of your site where you can try out changes.
Why Do You Need a WordPress Staging?
New WordPress users tend to take a reactive approach to website development where they tackle problems when they arise. As you gain more experience, you appreciate the importance of taking a proactive approach that prevents serious issues from ever arising.
As Karishma explains in “How to Backup Your WordPress Site Successfully“, a website backup is an insurance policy for your website that ensures you can restore your website if it is attacked or crashes.
Whereas a good WordPress backup solution allows you to restore your website if something goes wrong, a WordPress staging site greatly reduces the risk of anything going wrong in the first place. This can help you avoid unnecessary website downtime.
WordPress staging works like this:
- Cloning – The staging solution creates an exact replica of your live website which contains your website files and WordPress database
- Modifications – You can now safely process upgrades, switch themes, and make other changes to your website in your “Staging Area”. Also staging helps build better WordPress sites because you are not afraid of experimenting or trying out everything thoroughly before pushing them on your original site.
- Testing – All changes and upgrades can be tested to ensure everything is working OK
- Deployment – With just one click, your updated website can be pushed from your staging area to your live website
One of the key aspects of website staging is that the whole process is straightforward. It only takes a few minutes to create a WordPress staging site and your staged website works exactly the same as your live website.
Create WordPress Staging Site Using a WordPress Plugin
I’m a huge fan of website staging and have been using it to perform major updates on my WordPress websites for many years. My hosting company Wetopi has a useful staging system, but I use BlogVault to create a WordPress staging website instead as their service tends to be faster and boasts additional security steps when making changes go live.
Let’s take a closer look at how to set up a wordpress staging site using a WordPress plugin.
1. BlogVault
Step 1: Access the Site Overview Page for Your Website
In the main dashboard of BlogVault, you can perform WordPress updates, manage website backups, review security issues and more.
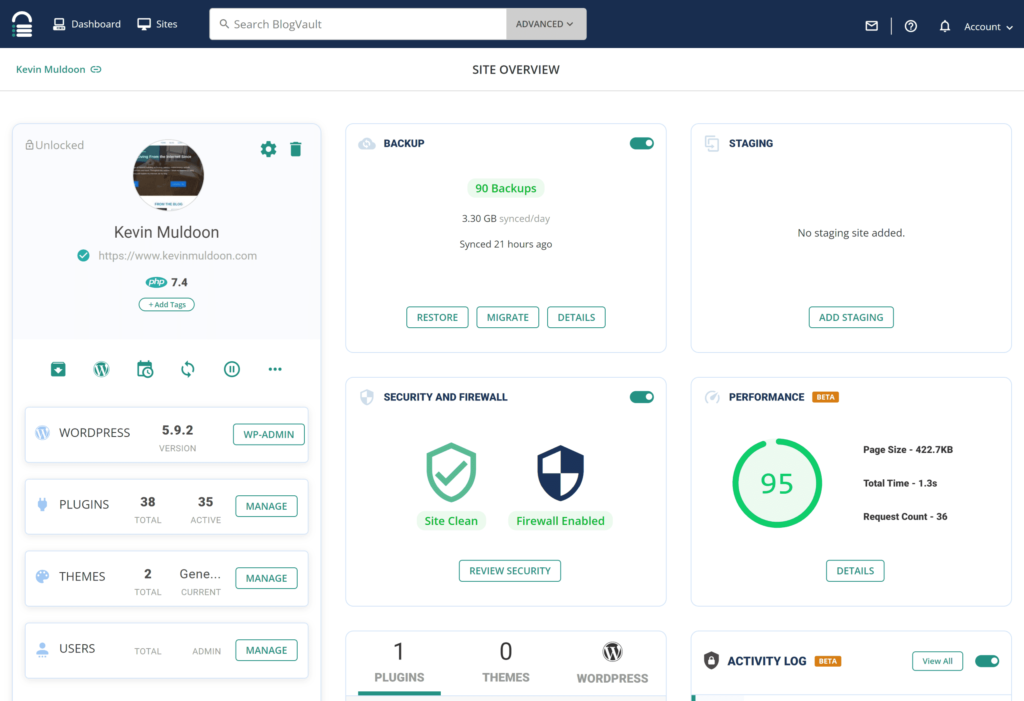
Step 2: Select “Add a New Staging Area”
At the top right, you will see an option to add a new staging area.
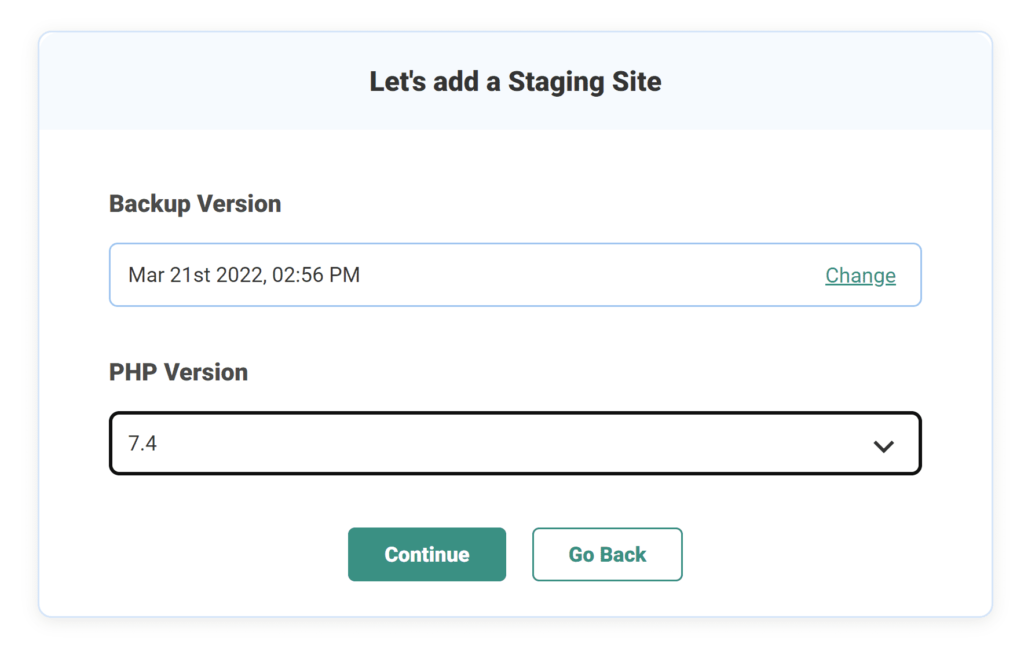
BlogVault allows you to create a WordPress staging site using any backups you have created. If you have made some changes to your website since the last backup, I recommend generating a new backup of your website and selecting that for staging.
Interestingly, BlogVault also lets you change the PHP version that is being used. This is incredibly useful for testing your WordPress website with a newer or older version of PHP.
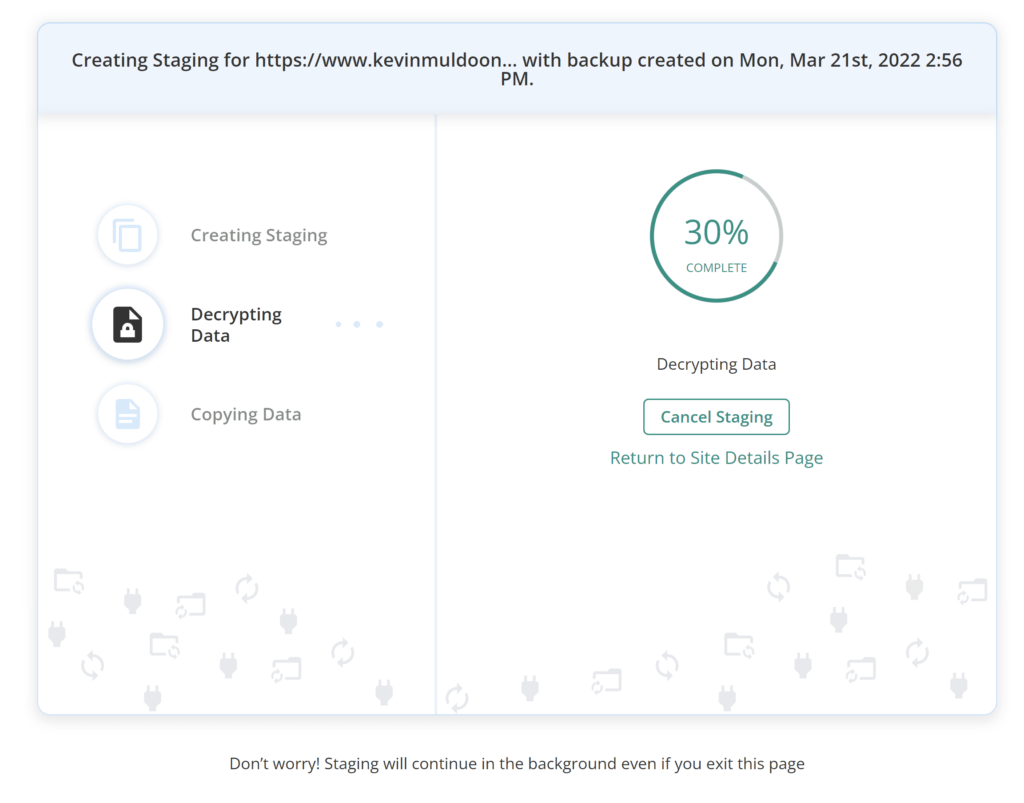
BlogVault will then create your staging area from your website backup. This step should only take a few minutes for a small WordPress website, but larger websites will take longer to set up.
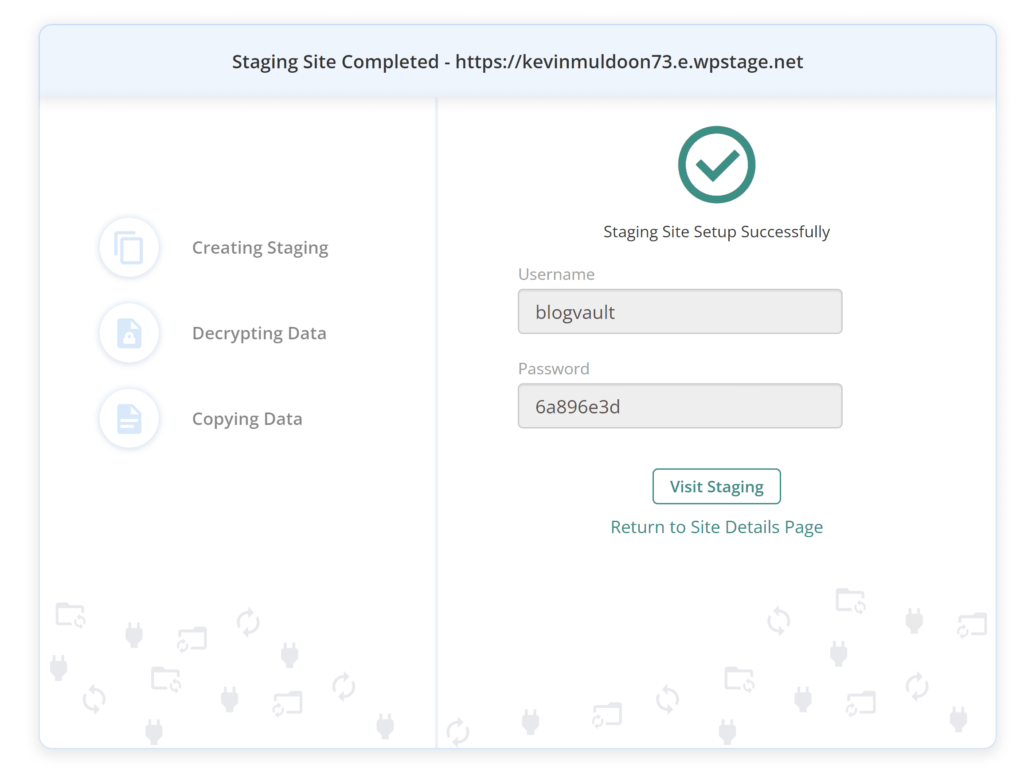
Step 3: Make a Note of Your Staging Authentication Details
Once your staging website has been created, BlogVault will send a confirmation email with HTTP authentication and FTP connection information.
The HTTP login username and password is an additional step that protects your staging area from others. Once you are logged in, you will still need to log in to your WordPress website as you would on your live website.
Step 4: Access Your WordPress staging site
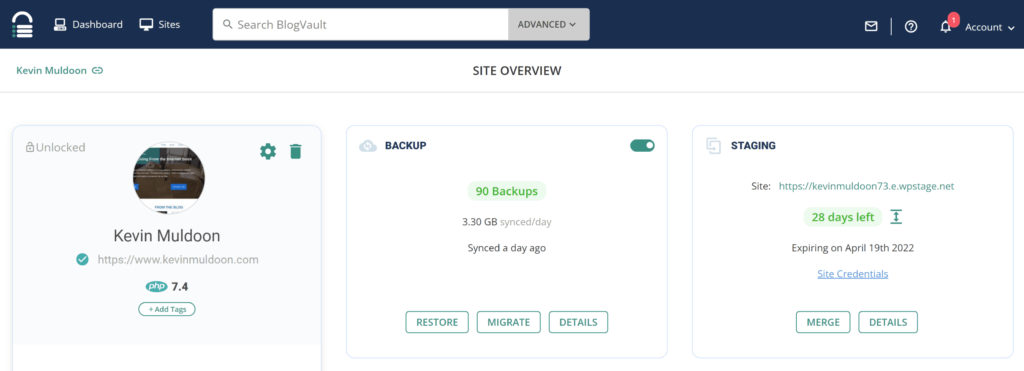
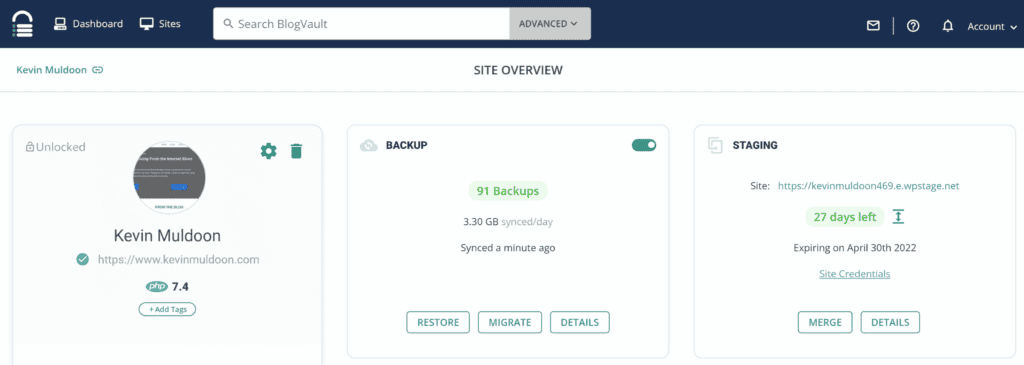
Your staging area can be accessed at any time from the main site dashboard of BlogVault.
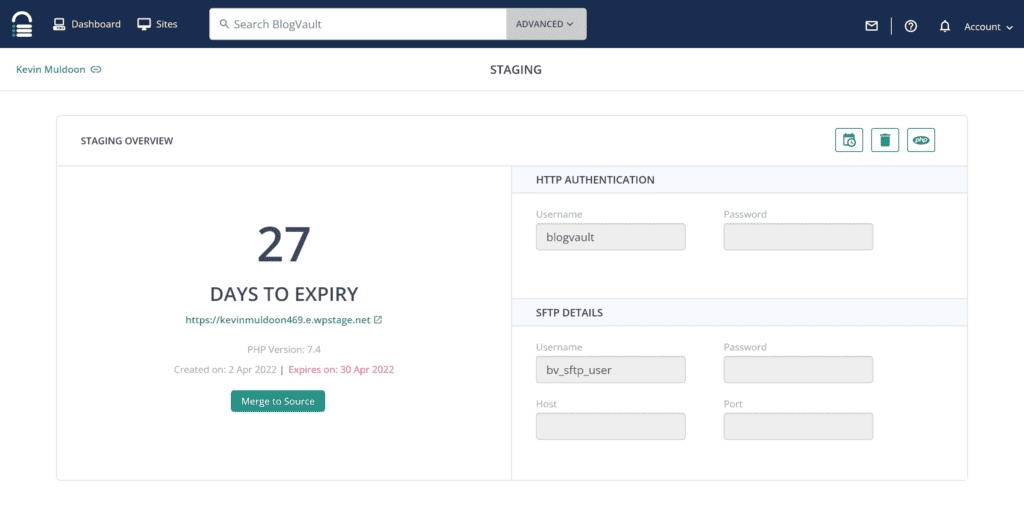
Optional Step: Extend the Expiry Date of Your Staging Area
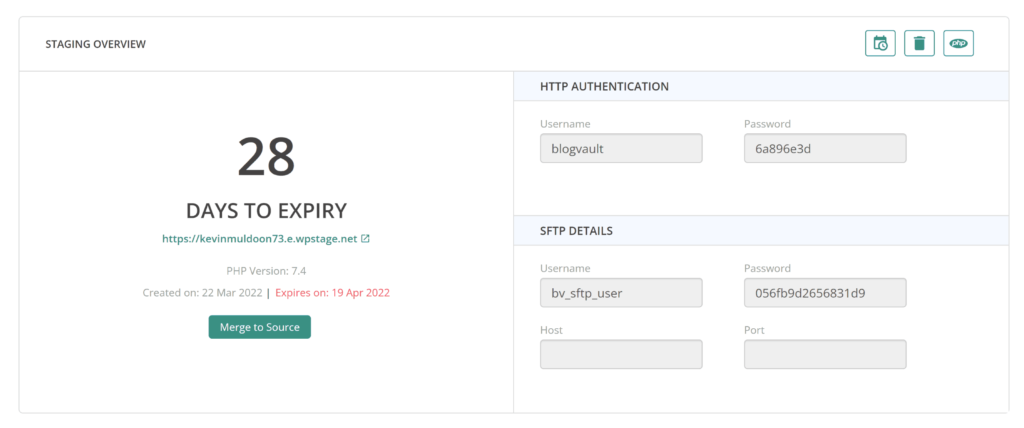
By default, BlogVault will set a staging area to expire after 28 days. This is more than enough time for most development and testing, but it can be extended at any time.
The staging overview page also reminds you of your HTTP and SFTP login information and has options for accessing your WordPress database via PHPYMyAdmin and for deleting the staging area.
BlogVault is still widely known for being a reliable WordPress backup solution, though its integrated staging features are a fantastic addition to the service.
2. WPStaging
WPStaging is a WordPress plugin that offers website staging, backups, cloning and migration. The premium version of the plugin retails from €89 per year (+ VAT), though a free version of the plugin is available on WordPress.org.
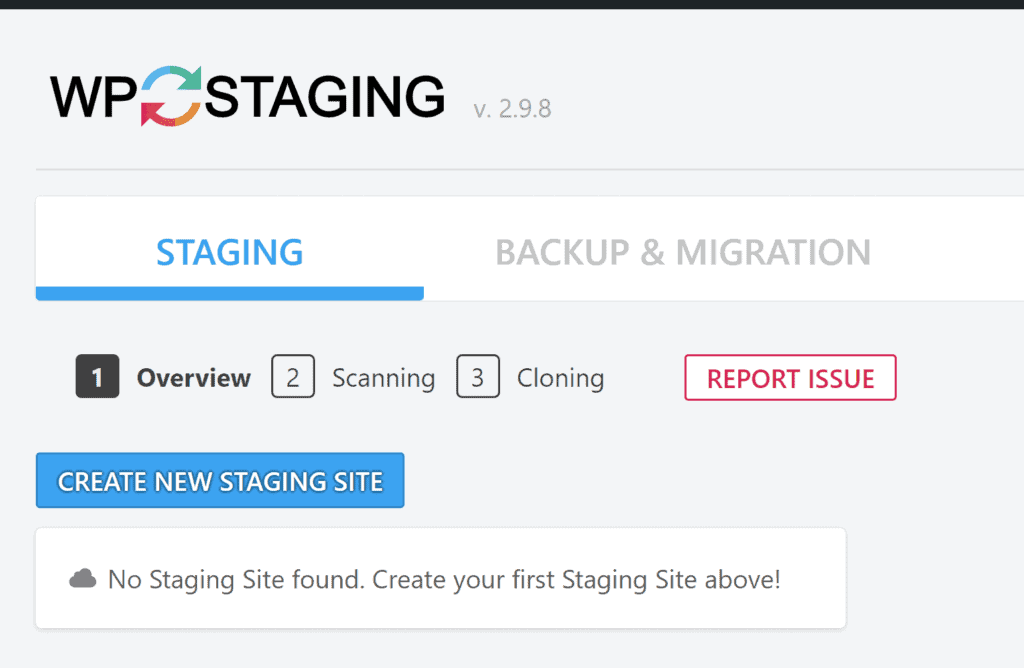
Step 1: Select “Create New Staging Site”
Once the plugin has been activated, you can create a new WordPress staging site by selecting “Staging Sites” from the main WP Staging admin menu.
Step 2: Create a Backup of Your Website and Begin the Cloning Process
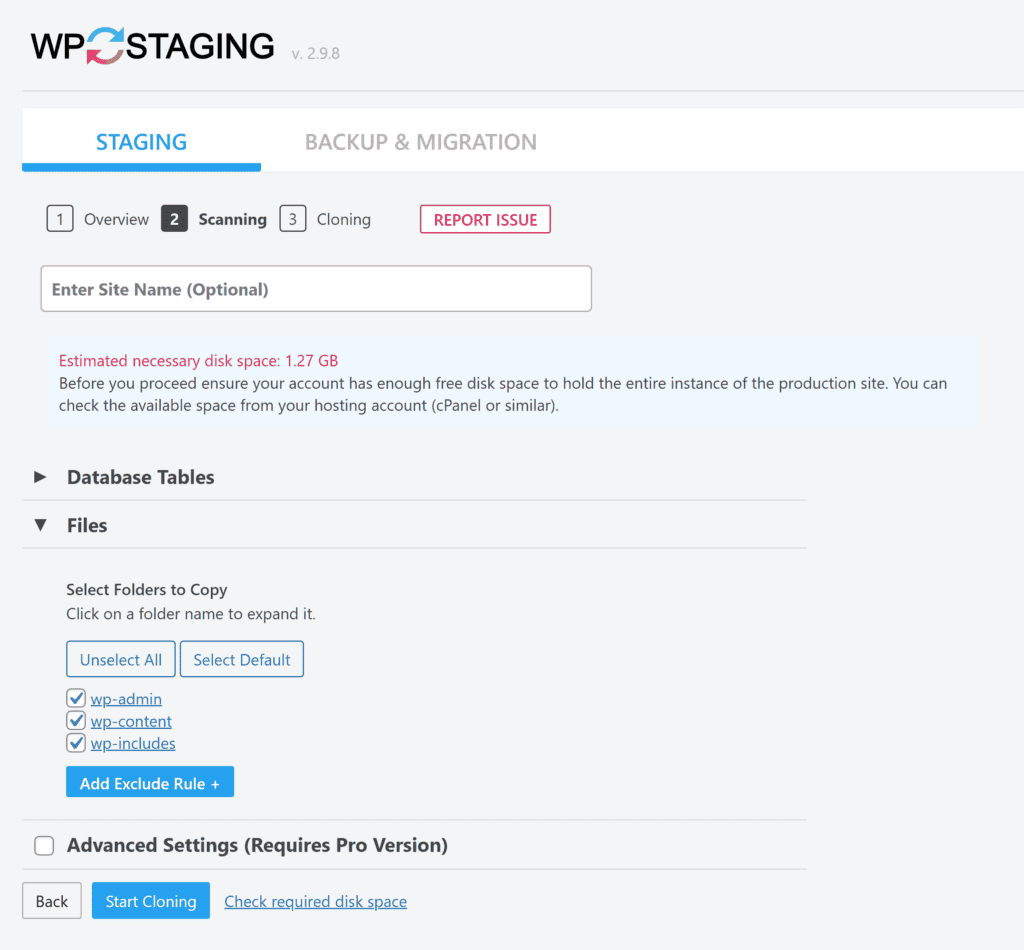
WP Staging needs to create a backup of your website in order to build a WordPress staging site. By default, all database tables and directories are selected for backup, though you can deselect any table or directory you do not require. You can also enter a name for your staging site and estimate the disk space you need to store the backup.
When you are ready to proceed, simply select “Start Cloning”.
WP Staging will then backup your website.
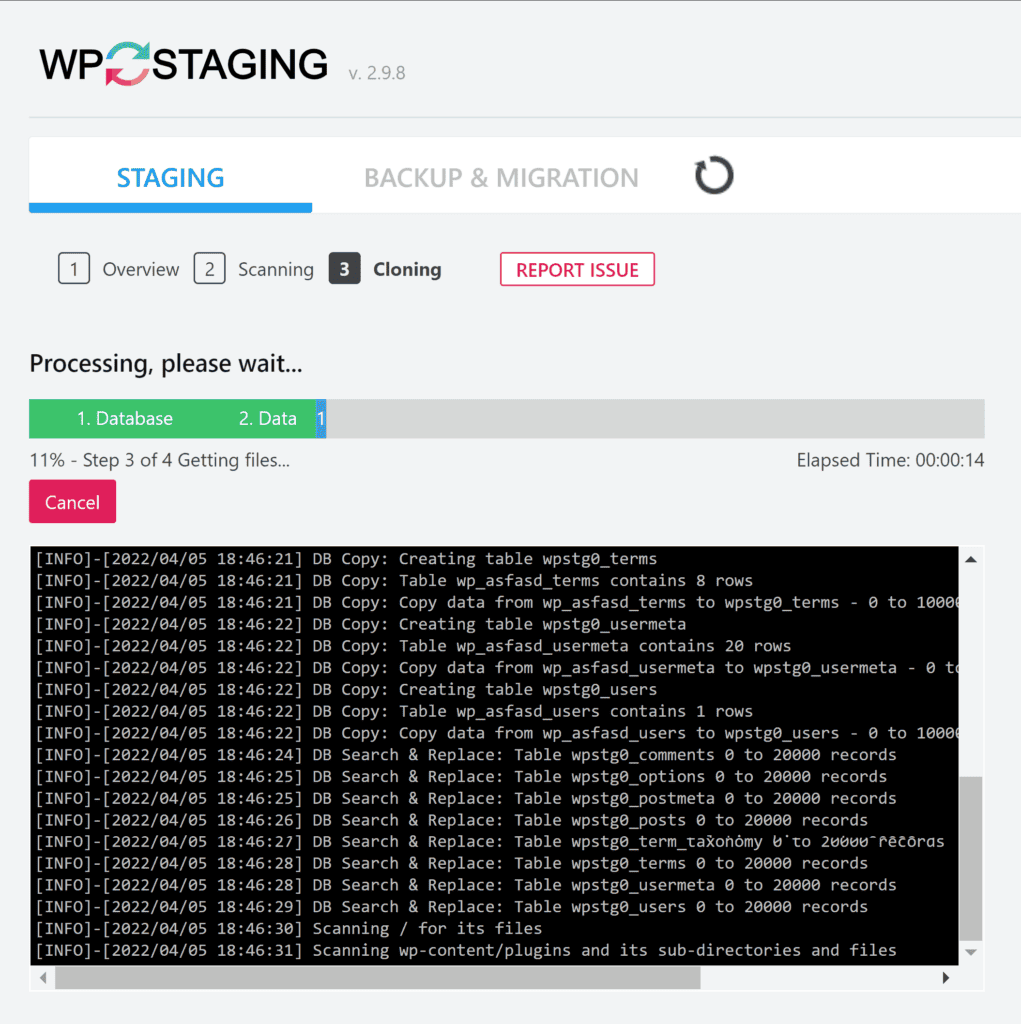
Processing the backup for your website.
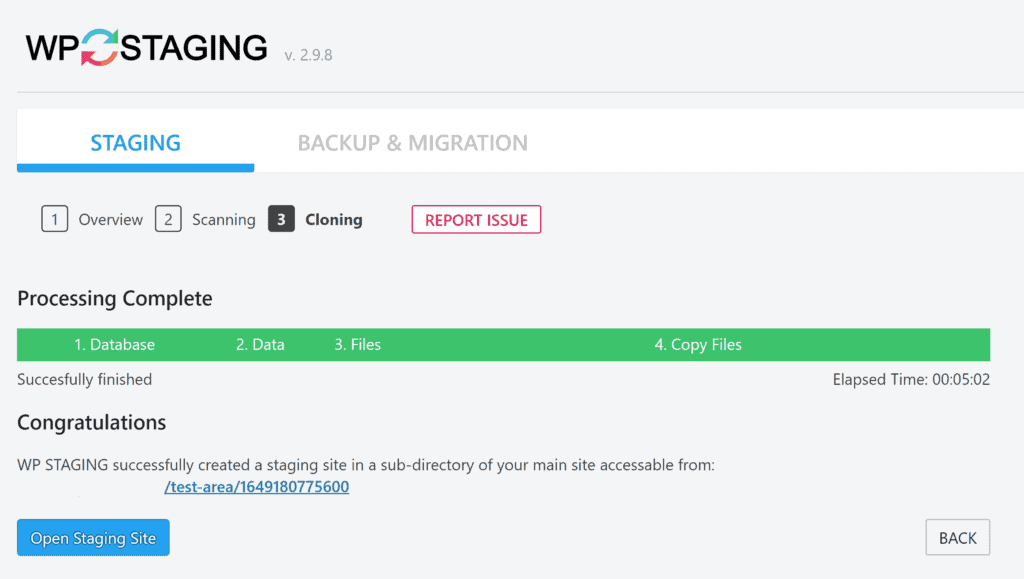
Step 3: Access Your Staging Area
After a few minutes, you will see a link to your new staging area, which WP Staging stores in a subdirectory of your main website.
WP Staging is a straightforward staging solution that works well. The free version of the plugin offers many useful configuration settings on its dedicated settings page and many more features can be unlocked if you upgrade.
3. WP Staging Coach
WP Stagecoach is a premium one-click staging solution that retails from $99 per year.
Step 1: Enter Your Username and API Key
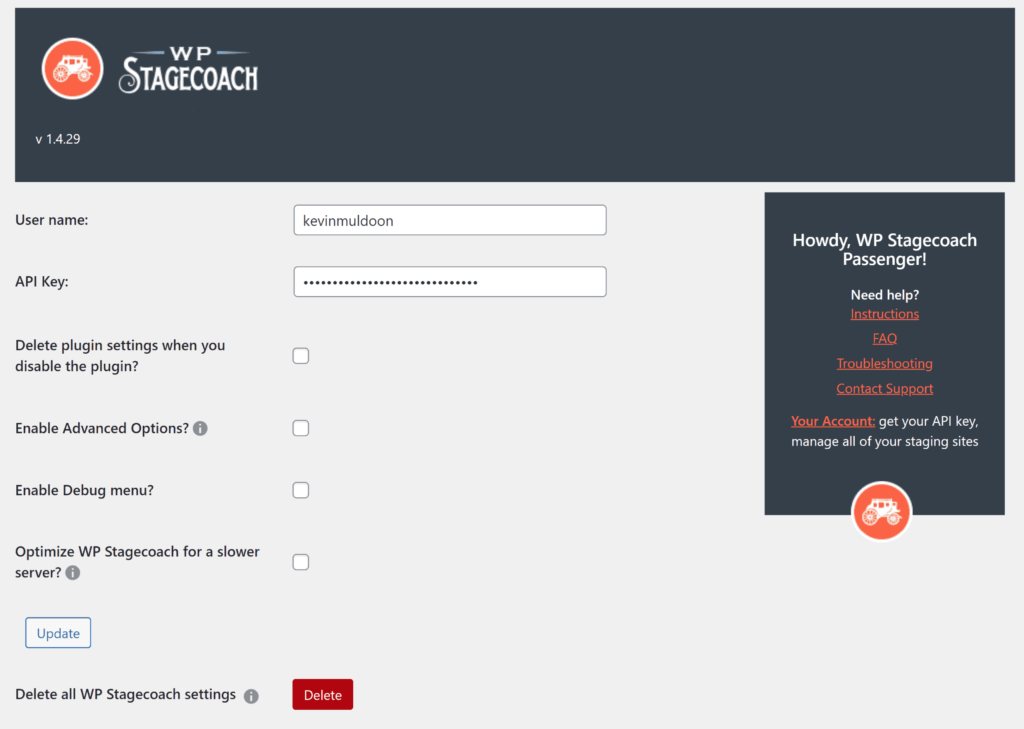
Once you have activated the WordPress plugin on your website, you need to visit the main settings page of WP Stagecoach to enter your username and API Key.
This page also has options for deleting data when you disable the plugin, enabling advanced options, enabling a debug menu and optimising WP Stagecoach for slower servers.
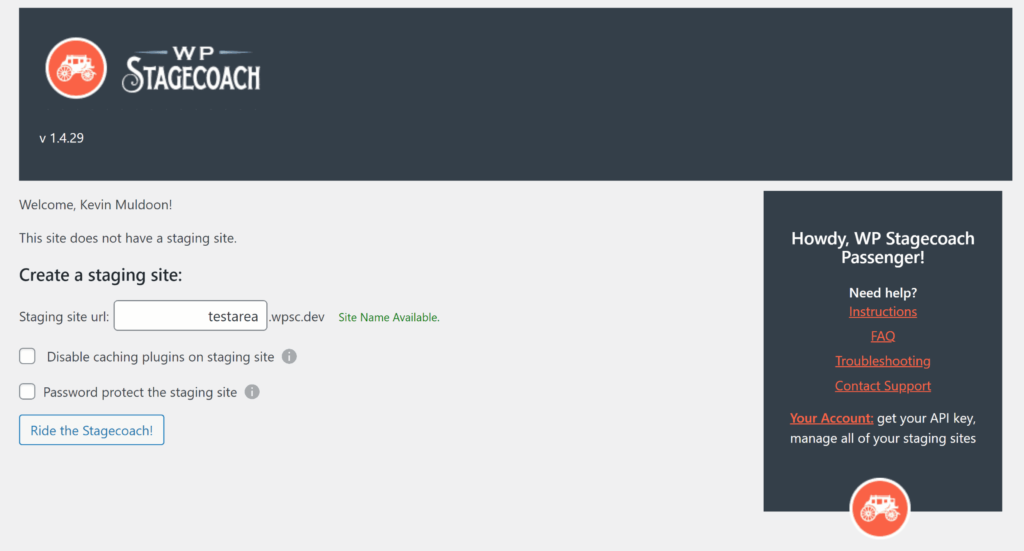
Step 2 (Basic): Create a New Staging Site
A new staging site can be created from the main page of WP Stagecoach. From here, you can define your staging site URL, disable caching plugins and password protect your staging area.
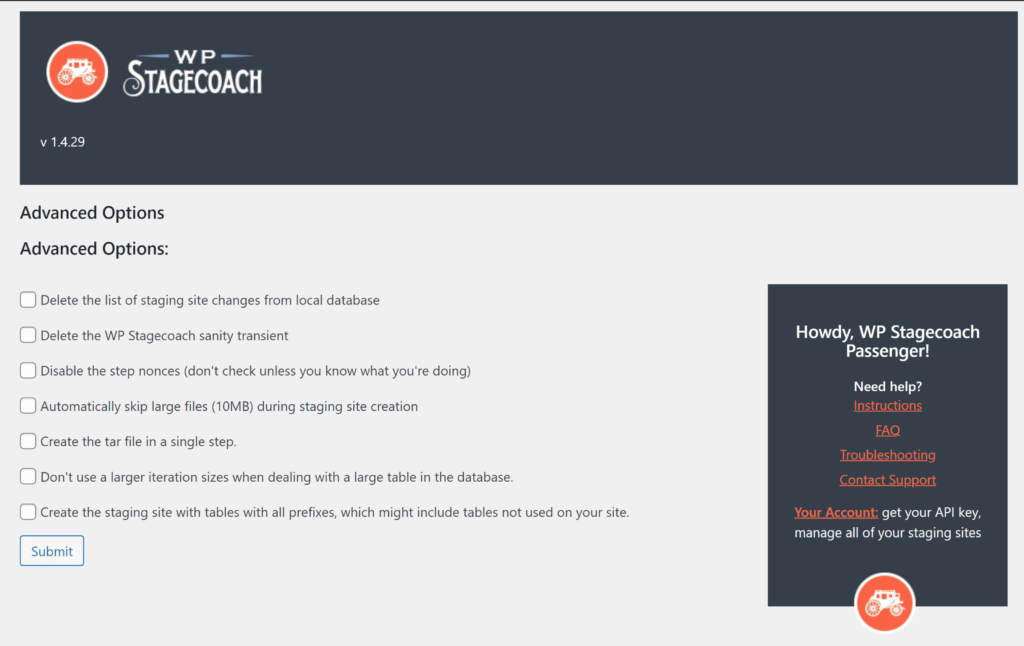
Step 2 (Advanced): Create a New Staging Site
If you enable advanced settings from the main plugin settings page, several additional options are available such as deleting the list of staging site changes from local database and skipping large files when creating the staging area.
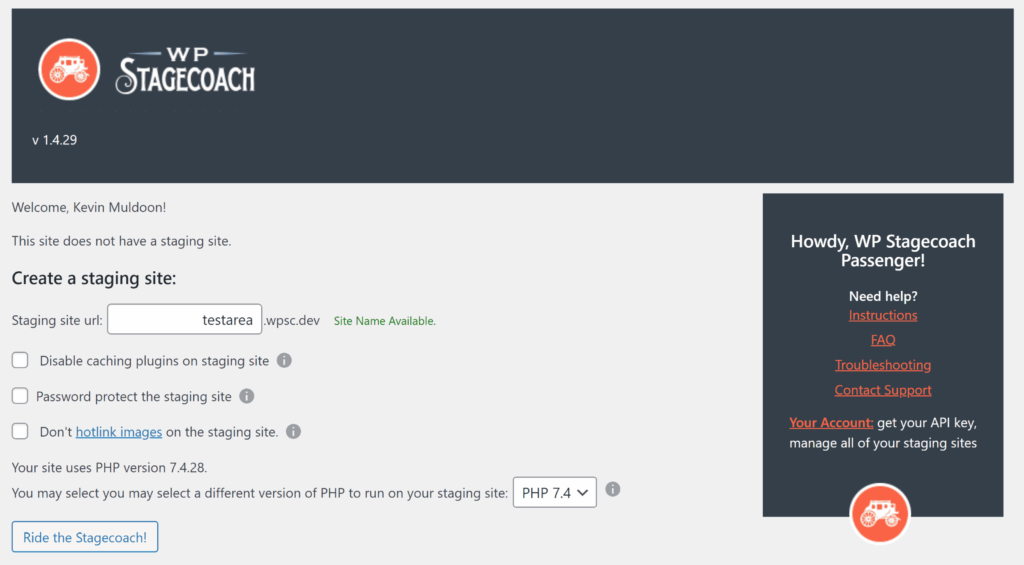
Advanced settings will also unlock two additional options on the create staging page for preventing image hotlinking and changing the version of PHP that is used.
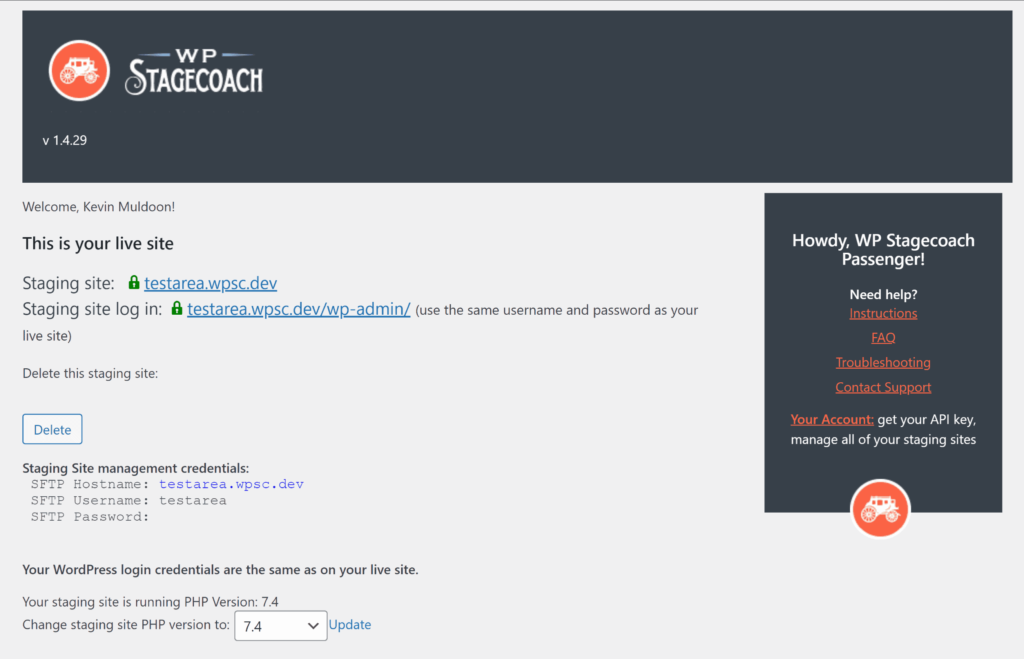
Step 3: Access Your Staging Area
Your staging area will be created once you select “Ride the Stagecoach”. You will then be redirected to an information page that has FTP connection information and links to your staging site and the WordPress login page for your staging site.
All in all, I found the process of creating a new WordPress development site in WP Stagecoach straightforward and the advanced settings that are available can be incredibly useful.
Create WordPress Staging Environment Using WordPress Hosting Companies
WordPress staging environment has become an important feature of managed WordPress hosting services such as WP Engine and Kinsta. If you host your WordPress sites with a company that offers WordPress staging, I encourage you to take advantage of it.
1. WP Engine
WP Engine remains one of the most popular managed WordPress hosting services online.
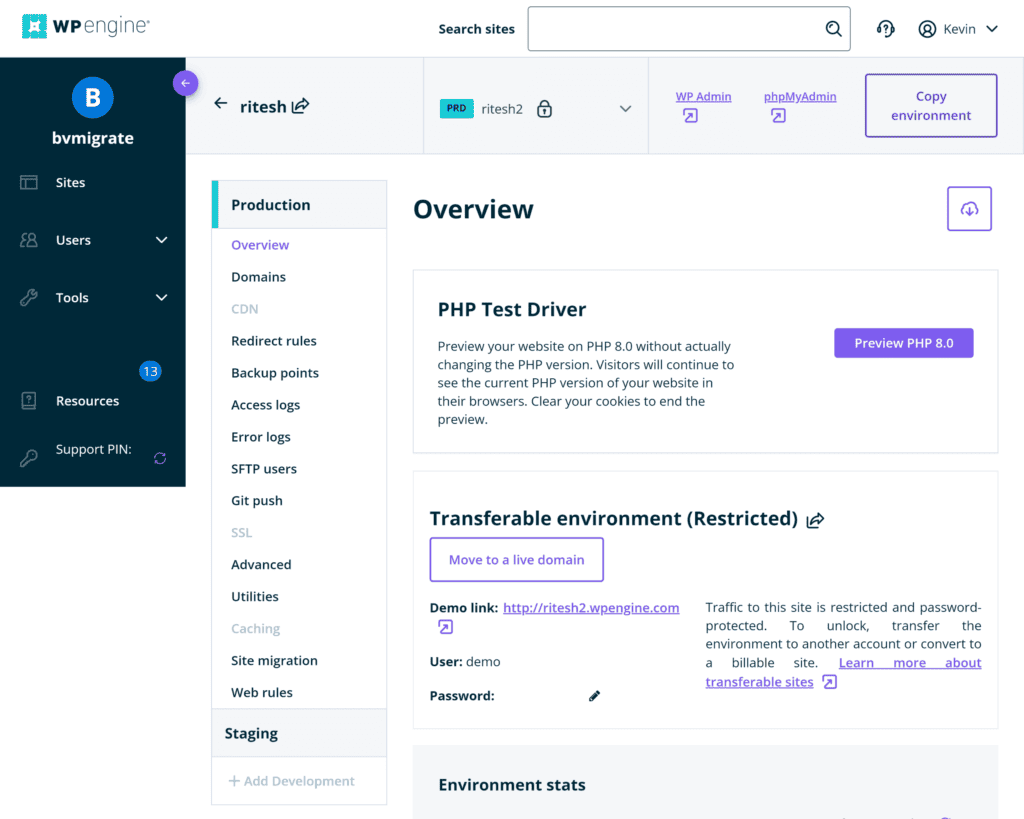
Step 1: Access Your Website Backups
A staging environment can be created from any website backup you have created in WP Engine. To view your website backups, simply select your production website and then select “Backup points”.
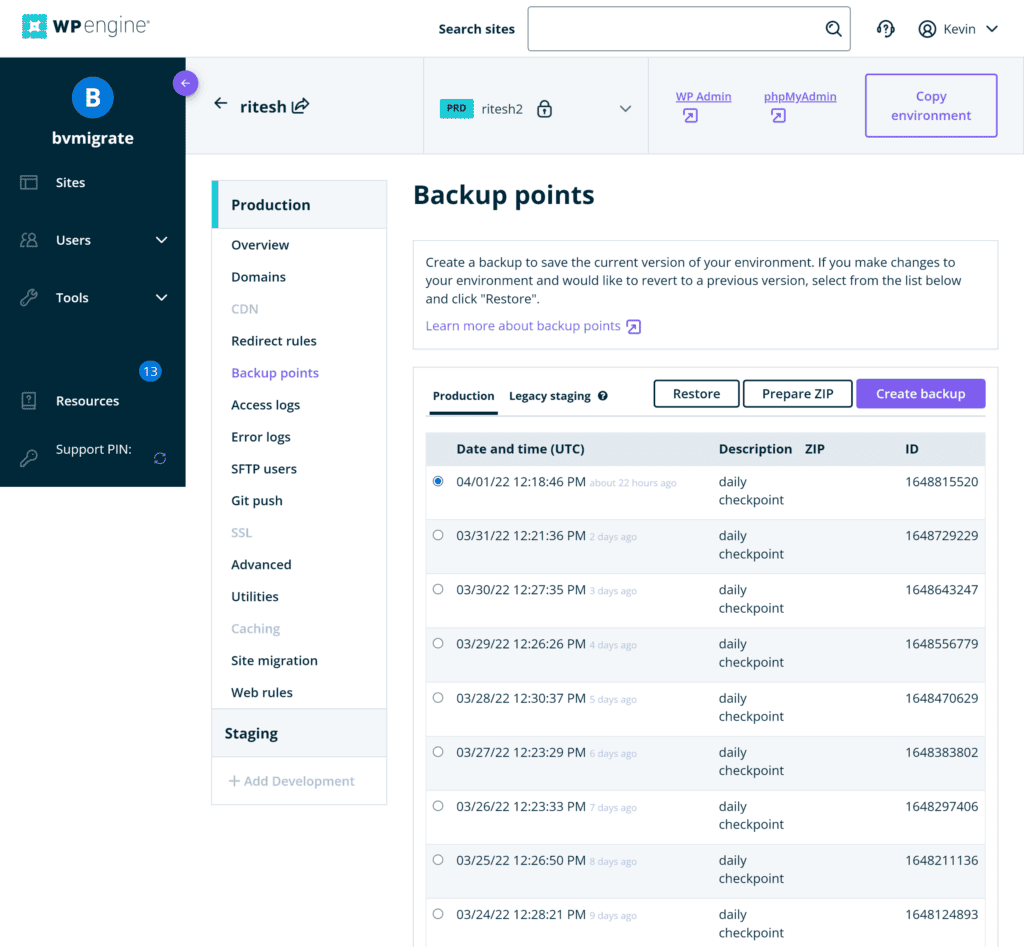
Step 2: Select the Backup You Want to Use For Your Staging Area
WP Engine performs website backups once a day, though you can create a new backup from the backup points page at any time.
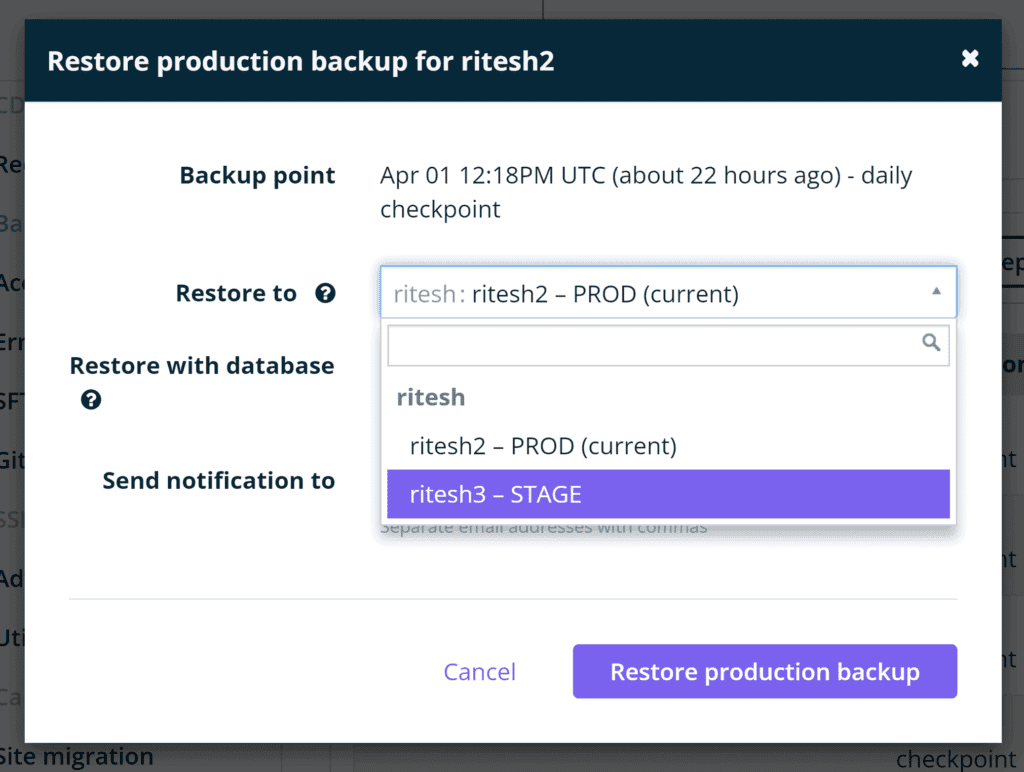
Step 3: Restore Your Website Backup to a Staging Environment
To create a staging environment, all you have to do is select the backup you want to use as the starting point and then click “Restore”.
The key thing to remember here is to ensure you restore the backup to your staging environment, not your production website (i.e. your live website).
Once your staging area has been created, WP Engine will send you an email advising you that it is ready.
The vast majority of configuration settings that are available for your production website are available for your staging environment too. This gives you complete control over how it is set up.
2. FLYWheel
FlyWheel is a popular managed WordPress hosting service that offers customers website staging.
Step 1: Activate Staging From Your Account Dashboard
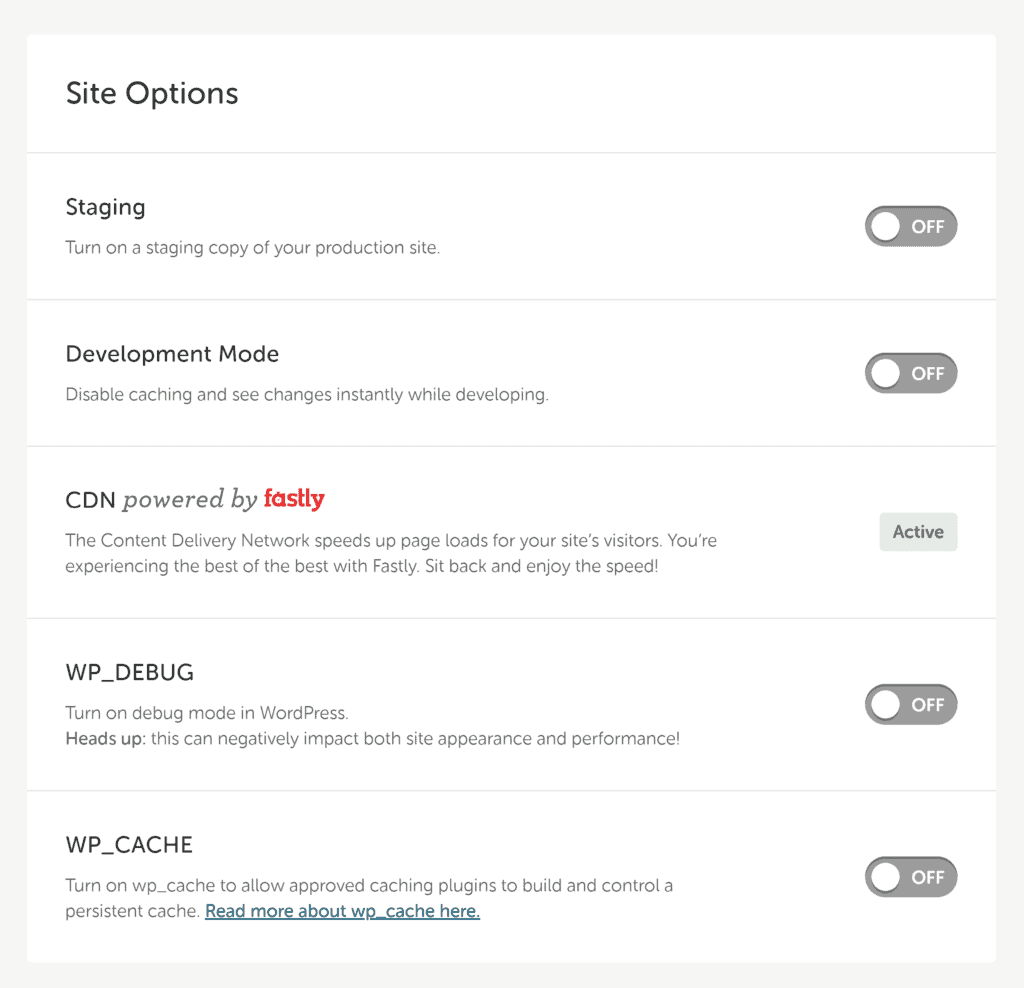
In order to set up a staging area, you need to first activate it from the advanced tab of your main Flywheel dashboard.
Website staging can be enabled from the site options area of the advanced settings page.
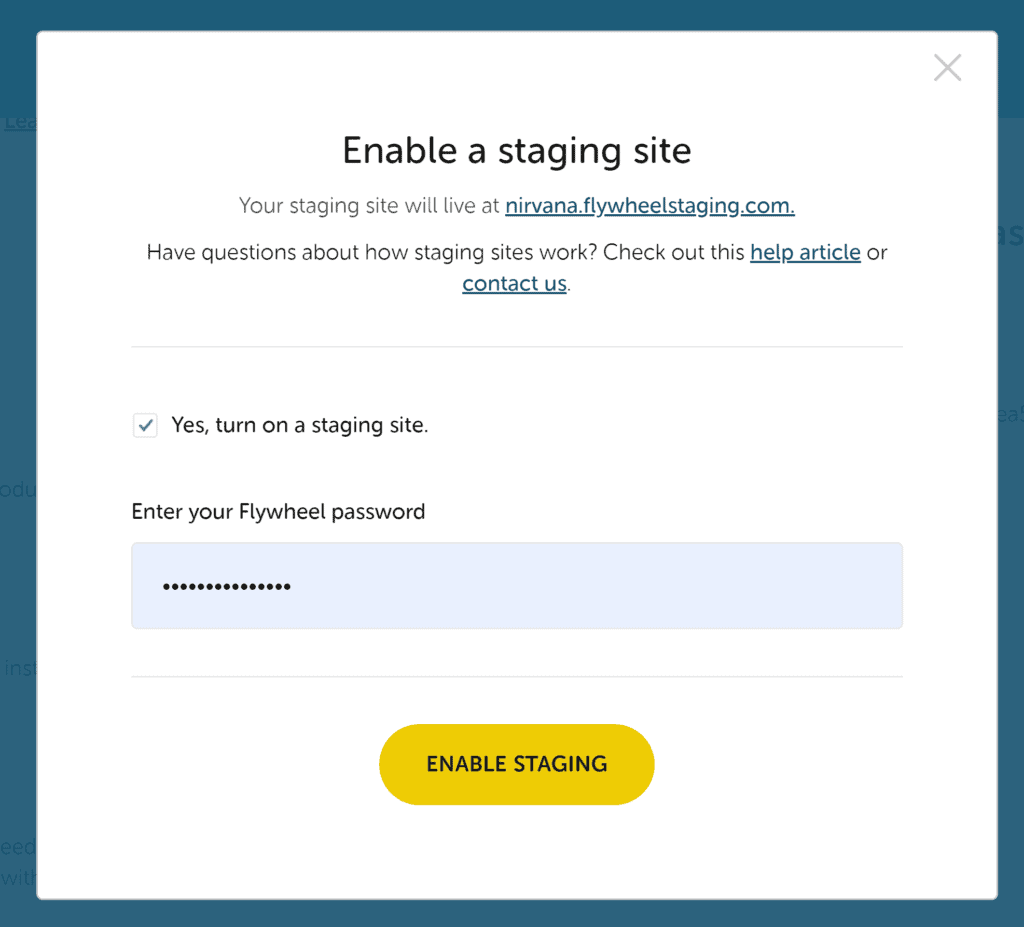
Step 2: Confirm You Want to Create a Staging Area
Once you have clicked on “Staging”, a pop-up box will appear asking you to confirm that you want to enable a staging site.
Flywheel will create a staging area from your live website once you confirm this step.
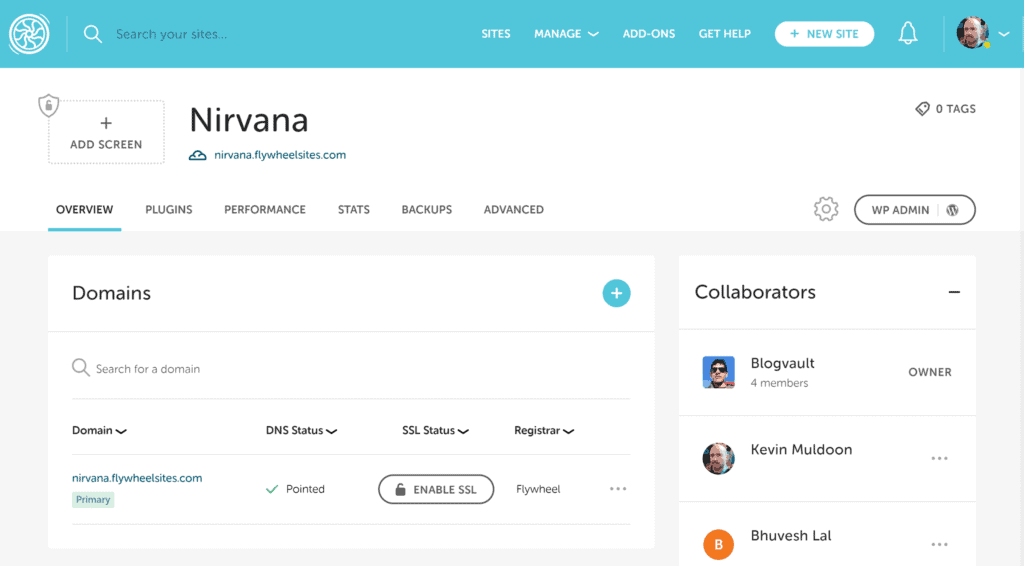
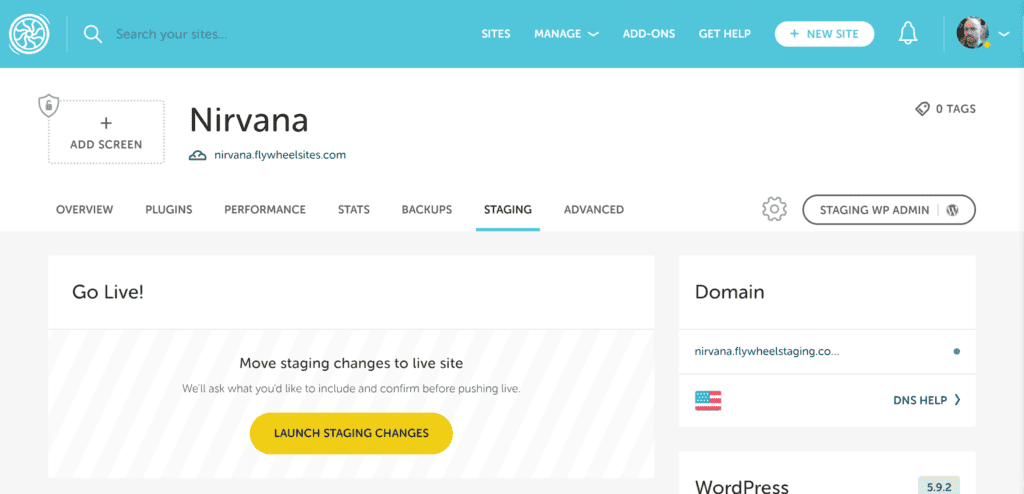
Step 3: Access Your Staging Area
You can access your new staged WordPress website from the staging tab that is added to your main navigation menu.
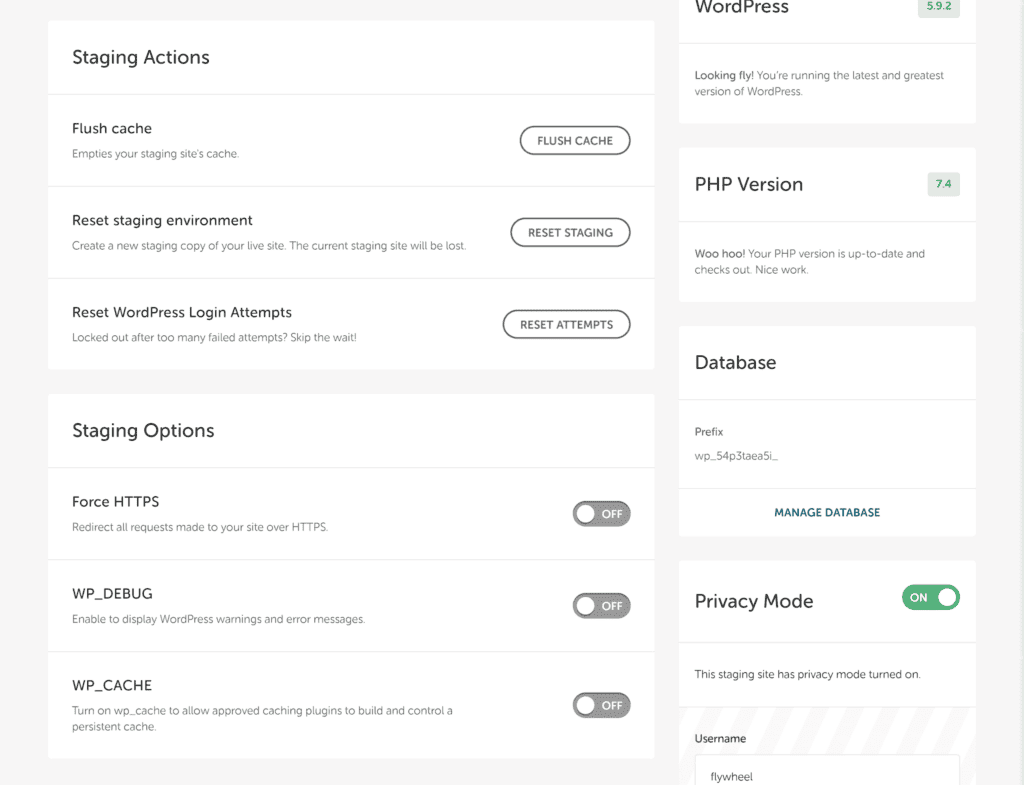
Step 4: Configure Your Staging Area
The staging page also gives you several additional administration options such as resetting your staging environment and allowing caching plugins.
I believe that Flywheel has done a good job of integrating staging into its hosting control panel.
3. Kinsta
Kinsta is an established managed WordPress hosting service that utilises Google’s cloud platform.
Step 1: Switch to Your Staging Environment
At the top of all pages in Kinsta, you will see a dropdown menu that lets you switch from a live environment to a staging environment.
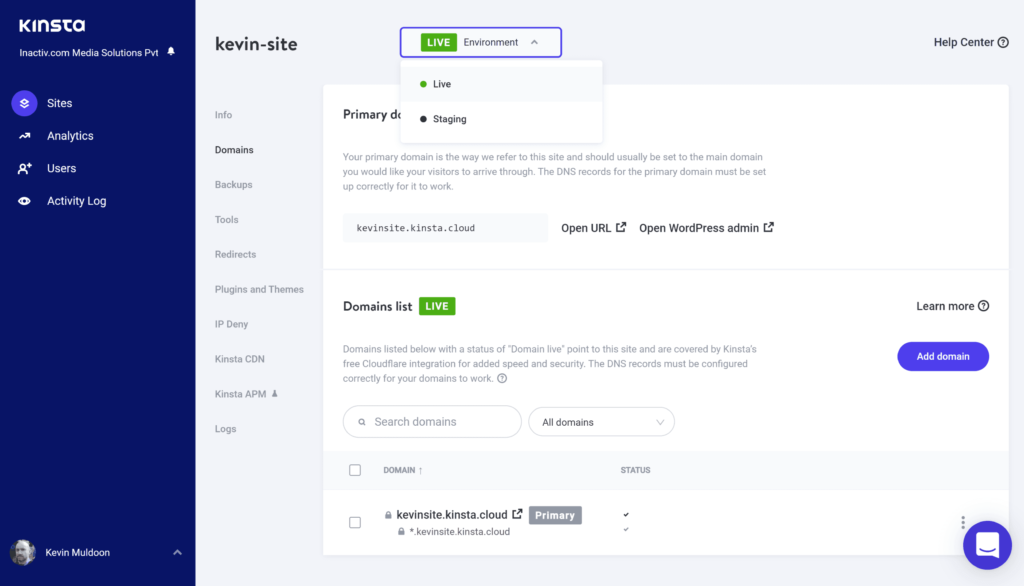
Step 2: Create a New Staging Website
To create a new staging website, all you have to do is switch to staging at the top of the page and select the option to create a new staging environment.

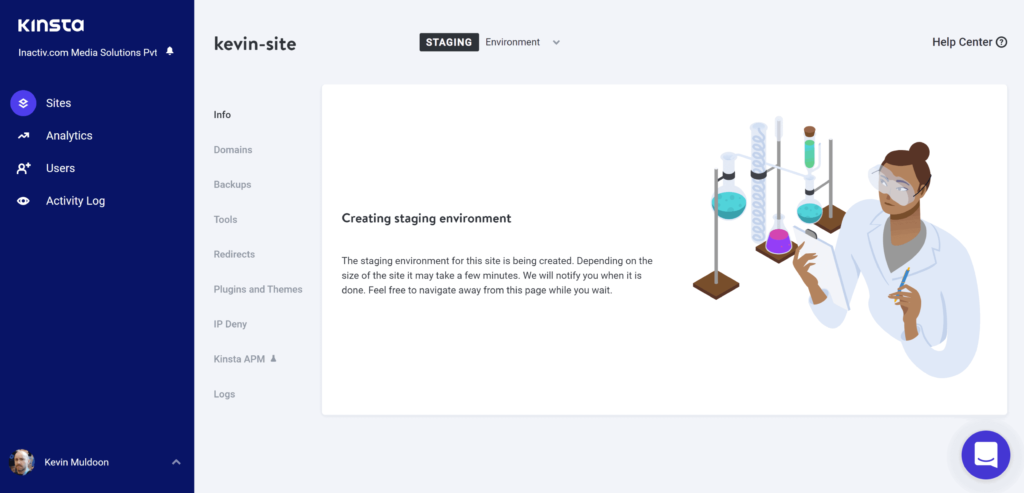
Step 3: Configure Your Staging Website
Kinsta has done a fantastic job of integrating website staging into their hosting service, allowing you to switch between your live environment and staging environment at any time using the dropdown menu at the top of each page.
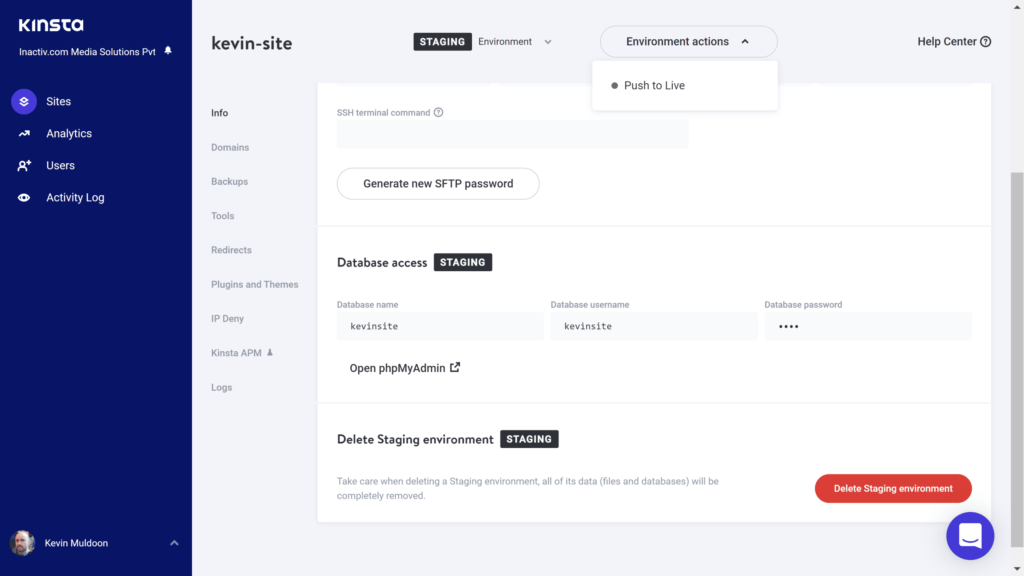
The same hosting and website administration tools that are available for live websites are available for your staging website too. To ensure you don’t make a mistake, tags are prominently displayed throughout the admin area to remind you of whether you are managing your live website or your WordPress development site.
4. Bluehost
Bluehost is a hosting company that is popular with WordPress users due to its low pricing. The Bluehost WordPress plugin gives you quick access to your website hosting panel, billing and features such as automatic updates and caching. Unfortunately, their staging feature is not currently working, therefore I am unable to show how it works.
How to create a staging site for WordPress manually
Before website staging solutions were available to WordPress users, we had to clone our live website to a development area. This was unfortunately a time-consuming process due to the steps involved.
Step1: Clone Your WordPress Website to a Development Area
A development area is a place where you can store a copy of your live website. It can be stored locally, on a subdomain of your live website or on a completely different domain altogether.
In the early years of WordPress, we had to manually back up the WordPress database and all WordPress files and then upload them to our development area. Solutions such as BlogVault and Duplicator have simplified this step, but it can still take time to migrate everything to your development area and configure everything correctly.
Step 2: Make the Changes You Need to Make
The WordPress website you copied to your development area should now look identical to your live website. This allows you to make changes to your website without worrying about your live website going down.
Step 3: Migrate Everything Back to Your Live Website
Once you have tested all of your changes and have confirmed there are no errors or issues, you need to migrate the WordPress database and WordPress files back to your live website. It is prudent to place your website in maintenance mode during this step so that visitors do not see errors during the migration process.
Why I Do Not Recommend Manually Creating a WordPress Staging Site
I used a WordPress development area for years to safely test changes to my websites, but I frequently spent hours transferring files and making sure there were no configuration issues.
Once I used an automated website staging solution, I never looked back. Staging solutions such as BlogVault will save you time, reduce downtime and help you avoid configuration issues that frequently occur when migrating WordPress manually.
That is why I recommend using a staging solution that does all the hard work for you.
Best Practices for WordPress Staging
One-click website staging solutions have simplified the process of creating and managing staging environments. There are, however, a number of things to keep in mind when using WordPress staging.
- No Task is Too Small – Do not make the assumption that staging environments are only useful for making major changes to your website. Even small updates and changes can crash a WordPress website, so take advantage of WordPress staging whenever you can.
- Use the Correct Backup – Be sure to create your staging environment using the correct website backup. In most situations, you will want to use the latest backup you have, so it is worthwhile performing a new website backup if your website is updated daily.
- Make Sure Your Sites Are Not Out of Sync – A staging area is an identical copy of your live website, but it can quickly become out of date if your live website is continually updated. Be conscious of this when you are ready to make move your staging site to a production site as there is a risk of overwriting new content.
- Test Everything Before it Goes Live – Be sure to test your website is functioning correctly before you make your changes go live.
Be sure to keep these best practices in mind when using WordPress staging 🙂
How to Push Staging Site Changes to Live
When you are happy with all of the changes you made in your WordPress staging environment, it’s time to apply those changes to your live website.
For a complete guide on moving WordPress staging to a live site, refer to this guide.
Step 1: Confirm You Want to Make the Changes in Your Staging Area “Go Live”
In many WordPress staging solutions, you will see an option to “Launch” or “Push” your changes. In BlogVault, it’s called merging and you will see an option to merge your website on your main site dashboard.
You will also see an option to “Merge to Source” on the staging overview page.
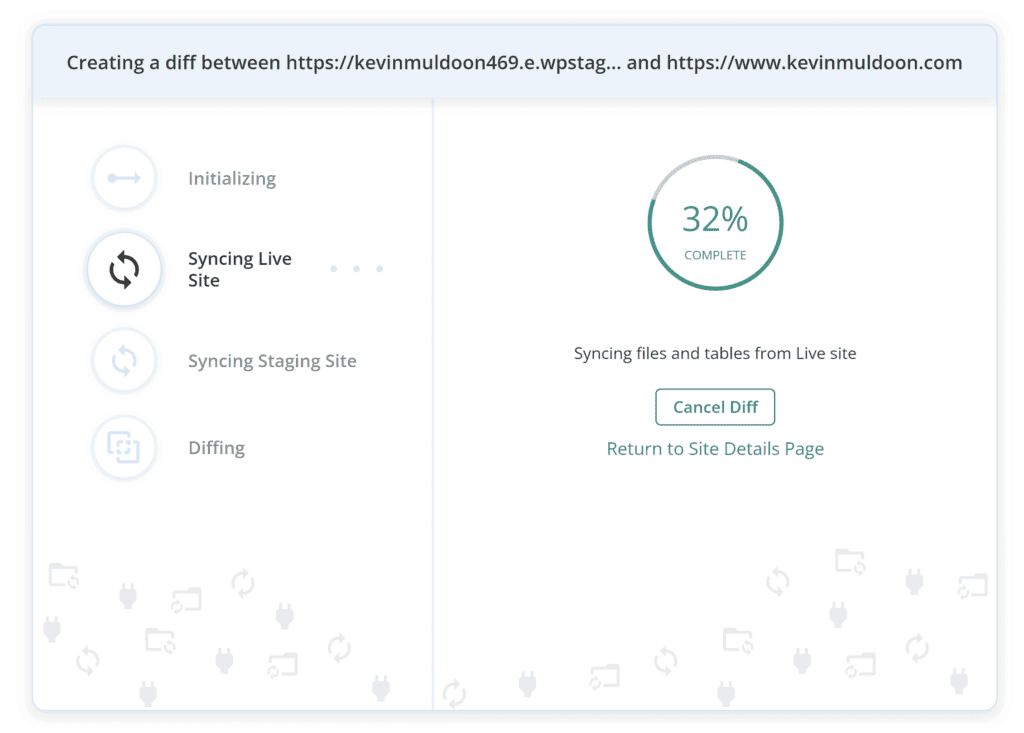
Once you have clicked to merge from the site overview page or staging overview page, BlogVault will start syncing your files and database tables.
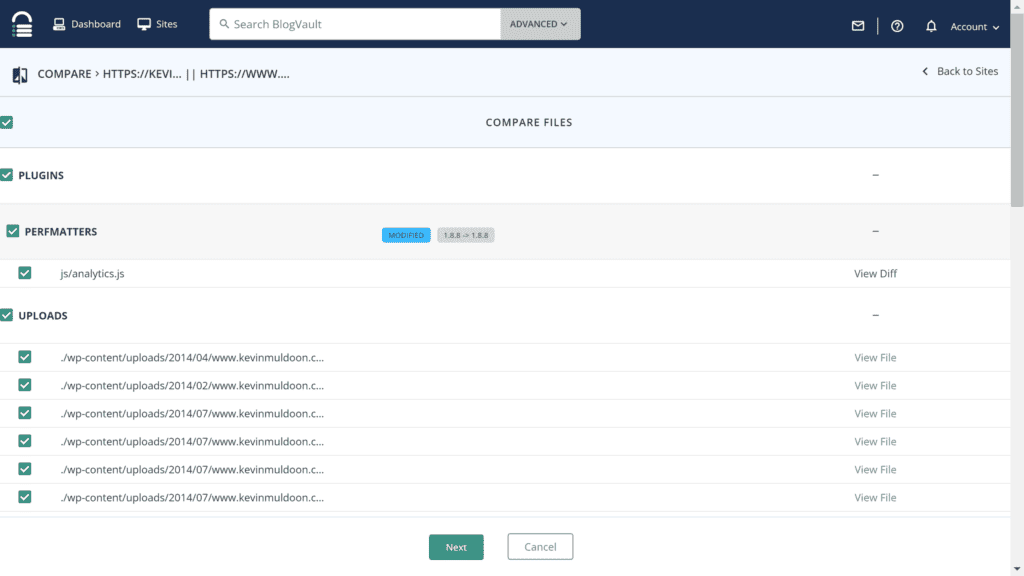
Step 2: Review the Changes You Made
Once the files have been synced, BlogVault gives you an opportunity to compare files and tables. This is an additional step that allows you to see the exact differences between your staging site and your live site.
Be sure to review everything at this step so that important updates on your live website are not unknowingly overwritten.
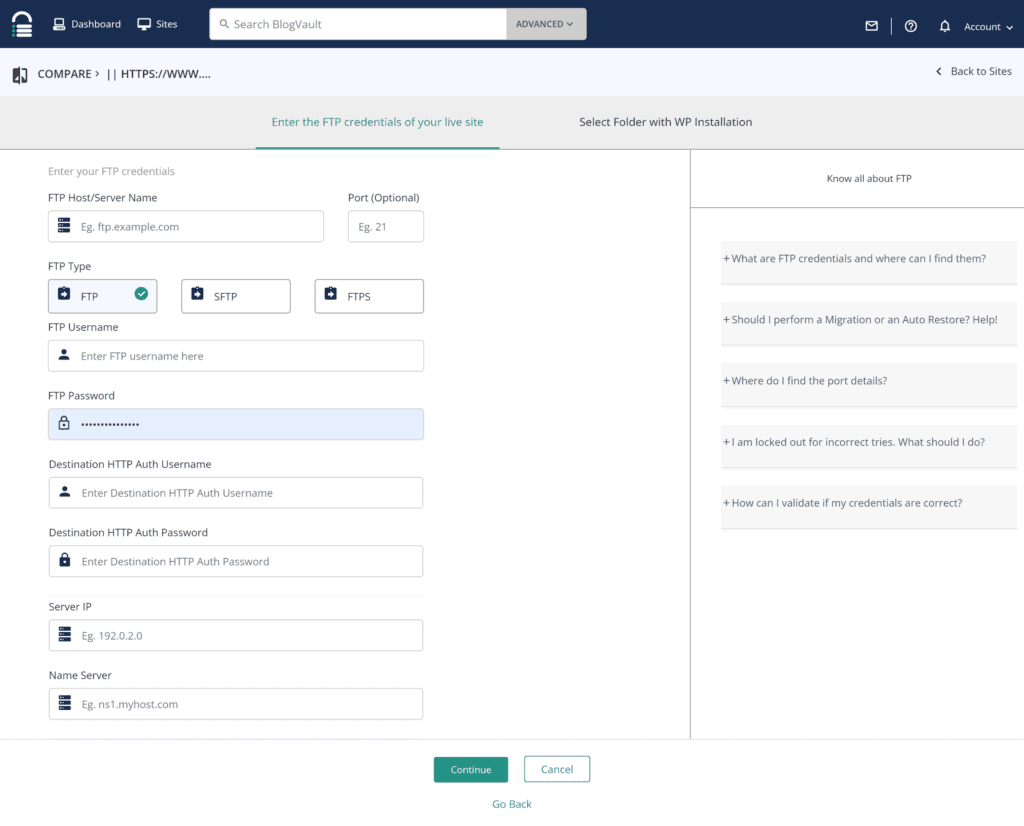
Step 3: Choose Where You Push Your Staging Site
BlogVault is set up so that staging sites can be pushed to any website or server. In most situations, you will want to enter the website FTP connection information for your live website, but this additional step gives you the flexibility of migrating or duplicating your WordPress website to a new location.
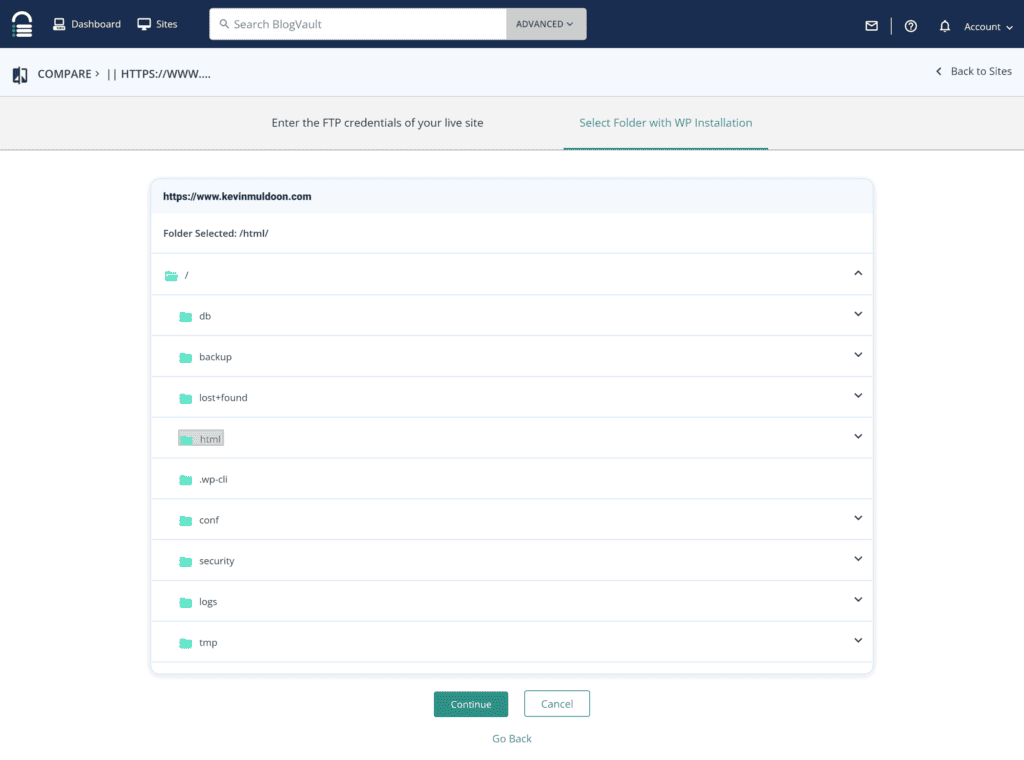
Step 4: Confirm the Directory WordPress is Installed
In the next step, you need to select the folder where WordPress is installed. My personal blog is stored in a folder called html, but hosting companies frequently install WordPress in a folder called public_html.
Be sure to speak to BlogVault if you are not 100% sure which folder WordPress is installed.
BlogVault will then start merging the changes from the staging site to your live site.
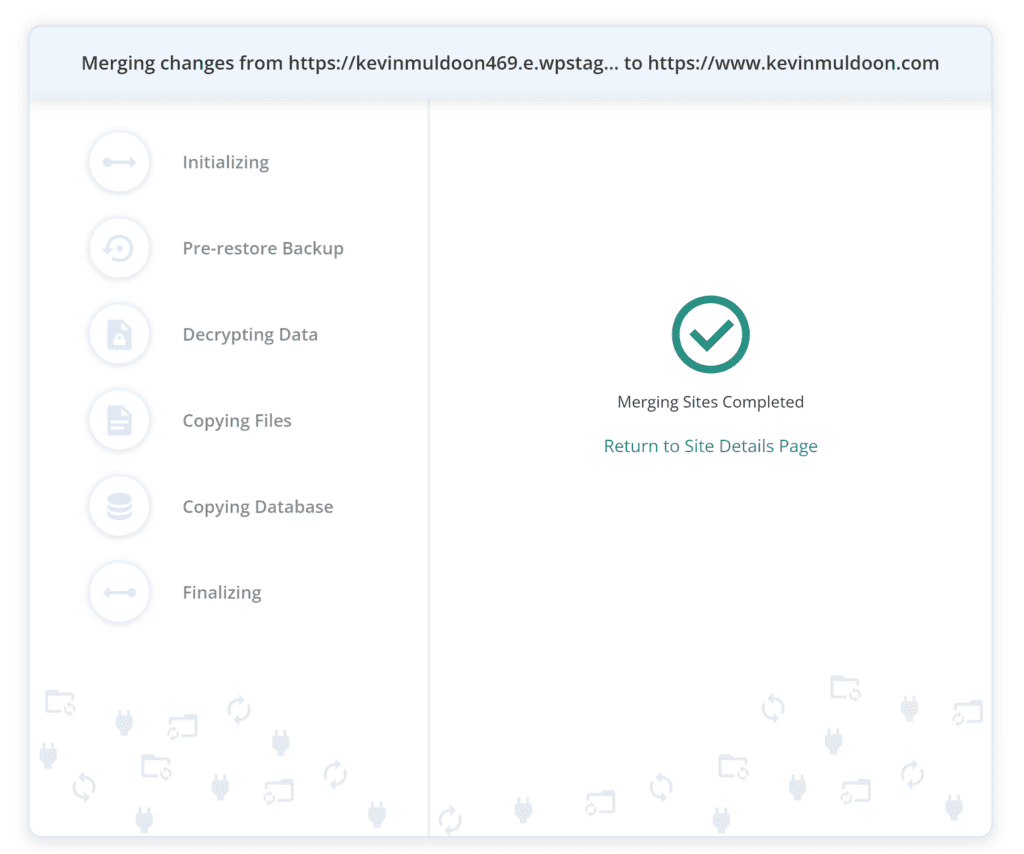
I have always found the process of deploying changes to be straightforward with BlogVault. The additional steps during the process provide an extra layer of security, allowing you to review all differences and confirm the destination of your website.
Frequently Asked Questions
Why is a Staging Area Even Necessary?
Whenever you make a change to a WordPress website, there is a risk that something goes wrong. Your website can go offline for a number of reasons, such as plugin and theme conflicts or a WordPress update failing.
By using a WordPress staging environment to perform changes to your site, you can effectively eliminate the risk of your live website going offline because of these issues.
Surely it’s OK to Make Small Changes?
WordPress is set up so that changes can be made to your live website directly from the WordPress admin area. As long as you backup your website, it’s relatively safe to make styling changes to your website from the admin area.
Be aware, however, that relatively simple changes can still crash your website. For example, WordPress plugins that modify important database tables or the .htaccess file can also crash your website if the wrong configuration settings are entered.
Why Pay for WordPress Staging Site?
I’ve been impressed with the free staging plugins that are available on WordPress.org, but premium staging solutions tend to automate the process better and offer advanced security and backup features.
For important websites, WP staging is an affordable way to reduce downtime and make changes safely.
Should I Use the Staging Features My Website Host Offers?
If your hosting package already includes website staging, I recommend taking advantage of it as the functionality is already available to you.
As you saw earlier in the article, the hosting companies I checked out have integrated staging into their hosting dashboard very well. If you find their staging solution doesn’t work well with your setup, you can always explore other options.
What is the Best WordPress Staging Solution?
I have been impressed with all of the staging solutions I have tested for this article. Therefore, I believe the “Best Staging Solution” is the one that matches your budget and offers the functionality you need.
For my personal blog, I use BlogVault for website staging as it offers a few additional security steps during the staging process. BlogVault also compliments what I do online, automating my website backups, managing website updates and notifying me of security concerns. It just makes my life easier.
Final Thoughts
I hope you now have a better understanding of how to create a staging site for wordpress. Creating a new staging area is not difficult and by using staging regularly, you can greatly reduce website downtime and ensure that your WordPress website runs smoothly.
Thanks for reading.
Kevin
Tags:
Share it:
You may also like

How to Limit Form Submissions with Droip in WordPress
Forms are an indispensable part of any website because of their versatility, letting you collect information for various purposes! However, people with ill intentions often attempt to exploit these forms…

How To Manage Multiple WordPress sites
Management tools help agencies become well-oiled machines. Each task is completed with the least amount of effort and highest rate of accuracy. For people managing multiple WordPress sites, the daily…

PHP 8.3 Support Added to Staging Feature
We’ve introduced PHP version 8.3 to our staging sites. Test out new features, code changes, and updates on the latest PHP version without affecting your live website. Update PHP confidently…
How do you update and backup your website?
Creating Backup and Updating website can be time consuming and error-prone. BlogVault will save you hours everyday while providing you complete peace of mind.

Updating Everything Manually?
But it’s too time consuming, complicated and stops you from achieving your full potential. You don’t want to put your business at risk with inefficient management.

Backup Your WordPress Site
Install the plugin on your website, let it sync and you’re done. Get automated, scheduled backups for your critical site data, and make sure your website never experiences downtime again.


