How to Undo Changes in WordPress Websites?
Bulletproof Backups for Your WordPress Website
Fortify your business continuity with foolproof WordPress backups. No data loss, no downtime — just secure, seamless operation.
Accidentally deleted a whole section from your blog? Clicked Publish before finishing a post? Don’t panic. It’s fixable. WordPress’ revisions and autosaves feature is a great tool to have under your belt. It’s a great way to undo changes in WordPress, even after the change has gone live.
TL;DR: If changes were made to a post or a page and you’ve already clicked Publish or Update, the Revisions interface is an easy way to revert changes in WordPress. But, before you make any major changes to your site, we recommend you backup your site with BlogVault because even if the Revisions feature doesn’t work, you have a version of your site to restore.
If you’d like to make bigger changes to your site like going back to an older version of WordPress or a plugin, we have an article that can guide you through the process of a rollback. But, if the changes you’re looking to roll back are in a post or page, this is the article for you. Let’s start with understanding how to undo changes in WordPress using revisions and autosaves.
How to undo changes in WordPress using a revision or autosave
Every time you click Save Draft, Publish, or Update, WordPress saves the version as a revision. If you don’t select any of those options, it still saves a version as an autosave every minute. These versions can be restored using the Revisions interface. Here are the steps to undo in WordPress:
- Open post editor
On your WordPress dashboard, on the menu on the left, hover over Posts and click All Posts. Find the post you’d like to revise and click Edit. This should lead you to your editor. Depending on whether you’re using the Gutenberg Block Editor or the classic Editor, this will look different.
- Open Revisions interface
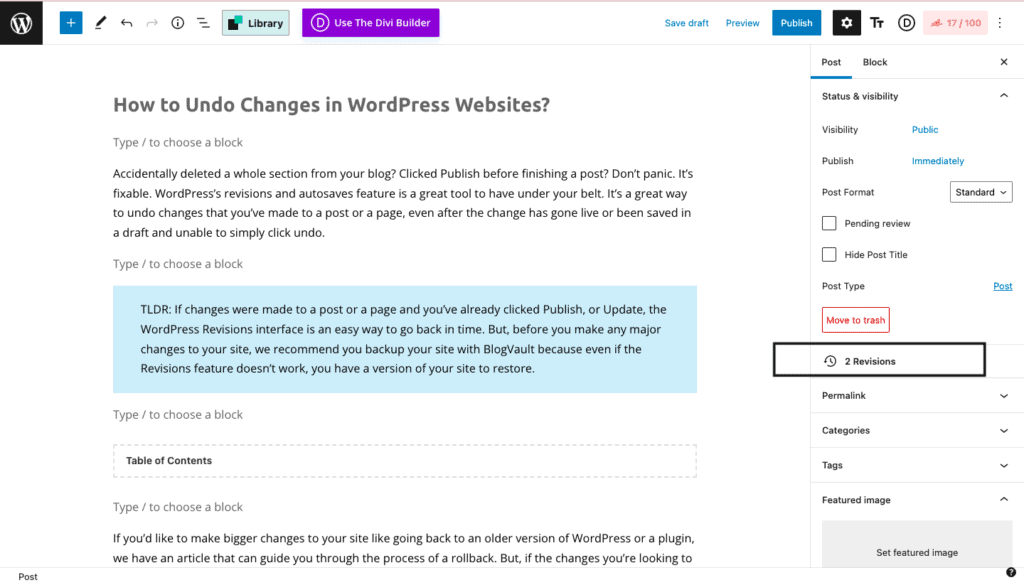
Click Revisions on the menu on the right. If you’re using the classic editor, you can find Revisions in the Publish section. If you’re using Gutenberg, you can find it in the post settings. Once you click Revisions, this will lead you to your Revisions interface.
- Select the version
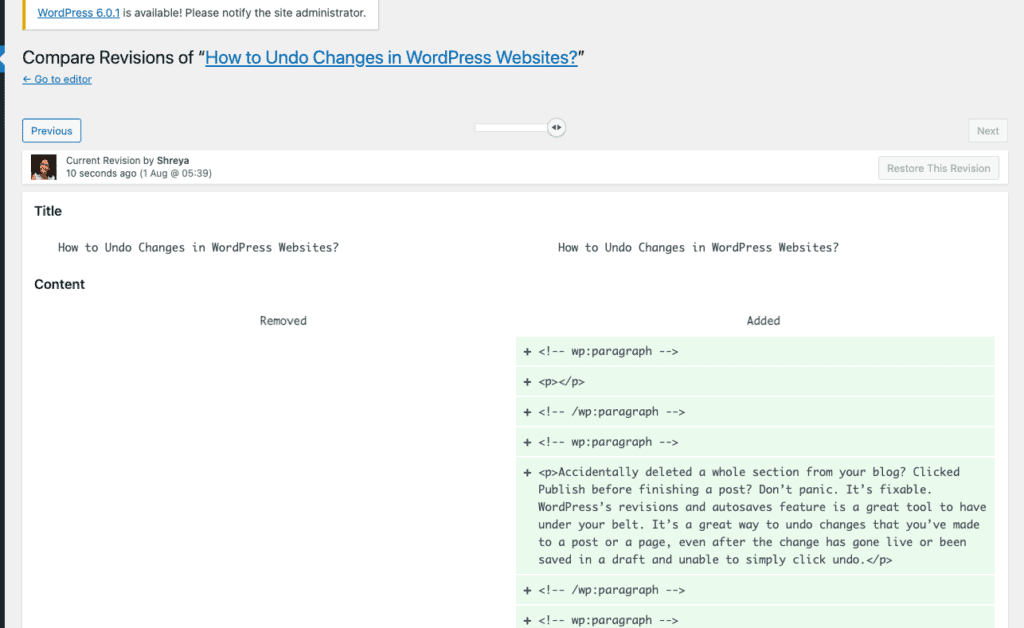
Here, WordPress automatically compares a version with the one that was created just before. There is a slider at the top that you can use to switch between versions and check which one you need. You can also tick the box near Compare any two versions and select two versions to compare using the same slider. - Restore the version
Once you’ve decided which version you’d like to restore, click Restore this revision (or Restore this AutoSave, depending on how the version was created) at the top right. This will restore the entire version and once it’s restored, you’ll be redirected to the editor. If you’d like to just restore a specific section, you can do so by copying that paragraph, for example, returning to the editor, and pasting it correctly.

If restoring a revision isn’t working, restoring a WordPress backup is your next best bet. With the BlogVault backup plugin, you can not only go back to a specific version of a site, but you can also roll back posts and pages.
WordPress restore revision not working? Here’s how to fix it
If you’re not even able to see the Revisions Interface or WordPress restore revision not working while you are trying to undo WordPress changes, there are a few possible problems that need to be resolved and we will talk about troubleshooting them in this section:
- Enable Revisions Feature: Some hosts automatically disable revisions so as not to take up too much space on the server. If revisions and autosaves aren’t enabled on your site, you can edit the wp-config file to do so. We’re using an FTP client to make that change but you can also edit the file using File Manager on cPanel. The steps to enable WordPress revisions with an FTP client are as follows:
- Access your files using an FTP client or cPanel: We used the FTP client Cyberduck. Once you’ve installed the FTP client, click Open Connection. Fill in your details — public IP, username, and password— and click Connect.
- Download the wp-config.php file: Once you’re connected to the server, double click on the wp-config.php file. You can usually find it in the public_html folder.
- Add the code: Open the file in a text editor. First check if the following code exists:
define(‘WP_POST_REVISIONS’, false );
If it is, replace FALSE with TRUE. If not, add the following code just before the line of code – /* That’s all, stop editing! Happy blogging. */ – and once you’re done, save it.
define(‘WP_POST_REVISIONS’, true );
- Upload the file: Go back to the FTP client and click File at the menu on the top. Click Upload and select the edited wp-config.php file from your device. Overwrite the existing file and you’ve now enabled WordPress revisions.
- Fix an incompatible theme: Unfortunately, if your theme is not compatible, you’ll have to change the theme and disable the current one.
- Revision wasn’t created in the first place: If you’ve lost a revision because it was never created in the first place, unfortunately, there’s nothing that can be done about it. Although WordPress does autosave every minute, so you couldn’t have lost a lot of data.
- Restoring a backup: If revisions don’t work, restoring a backup is always an option. Regardless of whether revisions are working or not, we recommend that you store a backup before making changes to any site. Backups with BlogVault are easy, regular, automatic, and without downtime. Backups are taken once a day and on demand. Restoring is also incredibly painless and faster than a manual restore.
What are Post Revisions and Autosaves?
Now that you’ve learned how to use the feature, let’s understand it better. This section will explore revisions and autosave and why it helps.
Revisions:
Revisions are a copy of a page or post that is created when you click SaveDraft, Publish or Update. It then lets you see those changes and restore them if needed. For sites with multiple authors, authors can see what changes other authors have made and manage them all.
There are no limits to the number of revisions that are saved and will take up storage till you delete the unwanted ones, so we recommend you cap the number or delete old ones, especially on large sites.
While WordPress hasn’t provided a way to manage these settings automatically, you can delete, limit or disable revisions either manually or with plugins. Later in this article, we’ll talk about how to manage your revisions
If you look at the Revisions interface, you’ll notice a few things. You’ll notice that some of the text in every version is in red or green. Red refers to text that was deleted and green refers to text that was added. You’ll also see a slider at the top. The more versions you have, the longer the slider. You can move the slider to go between versions.
Autosaves:
Every 60 seconds, WordPress automatically saves a version of your post or page and this feature is called an autosave. Every new autosave also replaces the older one, saving only one at a time. Besides that, it works exactly like the autosave in every other application. On the Revisions interface, you’ll see an alert on the top if you’re looking at an autosave, as opposed to a revision.
How to manage WordPress revisions?
There is no cap on how many revisions WordPress can store, but the more revisions you make, the more unnecessary storage you’re taking up. For this reason, we recommend putting a cap on the number of revisions being stored and deleting the older versions.
You can also disable Revisions altogether, though we don’t recommend it. Additionally, we recommend backing up your site before optimizing your database, thus keeping a copy of your revisions for future use. Now, let’s talk about these solutions:
A. Setting a limit on the number of versions
There are two ways to cap the number of revisions – with a plugin or manually. For the method, you’ll have to access and edit your wp-config.php file. So, we recommend that before you make any changes, we recommend backing up your site. We are using an FTP client, but you can also use your site’s cPanel. Here are the steps to do so:
- Using a plugin: The easiest way to manage your revisions is using a plugin and here are the steps to do so:
- Install and activate a plugin: We recommend using the WP Revisions Control plugin. Click install and activate once you’ve found the plugin in your directory.
- Set a cap for specific post types: After activating the plugin, hover over Settings on the left menu and click Writing. Scroll down to the plugin’s settings and add the number of revisions you’d prefer and click Save Changes.
- Set a cap for individual posts: Once it’s activated, you can set the cap on any of your posts. Hover over a post in the Posts page and click Edit. You’ll see a WP Revisions Control section in your post settings. You can add the number of versions to save. Once you’ve the number of versions to keep, you can click Purge Excess Revisions. This will purge all the rest and clear up your storage space.
- Manually:
- Access your site files using an FTP client or cPanel: We used Cyberduck. Once you’ve installed the FTP client, click Open Connection. Fill in your details and click Connect.
- Download the wp-config file: Once you’re connected to the server, find the wp-config file. It is generally in the root directory, although it can be elsewhere. Download the file to your system.
- Add the code: Open the file using a text editor and look for the following line of code: /* That’s all, stop editing! Happy blogging. */
Just before that line, add the code as seen below:
define('WP_POST_REVISIONS', 2);
Replace the number 2 with whatever number of revisions you’d like.
- Upload the file: Save the file and go back to the FTP client and click File at the menu on the top. Click Upload and select the edited wp-config file from your device. Overwrite the existing file and you’ve now limited the number of revisions that your server will store.
B. Deleting older Revisions
If you’d like to delete old revisions, the best way to go is to use a plugin. It’s easier than manually deleting because the manual process requires accessing your database. In this section, we’ve talked about both processes.
- With a plugin:
- Install and Activate the plugin: We used WP Optimize. You can find the plugin in the plugin directory. Click Install and Activate.
- Select the option to clear revisions: Once it’s activated, go to the plugins page, scroll till you find the WP Optimize plugin and click Optimize. This will lead you to a page with all the steps to optimise your database, Select Clean all Post Revisions and Run Selected Optimizations. This will delete all old ones.

2. Manually delete revisions:
- Login to your database: On your cPanel, select phpMyAdmin in the Database section. Next, click SQL and add the following piece of code:
DELETE FROM wp_posts WHERE post_type = "revision";
Replace wp_ with your database prefix.
Next, click Go.
C. Disable revisions
Revisions can be really helpful and act as insurance and we don’t recommend it. But revisions take up space on your database and like we’ve mentioned before that can affect the efficiency and speed of your server. So, if you’d still like to do it, there are two ways to go about it – with and without a plugin.
- Using a plugin:
- Install and activate a plugin: We recommend using the Disable Post Revisions plugin. You can find it in your plugin directory. Click Install and Activate.
- Select the type of Revisions to disable: On the left, hover over Settings and click Writing. In the Disable Post Revisions field, select the type of revisions you’d like to disable; posts, pages, media etc. Then scroll down and click Save Changes.
- Manually:
- Connect to your server using an FTP client: We used Cyberduck. Once you’ve installed the FTP client, click Open Connection. Fill in your details and click Connect.
- Download the wp-config.php file: Once you’re connected to the server, find the wp-config file. Download the file to your system.
- Add the code: Open the file using a text editor and look for the following line of code: /* That’s all, stop editing! Happy blogging. */
In a line just above, add the following line of code and save the file:
define('WP_POST_REVISIONS', false);
To re-enable revisions, replace the word false with true.
- Upload the file: Go back to the FTP client and click File at the menu on the top. Click Upload and select the edited wp-config file from your device. Overwrite the existing file and you’re now good to go.
Final Thoughts
Making a mistake that needs to be reversed is such a common problem, that it may as well be a right of passage. Thankfully, the WordPress revisions and autosaves feature make it incredibly easy to revert changes in WordPress.
Despite that, we recommend backing up your site with BlogVault before you undo changes in WordPress because it’s the insurance every site needs against mistakes or hacks.
FAQ
Why should you delete revisions?
Revisions take up space on your database and a large number of them can impact the speed and quality of your website. This holds especially true for large sites with hundreds of revisions. We recommend using a plugin like WP Revisions Control, keeping only the last few revisions and purging the rest.
What to do if Revisions aren’t showing up?
Some web hosts disable revisions to save space on the server. In that case, you’ll have to enable it by editing the wp-config.php file and adding a line of code. Here are the instructions to do so.
Tags:
Share it:
You may also like

How to Limit Form Submissions with Droip in WordPress
Forms are an indispensable part of any website because of their versatility, letting you collect information for various purposes! However, people with ill intentions often attempt to exploit these forms…

How To Manage Multiple WordPress sites
Management tools help agencies become well-oiled machines. Each task is completed with the least amount of effort and highest rate of accuracy. For people managing multiple WordPress sites, the daily…

PHP 8.3 Support Added to Staging Feature
We’ve introduced PHP version 8.3 to our staging sites. Test out new features, code changes, and updates on the latest PHP version without affecting your live website. Update PHP confidently…
How do you update and backup your website?
Creating Backup and Updating website can be time consuming and error-prone. BlogVault will save you hours everyday while providing you complete peace of mind.

Updating Everything Manually?
But it’s too time consuming, complicated and stops you from achieving your full potential. You don’t want to put your business at risk with inefficient management.

Backup Your WordPress Site
Install the plugin on your website, let it sync and you’re done. Get automated, scheduled backups for your critical site data, and make sure your website never experiences downtime again.


