Those helpful WordPress revisions have a quiet downside that can sneak up on you.
With every saved draft, your database gets a little heavier, and your site gets a little slower. Before you know it, you’re left wondering why everything feels so clunky.
But that sluggishness isn’t something you have to live with; a simple WordPress limit revisions setting is the key to keeping your site light and fast.
Use a plugin like Companion Revision Manager to limit your WordPress revisions. If you prefer not to install an extra plugin, you can edit the wp-config.php file instead. Both options offer effective ways to manage revisions based on your preferences.
You might be wondering why WordPress doesn’t just combine small edits automatically. It’s a great question, and if it worked that way, we wouldn’t need this guide.
As it stands, it saves a new copy with every click, which means we have two straightforward methods to manage it: tweaking your wp-config.php file or using a plugin. We’ll walk you through both right now.
A) Use a plugin
Let’s start with the simplest and safest route. If you’d rather not touch any code, using a plugin is the best way to manage post revisions. Before you begin, it’s always a good idea to have a recent backup of your site, just in case.
A great, no-fuss plugin for this is Companion Revision Manager.

First, install and activate the plugin. You’ll need to install and activate the Companion Revision Manager plugin from your WordPress dashboard to get started.
Next, locate the plugin’s settings. Once the plugin is active, find its settings page. You can usually find this in the menu on the left side of your dashboard. This is the control panel for all your revision settings.

Finally, set your limit and save your changes On the settings page, enter the number of revisions you want to keep for each post in the limit box. A number between 3 and 5 is a great starting point.
B) Edit your wp-config.php file
If you’re comfortable editing your site’s files, you can set a revision limit directly in your wp-config.php file. This is a powerful method that doesn’t require a plugin.

First, you’ll need to connect to your server via FTP. Use an FTP client like Cyberduck or FileZilla to connect to your site. You can get your FTP login credentials from your hosting provider. Once connected, navigate to your site’s root directory, which is usually named public_html or www.
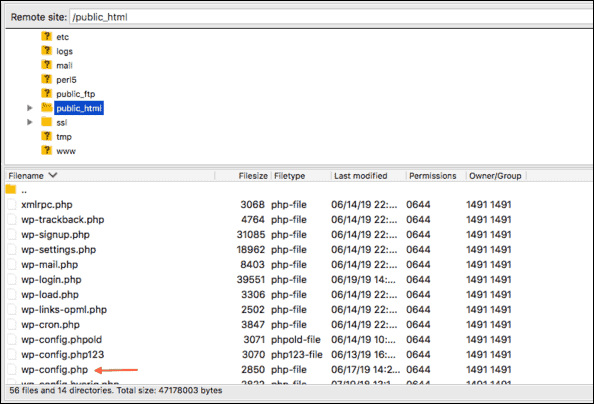
Next, locate and open the wp-config.php file. Inside the root directory, you will find the wp-config.php file. Download a copy to your computer as an extra precaution, then open the file on the server using a text editor like Visual Studio Code or Notepad++.

If WordPress revisions are disabled, you can easily enable WordPress revisions by adding the following line of code to your wp-config.php file: define('WP_POST_REVISIONS', true);
Now, add the revision limit code snippet. Scroll down to the bottom of the file until you find the line that says, “That’s all, stop editing! Happy publishing. Just above this line, add the following code: define('WP_POST_REVISIONS', 5);
This simple line tells WordPress to save only the last 5 revisions for any post or page. You can change the number 5 to whatever works best for you. If you find that revisions are disabled entirely, you can turn them back on by using this code instead: define('WP_POST_REVISIONS', true);
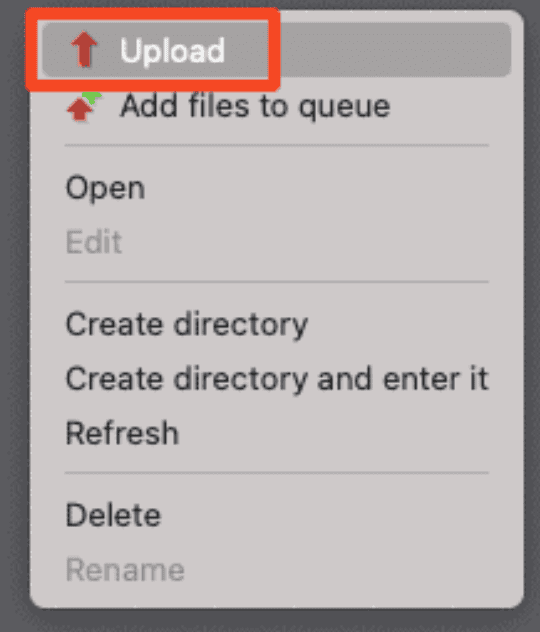
Then, save the file and upload it back to the server. Save your changes in the text editor. Your FTP client will then ask if you want to upload the modified file back to the server. Click yes to overwrite the original file with your updated version.
Finally, verify that the changes are working To confirm everything is working correctly, go to an existing post and edit it a few more times than the limit you set. You should see that WordPress now only stores your specified number of revisions.

Keep in mind this method only limits revisions going forward; it does not delete the revisions already stored in your WordPress database. To clean up old revisions, you can use a database cleanup plugin like Advanced Database Cleaner. Just remember to take another full site backup before running any cleanup tools.
You can nip this problem in the bud by tweaking your wp-config.php file.
Note that this method only limits future revisions. This change will not delete existing revisions.
The case for WordPress revisions
WordPress’s revision or version history lets you revert to earlier edits. Think of it like an activity log for your posts. Every time you make a change to a post or page, WordPress saves a complete copy of the content as a revision. Therefore WordPress revisions enable you to revert to previous versions of a post when needed.
WordPress limit revisions. Why do it?

WordPress revisions are helpful for restoring older content, but the system has a significant downside. It saves a full copy of your post with every minor change, from fixing a typo to adding a sentence. Over time, these copies pile up, creating a bloated database that slows your entire site down.
- A bloated database hurts site performance When your site’s database is stuffed with thousands of old revisions, every action takes longer. Loading a page or searching your site forces WordPress to sift through unnecessary data. This increases the time it takes for your server to respond, leading directly to a slower experience for your visitors.
- It makes backups and restores take longer An overloaded database doesn’t just affect your site’s speed; it makes essential maintenance tasks a headache. Backing up and restoring your site can take much longer, which is a serious problem when you need to recover your site quickly after an issue.
- There can be hidden costs. All that extra data takes up space. This can lead to higher hosting costs if you’re paying for storage or using more server resources than necessary. Limiting revisions is a simple way to keep your operational costs in check.
By adjusting your revision limits, you keep your database lean. This directly enhances site performance, simplifies your content management, and makes WordPress backups far more efficient. Ultimately, it ensures a faster, smoother experience for everyone using your site.
If you want a detailed history of every change without the database clutter, a dedicated backup plugin is a better choice. A tool like BlogVault, for example, gives you secure backups, so your content is always protected without leading to a slow site.
Parting thoughts
Effectively managing revisions on WordPress is crucial for optimizing your site’s performance and user experience. By limiting the number of revisions, you can prevent database bloat and maintain a lean, responsive website.
While having a track record of all edits ever made is great, most sites will not require that level of a paper trail. For those that do, use a backup plugin like BlogVault instead—all the pros and none of the cons.
FAQs
How do I limit the number of revisions in WordPress?
You can limit the number of revisions in WordPress in two ways. You can either use a plugin like Companion Revision Manager for a more user-friendly approach. Or you can manually edit the wp-config.php file by adding the line `define(‘WP_POST_REVISIONS’, 5);` to specify the number of revisions to keep. Note that we DO NOT recommend this method as it runs the risk of completely crashing your website if something goes wrong.
How do I clean up revisions in WordPress?
You can clean up revisions in WordPress using database cleanup plugins like WP-Optimize. Database cleanup plugins offer an easy way to delete older WordPress revisions and keep your database tidy. You won’t need to dive into complex SQL queries or perform manual deletions. But make sure that you take a complete backup of your site before using the plugin.
Where are WordPress revisions stored?
WordPress revisions are stored in the database, specifically in the wp_posts table. Each revision gets its own entry, containing a full copy of the post or page. This can lead to significant database bloat if not managed properly.
Do revisions slow down WordPress?
Yes, revisions can slow down WordPress, over time. Each additional revision adds to the size of your database.This makes every database query—whether it’s loading a page, searching for content, or managing posts—take longer. This can result in slower load times and a less responsive website. In turn, it hurts user experience and potentially increases server costs.

Shivani enjoys crafting guides that make every aspect of using WordPress simple and easy to follow. When she's not glued to her laptop, you can find her buried in a good book or occasionally, painting.