

WordPress plugin updates are meant to be a boon, bringing new features and security. But when an update turns your site into a minefield of issues, that sinking feeling is all too real. Your first instinct might be to restore your entire site, but that’s overkill.
You probably updated a bunch of plugins and just one bad apple caused the issue. A targeted downgrade is the quick, surgical way to regain control. This WordPress downgrade plugin guide will show you exactly how to do it safely.
Don’t do a full site restore for one bad plugin. The smarter move is using BlogVault’s selective reliable restore feature. It lets you surgically roll back just the plugin, leaving the rest of your site untouched.
How to downgrade a WordPress plugin
Downgrading a plugin means rolling it back to a previous, stable version. You’ve probably noticed there’s no simple “downgrade” button, a stark contrast to the constant alerts you see for updates.
This is intentional. Downgrades are a last resort, meant only for situations where other troubleshooting methods have failed. Fortunately, there are three distinct ways to handle a rollback, and we’ll cover them all.
A) Use a backup plugin
Honestly, the safest and most hassle-free way to rollback a plugin is with a solid backup tool. If you’re already using a service like BlogVault, you’re in a great spot because this process is incredibly straightforward. Here’s how you do it.
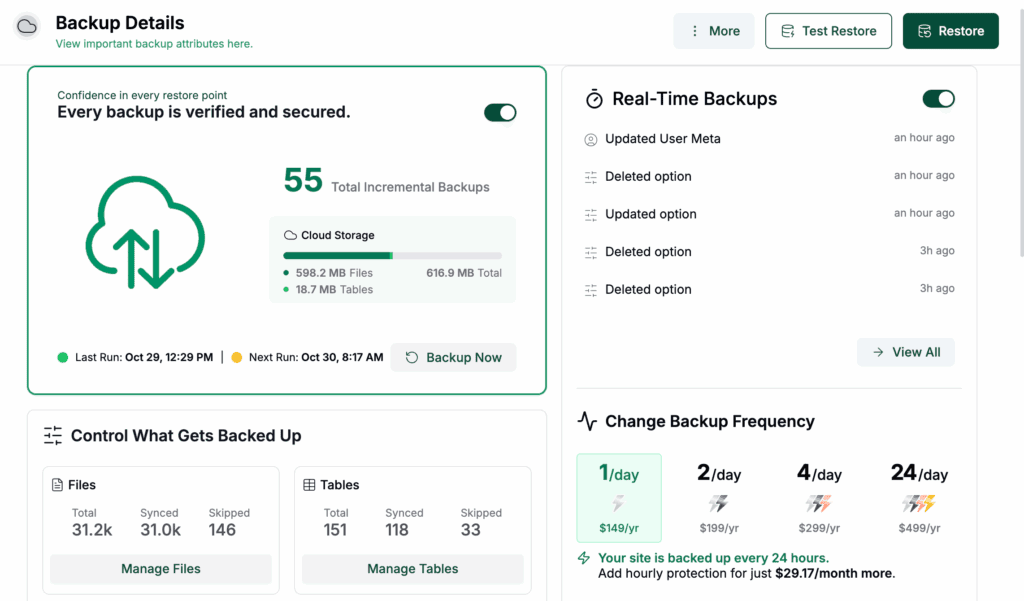
Find and open the correct backup: First, log in to your BlogVault account. Head to the Backup card for your site and click the Restore button. You’ll find it on the top right, just below your profile.
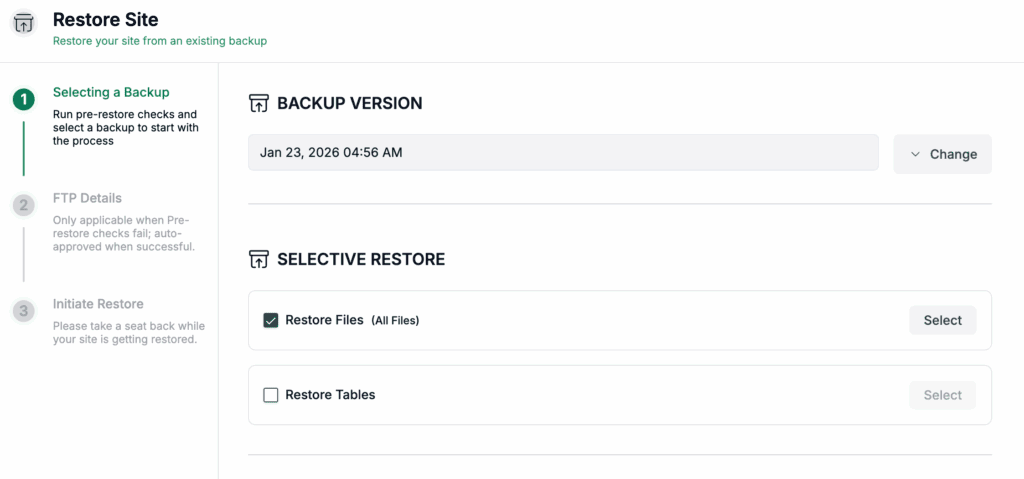
Select the backup version from before the update: This is the most important part. You need to pick a backup point from a time when your site was working perfectly, before you ran that troublesome update. Under the SELECTIVE RESTORE section, uncheck the main box for Restore Tables.
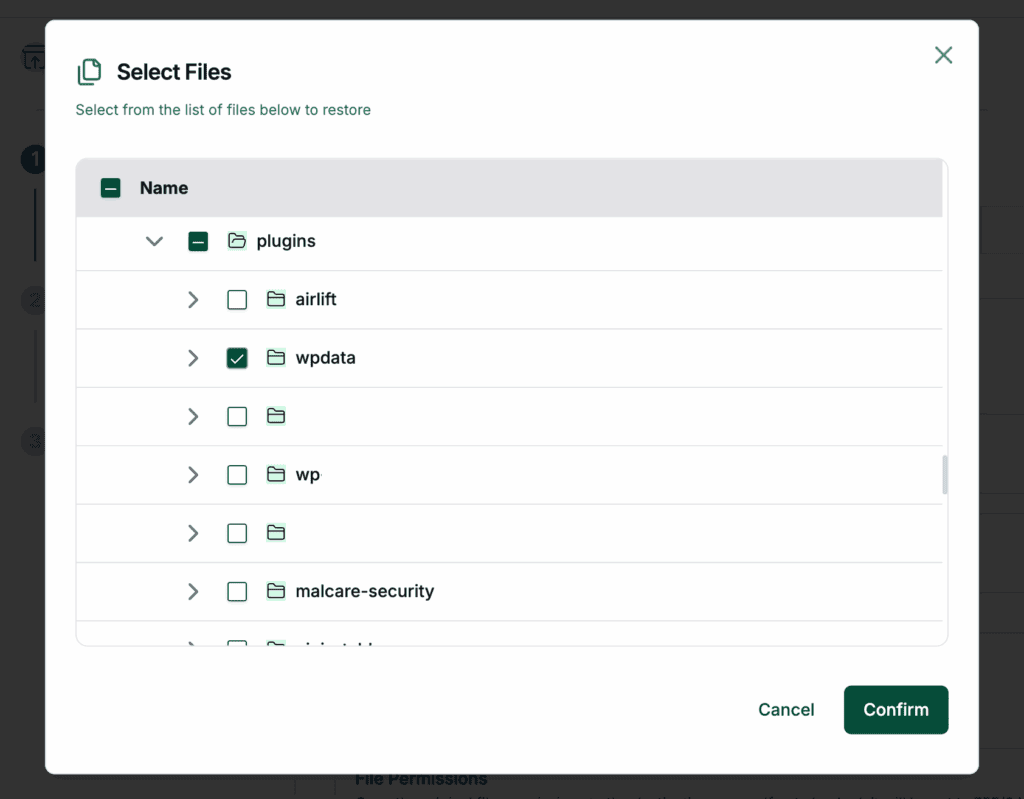
Isolate the specific plugin folder: Click on Select to browse your site’s structure. You’ll need to navigate to the wp-content/plugins folder, find the exact folder for the plugin you want to roll back, and select it. Just a heads up, be certain you’ve picked the right one before you click Confirm.
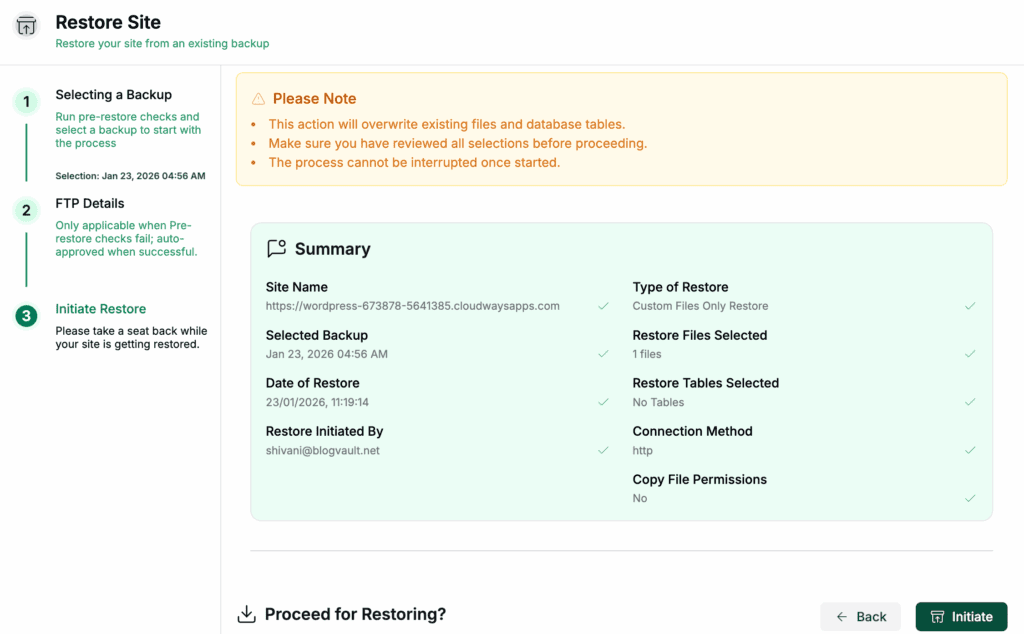
Review and start the partial restore: BlogVault will run some quick checks to make sure everything is good to go. Once it’s done, you’ll get a final review screen. Give it a quick look, then Initiate the restore. In just a few moments, your plugin will be safely downgraded to its previous version.
B) Use a rollback plugin
If a backup restore isn’t an option, a dedicated rollback plugin is the next best thing. These tools are built to reinstate a previous, stable version of a plugin. The real advantage is simplicity; the automated process makes it far better than a manual rollback, sparing you the technical hassle and risk of errors. While there are options like Revisr, we’ll use WP Rollback because it’s so straightforward.
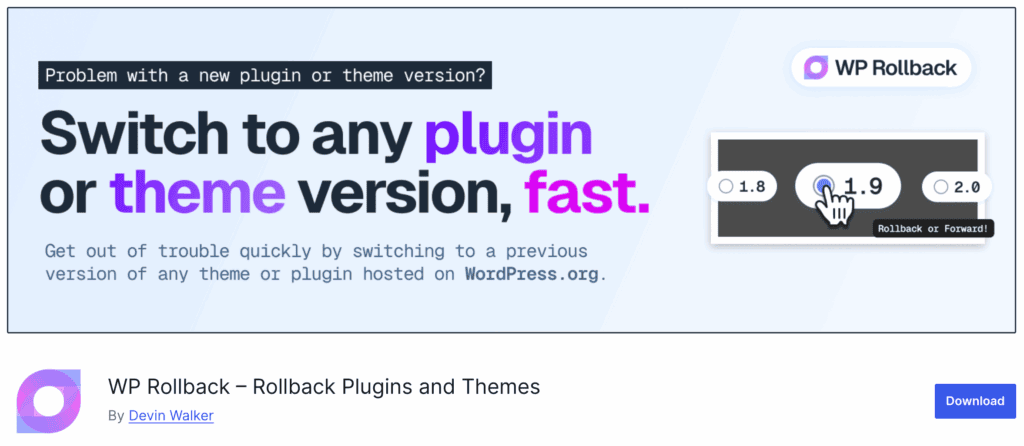
First, get the WP Rollback plugin installed: Just find, install and activate the plugin from the official WordPress repository.

Find the plugin you need to roll back: Now, go to your Installed Plugins list. Find the plugin that’s causing the trouble. You should see a new Rollback option right under the plugin’s name. Go ahead and click that.

Choose a version and confirm the rollback: WP Rollback will show you a list of all the previous versions available. It’s usually best to pick the one right before the latest update. Select the version you want, click the Rollback button, and confirm your choice. The plugin will handle the rest, replacing the current version with the older one.
C) Use a manual method
Using plugins is definitely the easiest way to handle a rollback. But sometimes, you have to get your hands dirty. You might need a manual fix if you don’t have a backup, are using a premium plugin, or the plugin isn’t in the WordPress repository. This is more challenging and a bit risky, but it’s still an option when you’re stuck.
Before you begin have a good backup strategy in place. You will really save yourself from a headache if anything goes wrong.
C1. Upload an older version of the plugin to the wp-admin dashboard

First, download the correct older version: Go to the plugin’s page on the WordPress repository or the developer’s site. Find the dropdown menu for previous versions, select the one you need, and download it. It will arrive as a .zip file on your computer.

Next, completely delete the current version: In your WordPress dashboard, go to your Installed Plugins list. Find the plugin, deactivate it, and then click Delete. This is important because it prevents plugin conflicts when you upload the old version.
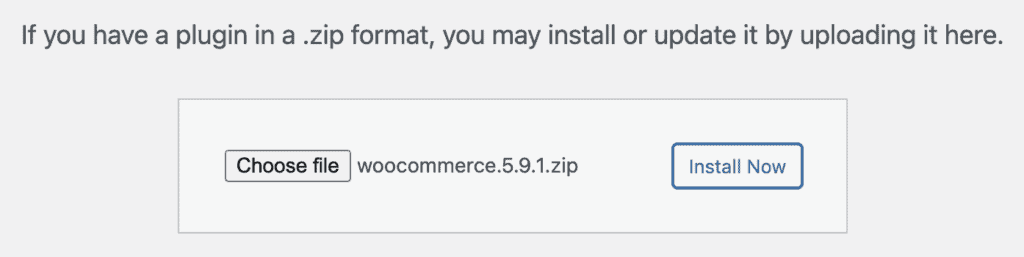
Finally, upload and activate the older version: Go back to Plugins > Add New and click the Upload Plugin button at the top. Choose the .zip file you just downloaded, install it, and then activate it once it’s done.
C2. Upload an older version of the plugin through FTP
If a bad plugin has crashed your site and you can’t even get into your admin panel, you can still fix it using an FTP client. Again, please have a backup ready before you try this.

Start by connecting to your site with an FTP client: Use the server details your hosting provider gave you to connect your FTP client (like FileZilla) to your site.

Get the older plugin version ready on your computer: Unzip the older plugin file that you downloaded. This should leave you with a regular folder on your computer.

Now, upload the folder to the right place: In your FTP client, find your site’s root directory (often public_html or www). From there, go into the wp-content folder, and then into the plugins folder. Upload the unzipped folder of the older plugin version here. Your FTP client will likely ask if you want to overwrite the existing folder; say yes.
Lastly, check that the plugin is active: Once the upload is complete and your site is back up, check your WordPress admin dashboard to make sure the plugin is active.
C3. Upload an older version of the plugin through cPanel
If you have access to your hosting account’s cPanel, this is another great way to do a manual rollback.

First, log into cPanel and open the File Manager: Find the File Manager icon, usually under the Files section, and open it.

Find your way to the plugins folder: In the left-hand panel, find your root folder (public_html or www). Open it, then go into the wp-content folder, and finally into the plugins folder.
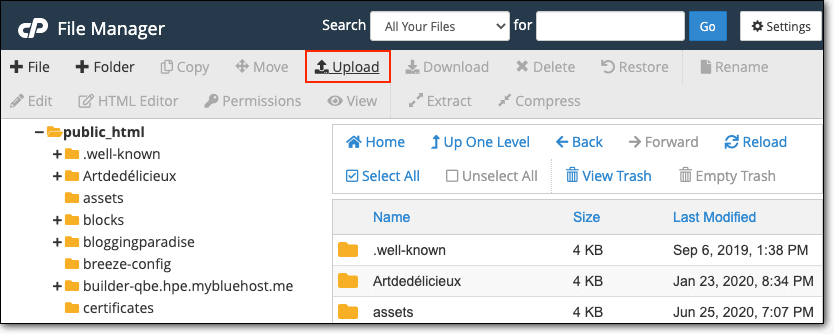
Delete the current plugin and upload the older version: Find the folder for the plugin you want to replace and delete it. Then, use the Upload button at the top of the File Manager to upload the .zip file of the older plugin version you downloaded earlier.
Finally, make sure the plugin is active: Once the upload is done, go back to your WordPress dashboard. You may need to refresh the page, but you should see the older version of the plugin there, ready to be activated.
How can a plugin update cause issues on WordPress?
Updating your plugins feels like a basic, responsible task. You click the button, expecting new features and better security, but then… your site breaks. So what’s really going on? Understanding why a plugin update can disrupt your site is the first step to preventing and fixing these headaches.
Here are a few common reasons things go sideways:
- Conflicts with your theme: Sometimes, an updated plugin and your theme just stop playing nice. Themes often rely on specific plugin versions, and an update can break that harmony. This risk is even higher if you’re using nulled themes, which are pirated versions that don’t get official support.
- Conflicts with other plugins: Your WordPress site is like a team of different plugins working together. When you update one, it can start stepping on another plugin’s toes, leading to errors or broken features.
- Bugs in the new update: Let’s be honest, sometimes the update itself is just buggy. Developers work hard, but coding errors can slip through testing and cause unexpected site issues. It happens.
- Issues with your server: Plugins need to work with your web server’s software. If your hosting environment is running an outdated version of PHP, for example, a new plugin update that requires a newer version might not work correctly.
- Changes to the database: Some updates need to change how data is stored in your site’s database. If these changes aren’t handled perfectly, it can lead to lost data or problems retrieving information.
- Necessary security patches: A developer might release an urgent security patch. While these are crucial for safety, the changes needed to close a vulnerability can sometimes have unintended side effects on other site functions.
- Limited developer testing: Finally, developers can’t possibly test their plugins on every combination of themes, servers, and other plugins out there. Your unique setup might just uncover an issue they never saw.
WordPress downgrade plugin: Best practices
Rolling back a plugin can be a quick fix, but it’s a move you want to make carefully. Before you jump in, it’s worth thinking through a few things to make sure you don’t accidentally create new problems.
Here are some critical points to consider:
- First, make sure you’ve identified the root cause. Before you do anything, are you absolutely sure the plugin update is the problem? The easiest way to check is to simply deactivate it. If the issue disappears, you’ve found your culprit. You can also check your WordPress logs for clues that point to the plugin as the source.
- Next, always create a full backup of your site. This is non-negotiable. Get a complete backup of everything, including your database and all your files. And here’s a crucial tip: try to test your backup. A corrupted backup is useless if the rollback goes wrong.
- Then, verify the older version’s compatibility. Make sure the version you plan to roll back to works with your current version of WordPress and your theme. Also, remember that you might be reintroducing old bugs or security flaws that were fixed in the newer update.
- Understand what features and customizations you’ll lose. Rolling back means you’ll lose any new features from the latest update. If you’ve added any custom code that depends on that new version, it will likely break your site.
- See what the plugin developer has to say. Before rolling back, check the developer’s site or social media. They may have already acknowledged the issue and could be working on a fix. Sometimes waiting a day for an official patch is the better move.
- Plan the rollback for a low-traffic time. If you must perform the downgrade on your live site, schedule it during a maintenance window or a time when you have the fewest visitors. This will minimize disruption.
- Always try the rollback on a staging environment first. This is the safest way to proceed. A staging site lets you see exactly how the downgrade will affect everything without touching your live site. It’s the perfect way to confirm that the rollback actually solves your problem.
- Finally, get input from the community. Check the plugin’s support forums. Other users might be having the same issue, and their discussions can offer valuable insights or even a solution that doesn’t require a rollback at all.
Parting thoughts
When a plugin update leads to issues, knowing how to roll it back can quickly restore the site’s functionality and integrity. In more severe cases, recovering your WordPress website from a backup might be the safest solution to avoid any data loss or extended downtime.
Preparation and caution are your best allies. For those weary of installing specific rollback plugins, a comprehensive backup solution like BlogVault offers an excellent alternative. With BlogVault’s partial restore feature, you can easily roll back or downgrade any plugin without losing your current site changes.
FAQs
When should I consider rolling back a plugin update?
Consider rolling back a plugin update only after confirming that the plugin is the one causing issues. If the update of the plugin to a newer version disrupts your site’s stability or introduces new bugs, rolling back can be a quick fix to restore normalcy.
Is it safe to roll back a plugin update?
Rolling back a plugin update is generally safe if done correctly; providing the older version doesn’t have vulnerabilities. In any case, always ensure you have a full backup of your site before proceeding. Test the rollback in a staging environment to check for any additional issues. Being cautious and prepared helps mitigate the risks involved.
Can I roll back a plugin update without accessing the WordPress admin dashboard?
Yes, you can roll back a plugin update without accessing the WordPress admin dashboard. You can use BlogVault, FTP, or cPanel to manually replace the current plugin version with an older one. These methods are useful if the update locks you out of your admin panel.
Where can I find previous versions of a plugin?
You can find previous versions of a plugin on the plugin’s page or the plugin developer’s page. Visit the plugin’s page, click on the Advanced View button, and navigate to the Previous Versions section. Select the version you need and download it as a .zip file.
Should I back up my site before performing a rollback?
Yes, absolutely. Always create a full backup of your website, including the database and all files, before rolling back a plugin. This ensures that you can revert to the current state of your site if anything goes wrong during the rollback process.

Shivani enjoys crafting guides that make every aspect of using WordPress simple and easy to follow. When she's not glued to her laptop, you can find her buried in a good book or occasionally, painting.


