How to Backup WordPress site to Computer? (Using Plugin, Webhost and cPanel)
Bulletproof Backups for Your WordPress Website
Fortify your business continuity with foolproof WordPress backups. No data loss, no downtime — just secure, seamless operation.
There are three ways to backup WordPress site to computer: using your web host backup service, using a plugin, or manually with cPanel. Each of the three ways has their points.
We tried each method thoroughly, focusing on speed of backing up and ease of download. In the article, we will also outline our experiences with full and partial backups. Finally, we wanted to make sure taking backups did not affect site performance in any way.
Our goal was to recommend the best solution to download WordPress site to computer, and after all our testing, one clear winner emerged.
TL;DR: Downloading a WordPress backup to computer using a plugin is the easiest, with the most consistent results. Web host backup services and manual backups were unreliable and visibly affected site performance. We recommend you try out BlogVault, because it has the most features and is intuitive to use.
Backup WordPress site to computer using plugin [RECOMMENDED]
The plugin method is by far the easiest method to backup WordPress site to computer.
The advantage that plugin backups have over web host backups is that these plugins are designed for specifically that function.
So when you have daily, automated backups already available in plugins, downloading them becomes so much easier.
Web hosts, on the other hand, offer backups as a service, but often one of many. Sometimes backup options, and then subsequently download options, can be buried deep in the interface. If you want a quick backup, it is not intuitive to use.
We tried the three most popular WordPress backup plugins for downloading our sites and saving the files to our local drives. In this particular use case, there is very little to choose between them. Any of them will get the job done well.
The real sticking point is restores, which don’t work well with all plugins. We’ve linked to an in-depth review of each of the plugins in their respective sections, if you want to explore their other features.
BlogVault
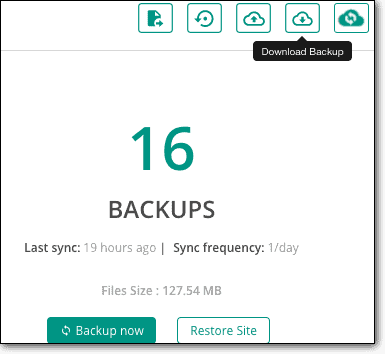
The easiest method to backup WordPress site to computer by far was via BlogVault. All you need to do is download one of the daily automated backups from the list. If you need a fresh backup, you can create one and download it, either fully or partially.
Full site download
We just have to create a backup and download it. As the backup was stored on BlogVault’s own servers, the download did not slow down the site at all.
Partial download
Moreover, you can even customise it to download just one file or table. All you have to do is expand the directory and select the items you want to include in the download for files and database.
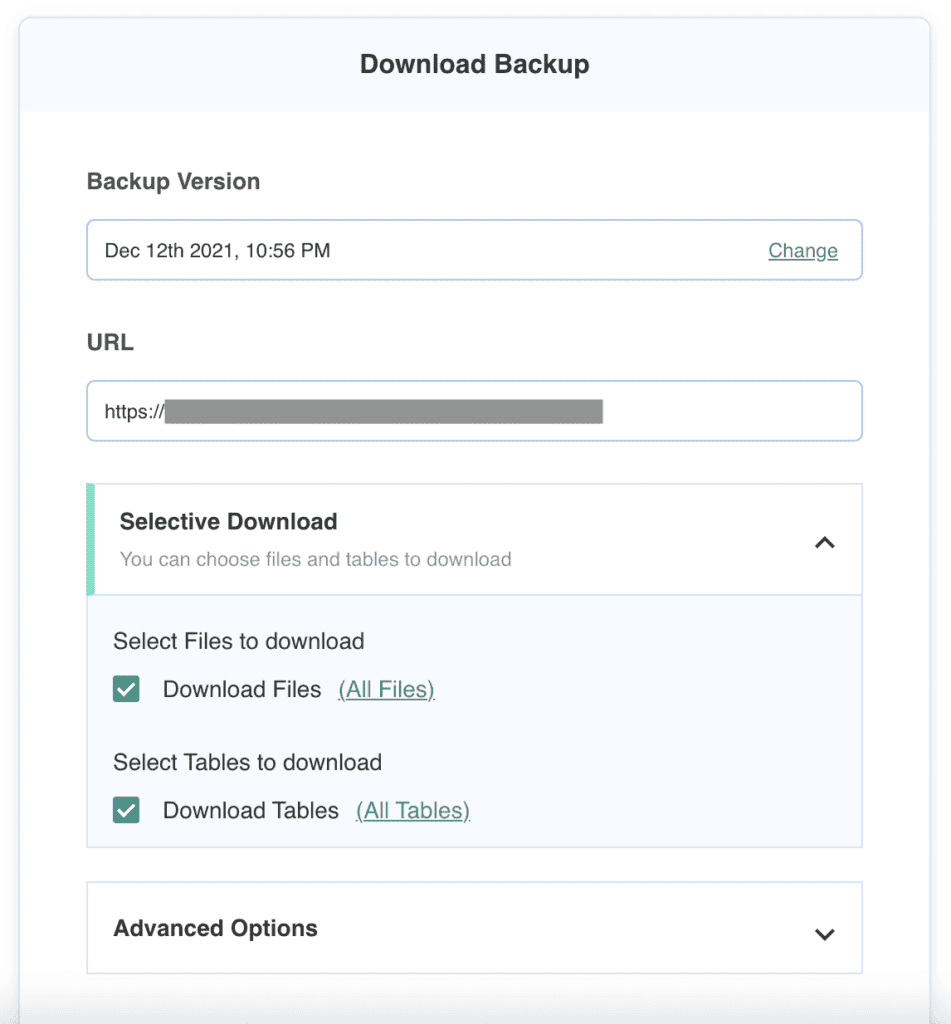
We wanted to check if it’s possible to download just one plugin or theme using BlogVault. Across the board of our testing, we were not able to do this with any other method.
We wanted to ensure that in case one of our plugins crashes while we added content to our site, we can restore the plugin to the previous version. We could easily download a single plugin using BlogVault.
Moreover the site performance wasn’t affected at all while creating or downloading backups using this plugin. Thus, we reached the conclusion that BlogVault was the best solution to backup WordPress site to computer, fully or partially.
UpdraftPlus
This backup plugin allows you to create backups and saves them in five sections. We were able to download each of the sections separately. We found this to be quite effective for creating a partial download.
However, when we wanted to download a single file, we couldn’t. Similarly, if you have to download a single plugin, for example, you cannot do so using UpdraftPlus.
Frankly, this is not a make-or-break limitation. You can still find the single table or file in the right backup, but it will involve more steps. A real problem will only arise if you have an enormous site, and you want something very specific.
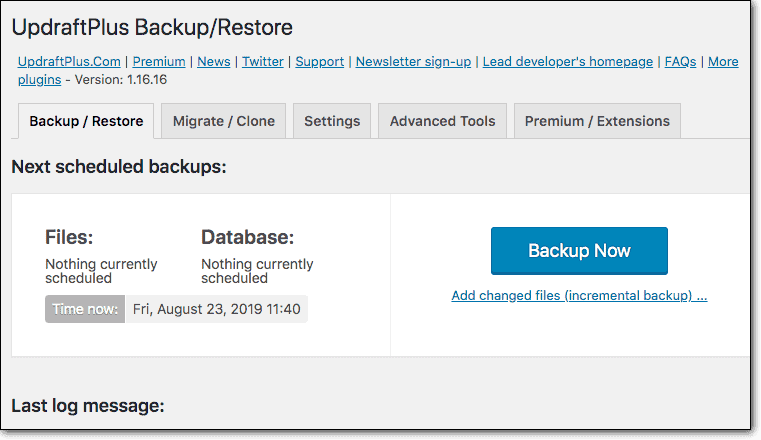
On the other hand, what advantage UpdraftPlus gains with partial, it loses with full backups. We don’t recommend you use this plugin for full site downloads.
The reason being, you will have to download five different components of the site separately. Thus, saving five files instead of one full site backup.
Creating backups and downloading them didn’t affect the performance of small site much, but we could still see a difference for the large site. We checked out the other features of UpdraftPlus. Check out our full review here.
BackupBuddy
BackupBuddy offered much more optimisation than UpdraftPlus when it came to creating and downloading backups.
The plugin allows you to create and download complete backups, partial backups such as databases, or themes or plugins.

Moreover, you can create a custom profile and add the items you want to download to that profile. Then create a backup and download WordPress site to computer.
Custom profiles are great for users who know exactly what they want in their backups, but the complete backup option is the one that suited us best.
Moreover, the site performance was pretty much the same for the small site, however we could see that the large site was slowed down slightly during the process.
Overall, BackupBuddy did offer much more flexibility. You may be able to create a profile for a single database table, say orders, and download it. This could come in handy for WooCommerce sites.
Read our full review of BackupBuddy to explore its other features.
Download WordPress site to computer using web host
Since the website is on the hosting server, web host backups should be easy to download, and therefore should be the quickest solution.
We tried three web hosts for local backups specifically. You can also read our in-depth reviews of their backup services here: WP Engine, Bluehost and GoDaddy.
When we downloaded our sites using different web hosts such as WP Engine, GoDaddy, and Bluehost. The download process went much faster for our small and medium-sized sites.
However, the large site (more than 10 GB) did take quite a bit longer.
The experience varied with each of the hosts, but overall we found that managed WordPress hosting offered the most convenient option to backup WordPress site to computer.
However, there were limitations to that as well. We dive into these in our observations, below.
WP Engine
With WP Engine, it is very easy to download WordPress website to a local drive. You can make a backup of your full site and then go to ‘Backup Points’. Select the backup you want and click on Prepare ZIP. You can save this compressed file on your computer or an external hard disk.
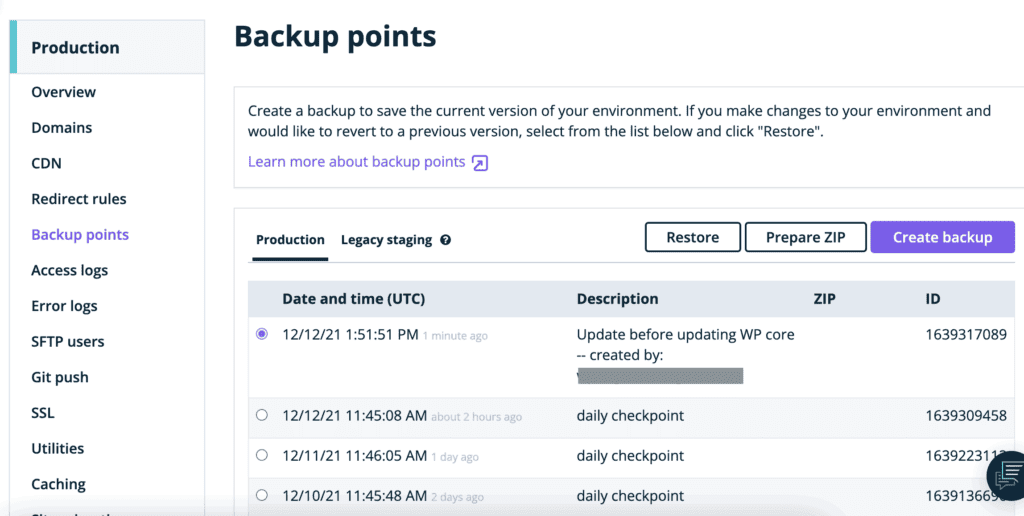
The backup created with WP Engine are full backups only. However, while preparing the ZIP you can choose to download full or only a part of the backup.
Good thing, whether you choose to download partial or full backups for any size of site, downloading the backups won’t slow down your site.
GoDaddy
If you have backups enabled, the process is straightforward. From Sites, go to your site Backups. Then, download the backup version you want to save on your computer.
If you do not have backups enabled, then you can download your files and database manually through cPanel.
Unlike the easy site download that Managed WordPress offers, the manual method can be intimidating for many. So we find it easier to simply enable automatic backups, and then download one.
Whether you can download a partial backup or not depends on the add-ons you’re using. However, you can always partially backup your WordPress site to computer via cPanel. This may slow down your site depending on how large the backup being downloaded is.
Bluehost
The hosting provider only offers one way of downloading WordPress site to computer. You’ll have to download your database and files separately through two different tools from the cPanel. As this is a manual method, this may require some level of expertise.
We will cover downloading via the cPanel method a little later in the article.
Our observations
WP Engine, a managed WordPress hosting provides much faster and smoother downloads than other hosts. This is because of several reasons.
You can download one of the full backups created by the backup service. This will not slow down the site. Moreover, the backup can be downloaded in compressed format, making it faster.
On the other hand, exporting sites from web hosts such as GoDaddy and Bluehost may slow down your site. Moreover, the procedure is manual. So, you may take a while getting used to the cPanel tools.
We found the easiest way to download our sites was using WP Engine, among all hosts. However, this is when you want to download the whole site. To download your site partially, you may still have to use the manual method to be able to select the items you want.
Save WordPress site to computer manually
With the manual method, you are effectively taking a backup of your website in real time, and then downloading that backup.
The biggest concern for us with this method was that large sites would take longer, as well have an impact on site performance. However, these downsides were somewhat mitigated by using file compression.
Backup your site via cPanel
Using cPanel tools require a basic comfort level with your hosting account dashboard. We tried to download the files and database of our small and large sites using cPanel tools, phpMyAdmin and File Manager. As this is a manual method, it is prone to errors.
Full database download via phpMyAdmin
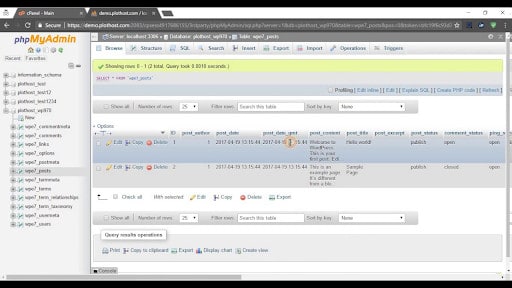
We, first, downloaded the full site database. For that, we had to select the database name (site name) from phpMyAdmin. After clicking on Export, we chose the Quick option and SQL format to download our database.
Partial database download via phpMyAdmin
Partial download is an important requirement, especially for WooCommerce sites. You may have to download information related to orders or users from time to time. We tried this method to see if partial database download was as easy as full database downloads.
There are two ways to do so. First is to follow the steps for complete database download. But instead of Quick, you can choose Custom and select the tables you want to add.
Or, you can click on the Databases and expand the site database you want. Simply select the tables you want and click on Export. Then choose Quick and Go. The SQL file is saved on your computer.
Important recommendation
Always follow a naming protocol that helps you identify the file easily and what it contains. Also, ensure that you save this file in a separate folder. Your database file may include important information related to your site. You don’t want it getting lost or in the wrong hands.
Files download via File Manager
You can access the File Manager via the cPanel of your host. To download our files, we first located the public_html folder where our site files were saved. The location contains all the main folders and files, such as wp-admin, wp-content, and wp-includes.
Note: If you don’t know which folder contains your site files, you may have to search for it or ask the person who set up your site in the first place.
Complete file download: The easiest way we found was to ‘Select all’ and ‘Download’ the files.
Small site: This method worked perfectly for the small site. Due to its size, the download did not take a lot of time, and so we didn’t see any change in site performance during the download.
Large site: Our large site was around 10 GB. We downloaded it two times, first without compression and then with compression. During the first time, not only did the download take longer, we also observed that our site was slower than usual.
So, we tried to compress the files first before downloading. This certainly helped by accelerating download speed, thus, affecting site performance much less.
Partial download via File Manager
Sometimes, you may need a backup of a single theme or plugin. Therefore, we wanted to check if partial file download was possible through cPanel.
To download a single file, we selected it and chose download. The method was quite simple, however, this can be tricky for someone who doesn’t know where the file is located.
Our observations
The manual method was quite time-consuming. You may need some level of expertise to get around the tools easily.
Moreover, the method required us to download databases and files separately from two different tools. This created two files instead of one.
We would recommend you to try the plugin method, which is the easiest to download WordPress site to computer.
Backup WordPress site to computer: Final Verdict
From the three methods tried by us and discussed above, we found two things. The manual method offered the most flexibility to save WordPress site to computer.
However, it is prone to error and requires some amount of expertise. The plugin method was the easiest, however, selecting the right plugin was the key.
We recommend you to use the BlogVault plugin as it offers us both the features: flexibility and ease. It allowed us to create and download backups for the full site, partial site, as well as a single table or file. This could be an advantage for content heavy sites and WooCommerce sites.
Moreover, BlogVault did not slow down the live site, thus, emerging as the best pick from the lot of the popular plugins we tried to backup WordPress site to computer.
Tags:
Share it:
You may also like
How to Limit Form Submissions with Droip in WordPress
Forms are an indispensable part of any website because of their versatility, letting you collect information for various purposes! However, people with ill intentions often attempt to exploit these forms…
How To Manage Multiple WordPress sites
Management tools help agencies become well-oiled machines. Each task is completed with the least amount of effort and highest rate of accuracy. For people managing multiple WordPress sites, the daily…

PHP 8.3 Support Added to Staging Feature
We’ve introduced PHP version 8.3 to our staging sites. Test out new features, code changes, and updates on the latest PHP version without affecting your live website. Update PHP confidently…
How do you update and backup your website?
Creating Backup and Updating website can be time consuming and error-prone. BlogVault will save you hours everyday while providing you complete peace of mind.

Updating Everything Manually?
But it’s too time consuming, complicated and stops you from achieving your full potential. You don’t want to put your business at risk with inefficient management.

Backup Your WordPress Site
Install the plugin on your website, let it sync and you’re done. Get automated, scheduled backups for your critical site data, and make sure your website never experiences downtime again.


