How to Install a WordPress Theme For Beginners (Step-by-Step Guide)
Bulletproof Backups for Your WordPress Website
Fortify your business continuity with foolproof WordPress backups. No data loss, no downtime — just secure, seamless operation.
New digital products appear all the time, but good old WordPress is still in high demand. 2019 statistics show that WordPress powers 34% of the entire internet (around 19,500,000 websites). For the 7th year in a row, it is the most popular CMS.
It caters to both personal and corporate use, and has numerous eCommerce and niche businesses on its platform.
When it comes to setting up a WordPress site, having a customised theme sets your site apart from the rest. The modern market offers you tonnes of web designer WordPress themes for blogs, agencies, medicine, art, sports, beauty, food & drinks, travel, sales, and much more. Whatever you want to showcase, WordPress already has a ready-made solution for it.
Now, not all themes are easy to install, so if you’re looking for an easy way to get an exceptional theme, you’re definitely on the right page. Today, I’m going to share with you my step-by-step WordPress theme installation guide. Without further ado, let’s get started.
[lwptoc skipHeadingLevel=”h3,h4,h5,h6″]
Is It Possible for a Beginner to Install WordPress Theme?
‘Can I do it by myself?’ is the most frequently asked question when it comes to theme installations. Yes, you can, and there is no need to look for a web developer.
Now the process to install a theme is simple and quick. But there’s one thing many beginners usually forget about. To install and activate any WordPress theme, you should have the latest version of WordPress first.
Feel free to skip the next section if you’re already running on the latest version of WordPress.
Why You Need to Have the Latest WordPress Version?
Even if your current CMS version is compatible with the theme you choose, I strictly recommend getting an update. And not without reasons!
The main reason you should use the newest WordPress version is the safety of your website. The WordPress team releases updates with security patches when vulnerabilities are found. The newer the WP version you use, the fewer chances you have to be hacked. Apart from that, WordPress updates also carry bug fixes that are meant to make your site perform better and also have new features to increase functionality.
Secondly, by using the old version of WordPress, you risk slowing down the site. Today’s online audience demands comfort and speed. Poorly working websites are quickly ditched for faster ones. According to Google, websites that load within 5 seconds see 70% longer sessions, 35% lower bounce rates, and 25% higher ad viewability than other sites.
Lastly, themes/plugins are updated regularly by their creators to stay compatible with the latest WordPress developments. Running on an outdated WordPress installation could render them incompatible. This means either won’t be able to use the theme/plugin, or you’d see your site malfunction.
How to Download the Latest WordPress Version?
Downloading the latest version of WordPress is usually very simple but sometimes, you may face hiccups. There are ways to safely update your WordPress site without seeing anything malfunction or break. To get the latest version, you can do this in two ways:
- If you already have WordPress installed, simply visit your admin panel and go to Dashboard > Updates. If there is a new version available, it will show up here. Simply click on ‘Update Now’.
- If you are installing WordPress for the first time, visit the official WordPress site and download the latest version by clicking on the blue download button. Choose the required format below and a zip file will download to your system. Next, you need to use the instructions on the same page and upload it to the hosting server.
How to Install a WordPress Theme?
Once you have the latest version of WordPress, we can begin to install the theme of your choice. Basically, there are 3 ways to install WordPress themes:
- WordPress admin theme search
- Upload from WordPress admin
- Using FTP
Installing WordPress Theme via Admin Search
Nowadays, an overwhelming majority of website owners say that this is the easiest way to install a WordPress-based theme. Alas, it comes only for free themes available in the WordPress.org theme’s directory.
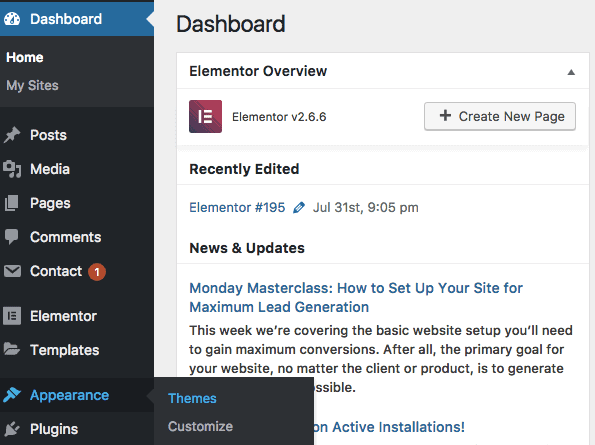
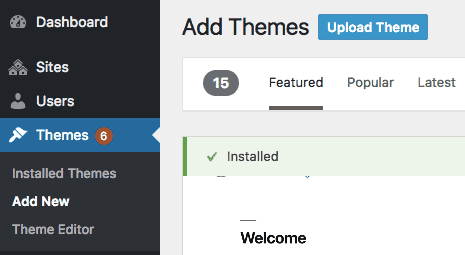
Simply login to your WordPress admin also known as WordPress dashboard. Then navigate to ‘Appearance’ section and select ‘Themes’.
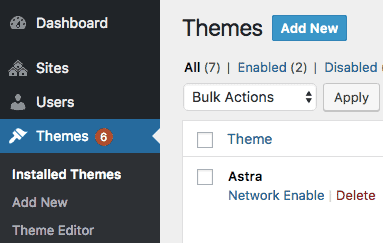
Next, press the ‘Add New’ button present on top.
Now you can select your theme type from the following variants:
- Featured WordPress themes
- Popular WordPress themes
- Latest WordPress themes
- Search for a specific theme
- Search for themes with specific features
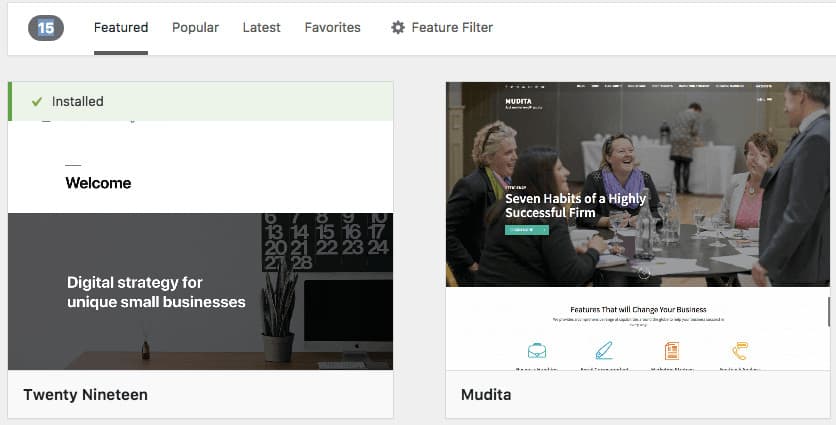
Depending on your choice, you’ll see a single WordPress theme or a selection of products which meet the mentioned requirements. When you choose an item, hovering over its image will reveal buttons for details, install, and preview.

Simply click on install and the process will begin. Once completed, you will get a success notification. The next step is to click on ‘Activate’ and your theme will go live on your site.
Installing WordPress Theme Using the Upload Option
All right, now you know how to install a free WordPress theme with minimal effort and no technical knowledge. But this method doesn’t work if you want a premium or custom theme that’s not present in the WordPress repository. This is where the WordPress dashboard upload method comes in.
First things first, download the theme you purchased. Then enter the admin area to navigate to the sections you are already familiar with: Appearance > Themes > Add New. Here, instead of choosing from the themes available, you need to click on ‘Upload Theme’.
The system will ask you to choose the theme zip file you purchased.
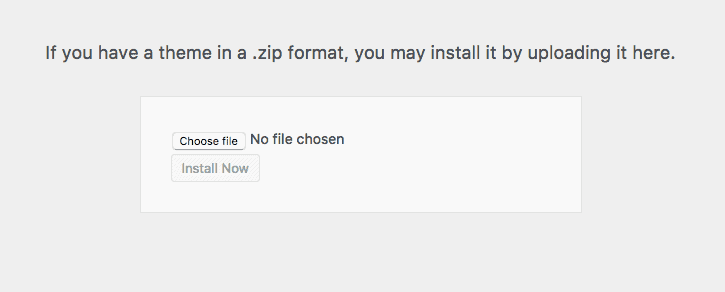
Select the needed file and click the ‘Install Now’ button. Once complete, you’ll be notified and you can proceed to activate the theme.
It’s easy to install a WordPress theme with this method, however, keep in mind that the option is available for self-hosted WordPress.org users. You won’t be able to install the theme this way if you use WordPress.com. Note: You can switch to WordPress.org at anytime. If you are not sure what each one has to offer, check our wordpress.org vs wordpress.com comparison.
Installing WordPress Theme via FTP
If you aren’t tech-savvy, this method is not preferable! However, if you decide to take this route, you should first understand what FTP is. Follow this link to learn how to use FTP to upload files. Next, you need to keep the theme zip file ready on your computer.
I recommend you download and install FileZilla. Open the program and enter your FTP credentials that you can find in your host account. Once you connect to your site, on the right-hand panel, you need to locate your website’s folder, usually under public_html, and then look for wp-content > themes.
To illustrate, I’ve used the image below.
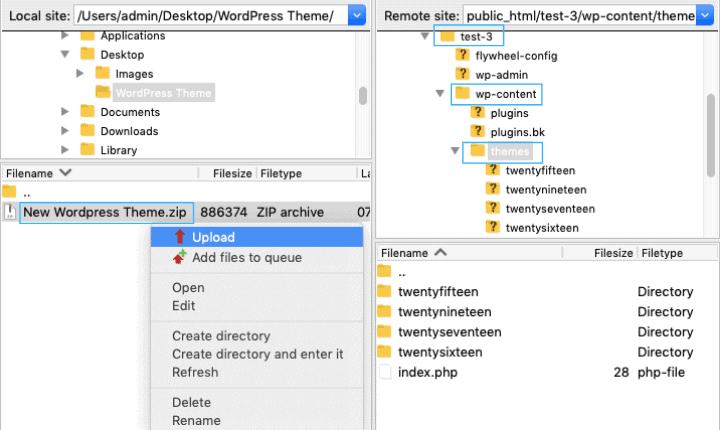
I saved my new theme zip file in a folder called ‘WordPress Theme’ on my Desktop. The left panel on FileZilla is my local computer. I’ve accessed Desktop > WordPress Theme and found the file I need.
Now, ‘Test 3’ is the name of my site so all it’s files reside in the folder named Test 3. On the right panel, I’ve located public_html > Test 3 > wp-content > themes.
By selecting the new theme file and right-clicking, you get an option to upload your theme files. Remember, you need to unzip the folder before you upload it. Once it’s uploaded to the right panel, go to the WordPress dashboard > Appearance > Themes. You should be able to see the new theme present, you just need to activate it.
Bonus read: Creating a Child Theme
Now that you have an awesome theme on your site, you need to carry out one more step. Before you make any customisations to your theme, it’s best to create a child theme.
What are parent themes and child themes? As the names suggest, a child theme is a replica of the parent in which you can make customisations and changes. The parent theme, however, stays the same. The reason for this is so that you can continue to update the parent as the theme developers roll out upgrades. Now the child theme will inherit the upgrades but will still retain the customisations you made for your site.
It takes a few simple steps depending on the theme you are using, but it’s generally straightforward. I won’t delve into it too much because the steps vary depending on which theme you use. This is a detailed guide from WordPress that can help you create a child theme.
In Summary
There are 3 main ways a non-techie can install and activate a WordPress theme in 2019. All of them are free, which means you won’t need to make any additional payments. To sum up:
- Always use the latest version of WordPress available.
- Installing a theme via Admin Panel is the easiest but limits you to free WordPress themes.
- The FTP method should only be carried out if you’re tech-savvy or don’t have any other choice.
- And finally, to install a premium WordPress theme, use the upload or the FTP method. There are plenty of affordable premium themes that are easy to customise to your preferences.
Whichever one you choose, before you make any changes to your site, to be on the safe side, always take a backup! Just in case something goes wrong, you can quickly restore your site and pretend it never happened.
I hope now you’ll be able to select the theme you want and install it without any hassles! For more WordPress tutorials follow our WordPress blog.
Tags:
Share it:
You may also like

How to Limit Form Submissions with Droip in WordPress
Forms are an indispensable part of any website because of their versatility, letting you collect information for various purposes! However, people with ill intentions often attempt to exploit these forms…

How To Manage Multiple WordPress sites
Management tools help agencies become well-oiled machines. Each task is completed with the least amount of effort and highest rate of accuracy. For people managing multiple WordPress sites, the daily…

PHP 8.3 Support Added to Staging Feature
We’ve introduced PHP version 8.3 to our staging sites. Test out new features, code changes, and updates on the latest PHP version without affecting your live website. Update PHP confidently…
How do you update and backup your website?
Creating Backup and Updating website can be time consuming and error-prone. BlogVault will save you hours everyday while providing you complete peace of mind.

Updating Everything Manually?
But it’s too time consuming, complicated and stops you from achieving your full potential. You don’t want to put your business at risk with inefficient management.

Backup Your WordPress Site
Install the plugin on your website, let it sync and you’re done. Get automated, scheduled backups for your critical site data, and make sure your website never experiences downtime again.


