How to Limit Form Submissions with Droip in WordPress
Bulletproof Backups for Your WordPress Website
Fortify your business continuity with foolproof WordPress backups. No data loss, no downtime — just secure, seamless operation.
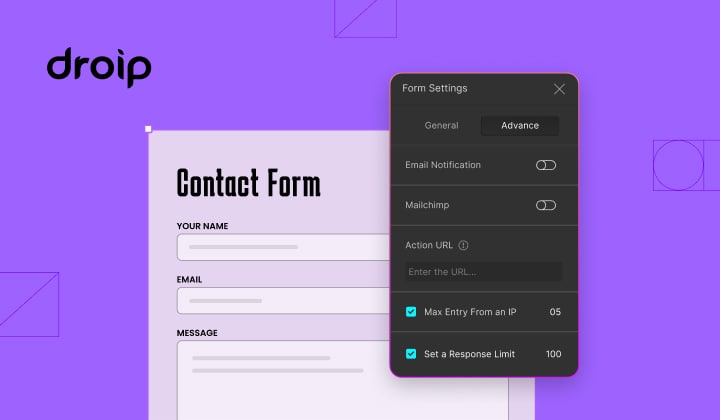
Forms are an indispensable part of any website because of their versatility, letting you collect information for various purposes! However, people with ill intentions often attempt to exploit these forms in various ways.
Hence why in this article, we’re going to go over how to limit form submissions for your web forms in WordPress!
Why You Should Limit Form Submissions
Now, you may wonder why you should limit form submissions. As mentioned earlier, web forms can help you collect information for a range of different purposes such as creating user accounts on your website, completing user purchases, letting users send information or feedback, and more.
A lot of this is sensitive information and it is important to ensure it is secure. Limiting form submissions is one such way of doing that and has the following benefits:
- Prevents Spamming: Limiting submissions, especially multiple ones from the same IP can help prevent users from spamming and oversaturating the information pool.
- Make Data More Manageable: Limiting responses to a certain number can make the data more manageable, allowing you to save your resources and also reply to submissions more efficiently.
- Reduces Server Load: Fewer responses also means less of a load on the server, ensuring optimal website performance.
- Reduce Malicious Attacks: Last but not least, this measure can also help slow down malicious attacks that target your website through your web forms.
How to Limit Form Submissions in WordPress
Now let’s get to the meat of the matter, that is how to limit form submissions in WordPress!
To achieve this feat, we’re going to be using Droip, the no-code website builder for WordPress.
Droip is a powerful tool that you can use to visually craft highly functional and responsive WordPress websites and boasts an advanced and flexible Form Builder that lets you create sophisticated web forms effortlessly!
Now, limiting form submissions using this tool is a very simple feat so take a look at the instructions below:
- Step 1: Start by creating a new web page on your Droip website or edit one that already exists.
- Step 2: Next, start designing your Form using Droip’s diverse range of Form Elements. Once you’ve done that it’s time to configure its settings!
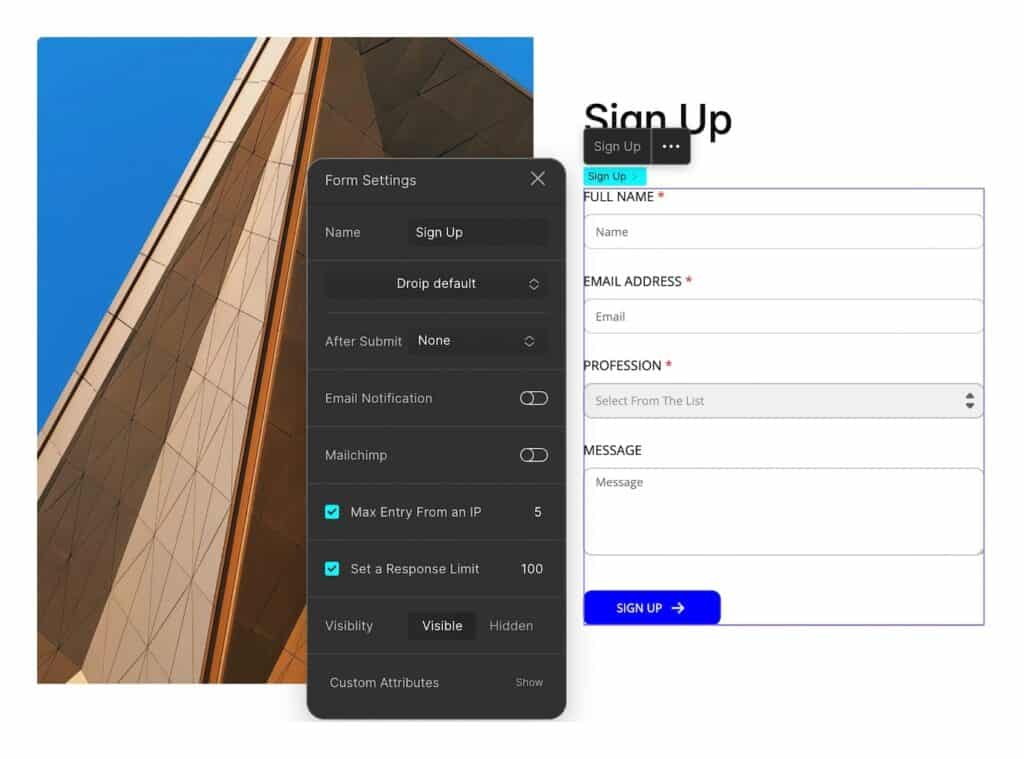
- Step 3: Select your Form Block element and click on the ellipsis icon on the inline editor to open Form Settings.
- Step 4: Here, you’ll find the following two options to limit your form submissions:
- Max Entry From an IP: Enable to define the number of entries that can be submitted from the same IP address.
- Set Response Limit: Enable to define the number of responses that can be submitted to this form.
Depending on your needs, you can enable either option or both. Once enabled, define the number you want to limit each type of submission to.
And you’re done! A quick and simple way to ensure your forms are not only effective but also more secure with Droip.
More Ways to Enhance Your Web Forms
Limiting form submissions is just the tip of the iceberg of what you can achieve using Droip’s powerful and intuitive Form Builder.
So with that said, listed below are more ways to enhance your web forms and take them to the next level!
Secure Your Web Forms
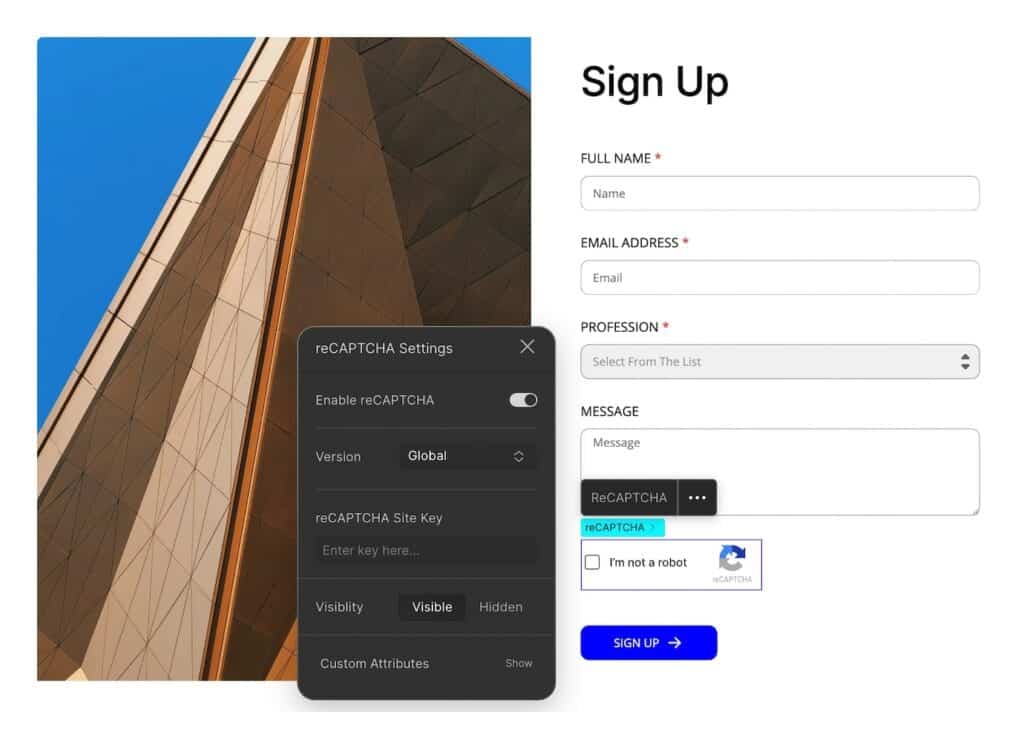
Apart from limiting form submissions, Droip also offers other spam protection features such as seamless integration with reCAPTCHA.
By enabling this feature for your forms, you can ensure that your form is used by humans and easily prevent spam bots from responding!
You can implement this feature with a few simple clicks by adding the reCAPTCHA element and configuring the reCAPTCHA Settings once you’ve connected its API.
Make Forms GDPR Compliant
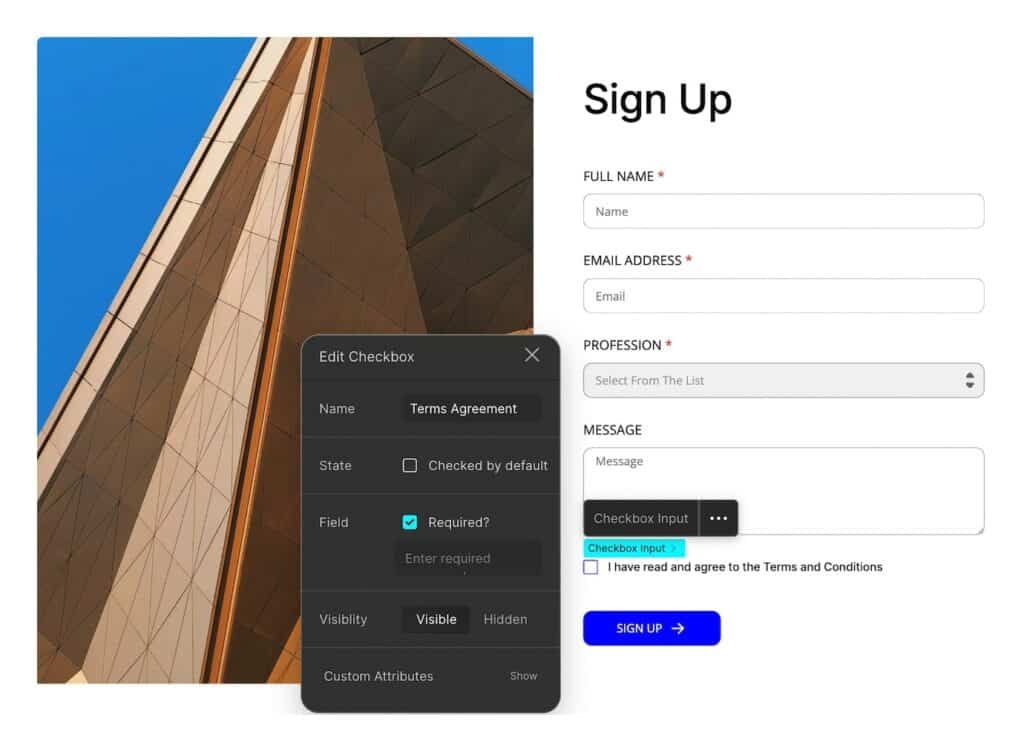
Forms deal with users’ personal data and it’s often required that they be GDPR compliant to protect their privacy.
Luckily you can easily ensure your forms fit this criterion in Droip. All you have to do is add a Checkbox element that users must actively check to provide consent for such as agreeing to your terms and conditions, receiving marketing emails, etc.
Define After Form Submission Actions
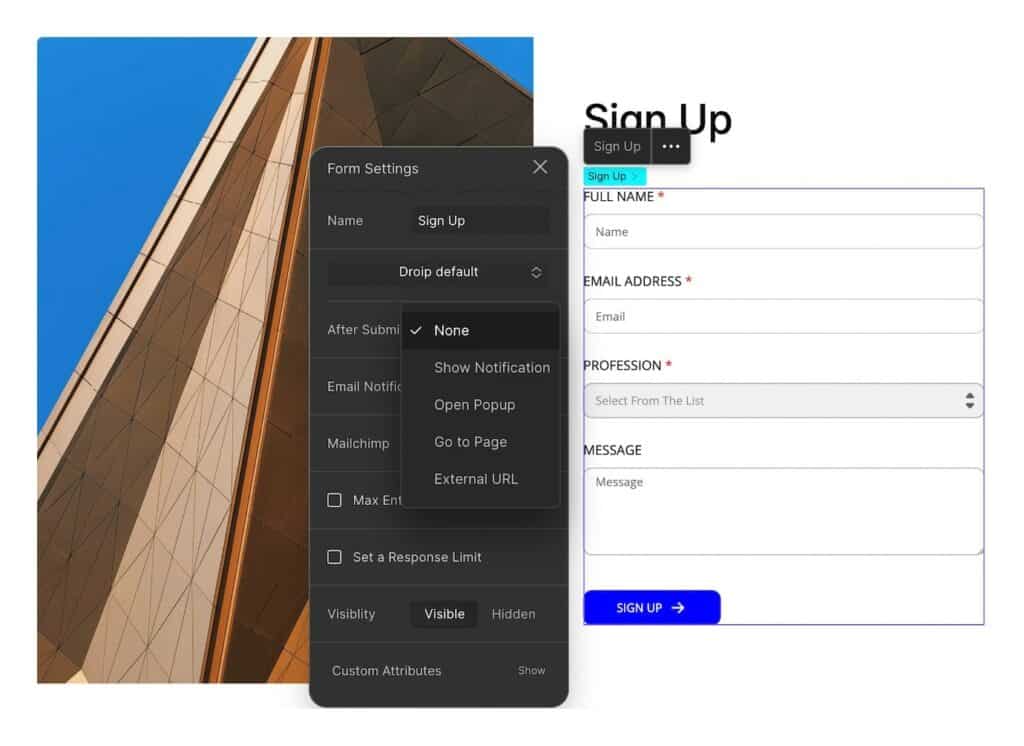
Droip also lets you choose from a plethora of After Submit Actions for your forms!
Using after-submit actions, you can enhance your web forms further by providing confirmation notifications, guiding users, and improving the overall user experience and efficiency.
To configure this, simply select the Form element and open its settings. Then, from the After Submit dropdown, choose a type of action and define their individual settings.
For a few of these options, you can even configure the actions differently based on form submission, success, or failure!
Enable File Upload
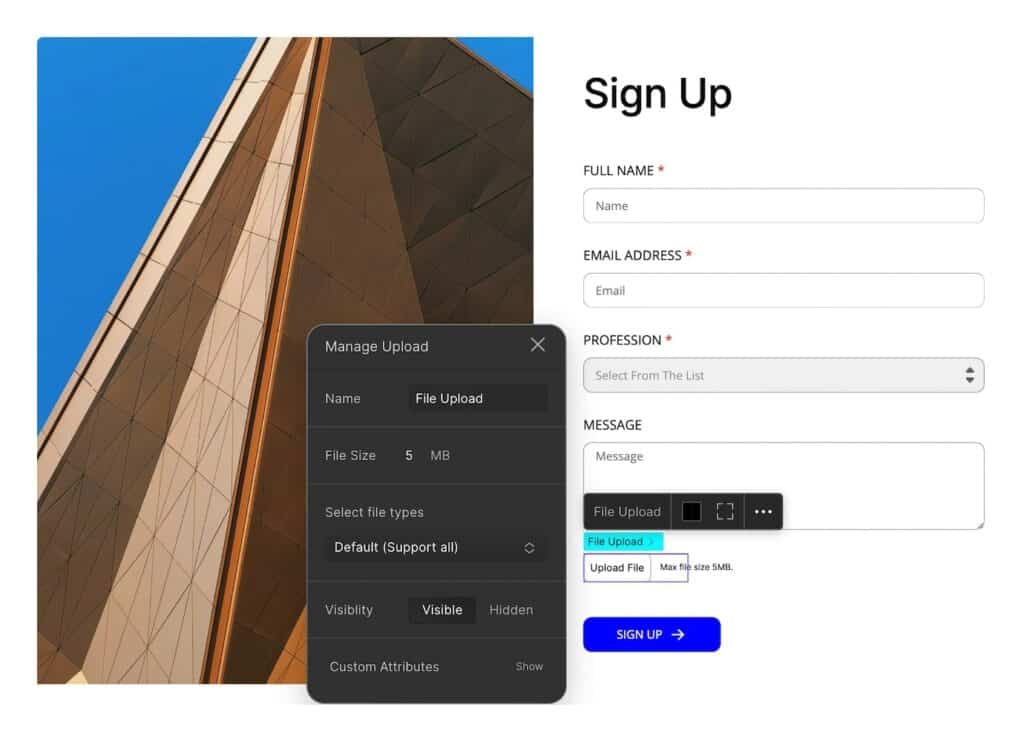
File Upload is another must-have functionality of forms and you can easily implement this in Droip using the File Upload element!
Once added, you can even limit the maximum file size and file formats that users can upload using this form. This will help prevent files that are too large or of the wrong format from being uploaded, further ensuring you collect the exact data that you desire.
Use Pre-built Form Templates
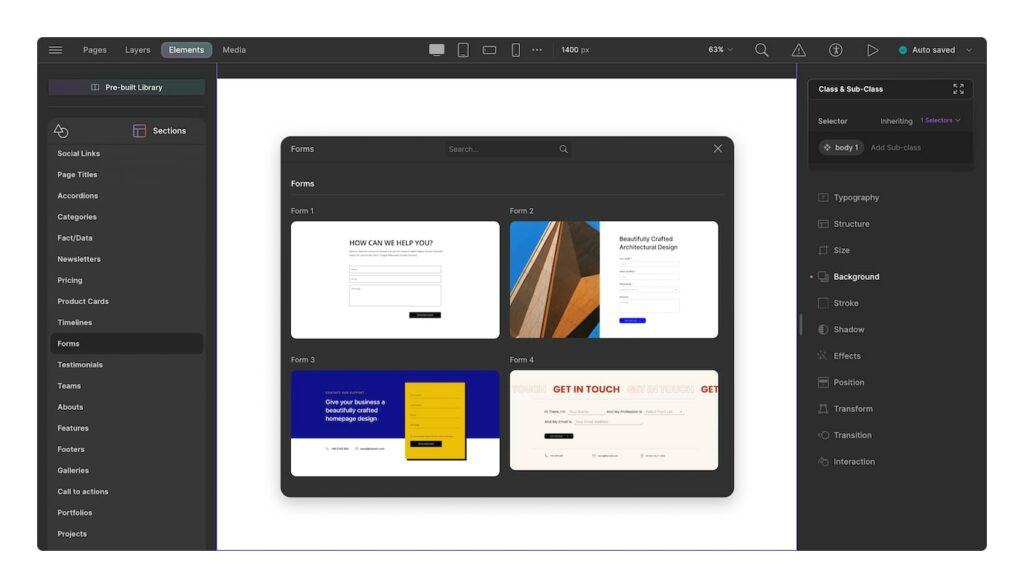
Not sure where to start when designing your form? Fret not because from Sections in Droip’s Pre-built Library panel, you’ll find a range of ready-made form templates to help you get started!
Once you’ve chosen a template you like, you can then customize it using the options in the Style Panel and also build on it by adding other form elements and configuring its behavior to suit your needs.
Integrate Email Marketing Management
Last but not least, you can use Forms in tandem with Automated Email Marketing Management to prompt your users to respond! In Droip, this can be easily achieved by integrating the Mailchimp API!
With this, you can automate your email marketing campaigns, integrate e-commerce data, and other marketing tasks leaving you free to manage other aspects of your website and brand.
Manage Form Data
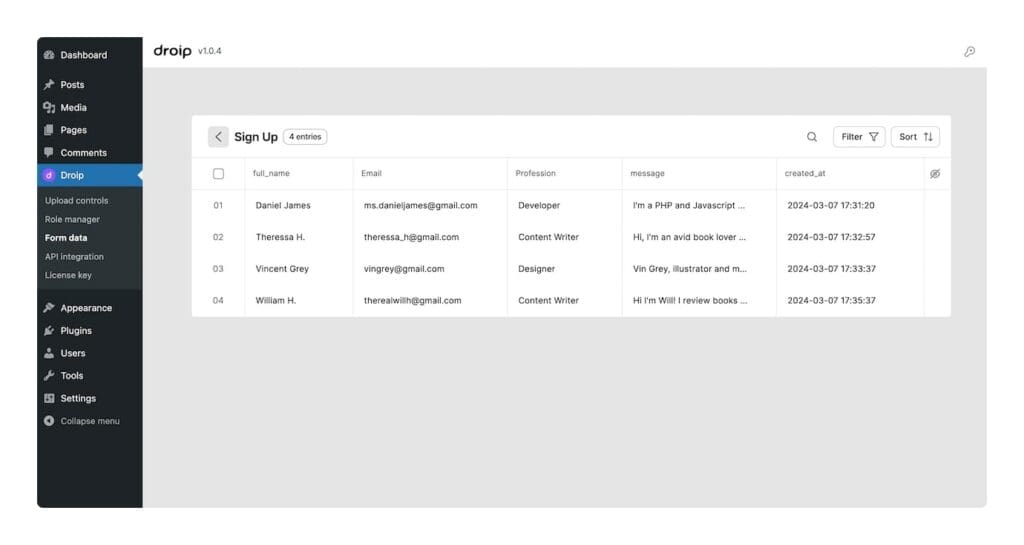
Droip also boasts its own built-in Form Data Manager, which means you don’t need the assistance of third-party tools to manage the data collected through your forms!
From this dedicated dashboard, you can access and manage all of the data gathered through the Form Block element. You’ll also find options to Filter and Sort through the data as well as Export it to conduct further analysis.
Wrapping Up
And that’s a wrap! Now you know how to limit form submissions in WordPress using Droip and its Form Builder feature which you can use to create intuitive and functional web forms that are also well-secured!
But this is just a drop in the ocean so to speak because just like Forms, Droip boasts a range of other powerful tools that can make website building a breeze. So take the chance and experience Droip for yourself!
Tags:
Share it:
You may also like
How To Manage Multiple WordPress sites
Management tools help agencies become well-oiled machines. Each task is completed with the least amount of effort and highest rate of accuracy. For people managing multiple WordPress sites, the daily…

PHP 8.3 Support Added to Staging Feature
We’ve introduced PHP version 8.3 to our staging sites. Test out new features, code changes, and updates on the latest PHP version without affecting your live website. Update PHP confidently…

How to Repair & Optimise the WordPress Database
WordPress is developed with the scripting language PHP and uses either MySQL or MariaDB as its open-source relational database management system. Behind the scenes, the WordPress database stores content such…
How do you update and backup your website?
Creating Backup and Updating website can be time consuming and error-prone. BlogVault will save you hours everyday while providing you complete peace of mind.

Updating Everything Manually?
But it’s too time consuming, complicated and stops you from achieving your full potential. You don’t want to put your business at risk with inefficient management.

Backup Your WordPress Site
Install the plugin on your website, let it sync and you’re done. Get automated, scheduled backups for your critical site data, and make sure your website never experiences downtime again.


