How To Recover WordPress Website: A Step-by-Step Guide
Bulletproof Backups for Your WordPress Website
Fortify your business continuity with foolproof WordPress backups. No data loss, no downtime — just secure, seamless operation.
Imagine waking up one morning and discovering that your WordPress site is completely down. Instead of your familiar homepage, you’re greeted with an error message or, worse, a blank screen that’s as welcoming as a brick wall. You’re left wondering what went wrong and how to fix it.
Every second that your site is down feels like an eternity, and you’re acutely aware that downtime is costing you visitors, credibility, and revenue. Frustration quickly sets in as you realize there’s no straightforward guide on how to bring it back. Your hard work has seemingly vanished into thin air, leaving you in a state of mounting panic.
But wait, don’t lose hope just yet!
TL;DR: Quickly recover your website’s database and files using BlogVault, an automated backup solution. BlogVault ensures your site is regularly and securely backed up, making the process of recovery straightforward and hassle-free.
If you didn’t have backups already, this is the internet’s rather rude way of reminding you that they’re a non-negotiable part of site management. There are quite a few ways to recover your site—if not fully, at least partially. We’ll walk you through the steps to bring your WordPress website back from the brink. Whether you’re facing a minor glitch or a major meltdown, here’s how to go about it.
Option 1: Using a backup plugin (RECOMMENDED)
There are situations where your web host might delete your website, such as when malware is detected. In such cases, having a reliable backup plugin can save you from significant stress and downtime. Not only does it enable quick recovery, but it also gives you peace of mind knowing that your site can be restored even if it is hosted on a new server or with a different provider.
If you are a BlogVault customer, you can recover your deleted site in just a few simple steps. You don’t have to worry about recovering your fully crashed site. The restore will work because of the emergency connector. This works even if your site needs to be on a new server with a different host ensuring minimal downtime and hassle. Here’s how to go about it:
- Access your backups: Log in to your BlogVault account. Since your site has been deleted, you will notice a Disconnected icon under your site’s name. Even if the site has been disconnected from BlogVault you can still access your Site Overview section. Navigate to it, find the Backup card, and click on the Restore button.

- Start the recovery process: Select a backup version and enter your FTP details. You will get these from your hosting provider. Next, enter your Database Credentials and click on Continue to recover your site.

Option 2: Using your web host
For those moments when your entire site has been deleted., many web hosts have you covered by storing your deleted site in their built-in trash for a certain period before it’s permanently wiped off the internet. This safety net can range from a few weeks to a few months, depending on your web host.
If you’re using Cloudways, they keep your deleted website (Application) in the trash for about 14 days. Here’s how you can recover it before it’s lost forever:
- Find the deleted application: Start by logging into your Cloudways account and head over to the Applications tab. Click the Recover Application button at the top right. This will display all deleted applications that are still recoverable.

- Recover your site: Find the website you want to recover and click on the Recover Application button. Next, choose the server you want to recover your site to and click on Continue. Your site will be brought back to life shortly.

Note: Different web hosts handle the storage and recovery of deleted sites in various ways. While some make the recovery process straightforward, others may require you to contact their support team. So prepare yourself for the possibility of delays if your host is slow to respond to customer requests.
Option 3: Manually recover your site
While using backup plugins or web host backups is often the easiest route, some situations like permanent deletions can call for a manual recovery. This method is also useful if your site has been permanently deleted or if you simply prefer a hands-on approach.
To proceed, you need a downloaded copy of your site’s files and database. You can recover your site’s files manually via FTP or cPanel and your database via phpMyAdmin.
Note: if your website has been deleted, start by setting up a fresh WordPress installation and then follow these instructions.
A. Restore files
Using FTP
- Connect to the server: Use an FTP client such as Cyberduck to connect to your server. You’ll need the FTP details provided by your hosting provider.

- Upload backup files: Once connected via FTP, navigate to the root folder of your website (commonly named public_html or www). Right-click, and choose Upload to replace all the existing files with your backed-up files in the directory.

- Verify file replacement: Ensure that all core WordPress files have been uploaded correctly.
Using cPanel
If your hosting provider offers cPanel, you can also use the File Manager to recover your files.
- Access the file manager: Navigate to the File Manager option under the Files section within Tools.

- Start the upload process: Within the File Manager, find the Upload button and click on it. Now, select the backup file you want to upload and check the Overwrite existing files option. Your website files will be recovered soon.


B. Restore database
- Access phpMyAdmin: Log in to your site’s phpMyAdmin dashboard. You can access the dashboard either through a URL like “yourdomain.com/phpmyadmin”, your hosting provider’s control panel, or cPanel if you have access to it.
- Start the import: Navigate to the Import tab at the top of the phpMyAdmin interface. In the File to import section, click the Choose file button and select your database backup file (often in SQL format) from your local computer. Click on the Import button at the bottom right to start the import process. phpMyAdmin will upload and restore your database from the backup file.


Option 4: Wayback Machine
Sometimes, you have to get creative to recover parts of your website—this is where the Wayback Machine comes in. Think of it as your Hail Mary to retrieve at least some bits of your lost site.
It’s an inefficient process and essentially involves recreating your website from scratch, but it can be a lifesaver in desperate situations. Here’s how to use the Wayback Machine to bring your site back:
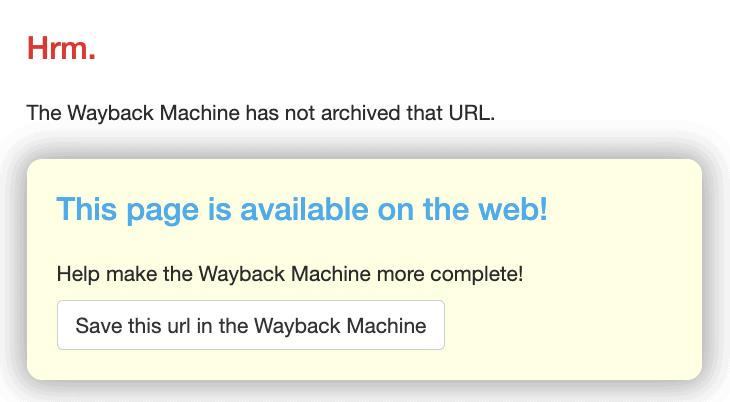
- Find your site: Go to the Wayback Machine website and search for your website’s URL in the search bar at the top of the page. Note that not all sites are archived and you might be slammed with an error message.

- Select the timeline: You’ll see a calendar view showing the specific days your site was archived. Click on a particular date to view a snapshot of your site from that time.

- Copy and store content: Open each page and manually copy the visible textual content. Paste it into a text editor or directly into your WordPress editor for safekeeping and further use. There is a chance that not all pages are archived, so you might be working with incomplete data.
- Create new posts/pages: Log into your WordPress dashboard, navigate to Add New under Posts or Pages, and rename it to the original title. Insert the copied text into the content area of the new post or page and rearrange it accordingly.
- Recover and upload images: From the cached snapshot on the Wayback Machine, save the images to your device. Upload these images to the new page/post on your website, arranging them as they were originally.
- Reapply themes and plugins: Manually search for the themes and plugins you were using before the delete incident. Reapply and activate them accordingly to get the look and functionality you had previously.
Note: Always take regular backups to prevent the headache of having to cobble your website back together using bits and pieces from the internet. Frequent backups can save you from the stress and labor of extensive reconstruction, much like trying to rebuild a shattered vase without all the pieces.
Option 5: Search engine caches
When you’re down to the wire and desperate to salvage some content from your site, search engine caches can be a last-ditch effort. Here’s how to leverage cached pages from search engines like Google to recover your site:
- Access the cached page: Copy and paste the following URL into your browser, replacing “https://user.com/” with your website’s URL: “http://webcache.googleusercontent.com/search?q=cache:https://user.com”

- Copy and store content: Open each page and manually copy the visible textual content and paste it into a text editor or directly into your WordPress editor for safekeeping and further use. There is a chance that not all pages are archived, so you might be working with incomplete data.
- Create new posts/pages: Log into your WordPress dashboard, navigate to Add New under Posts or Pages, and rename it to the original title. Insert the copied text into the content area of the new post or page and rearrange it accordingly.
- Recover and upload images: From the cached snapshot on the Wayback Machine, save the images to your device. Upload these images to the new page/post on your website, arranging them as they were originally.
- Reapply themes and plugins: Manually search for the themes and plugins you were using before the delete incident. Reapply and activate them accordingly to get the look and functionality you had previously.
Long-term preventive measures
Rebuilding a lost website is about as much fun as getting a flat tire in the middle of nowhere. Here are some preventive measures to save future you from ripping your hair out:
Regular automated backups: Spare yourself the hassle by choosing a reliable backup plugin like BlogVault. Let automation do the heavy lifting while you sip your coffee.
Store backups offsite: Use cloud storage solutions like Google Drive, Dropbox, or Amazon S3. If your server decides to take an unexpected holiday, your backups will still be safe and sound far away from the mayhem. We also recommend archiving your sites to add an extra layer of safety.
Enhance site security: Install security plugins like MalCare to protect against hacks and malware. Think of it as a digital bouncer, keeping the riff-raff out so your site can party in peace.
Update WordPress, themes, and plugins: You can update the WordPress core, themes, and plugins all at once with BlogVault. Keeping everything updated patches those pesky security vulnerabilities.
Implement strong user authentication: Use strong passwords. No, “password123” doesn’t count. Ensure all user accounts have strong, unique passwords.
Enable two-factor authentication (2FA): Add an extra layer of security by requiring a second form of verification. Two-factor authentication significantly reduces the risk of unauthorized access by requiring users to provide a second piece of information beyond just their password. This second factor is typically a code sent to their mobile device or generated by an authentication app.
Multiple backups: Why have one backup when you can have many for the same price? Keep multiple versions of backups to ensure you have several points to recover from if needed. It’s the digital equivalent of having more than one lifeboat on your ship—just in case.
Parting thoughts
Rebuilding a WordPress site from scratch is as enjoyable as a root canal—and just as painful. If your website really matters, it is non-negotiable to take regular backups. Unless you have a hidden desire to spend hours hunting for lost content. Save yourself the hassle and back up your site using BlogVault. Think of it as a small investment in avoiding a complete and utter meltdown. Your future self will thank you and us for the foresight.
FAQs
Can you recover a deleted WordPress site without a backup?
Yes, you can recover a deleted WordPress site without a backup. You can access archives or cached versions of your site and rebuild your website piece by piece. But be warned it is like trying to solve a Rubik’s Cube in the dark. Without a backup, you’re attempting to build a sandcastle from grains of sand scattered across the beach.
Why is it important to back up my site to multiple locations?
Backing up your site to multiple locations is crucial for ensuring the highest level of data security and availability. When you have backups stored in various locations—such as on your server, an external hard drive, and cloud storage (e.g., Google Drive, Dropbox)—you significantly reduce the risk of data loss.
How can I verify that my backup systems are reliable?
To verify that your backup systems are reliable, perform regular test restorations by restoring backups to a staging environment and verifying their functionality. Additionally, you can automate notifications from your backup solution to alert you of successful or failed backups.
How do you back up a site?
Back up your site effectively using a reliable backup plugin like BlogVault. Automate your backups to ensure ongoing protection and schedule them according to your needs. Store backups in multiple locations, such as on cloud storage (e.g., Google Drive, Dropbox), and external hard drives, to provide multiple layers of security. This comprehensive approach ensures that even if one backup fails, you have other copies to fall back on.
How often should you back up your site?
The frequency of your backups should depend on how often your site changes. For sites that frequently publish new content or operate in e-commerce, daily backups are recommended. Sites with moderate updates can do well with weekly backups, while static sites with minimal changes might only need monthly backups.
Tags:
Share it:
You may also like
How To Backup WordPress Site To Computer?
What do crashed sites, failed updates, and human error have in common? They are all fixable… if and only if you have a backup stored securely. Without a backup, you’ll…

How To Update A WordPress Theme From A Zip Folder?
A theme is to a WordPress site, what furniture is to a house. They add design and functionality to it. Without it, a website doesn’t work. A failed update can…
WordPress Theme Update Failed: Easy Fix
You’ve just initiated a theme update on your WordPress site. But instead of a seamless process, you’re staring at an error message. It’s also possible that you’re staring at a…
How do you update and backup your website?
Creating Backup and Updating website can be time consuming and error-prone. BlogVault will save you hours everyday while providing you complete peace of mind.

Updating Everything Manually?
But it’s too time consuming, complicated and stops you from achieving your full potential. You don’t want to put your business at risk with inefficient management.

Backup Your WordPress Site
Install the plugin on your website, let it sync and you’re done. Get automated, scheduled backups for your critical site data, and make sure your website never experiences downtime again.


