What the hosts file is all about
Bulletproof Backups for Your WordPress Website
Fortify your business continuity with foolproof WordPress backups. No data loss, no downtime — just secure, seamless operation.
WordPress developers are often faced with the challenge of moving their sites across hosts. The process includes moving all your WordPress files and the database to a new server. It also involves a DNS update to reflect the IP address of the new server. This can result in downtime in case the update occurs before all the data has been moved to the new location. Even if the DNS update happens at the end of the entire process, there is always a likelihood that something went wrong. This again may result in downtime and put you under a lot of stress to resolve the issue quickly.
When you type a URL in the browser window, e.g. www.google.com, the step is to fetch the mapping IP address. This is achieved by means of a DNS lookup. A query is sent to the DNS server configured on your computer to get the IP address of the server we are trying to contact (i.e. google in this case).
There is an option to override the DNS lookup by using the hosts file. The hosts file stores the mapping between host names and IP address. The hosts file can be of great help to eliminate downtime while moving across hosts. It provides you with an opportunity to test your site on the new server before going live i.e. updating the DNS entry with the new server. Lets say you moved your site (e.g. https://blogvault.net) from server X to Y. You can add a rule in your hosts file to map blogvault.net to the new server Y. Once this is done, the sitehttps://blogvault.net will be served by server Y, thereby enabling you to test all your changes. X and Y in this case would be IP addresses of the old and new server respectively.
10.20.0.1 blogvault.net (Y’s IP address is 10.20.0.1)
Note: Don’t forget to delete the entry from the hosts file once your testing is complete
Supposing you want to test blogvault.net as well as www.blogvault.net, you’ll need to add separate entries in the hosts file.
10.20.0.1 blogvault.net
10.20.0.1 www.blogvault.net
The hosts file can be edited using any text editor that’s available on your system. Once you add the new lines, save them and proceed with your testing. Always remember to backup the hosts file before making any changes to it.
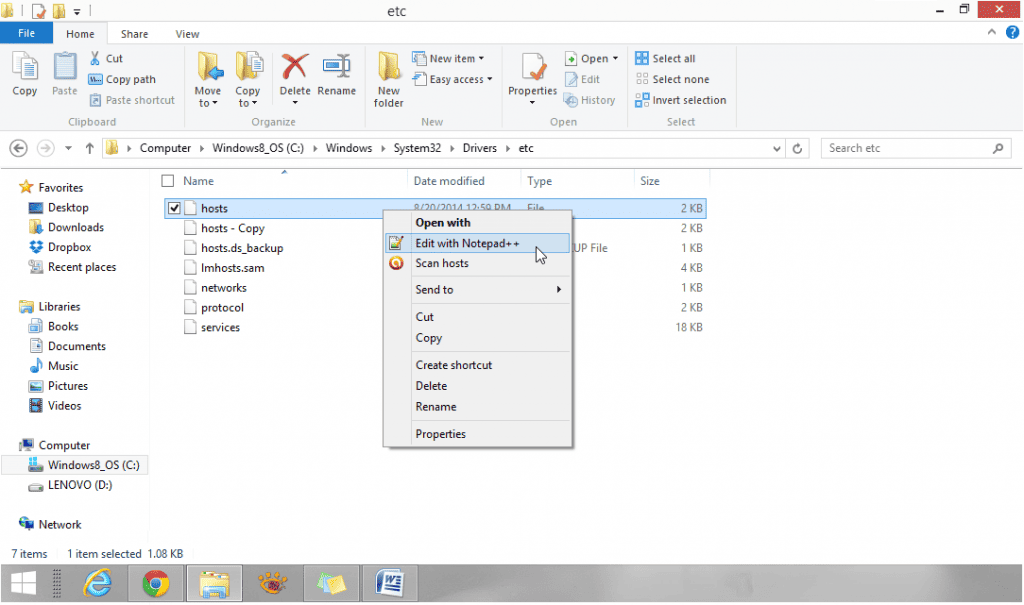
This file is found in different locations based on the OS that you’re running.
| Unix, Linux and Mac | /etc/hosts |
| Windows 8 | C:\Windows\System32\drivers\etc\ |
blogVault is a complete backup service that supports zero downtime migration. With just a click of a button, you can seamless move your site between hosts. To register with blogVault, click here.
Tags:
Share it:
You may also like

How to Limit Form Submissions with Droip in WordPress
Forms are an indispensable part of any website because of their versatility, letting you collect information for various purposes! However, people with ill intentions often attempt to exploit these forms…

How To Manage Multiple WordPress sites
Management tools help agencies become well-oiled machines. Each task is completed with the least amount of effort and highest rate of accuracy. For people managing multiple WordPress sites, the daily…

PHP 8.3 Support Added to Staging Feature
We’ve introduced PHP version 8.3 to our staging sites. Test out new features, code changes, and updates on the latest PHP version without affecting your live website. Update PHP confidently…
How do you update and backup your website?
Creating Backup and Updating website can be time consuming and error-prone. BlogVault will save you hours everyday while providing you complete peace of mind.

Updating Everything Manually?
But it’s too time consuming, complicated and stops you from achieving your full potential. You don’t want to put your business at risk with inefficient management.

Backup Your WordPress Site
Install the plugin on your website, let it sync and you’re done. Get automated, scheduled backups for your critical site data, and make sure your website never experiences downtime again.


