How to Disable Directory Browsing of Your WordPress Website?
Bulletproof Backups for Your WordPress Website
Fortify your business continuity with foolproof WordPress backups. No data loss, no downtime — just secure, seamless operation.
Hackers are always on the lookout for vulnerabilities in websites – be it in the form of outdated WordPress themes and plugins, weak login credentials, WordPress core vulnerabilities, or even hosting vulnerabilities. While most of these vulnerabilities are common knowledge among WordPress site owners, there is one other vulnerability that you need to be aware of – directory browsing.
[lwptoc]
1. What is directory browsing?
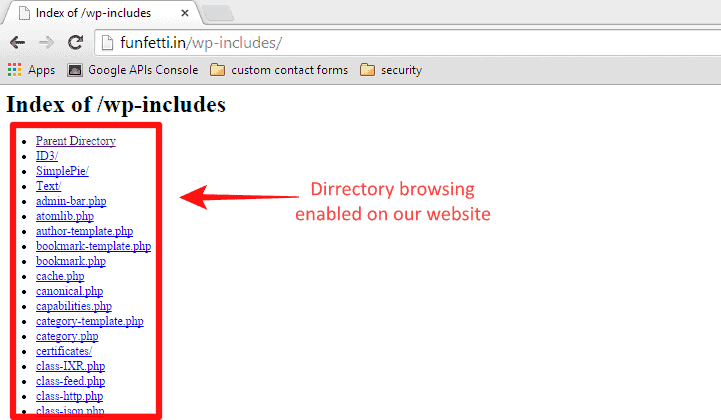
Directory browsing is when you access a website using a web browser and instead of a webpage, you see a list of files and folders. This happens because the web server that hosts your site can not only display web pages. But also the content of your web directories and other files. The reason this happens is because there is no index file (index.html, index.php etc) in the directory.
When a browser sends a request to access a web page, it is the web server that processes that request. A web server can be configured or instructed to prioritize which web pages to display whenever it receives such requests.
Typically, the index file (“index.html” or “index.php”) is the first file the web server serves up when a browser sends a request. However, in the absence of an index file, the web server displays the entire contents of the directory that was requested by the browser. This means all the files and folders inside the directory are on display!
Most web servers are configured to not display the contents of your directory (or directory listing as it is often referred to). You do need to make sure that directory browsing in WordPress website has been disabled. If you don’t disable it, then it would be like serving your site to the hackers, on a platter!
2. Why is disabling directory browsing important?
A web server that is configured to display all the contents of your website would lead to an information disclosure issue. Thich would aid an attacker in hatching an attack on your WordPress blog.
How would he be able to do that? So here is a scenario. Let’s say you have a site with the following domain name – www.yoursitename.com and you create a folder named private. If directory browsing is enabled by default for this site, a hacker can easily access all the files inside private by merely typing http://www.yoursitename.com/private/ in the browser.
Imagine the wealth of information available at the fingertips of a hacker who could potentially exploit vulnerabilities in your files. Directory browsing would also enable an attacker to view the critical and confidential contents of restricted files in the directory. And even the hierarchy of these files, that would give him crucial insights into the configuration of the website. All these would aid him in finding the vulnerabilities in your site – WordPress plugins, themes, core etc – if the directory that contains these files has enabled directory browsing by default.
3. Disabling directory browsing – An important security measure
Disabling directory browsing is not a security measure in the sense that it does not make your site more secure. You are merely obscuring your files from being blatantly displayed to an attacker. While this is extremely important, it is merely security by obscurity. And certainly not enough to protect your site.
A hacker can find many more ways to exploit the vulnerabilities in your site. So this step is just to ensure that your site is not served up on a platter to him! That is, all files under the directory are not accessible with a single request.
So disabling directory listing/browsing is crucial to your site’s security, however, it cannot ensure that your site is safe. For that, you would need to implement certain website hardening measures such as installing a firewall, creating strong usernames and passwords. Installing security plugins that can scan and clean your site (in case there is malware) among many others. You might want to check out our beginners guide on WordPress security.
4. Learn if directory browsing is enabled on my site
To test whether any random person can browse your directory, you would need to access the files in your site. The easiest way to do this is by using an FTP client. For the purpose of this article, we are using FileZilla FTP client. If you do not have FileZilla, you can download it from here.
To make the process easier, before you start, keep the below-mentioned information handy:
- FTP credentials (username, host server, password, port). If you do not know your FTP credentials, you could refer to our videos as a guide.
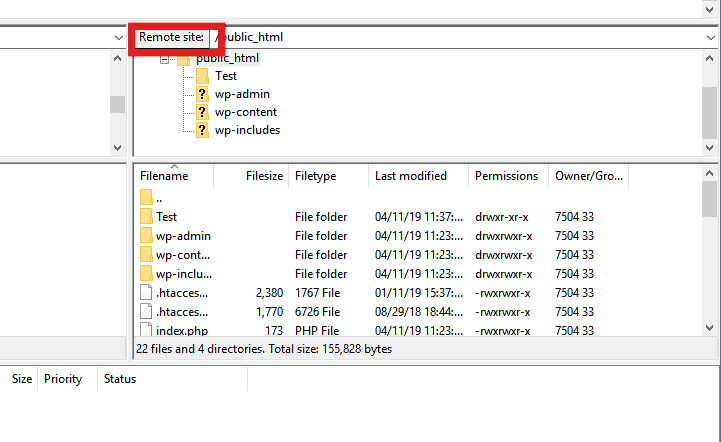
Step 1: Log into FileZilla using the FTP credentials as shown below and then click on Quickconnect.

Once you connect to the server, you can see the Remote Site section displays the contents of your site as shown in the image below.
Step 2: Next, create a dummy folder on your Local Site section (as shown by the arrows) i.e. the left side panel. We named our dummy folder Test as shown below.
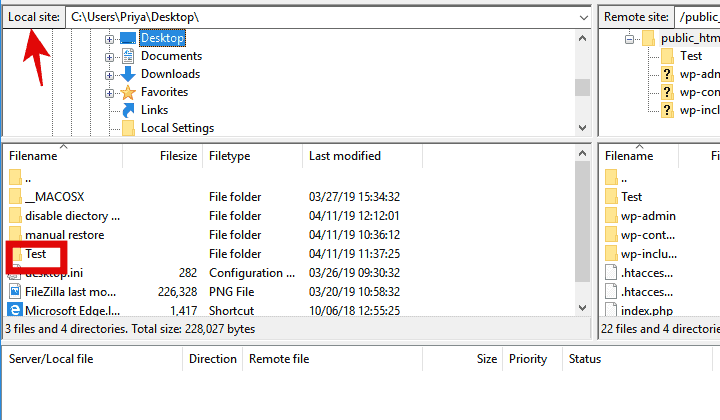
Step 3: Drag and drop the Test folder from the Local Site to the Remote Site section (i.e. from the left side panel to the right side panel. We’ll place this in the public.html folder of the remote site.
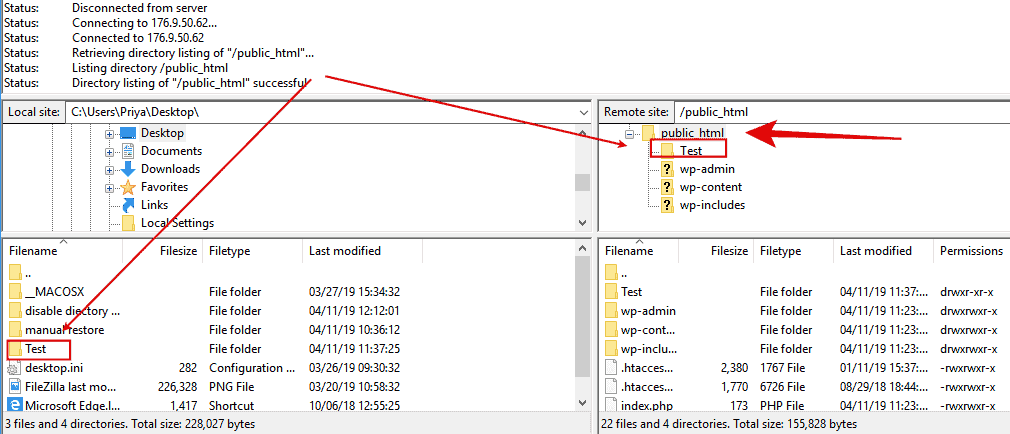
Step 4: Once you have created a parent directory/folder in the public.html section, then you can test whether directory browsing has been enabled or disabled by typing the following in the browser:
http://www.yoursitename.com/Test/
We typed Test because that was the name of the dummy folder we had created. You would instead be typing in the name of the folder you have created. In our case, since directory browsing has been disabled, we could not access the content of the Test directory. Instead, the browser showed an error message, preventing access to the directory.
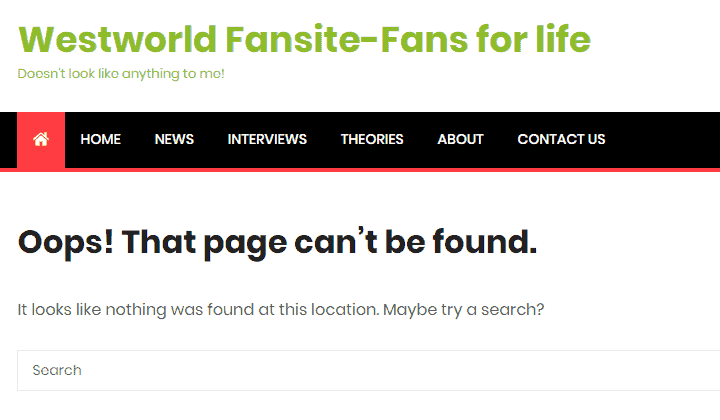
If instead of this error message, your web page displayed an error message such as ‘forbidden access’, that too means that your directory browsing has been disabled. However, instead of displaying an error message, if the web page actually shows an empty directory, then that means your directory browsing is enabled.
This is a serious situation that needs to be corrected promptly.
5. Disable directory browsing at a web server level –
Disabling directory browsing can be done by
- Either change your web server configuration file ‘httpd.conf’ through your Web Host Manager.
- Or directly on your site through “.htaccess” via the FTP client.
- Or by editing the ‘httpd.conf’.
However, the ‘httpd.conf’ file is a configuration file, editing which would require root access to the web server. Now, web servers can be of different types – apache, nginx, litespeed etc. Changing a ‘httpd.conf’ file on any of these web servers requires, as we mentioned, root access to the server.
If you are self-hosting your website, then you would have the required root access. But if you are hosting your site using a web host (managed or shared hosting), you would need to contact your web host for the root access. Sharing this information is at the discretion of your web host, some may comply, while others may not. So check with your web host regarding that.
Once you have the required root access, then you can log in to the cPanel/ control panel or Web Hosting Manager (WHM) as the root user. For a detailed step-by-step guide on how to edit the configuration of your Apache web server’s ‘httpd.conf’ file, follow the instructions in this article.
6. Disable directory browsing in cPanel (3 methods) –
To disable directory browsing via cPanel, there are three ways to do so.
a. Via file manager (method 1)
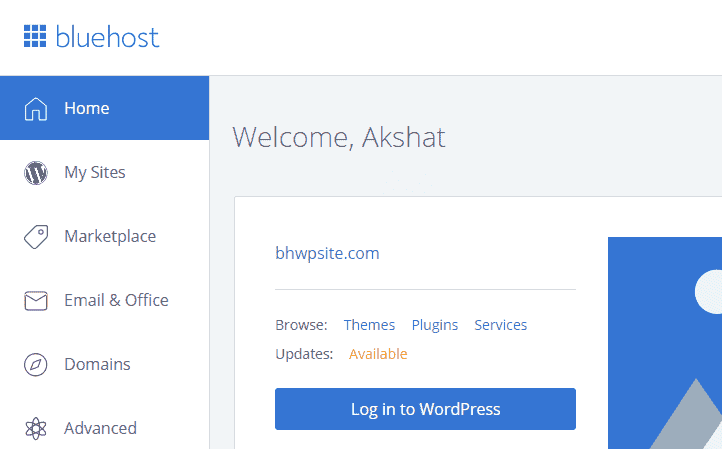
Step 1: Login to your web host account with your username and password. Once you login to your account, you’ll go to the following screen.
Step 2: Next, click on the File Manager icon.

Step 3: You will see a list of directories and files. Select the one for which you want to disable directory browsing by right clicking on it. A pop-up window will appear as shown below.
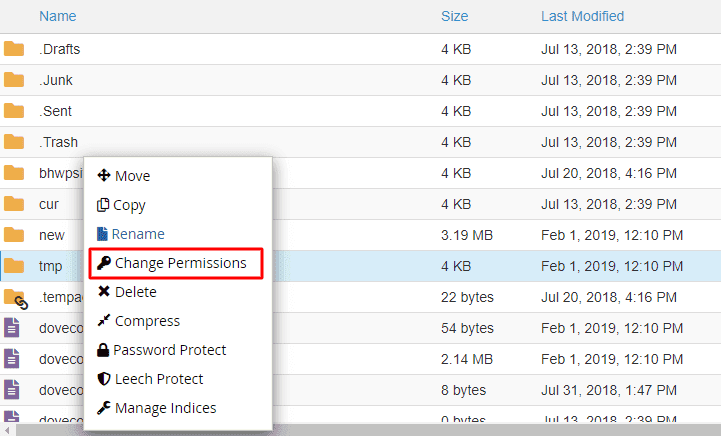
Step 4: Click on Change Permissions. A new popup window will appear where you can change the access permissions of the folder selected.
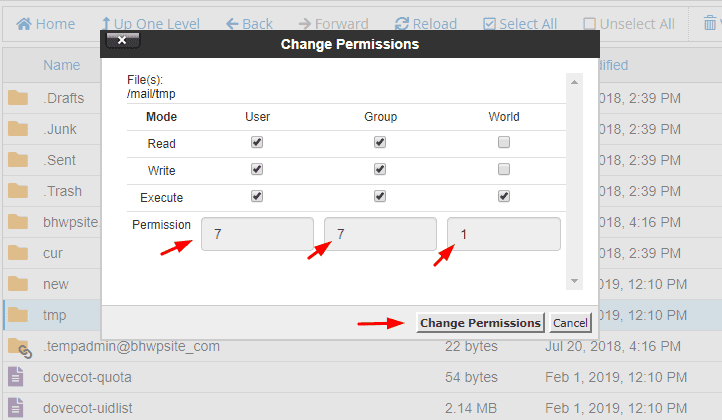
Step 5: Assign file permission as 771 which means that the folder can not be accessed by visitors, only by its owners and its groups. And click on Change Permissions. That’s it!
Now onto the second method.
b. Via File Manager Indices (method 2)
Step 1: Here we are going to access the cPanel Index Manager to disable directory indexing.
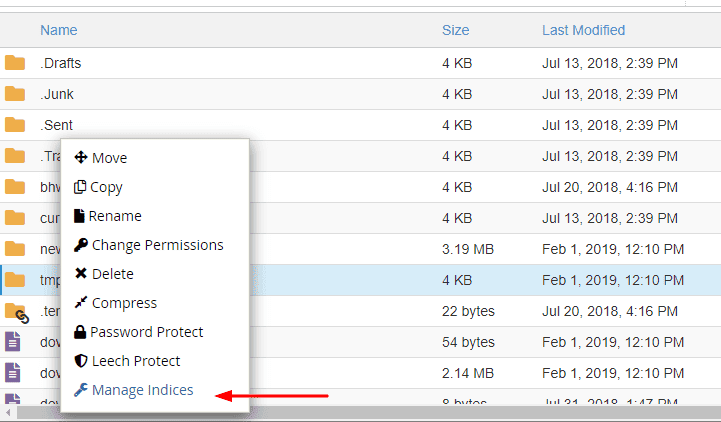
This method is similar to the above-mentioned method until Step 3 where you open File Manager after logging into your web host. Once you right click on the folder you want to disable directory browsing for, then instead of clicking on Change Permissions, click on Manage Indices as shown below.
Step 2: You will be taken to the Index page when you click on Manage Indices as shown below.
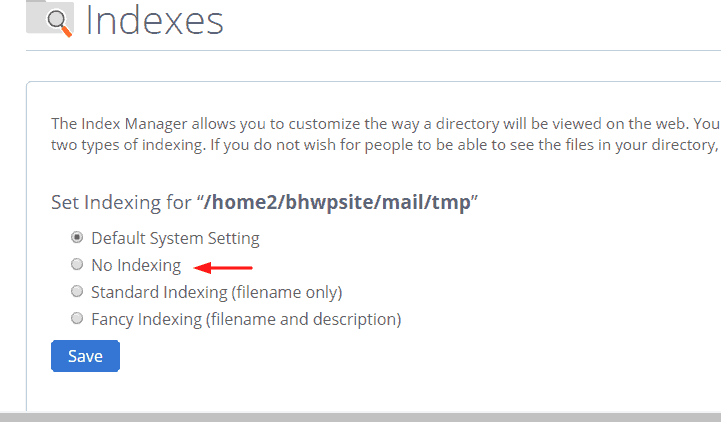
Click on No indexing and then Save the changes you have made. This will disable directory browsing on your site.
c. Via Directory Indexing (method 3)
In this method, after logging into your WordPress hosting account, click on the advanced settings icon. From the advanced settings, you can directly access the Indexes page. This is where you can edit the indexing settings of your server that will disable directory browsing.
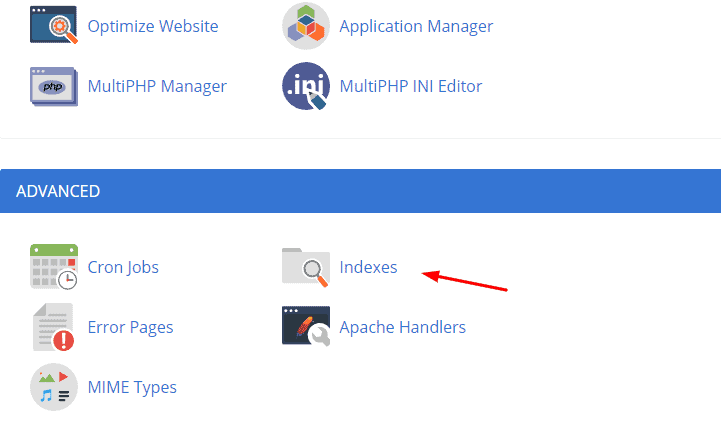
Step 1: Login to your web host account and click on the Advanced setting icon as shown below.
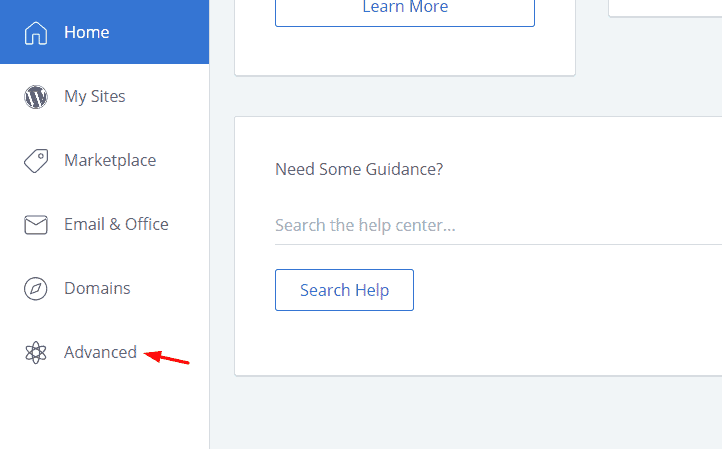
Step 2: In the advanced page, you will find the Indexes icon. Click on that.
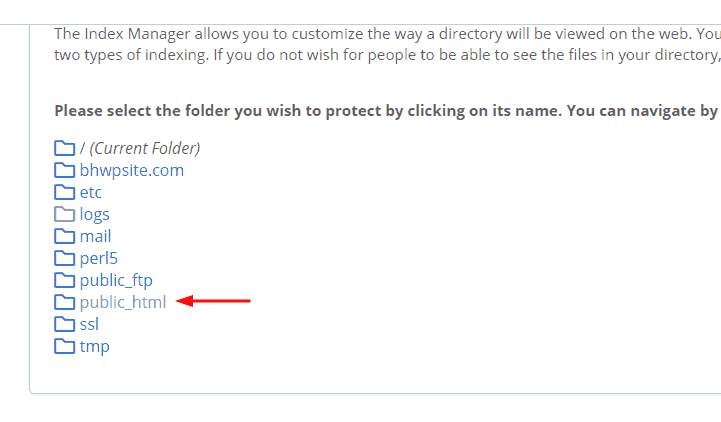
Step 3: On the Indexes page, select the folder whose directory browsing you want to disable. We selected the public.html folder, but you can select the folder whose settings you want to change.
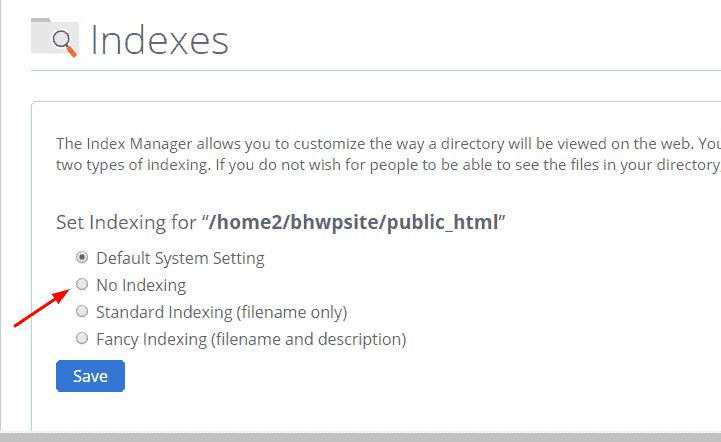
Step 4: Once you click on the public.html folder, you will be taken to the Indexes page where you can change the setting of the folder to No Indexing and then click Save.
And that’s it.
7) Disable directory browsing at site level (with .htaccess)
The above-mentioned methods dealt with changing the directory setting at a site level via the cPanel. Now we go on to explore how to disable directory browsing with the “.htaccess” file via an FTP client.
Your “.htaccess” file is crucial to the way your site’s server manages your web site. So it is crucial that there are absolutely no errors while modifying the file. After uploading the “.htaccess” file, it is highly recommended that you test your website to see if everything is working fine. Because even the slightest mistake can make your website dysfunctional. So we strongly recommend that you save a second copy of your “.htaccess” file on your local system so that in case your website is not working, you have the option to upload the unmodified file.
Another way to ensure that your live site is not affected is by staging your site using the BlogVault plugin.
When you stage a site using BlogVault, you basically create a copy of the site in a test environment without affecting the live site. To stage a site using BlogVault follow the simple instructions mentioned in this guide.
Moving on to disabling directory browsing on “.htaccess” file, we used an FTP client called FileZilla for the purpose of this article.
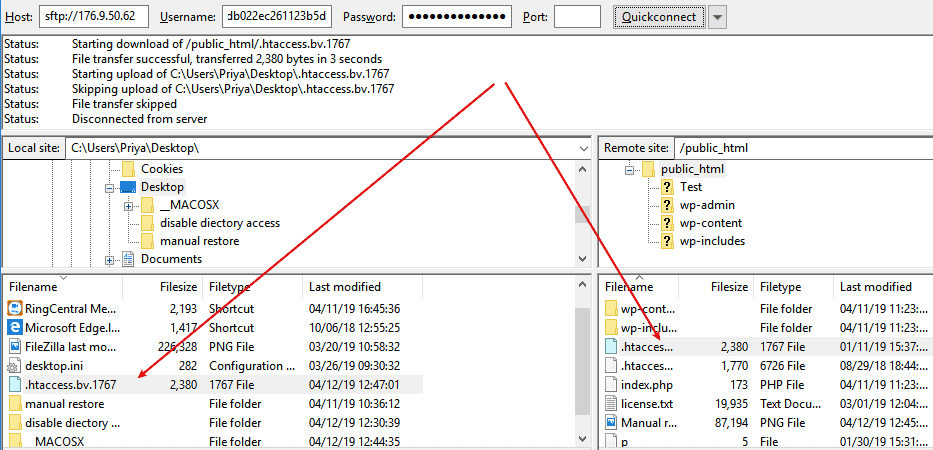
Step 1: Open FileZilla by entering the FTP credentials – server (host), username, password and port. If you do not have the information, please refer to our guides on how to find out these details.
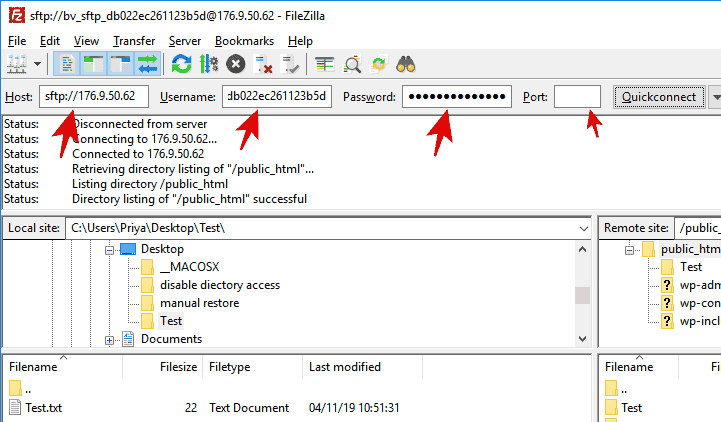
Step 2: Once you enter your FTP credentials, you will see a listing of all directories and files in the Remote Site section on the right-hand panel as shown below. Most probably you would find a “.htaccess” file under the public.html folder. If you find a file called “.htaccess” file, then download it on to your desktop by dragging and dropping it to the local section (or the left-hand panel).
<image>
Drag and drop it as shown below.
Step 3: Next, open the “.htaccess” file with a plain text editor on your desktop and make a copy of it just in case something goes wrong with this one while modifying it. We opened ours using the notepad.
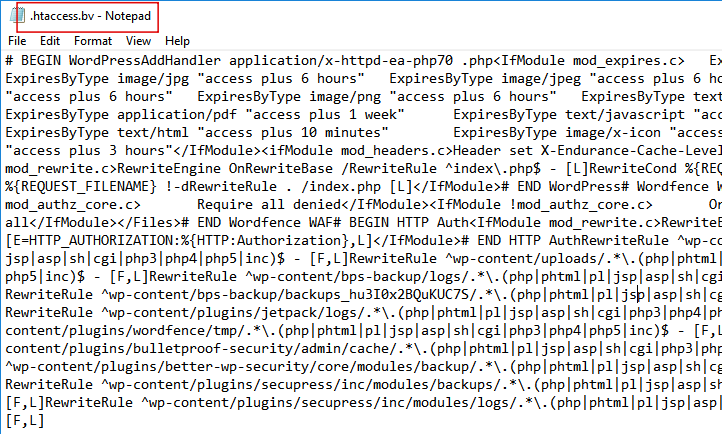
To disable directory browsing on your “.htaccess” file, add the following line to the beginning of the text document:
Options -Indexes
Hit enter and that’s it. Note that you have to use a plain text editor and not a word processor like Word, WordPad to open & modify the file.
What to do if there is no “.htaccess” file in your site directory
In a scenario where you do not find a “.htaccess” file in your site directory, you would need to create one on your desktop. To do this, create a new blank plain text editor document. Name the file “.htaccess” with the quotes and all.
Next, insert the following code to this new blank document:
Options -Indexes
And hit enter to it before saving it.
Once you have saved it, the next step is to upload it to the site. This step is the same whether you have created a new “.htaccess” document or you have modified an already existing one. To upload the file to the site, follow the simple instructions given below.
Step 1: Open your FTP client (FileZilla in our case) and log in with your FTP credentials.

Step 2: Next, on your local section, find the newly modified (or created if you did not already have the file in your site) “.htaccess” file.
Step 3: To upload it on to your site, simply drag and drop the file on to the Remote Site section as shown below. This should help you prevent directory browsing effectively.
As we mentioned at the beginning of the section, it is strongly recommended that you make changes to the “.htaccess” file in a test environment before making it on the live site.
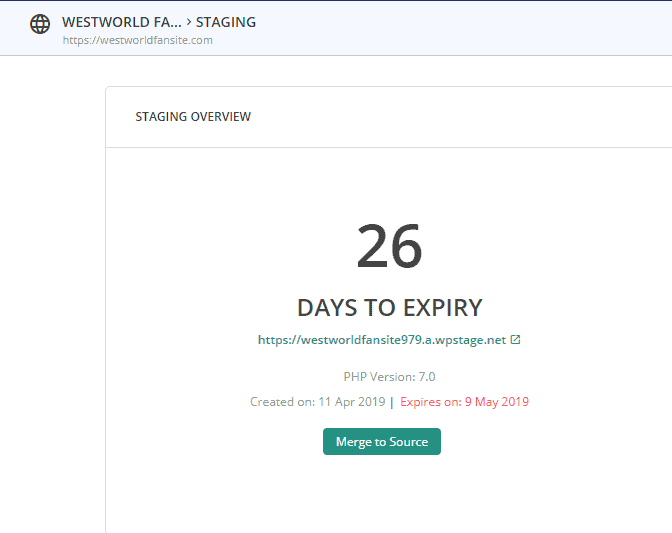
A staged site on the BlogVault platform offers FTP/SFTP credentials. You can use them to access the staged site using FileZilla as shown below. Also, after testing all changes on the staging site, you can merge it with the live site easily.
An important point to remember in this case is to back up your website before making any changes to it. Taking a backup copy would ensure that even if something goes wrong with your site while you make all these changes to such a crucial file, you always have a safe and secure copy to rely on that can be restored easily to contain the damage.
One of the most efficient and reliable ways to take a backup of your site is to use a plugin like BlogVault.
Tags:
Share it:
You may also like

How to Limit Form Submissions with Droip in WordPress
Forms are an indispensable part of any website because of their versatility, letting you collect information for various purposes! However, people with ill intentions often attempt to exploit these forms…

How To Manage Multiple WordPress sites
Management tools help agencies become well-oiled machines. Each task is completed with the least amount of effort and highest rate of accuracy. For people managing multiple WordPress sites, the daily…

PHP 8.3 Support Added to Staging Feature
We’ve introduced PHP version 8.3 to our staging sites. Test out new features, code changes, and updates on the latest PHP version without affecting your live website. Update PHP confidently…
How do you update and backup your website?
Creating Backup and Updating website can be time consuming and error-prone. BlogVault will save you hours everyday while providing you complete peace of mind.

Updating Everything Manually?
But it’s too time consuming, complicated and stops you from achieving your full potential. You don’t want to put your business at risk with inefficient management.

Backup Your WordPress Site
Install the plugin on your website, let it sync and you’re done. Get automated, scheduled backups for your critical site data, and make sure your website never experiences downtime again.


