Password Protecting wp-login.php with HTTP Authentication
Bulletproof Backups for Your WordPress Website
Fortify your business continuity with foolproof WordPress backups. No data loss, no downtime — just secure, seamless operation.
The WordPress admin dashboard can only be accessed by entering in your username and login password. It is good practice to use a strong login password at all times, as this makes it difficult for bots and hackers to break into your admin dashboard. However, the internet has never been a very safe place, and no amount of security is ever enough. Therefore, it’s always good to have as many layers of security as (sanely) possible, to keep hackers at bay.
While login credentials are a robust security measure at the WordPress application level, we can add further security using HTTP Basic Authentication (BA). HTTP BA is the simplest technique for enforcing selective restriction of access to your web resources, making it a system level security. But well, enough nitty-gritty for now, lets try to understand this with a simple analogy. Imagine your WordPress site to be a house. Although the house’s main door (read login credentials) is a vital part of security, it may not be enough, and you might want to add a fence around your house as an additional security measure. HTTP authentication is one such ‘fence’ for the protection of your WordPress site. Anyone who wants to enter your admin dashboard will first need to go through the HTTP authentication (your fence) and then enter in their login credentials (your main door).
To secure your WordPress site with HTTP authentication, you need to first generate a .htpasswd file, where you’ll list all authorised usernames and their respective encrypted passwords. Following our analogy, think of this as setting up a door to your fence. One can leverage .htpasswd only on an Apache server, since .htpasswd is an Apache password file. Good news is, Apache is the most commonly used web server software worldwide. This makes it highly probable that your site is running on Apache.
Creating a .htpasswd File
You can use the htpasswd command line tool to create a new .htpasswd file. In your command line, use the following code:
htpasswd -c .htpasswd harini
Here, ‘-c’ stands for ‘create’ and should only be used while creating a new .htpasswd file. ‘harini’ is a case-sensitive username for our HTTP BA. On hitting enter, you’ll be prompted to enter the password you would like to use. By default, the htpasswd tool encrypts your password using MD5.

In the case that you already have an existing .htpasswd file, and would just like to add a new username to it, you should use the following command line:
htpasswd .htpasswd rahul

Note that you don’t have to use the ‘-c’ switch in this command, since you don’t have to create a new htpasswd file here.
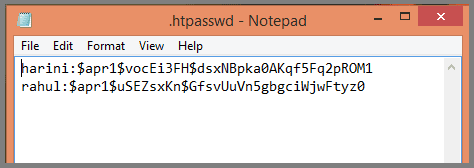
A typical htpasswd file looks like this: ‘username:encrypted_password’. For instance, a sample .htpasswd file that contains users harini and rahul would look like:
If you aren’t able to get your hands on the htpasswd tool, you can easily generate your .htpasswd entry (username-encrypted password pair) using this htpasswd generator.
Now that you’ve successfully created the .htpasswd file, you have a lot of flexibility over where to place it, however, it is advisable to store it in a directory that can’t be accessed directly through the web. One such good location would be one level above the WordPress install directory. This will ensure that your Apache password file remains secure, even if your web server software were to get corrupted.
Password Protecting wp-login.php
With the .htpasswd file ready and stored in a safe position, you can now go on to restrict access to your wp-login.php file. For this, you’ll need to specify the following things in your .htaccess file:
- what file to restrict?
- where to get HTTP BA credentials from?
Assuming .htaccess file is at WordPress install directory level, adding the following lines of code in the file will do this for us:
<Files wp-login.php>

AuthUserFile /path/to/.htpasswd

AuthName "Private access"

AuthType Basic

require valid-user

</Files>
Here, you need to focus on the following two lines:
AuthUserFile /path/to/.htpasswd: Make sure you provide the correct path to your .htpasswd file in place of ‘/path/to/.htpasswd’.
require valid-user: The ‘valid-user’ keyword tells Apache to provide any user mentioned in the .htpasswd file with access to the wp-login.php file. In case you want to grant selective access to the file, instead of using ‘valid-user’, you can just mention the usernames you’ll like to provide access to. For example, if there are three usernames mentioned in the .htpasswd file, out of which you want to grant access to only two users, say user01 and user02, and not to user03, you’ll use the following require directive:
require user user01 user02
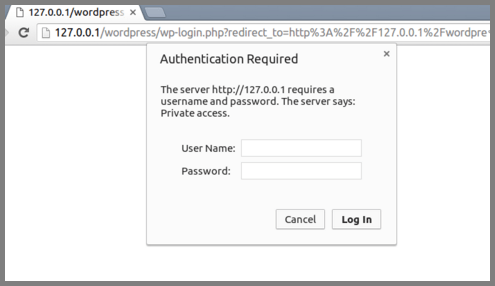
Once you’re done, save the file and upload it to the directory that contains the wp-login.php file. Now, the next time you try to login to your WordPress dashboard, you will find your browser prompting for authentication even before the admin-login screen is loaded, just like the fence we discussed.
While password protecting your login page is a good practice, we’d advise you to follow WordPress recommended security practices. Security plugins like MalCare enable you to perform those practices in the click of a button.
Tags:
Share it:
You may also like

How to Limit Form Submissions with Droip in WordPress
Forms are an indispensable part of any website because of their versatility, letting you collect information for various purposes! However, people with ill intentions often attempt to exploit these forms…

How To Manage Multiple WordPress sites
Management tools help agencies become well-oiled machines. Each task is completed with the least amount of effort and highest rate of accuracy. For people managing multiple WordPress sites, the daily…

PHP 8.3 Support Added to Staging Feature
We’ve introduced PHP version 8.3 to our staging sites. Test out new features, code changes, and updates on the latest PHP version without affecting your live website. Update PHP confidently…
How do you update and backup your website?
Creating Backup and Updating website can be time consuming and error-prone. BlogVault will save you hours everyday while providing you complete peace of mind.

Updating Everything Manually?
But it’s too time consuming, complicated and stops you from achieving your full potential. You don’t want to put your business at risk with inefficient management.

Backup Your WordPress Site
Install the plugin on your website, let it sync and you’re done. Get automated, scheduled backups for your critical site data, and make sure your website never experiences downtime again.


