How to Manage Auto Updates for WordPress Plugins and Themes
Bulletproof Backups for Your WordPress Website
Fortify your business continuity with foolproof WordPress backups. No data loss, no downtime — just secure, seamless operation.

Auto updates can both decrease and increase your workload when managing a site. That’s why it is such a hotly debated feature, with security advocates on one side and people dealing with crashed sites on the other.
We strongly believe in keeping plugins and themes (and WordPress too of course) always updated. However, we also know that we can’t rely solely on the WordPress auto updates feature. Ideally, you want the convenience of automatic updates, but none of the risk of crashed sites.
This is especially true of sites with a lot of plugins. On average, sites have between 25 to 50 active plugins, depending on its complexity, and any one of those can cause the site to crash. Yeah, no thanks!
In this article, we’ll talk about how to have the best of both worlds.
TL;DR: BlogVault’s auto-update feature has all the convenience of its WordPress counterpart but bundled with automatic backups, visual regression to assess differences, and sync to check if the site crashes. You can set your plugins and themes to update on schedules, and rely on BlogVault to let you know if something goes wrong. If the auto-updates feature is still a little too risqué, you can always use BlogVault staging to test a major update first, and once you’ve verified everything, you can push changes to your live site. Can’t get safer than that!
What are WordPress auto updates for plugins and themes?
WordPress auto updates for plugins and themes are a core feature of WordPress, which allows admin to enable automatic updates for plugins and themes on an individual basis. They form a part of the larger WordPress auto update feature which updates the core every time there is a new release.
Although the auto updates feature hasn’t seen a smooth rollout, let’s be very clear: the auto updates feature is a very good one.
A little backstory
When WordPress introduced them in 3.7, they started small with minor core releases, also known as security and maintenance fixes. 5.5 really brought in the heavy power, with major releases and plugin and theme updates added to the mix.
Opt-in only
The difference with plugin and theme auto updates is that they need to be opted into. You have to individually enable auto-updates from the Plugins and Themes dashboards on wp-admin.
Not all plugins and themes
Another caveat is that the plugins and themes need to be available on the WordPress repository to be able to use the auto update feature. As an update was uploaded to the repository, the same was made available to all the sites with that particular plugin or theme instantly.
This excludes premium plugins and themes from the auto update feature, unless their developers build the functionality into the plugin or theme themselves. Custom extensions or those that need to be downloaded from a developer’s site cannot use auto updates at all for obvious reasons.
Best way to manage auto update for WordPress plugins and themes
It can be tricky to track plugin and theme updates on your own, especially if you manage a few sites at a time. This is why, at first glance, the auto updates feature feels like an answer to all your problems. However, plugin updates are known to crash sites, and theme updates can wipe out customizations that aren’t using child themes. In short, it can cause more problems than providing solutions.
As we said at the beginning of the article, there needs to be a happy medium. And that happy medium is managing auto updates with BlogVault.
- Create an account with BlogVault, if you don’t already have one. We have a 7-day, fully featured trial for you to get familiar with the dashboard and features. Once you’ve got an account, add your site. BlogVault can automatically install the plugin on your site to make things even easier for you. Wait for a few minutes for your site to sync.
- Once the site has synced, you will see it pop up on your dashboard. Clicking on it will take you to the Site Details page. There, you will see an option for Auto Update. Click on Schedule to set one up.
- You can set a name for the schedule, a frequency, and which sites you want the updates on. We recommend selecting both the backup and visual regression test options. Click Create to finish setting up the update schedule.
And that’s all there is to it. You can set up multiple schedules for different combinations of sites and updates of WordPress, plugins, and themes, based on what is most convenient for you.
Rest assured that your site is safe from malware because of regular updates, and safe from updates because of BlogVault.
BlogVault’s auto-update feature is better than blind auto updates for a few reasons:
- You can set a schedule to update plugins and themes on your sites.
- Enable automatic backups before every update, so if something happens, you can recover immediately.
- Visual regression feature to check your site before and after the update.
- Uses WordPress functionality to update the plugins and themes, so updates are secure and safe.
In addition to all that, BlogVault checks your site every day, and will send you an email if there are updates available. Even if you choose not to use the auto-update feature, you can still benefit from timely reminders to update. For bigger updates, you can use BlogVault’s built-in staging feature to test them out before committing them to your live site.
How to enable auto updates for WordPress plugins and themes
Plugin and theme auto updates are meant to work on a plugin-by-plugin and theme-by-theme basis respectively. Ideally, you want to have granular control over auto-updates, because not all themes and plugins are built the same way. For instance, a page builder is an important plugin that should be updated mindfully because it affects the whole site, and the potential to crash it is greater. On the other hand, a lightweight plugin like Akismet can be automatically updated without a problem.
However, there are ways to bulk-enable auto updates too. We’ve listed out all the ways you can automatically update WordPress plugins and themes so you can choose the method that works best for you.
Enable auto updates for plugins and themes using wp-admin
The easiest way to manage auto updates is via wp-admin.
To set auto updates for WordPress plugins
1. Log into your WordPress dashboard, and click on Plugins from the left navigation pane.

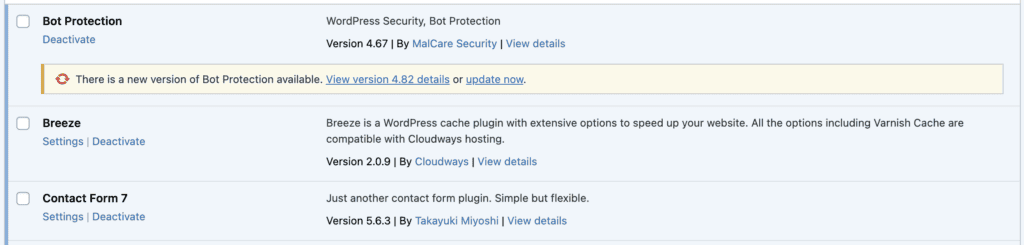
2. Scroll to your list of installed plugins. You should see a link to enable auto-updates against each one, unless it is a custom or premium plugin.

3. Click on the link to enable auto-updates. If your plugin is already up to date, the link will simply change to a disable option. If there is an update available, you’ll see when that update will be applied.

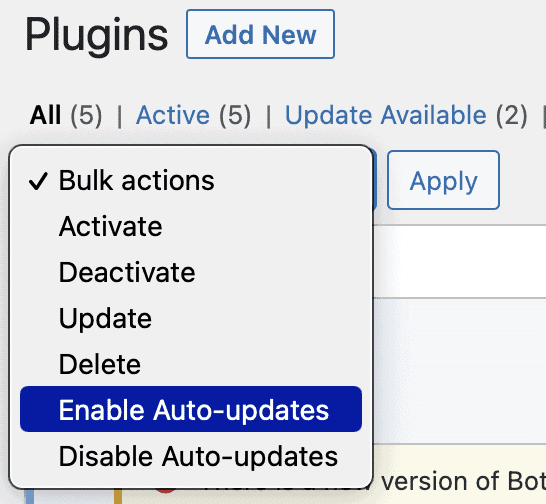
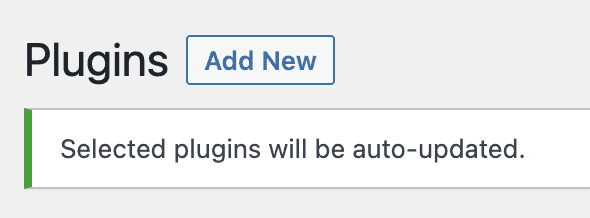
4. To enable updates for several plugins at once, select the checkbox against each one, and click on Bulk Actions. You’ll see an option to Enable Auto-updates. Select and click on Apply.
To set auto updates for WordPress themes
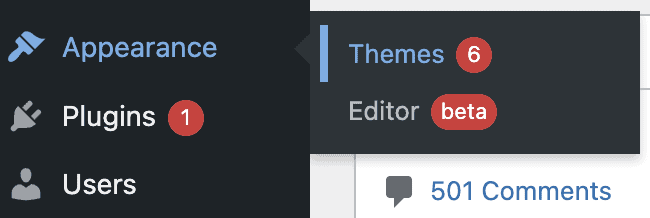
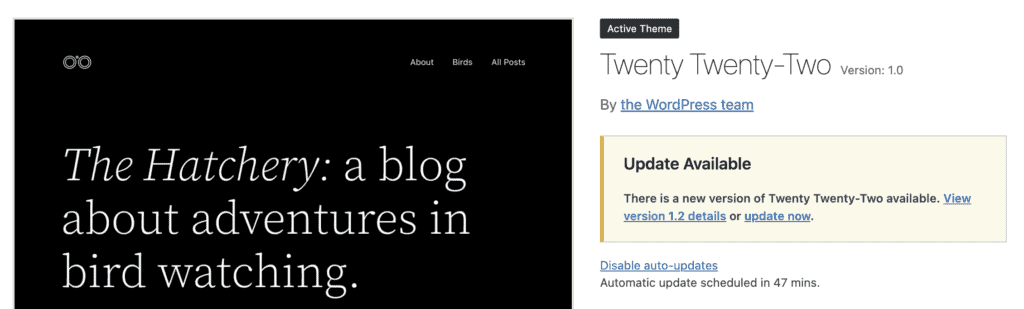
1. Log into your wp-admin dashboard, and click on Themes under the Appearance from your left navigation pane.
2. Hover over a theme to see the Theme Details button in the centre. Click on the button.
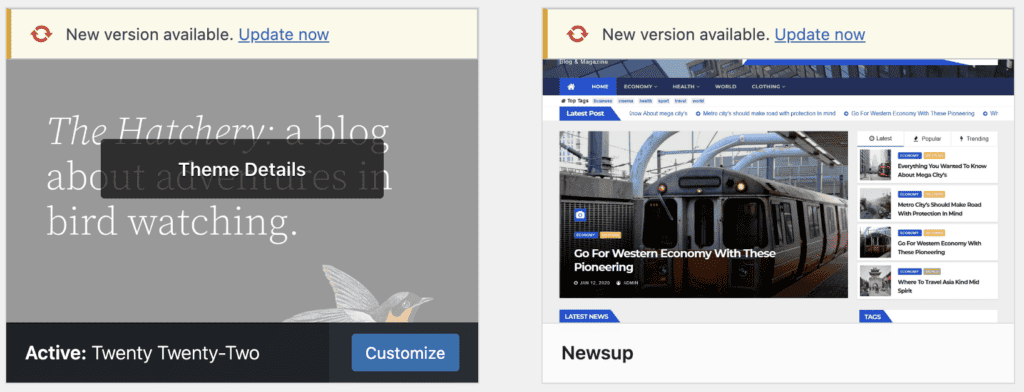
3. Within the theme details, you will see a link to enable auto-updates.
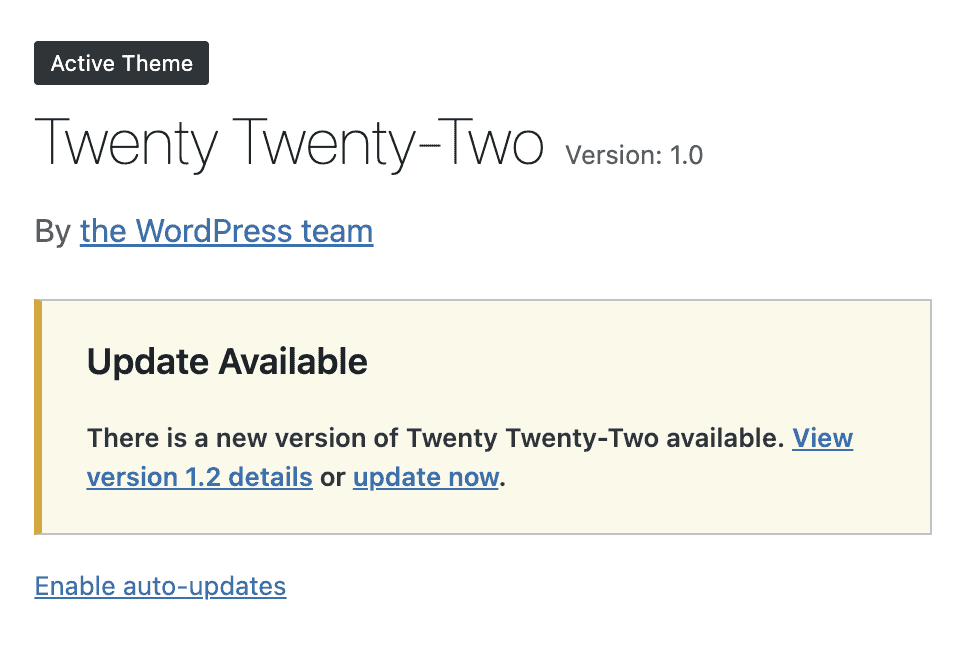
Once enabled, the link changes to a disable link instead. If there is an update already available, you’ll see a timeline for when it gets updated.
Premium themes will not have an option to enable auto updates. Good developers will indicate that an update is available and that you need to download and install it manually.
Unlike plugins, you cannot bulk select themes to enable auto updates. You can scroll through from one theme to another from the theme details pane, so you can shave off a little time there. Ideally though, you should have far fewer themes installed on your site, as compared to plugins. In any case, you can only have one active theme, so this may be a good opportunity to do some winnowing.
Setup auto updates for plugins and themes using an API filter
Although using the wp-admin interface is easier to auto update plugins and themes in WordPress, it can get a bit tedious to manage. If you rely on auto updates, you will need to enable it for each new plugin and theme that you install on your site.
The best way to manage plugin and theme updates is to use BlogVault. Available updates show up on your BlogVault dashboard immediately, and you can take a backup just before applying them. It really is the most effective way to protect your site from unnecessary downtime.
That being said, you can use API filters in a custom plugin to apply a blanket rule to auto update plugins and themes. This process is not without risk, as you will need to tinker with code. We highly recommend taking a backup first with BlogVault.
In the process below, we will be creating a custom plugin, inserting a few lines of code into it, and uploading it via FTP to our test site.
1. Create a text file on your computer, and start off with the basic plugin code.
<?php
/* Plugin Name: Plugin and theme auto updates
Description: Using filters to manage auto updates for plugins and themes
*/
?>
This code tells WordPress that this file is a plugin. Once it has been uploaded to your site, you will see it under Plugins. Make the plugin name and description meaningful, as this is what you will see on wp-admin.
2. To toggle plugin and theme auto updates, you need two lines of code just before the last line (?>):
add_filter( 'auto_update_plugin', '__return_true' ); // Enable plugin updates
add_filter( 'auto_update_theme', '__return_true' ); // Enable theme updates
If you only want to enable plugin updates, then only add the first line. Similarly, if you only need themes to auto update, then add just the second line.
3. Save the file with a .php extension.
4. Next, connect to your site via FTP. You will need an FTP client, your server IP, FTP username, and password. Alternatively, you can use File Manager if your host provided cPanel. Either way, the steps are the same.
5. Upload your newly created custom plugin to the mu-plugins directory in the wp-content directory. If the directory doesn’t exist, don’t worry; you can just create it. Once uploaded, exit the file manager.
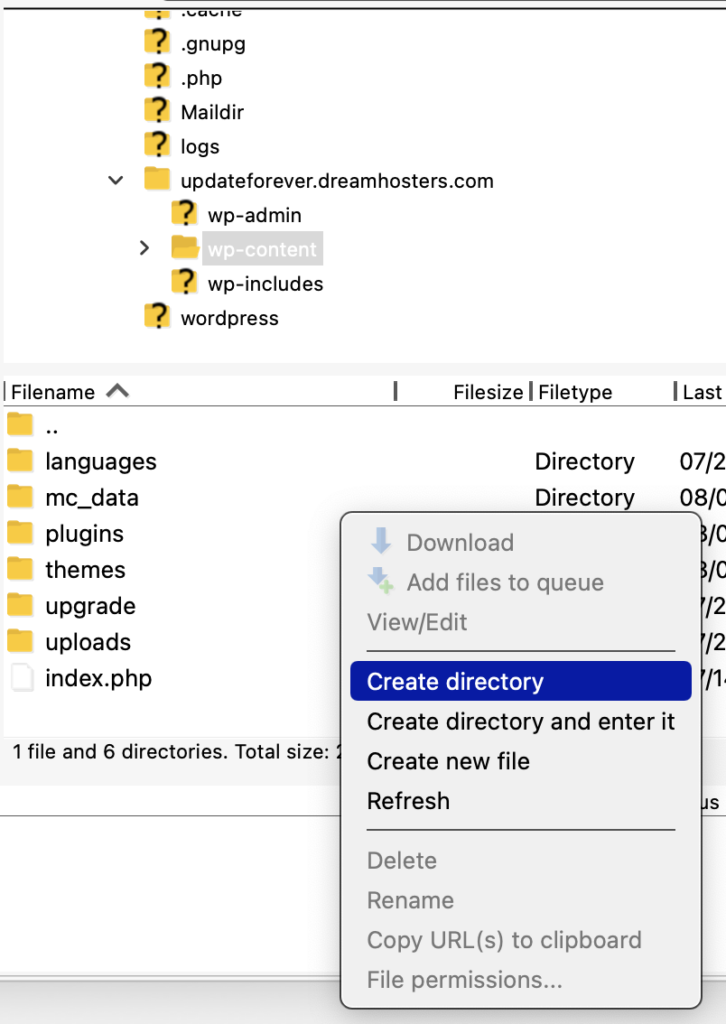
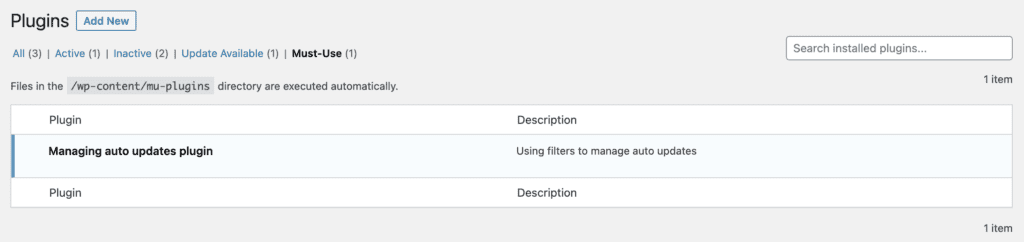
6. Go into wp-admin, and navigate to Plugins. You should see your new plugin under the ‘must-use’ filter.
Disabling auto update emails
If you have enabled auto updates, you might have a problem with a bunch of email notifications about available updates. This is especially the case if you manage multiple sites or have loads of plugins and themes installed. Your inbox can rapidly get overwhelmed.
There are a couple of ways to turn these notifications off:
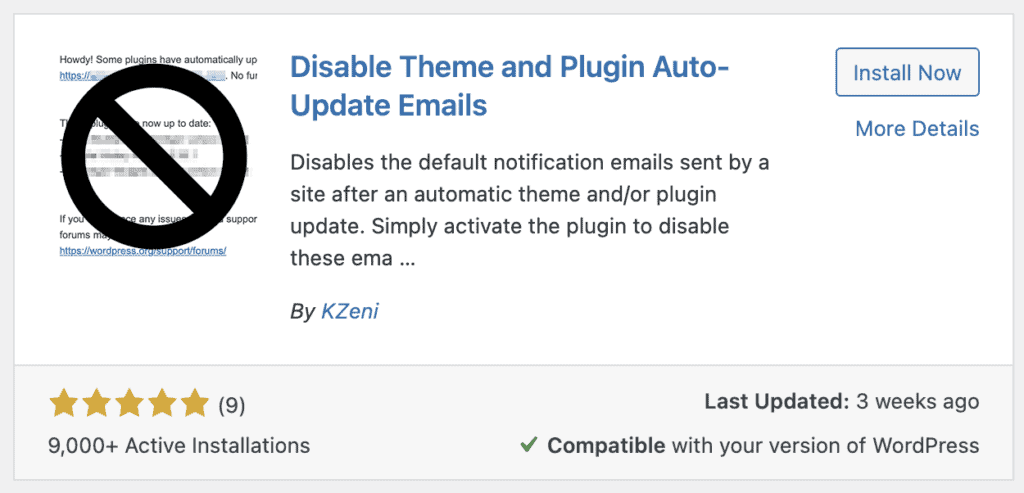
Using a plugin
1. From Plugins in your wp-admin, click on Add New to install a new plugin. Look for ‘disable plugin and theme auto update’ in the search bar. Install and activate the plugin.
2. Go to Settings on the left navigation pane, and click on General.
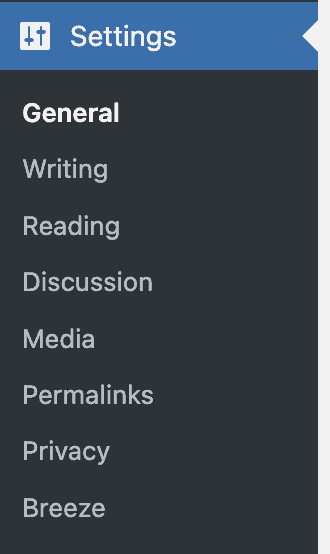
3. Scroll right down to the bottom, and you’ll see 2 new options: 1) disable successful update emails; and 2) disable failed update emails.
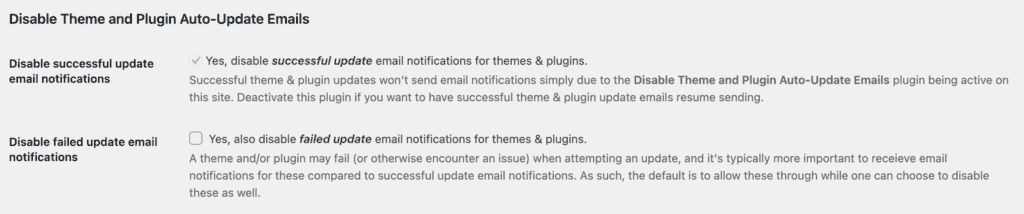
The former is checked by default by the virtue of the plugin being installed and activated on your site. The second option is a riskier one, and we recommend you leave that one unchecked. You always want to know if something has gone wrong.
Adding code to a custom plugin
Although we aren’t fans of adding plugins willy nilly to the site for every little thing, we have to admit that adding this plugin was easier than modifying code again. However, if you’ve used the custom plugin method above to enable auto updates for plugins and themes, you can just add the following lines of code to the same plugin:
add_filter('auto_plugin_update_send_email', '__return_false'); //Disable plugin update emails
add_filter('auto_theme_update_send_email', '__return_false'); //Disable theme update emailsBear in mind though, these lines of code will stop all update emails, even the failed ones. We really don’t recommend doing that.
How to disable auto updates for WordPress plugins and themes
As we said before, plugin and theme auto updates should be set granularly, i.e. one-by-one. Disabling auto updates can be a good idea for heavier or more critical plugins like page builders or SEO plugins that affect every post and page.
We’ll walk you through the different ways to disable auto updates for plugins and themes that are already enabled.
Disable auto updates for plugins and themes using wp-admin
Assuming you’ve used wp-admin to enable auto updates, you need to now do the reverse to disable.
To disable auto updates for WordPress plugins
1. Go to Plugins from the left navigation pane on your wp-admin dashboard.
2. Scroll through the list of installed plugins. The ones with auto updates enabled will have a link alongside to disable.
3. Click on the link to disable. Once done, the link will change to enable auto updates instead.
4. To disable auto updates for a bunch of plugins, use the checkbox selector alongside each plugin. Select the ones you want to change, and click on Bulk Actions on top. Select the Disable Auto-updates option and click on Apply.
To disable auto updates for WordPress themes
1. Go into the Themes menu under the Appearance on wp-admin.
2. Hover your cursor over a theme. You should see a Theme Details button in the centre. Click to view theme details.
3. In the popped up pane, there should be a link to disable auto updates. This means that auto updates are enabled for this theme. Click on the link to change this setting.

There is no way to bulk update theme auto update settings from wp-admin. You will need to check each one, and toggle auto updates one at a time.
Prevent auto updates for plugins and themes using BlogVault
If at any time you have enabled auto updates for plugins or themes—even if it is just one—you can use BlogVault to turn off all auto updates in one fell swoop.
1. Log into your BlogVault dashboard, and click on the site on which you want to change auto update settings.
2. On the Site Overview page, you’ll see a gear icon. Click on it to open the Site Settings menu.
3. Select the Auto Update tab from the left navigation pane, and click on Disable.
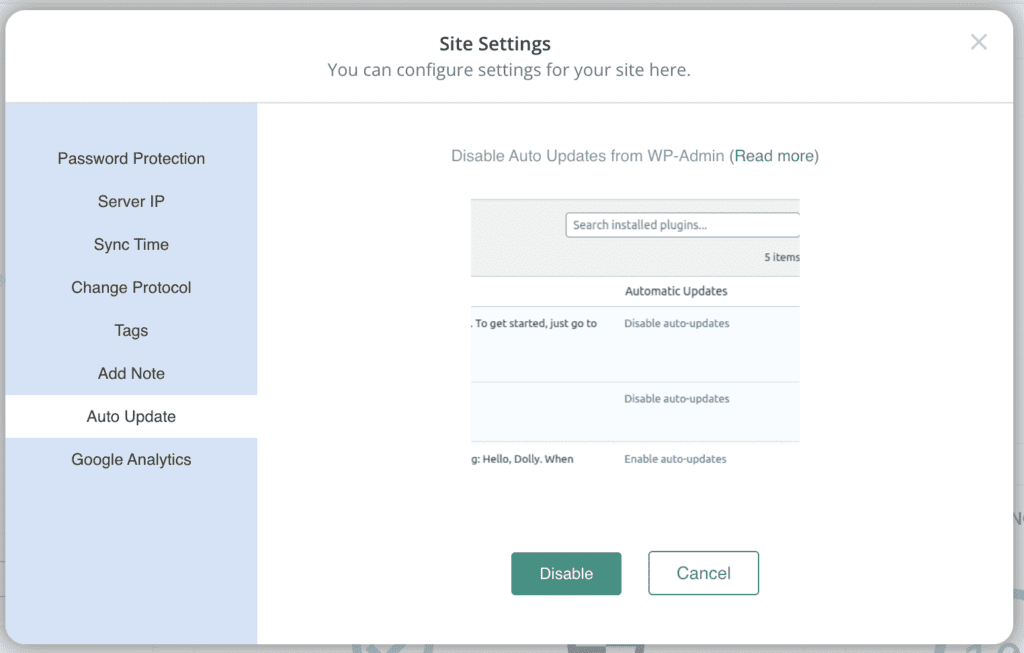
4. Go to your site dashboard, and open Plugins. You’ll see that the option to enable or disable auto updates has vanished entirely.
The advantage of toggling this feature on BlogVault is that now no one can inadvertently set a plugin or theme to update automatically.
Stop auto updates for plugins and themes using an API filter
As a last resort, you can also use API filters in custom plugins to disable plugin and theme auto updates. We do not recommend doing this though, because it involves messing about with your site code. Unless you are fairly confident, site code is best left untouched.
1. Start with a simple text file on your computer. Add the following code to it.
<?php
/* Plugin Name: Disable plugin and theme auto updates
Description: Turn off auto updates for plugins and themes
*/
?>
Later on, you will see this plugin in the list of installed plugins on wp-admin. Therefore, it makes sense to have meaningful entries for the name and description. This code also tells WordPress that this file is in fact a plugin, and should be considered as such.
2. Add the following lines of code in the penultimate line:
add_filter( 'auto_update_plugin', '__return_false' ); // Disable plugin updates
add_filter( 'auto_update_theme', '__return_false' ); // Disable theme updates
These lines will disable both plugin and theme auto updates. If you want to retain one set of auto updates or the other, then remove the corresponding line of code.
3. Once you’re done editing the file, make sure to save it with a .php file extension.
4. Use File Manager on cPanel or FTP to connect to your site server and see the files.
5. Next, go into the wp-content directory, and into the mu-plugins directory. If the directory doesn’t exist, create it. Then upload your brand new custom plugin into that directory.
6. WordPress will run the plugin every so often, and you’ve effectively disabled auto updates. You can see your new plugin in the installed plugins list on wp-admin as well.
Web host auto updates
Up to this point, we have talked about auto updates at a site admin level. In some cases, web hosts will manage updates for you. Typically these updates are for WordPress core, but they can also be for plugins and themes. Flywheel, for example, has a feature that manages plugin updates for you.
Some hosts will blanket deactivate auto updates. If you don’t see the option on your wp-admin dashboard, this is probably the reason why.
Troubleshooting failed plugin and theme auto updates
An update can sometimes cause a problem on your site.
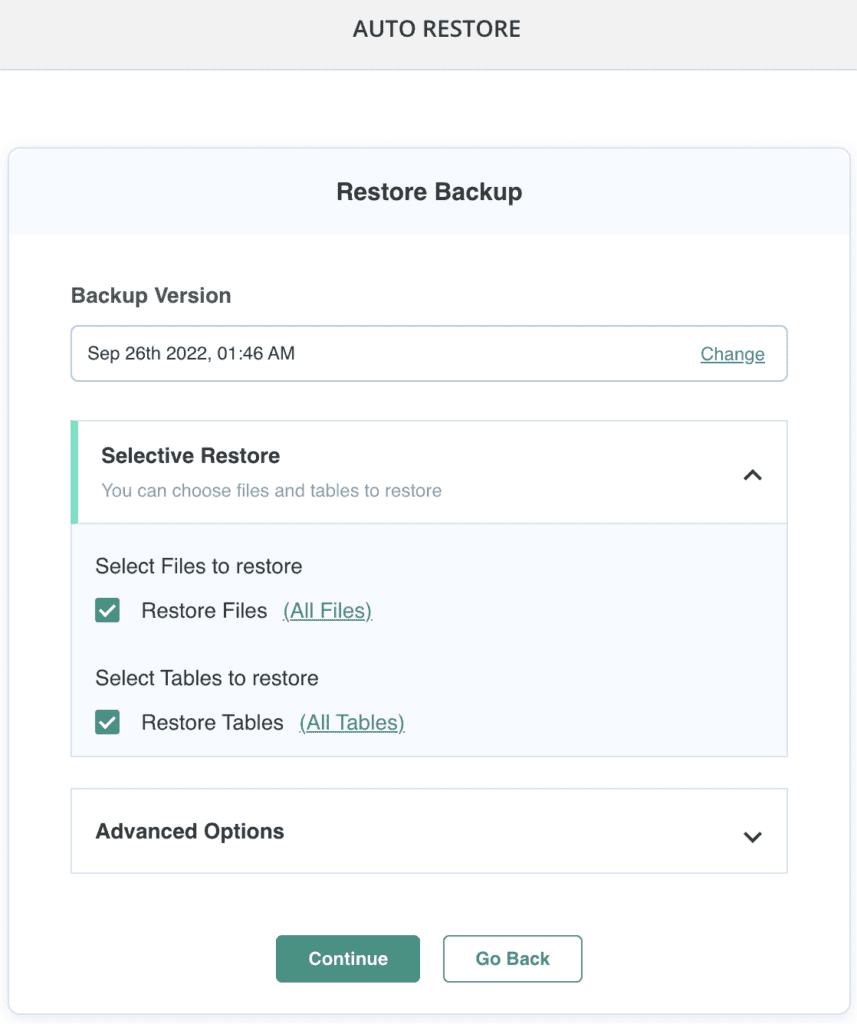
In this situation, the simplest troubleshooting technique is to rollback to a previous version. If you used BlogVault to update the misbehaving plugin or theme, you can restore the backup that was taken just before the update.
If you don’t have backups readily available, you can use WP Rollback to switch back to an older version. There is no native way to reverse an update, as using older versions is not recommended except for troubleshooting reasons.
Did you try updating too many plugins and themes at the same time? This may be the root of the problem. Restore a backup, and apply updates one at a time. Concurrent updates can overwhelm your site and cause a crash.
Sometimes updates can fail altogether, and have no perceptible reason to do so. We recommend reaching out to the theme or plugin developer to figure out what went wrong.
Best practices for handling plugin and theme updates
There is no one right way to manage updates for plugins and themes, as no two sites are completely alike. However, to protect your site from both malware and downtime, there are a few things you can do.
- Get a good backup plugin: We recommend BlogVault of course, because it takes automatic backups daily, and restores work every single time. You can use BlogVault to manage updates on a schedule as well, and if you need to test out that large update, it comes with a built-in staging feature.
- Be patient: But not too patient, of course. Plugin and theme updates can be buggy, even if they are supposed to address bugs in code. Wait for a week at least before updating your extensions, so that any bugs in the updates will surface. Alternatively, you can install the update on a staging site, and let it marinate for a week there. Observe carefully to see if there are any issues, like breaks in design or function, and only apply to your live site once you’re certain.
- Choose premium plugins and themes: Yes, there is a cost involved with premium plugins and themes, and bills for a site can mount quite dramatically. However, when weighed against the threat of malware and loss caused due to hackers, paying for premium extensions is actually less expensive. Premium developers invest time and energy into maintaining their products, and this will reflect in their performance. There have been many free plugins that get abandoned as their developers move on to more lucrative work presumably, and then have become the cause of hacks.
- Be prepared and stay informed: WordPress releases major updates on a schedule, and most reputed developers will time their updates soon after. If you keep informed, you can plan for these updates accordingly.
Why updates are critically important
Updates are very important because they usually contain bug and vulnerability fixes.
For instance, if a security researcher discovers a vulnerability in a plugin, they generally report it to the developer. The developer then codes a fix, and deploys the fix to sites via an update. The security researcher can then disclose their discovery publicly. If the fix isn’t applied, there is a good chance that hackers will try hacking sites that have the older version of the plugin.
In short, most malware infections and hacks work because fixes haven’t been applied, and hackers have been able to exploit vulnerabilities. At MalCare, we see that sites that have updated plugins and themes are 95% safer than sites with outdated extensions.
How does an auto update work?
In one of the major releases, WordPress created an auto update mechanism that is based off of cron jobs. Cron jobs execute every 12 hours and are used by WordPress and developers to schedule time-based tasks on sites.
The auto update mechanism connects to the Updates API every 12 hours to compare versions of WordPress, plugins, and themes installed on your site. It also checks the PHP version on your site to make sure the update is compatible with it. If it is, the update goes through as expected. If not, the API installs a patch instead of the whole update.
Conclusion
auto updates for WordPress plugins and themes are a mixed blessing, but only if you are not sure how best to use them. We have demystified how and when to apply auto updates, and how to manage all the other updates that are so critical for the continued security of your site.
If all of this feels like too much, install BlogVault and use the dashboard to easily manage plugin and theme updates. BlogVault does all the heavy lifting for you in terms of keeping track of updates and applying them safely. We offer a fully-featured 7-day trial for you to get a sense of how easy it makes maintaining your site.
FAQs
Do WordPress plugins automatically update?
WordPress plugins can be set to automatically update from the Plugins section on wp-admin. Plugin auto updates must be opted into on a plugin-by-plugin basis.
How do I turn off WordPress plugins notification?
To turn off WordPress plugin update notifications, you can use the plugin Disable Theme and Plugin Auto Update Emails. This will add options to disable auto update emails in the General section of the Settings menu.
How do I stop Elementor from automatically updating?
To stop Elementor from automatically updating, you need to disable auto updates from wp-admin. Log into your site, and click through to Plugins to see the list of installed plugins. Scroll down to Elementor, and look for the disable auto updates link against the plugin.
How do I turn on automatic updates in WordPress?
The easiest way to turn on core automatic updates is via the Updates menu on wp-admin. If you want to auto update plugins and themes, you’ll need to enable those individually from the Plugins and Themes menus on wp-admin respectively.
Tags:
Share it:
You may also like

How to Limit Form Submissions with Droip in WordPress
Forms are an indispensable part of any website because of their versatility, letting you collect information for various purposes! However, people with ill intentions often attempt to exploit these forms…

How To Manage Multiple WordPress sites
Management tools help agencies become well-oiled machines. Each task is completed with the least amount of effort and highest rate of accuracy. For people managing multiple WordPress sites, the daily…
PHP 8.3 Support Added to Staging Feature
We’ve introduced PHP version 8.3 to our staging sites. Test out new features, code changes, and updates on the latest PHP version without affecting your live website. Update PHP confidently…
How do you update and backup your website?
Creating Backup and Updating website can be time consuming and error-prone. BlogVault will save you hours everyday while providing you complete peace of mind.

Updating Everything Manually?
But it’s too time consuming, complicated and stops you from achieving your full potential. You don’t want to put your business at risk with inefficient management.

Backup Your WordPress Site
Install the plugin on your website, let it sync and you’re done. Get automated, scheduled backups for your critical site data, and make sure your website never experiences downtime again.


