How To Create And Use WPEngine Staging Environment (Complete Guide)
Bulletproof Backups for Your WordPress Website
Fortify your business continuity with foolproof WordPress backups. No data loss, no downtime — just secure, seamless operation.
Have you ever made changes on your website and it hasn’t turned out the way you expected it to? Reverting back is stressful and time-consuming.
Fortunately, there is a solution – a staging site! This provides you with a safe environment to develop and experiment with your site.
WP Engine has a staging feature built into its platform.
How does it work? How to use it? Where can I find it?
We’ve hosted websites on WP Engine and have checked out their staging features. We answer all your questions. We’ll show you how to create a WPEngine staging site and how to use it.
TL;DR–
Using WordPress hosts for staging can slow down your website because it uses the same server as your live website. You need a solution that uses its own web servers so there’s never any extra load on your own. Use BlogVault to set up a staging site in under a few minutes. Your staging site will never affect your live environment, and what’s more, merging the changes is as simple as one click.
TOC
What Is A WPEngine Staging Site?
If you plan on making major changes like shifting to a new theme, updating your website, installing a new plugin on your WP Engine site, we recommend first testing it out on a staging site.
A staging site is like a play environment to make all sorts of modifications to your site without ever affecting your live site. It is an exact copy of your live site, so the results shown here will reflect what it would look like on your live environment. You can also build new site while the old site is live with the help of staging site.
WP Engine offers this feature with all of its WordPress Hosting Plans.
This feature will enable you to check for errors and bugs behind the scenes, so you can fix them before you make the changes on your live sites. You can avoid putting your site in maintenance mode. Your visitors and search engines will always see an up and running, fully-functional website.
However, the WP Engine staging site uses the same server as your live website. This means when you create and use a staging environment, your web server has to host two websites. Your server will divert resources to the staging site which will impact your live site in terms of speed and performance.
To stage a site, you should ideally use a different server from your website’s server. This will ensure your live site is never impacted while creating or using your staging site. If you’re looking for such a solution, BlogVault has a free staging solution that’s easy to set up and use. It’s hosted on BlogVault’s own secure servers so your live site is never impacted.
That said, if you still want to proceed with staging a site on WP Engine, we’ve detailed the steps below.
Fun Fact: Earlier, WPEngine staging feature was called WPEngine Legacy Staging. Then in 2018, the web host introduced a new staging and development environment feature. WPEngine’s Legacy Staging was eventually replaced with the new one.
How To Create A Staging Site On WPEngine
To stage a website, you need a WordPress staging plugin. Some web hosts offer staging sites as a part of the hosting plan or as a premium add-on.
If you’re a WP Engine customer, the managed WordPress host provides this feature on your dashboard. It’s easily accessible and easy to use!
Step 1:
Log into your WP Engine Hosting Account. On the dashboard, go to Sites and select your website.
Step 2:
You’ll see three options appear – Add Production, Add Staging, Add Development. Select Add Staging, name your staging site, select Create Environment. WP Engine will begin to create your staging environment.
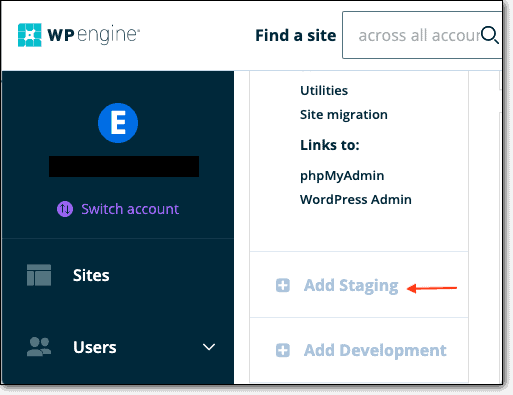
TIP: While naming your WP Engine staging site, you can use the name only once. You cannot reuse names even after you’ve deleted the staging site from your dashboard. If you name your staging site abc.wpengine.com, you can never use abc.wpengine.com again as your WP Engine staging URL.
Step 3:
To access your staging site, go back to Sites on your dashboard. Your staging site will appear here with an icon STG next to its name.
Step 4:
By clicking on this site, you’ll be directed to a dashboard where you can access your wp-admin page.
You can use your WP Engine staging site the same way you would use your live site. Once you’re happy with the changes you made, visit your homepage, cart and checkout pages, your blog, and any other important pages on the staging site to make sure everything is working fine.
To make the changes on your live site, you don’t have to go back to your live site and recreate the changes. This would lead to confusion and be an unnecessary waste of time.
Instead, you can automate the process by pushing from staging to production the changes you made to your live site. Let’s look at how you can do this on WP Engine.
How To Push WP Engine Staging To Live (or Production)
To Move WPEngine staging to live or production site, you just need to click a few buttons on your WP Engine dashboard.
Step 1:
Access your staging site under Sites on your dashboard.
Step 2:
Select your staging site to access the staging dashboard.
Step 3:
Here, you’ll see options on the top right-hand corner Copy From and Copy To. Select the Copy To option. Follow the instructions, select the changes you want to implement on your live site, and merge them.

Again, we recommend that you visit your live site and check that your changes have reflected. Check integral pages such as your homepage, cart and checkout pages, your blog, and any other important pages.
PRO TIP: You need to create a fresh staging site every time you want to use one. It’s not possible to continue using the same staging site each time. Say, you stage a site and push the changes on Monday. Then, you publish a few blogs and install a new plugin through the week. On Friday, if you want to use a staging site, you have to create a new one to ensure both the environments are an exact match. If not, changes will reflect differently on your staging site and your live site.
Once you’re done using the WPEngine staging site, it’s best to delete it. We reveal why and how next.
Deleting A WPEngine Staging Environment
Once you’ve completed copying WPEngine staging to live, you need to delete your staging environments for two main reasons:
- When you create the staging site, WP Engine stores it on your same server where your live site is stored. Your server has to shoulder the burden of two WordPress websites now. This will affect your live website’s speed and performance. To free up server resources and optimize your site, we suggest deleting unnecessary elements like your staging site once you’re done with it.
- You need a fresh site every time you want to work with a staging environment. Your staging site should be an exact replica of your live site. It’s best to get rid of staging sites once you’re done with it to ensure you or any member of your team doesn’t use it again.
To delete a staging environment on WP Engine, follow the steps below.
Note: You need to have Owner Level access. You won’t be able to delete a site if you are not an Owner.
Step 1: Log in to your WP Engine account and access the User Portal.
Step 2: Under Sites, locate your staging site’s name, you’ll see three dots on the right-hand side of the screen. This is a quick action menu.

Step 3: Click on the three dots to get a drop-down menu. Here, select Delete Environment.
Step 4: Type the name of your environment to confirm the deletion.
PRO TIP: If you don’t want to use the quick action menu, click on the staging site and you’ll be redirected to the site’s dashboard. Here, there’s an option to Delete Environment like so:

The fact that WP Engine offers the staging feature within its hosting plan is amazing. You won’t find this option with many hosts. However, the WP Engine staging site uses the same server as your live website. This means while you create and use a staging environment, it will consume your server resources and your live environment could be impacted in terms of speed and performance.
If you want a solution to overcome this issue, you can opt for our WordPress Staging Plugin BlogVault.
How To Stage A WordPress Site Using A Plugin
There are many staging plugins available in the market. But not all of them host the staging site on their own servers.
BlogVault is a widely popular and trusted WordPress Backup Plugin that offers its staging feature free with all plans.
To stage a site, you can follow the steps below:
Step 1: Create an account with BlogVault and Add Your Site to the dashboard.
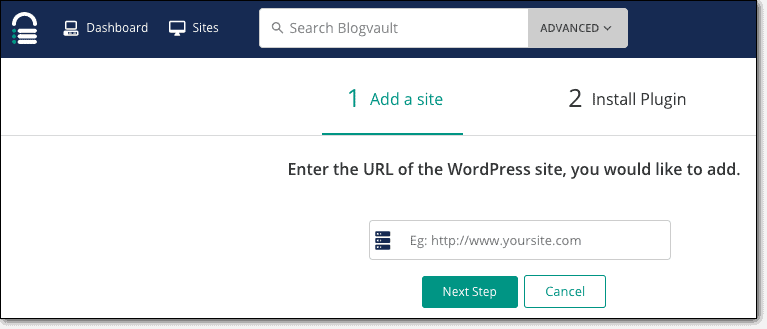
Step 2: The plugin will automatically sync and take a backup of your WordPress site. This will take a few minutes tops.
Step 3: Select your site and locate the Staging tab. Here, you can Add Staging Site.
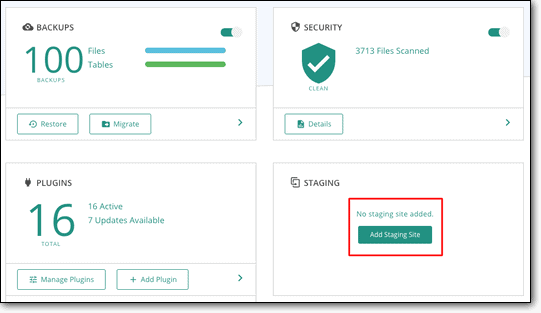
Step 4: BlogVault will create the staging site automatically on its own servers. This ensures there is never any load on your live website. Once complete, your staging site will be protected with a username and password. This ensures that your site is private and visitors and search engines cannot view your staging site.
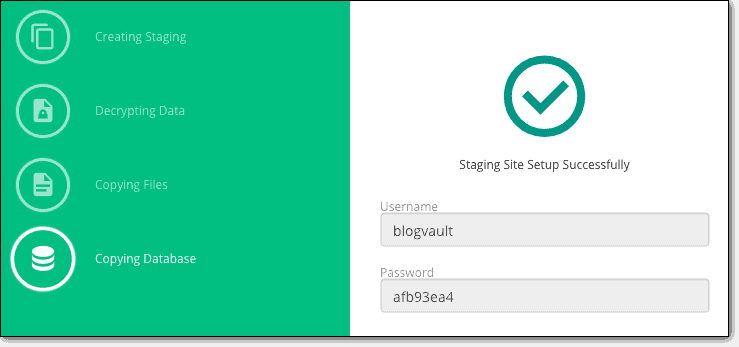
Step 5: To access your staging site’s WordPress admin panel, go back to Staging on the BlogVault dashboard. Select your newly staged site and it will display your stage site URL. Now, enter this URL in your browser’s address bar and add ‘wp-admin’ to your staging site’s name.
For example, if your staging URL is https://www.example.d.wpstage.net, enter https://www.example.d.wpstage.net/wp-admin in the address bar.
This will take you to your login page. Enter your WordPress credentials and you can start using your staging site.
Step 6: Once you’re happy with the changes you’ve made, go back to Staging on the BlogVault dashboard. Here, you can merge your changes to your live site with one click.
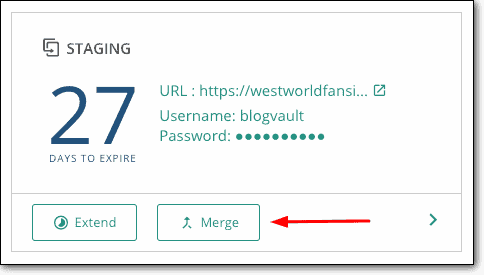
You will be given the option to choose whether you want to merge all changes or select the ones you want. Within a few minutes, your changes will appear on your live site.
That’s it! You’re done staging and merging a WordPress site.
Click to tweet: Always use a staging site to make changes to your website. Learn how to use WPEngine staging feature here.
What’s Next?
Staging environments enable you to keep your live site functioning perfectly fine for your visitors while you experiment with it behind the scenes.
But as we mentioned, WordPress sites can be sensitive to change. Whether you choose to stage your website or not, ensure your WordPress site is regularly backed up. In case anything goes wrong with your site, you can use your backup to restore your site back to normal.
With BlogVault, you get easy independent staging options and reliable automated backups. Restoring your site is as easy as one click and it is guaranteed to work.
Backup and Stage Your WordPress Site With BlogVault!
Tags:
Share it:
You may also like
How to Limit Form Submissions with Droip in WordPress
Forms are an indispensable part of any website because of their versatility, letting you collect information for various purposes! However, people with ill intentions often attempt to exploit these forms…
How To Manage Multiple WordPress sites
Management tools help agencies become well-oiled machines. Each task is completed with the least amount of effort and highest rate of accuracy. For people managing multiple WordPress sites, the daily…

PHP 8.3 Support Added to Staging Feature
We’ve introduced PHP version 8.3 to our staging sites. Test out new features, code changes, and updates on the latest PHP version without affecting your live website. Update PHP confidently…
How do you update and backup your website?
Creating Backup and Updating website can be time consuming and error-prone. BlogVault will save you hours everyday while providing you complete peace of mind.

Updating Everything Manually?
But it’s too time consuming, complicated and stops you from achieving your full potential. You don’t want to put your business at risk with inefficient management.

Backup Your WordPress Site
Install the plugin on your website, let it sync and you’re done. Get automated, scheduled backups for your critical site data, and make sure your website never experiences downtime again.


