How to Change WordPress Site URL? (Step-by-Step Guide)
Bulletproof Backups for Your WordPress Website
Fortify your business continuity with foolproof WordPress backups. No data loss, no downtime — just secure, seamless operation.
There have been many cases at BlogVault where we had to change the URL of a page. Over time, we’ve tried different methods of changing WordPress URLs on many dummy WordPress sites. This is what prompted us to put together this article. In this guide, we explain the process of changing a WordPress Site’s URL, including why one would want to do so and what challenges may one face.
Click here to Skip the Process of Changing your WordPress URL.
[lwptoc skipHeadingLevel=”h3,h4,h5,h6″ skipHeadingText=”Over to you”]
Before we dive into how one may change their WordPress Site URL, let’s understand the driving forces behind it. Why would one want to make changes to their site URLs in the first place?
Reasons to change your WordPress URL
Changing your WordPress Website URL is like changing your clothes. You change clothes for hygiene, to look better, to stay warmer, or even to give yourself a makeover! Similarly, you might want to change your website URL:
a) For Hygiene: You might want to move to a different directory, like move your sub-directory to the main domain or your might want to move your site to new domain.
b) To look better: You might want to make a certain URL more SEO friendly by changing its content.
c) To stay “warmer”: The constant threat of a hack or a security breach makes it a cold world out there. So, you might have gotten yourself an SSL certificate for which you need to change the “http” prefix to https and remove “www”.
d) To give your site a makeover: You might’ve changed the name of your blog/company and will have to move your site to a completely new domain.
When changing your URL, you will encounter two functions – your Site Address URL and your WordPress Address URL. What’s the difference, you ask? Let’s discuss this further.
WordPress Address vs Site Difference – What’s the difference?
WordPress has two configurable website URLs – WordPress address (also called SiteURL) and Site address (also called HomeURL). It relies on these URLs to access your WordPress files and load content onto your website.
Site Address –
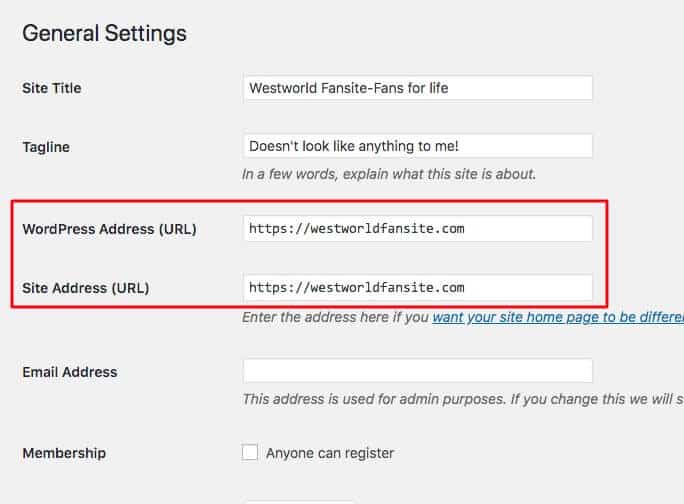
Simply put, Site Address is the address visitors type in their browser to reach your site. For instance, look at the URL of this blog: https://westworldfansite.com. This is the Site Address.
WordPress Address –
WordPress Address is the address where your WordPress core files are stored. At the time of building this website, WordPress files were automatically stored in specific locations. (For instance, all WordPress plugins are located in the Plugins folder, like in the image below) So if you change the location of WordPress installation, the WordPress Address URL will change accordingly.
For instance, the URL of this blog is https://westworldfansite.com. By default, this is also your WordPress Address. To access the Admin dashboard of our blog we visit: https://westworldfansite.com/wp-admin/.
Now if you move the WordPress install to a new WordPress directory called “FolderX”, then the WordPress Address would be https://westworldfansite.com/folderx. To access the Admin dashboard, we’ll go to https://westworldfansite.com/folderx/wp-admin.
Now that we have a better understanding of the WordPress Address and the Site Address URL, let’s take a look at how you can change them.
How to change WordPress URL?
There are multiple ways to Change WordPress URLs. In this article, we’ll discuss three of them.
- Change the WordPress URL from Admin Dashboard
- Change the WordPress URL from the wp-config.php file
- URL Change from wp-config using File Manager
- URL Change from wp-config using an FTP client
- Change the WordPress URL directly in the database
Prerequisites for changing your WordPress URL:
There are a few things to be mindful of before you change your WordPress site URL. They are –
a) Have a full site Backup: Changing site URLs can be tricky business as it involves making changes to important files or your database. A small mistake can make your site crash or have a glitch. It is better to be prepared by having a complete site backup. Use BlogVault – our premium backup solution with an auto-restore option. That way if anything goes wrong, you can recover your site immediately.
b) You will need an FTP client: To change your URL using the wp-config file, you need an FTP tool like Filezilla. It is used to access your web server and your WordPress files.
c) You need to purchase the destination domain: If you’re looking to change your domain, you will need to purchase the domain that you want to change it to. Make sure you have complete jurisdiction over the domain and have all the credentials.
Note: To change the WordPress site URL you’ll have to change both the WordPress address (SiteURL) and Site address (HomeURL).
Let’s dive in!
Change URL from Admin Dashboard:
To modify your URLs from the WordPress dashboard, follow these steps:
- Log in to your website. Click Settings and you’ll find a section called “General”.
- As we saw above, there will be two options: WordPress Address and Site Address. Make your changes to them and hit “Save Changes”.
- This is the simplest way to change your WordPress URL. However, if you are trying to access your site using the new URL and are facing an error, it’s most likely a cache issue. You can easily clear your cache using a WordPress Caching Plugin like WP-Rocket.
And that’s how to change WordPress URL from the dashboard!
Change the URL from the wp-config.php file:
Editing the wp-config file is risky if you are not familiar with WordPress. For beginners, changing the site URL from the Admin Dashboard would be a safer bet. Choose to edit the wpconfig.php file only if the URL fields in your General page (under Settings) are not editable.
There are two ways to access the wp-config file:
- Through the File Manager
- Through an FTP Client
Change URL from wp-config using File Manager –
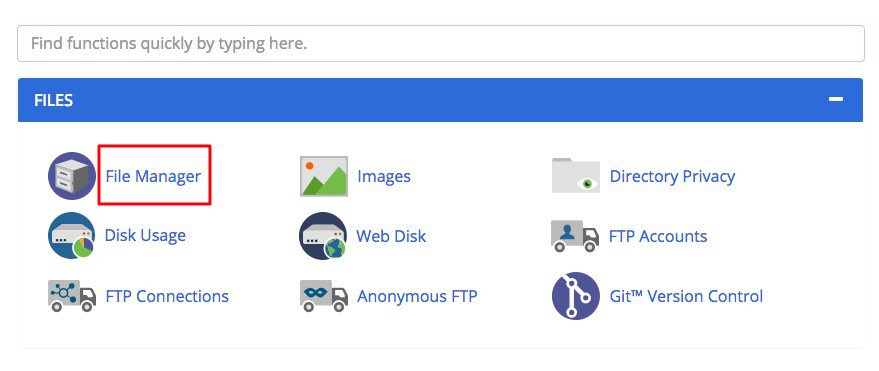
1) To access the wp-config file, first, log in to your web host account and navigate to the cPanel.
2) From the cPanel, select File Manager.
The file manager will look like the image below:
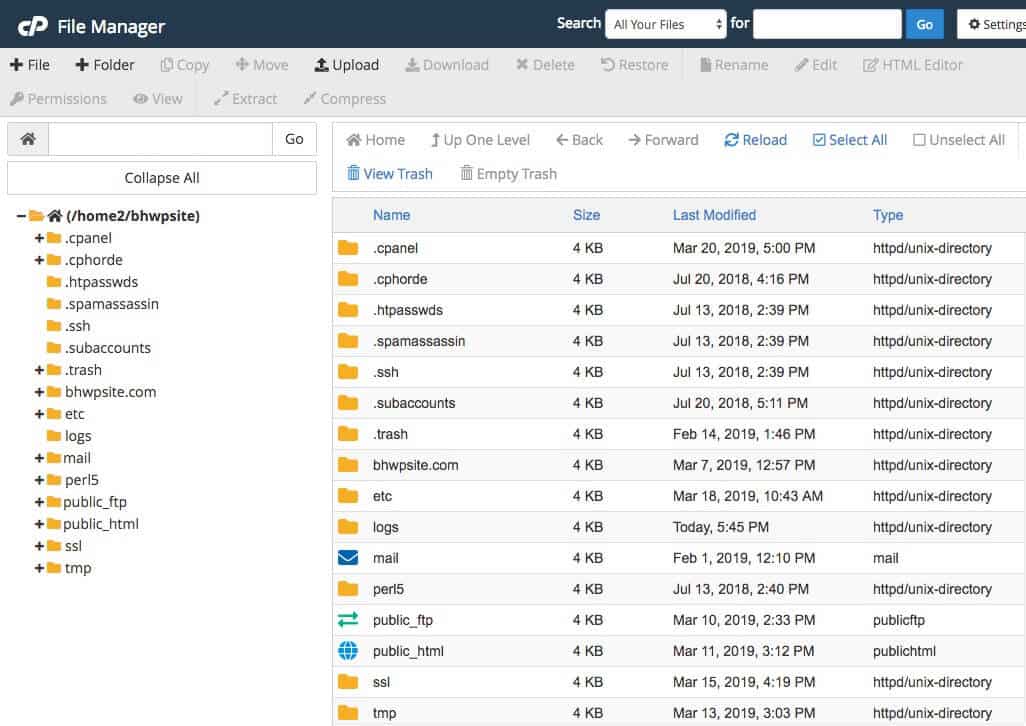
3) From the left side of the file manager, select the root directory, i.e. public_html folder. When you click on the folder, the content of the public_html folder appears on the right. There, you can find the wp-config.php file.
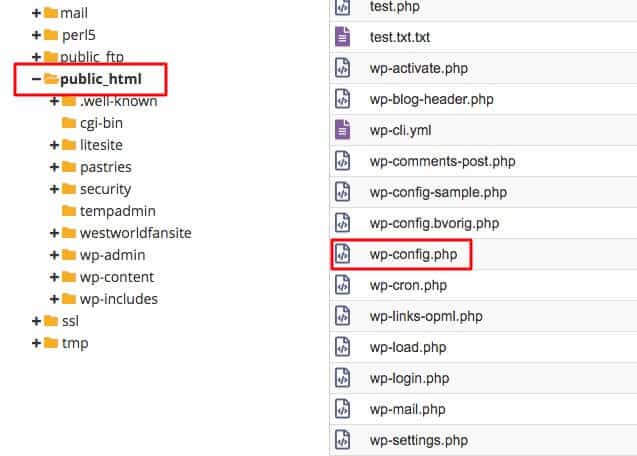
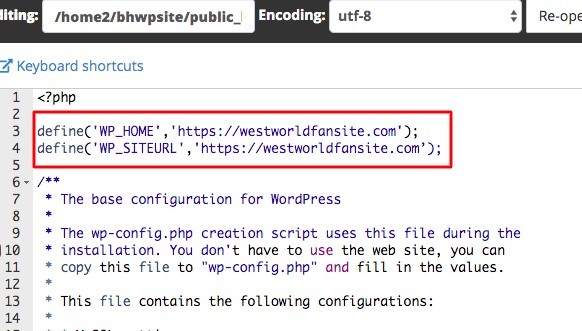
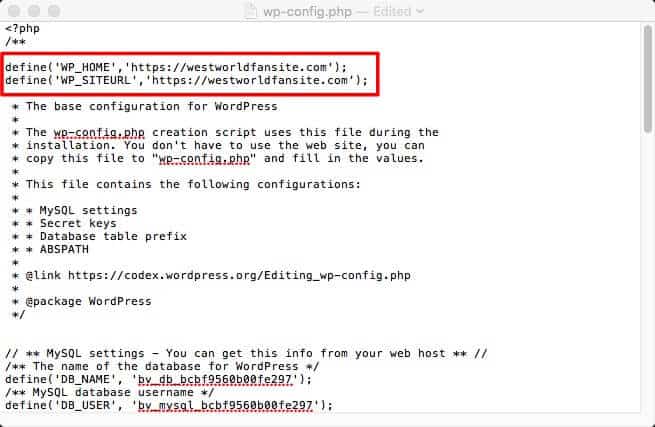
4) Once you’ve found the wp-config file, right-click on the file and select Edit. This will take you to a new tab from where you can edit the contents of the wp-config file. Now, simply add the following sentences at the beginning (replaced with your site URL):
define(‘WP_HOME’,’https://westworldfansite.com’);
define(‘WP_SITEURL’,’https://westworldfansite.com’);
Note: If you have an SSL certificate installed, use https in front of the URL.
If your WordPress address is not the same as Site address, then the input text would look like this:
define(‘WP_SITEURL’,’https://westworldfansite.com/folderx’);
define(‘WP_HOMEURL’,’https://westworldfansite.com’);
5) Select “Save Changes” and then exit the page. Now try typing out your new domain name in the address bar to check if you have successfully changed the WordPress site URL.
Change URL from wp-config using an FTP client –
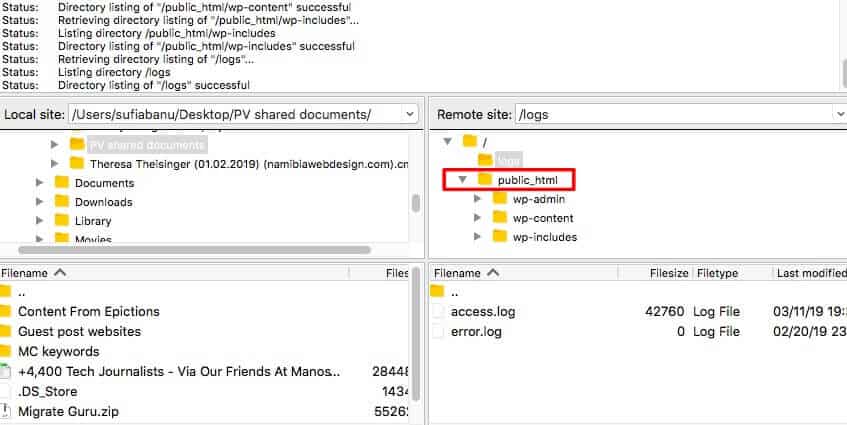
There are several FTP clients to choose from. In this section, we are using the highly-recommended FileZilla.
1) Open FileZilla and enter your FTP hostname, username, password and port number and then click on Quickconnect.
Pro Tip: If you don’t know your FTP credentials, refer to our Guide on Working with FTP to find your details.
2) Once FileZilla connects with your web host, your website folders appear on the right side of your FTP client under Remote site (see image below).
3) Select the public_html folder. The contents of the folder will appear under “Filename”. You should be able to find the wp-config file in there.
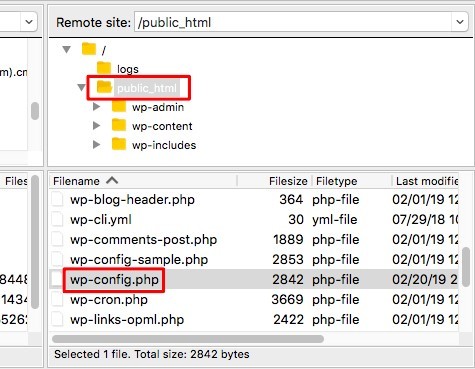
4) Right click on the wp-config.php file and select Edit/View. Insert the following sentences at the beginning (replaced with your site URL):
define(‘WP_HOME’,’https://westworldfansite.com’);
define(‘WP_SITEURL’,’https://westworldfansite.com’);
If your WordPress address is not the same as Site address, then the input text would look like this:
define(‘WP_HOME’,’https://westworldfansite.com/folderx’);
define(‘WP_SITEURL’,’https://westworldfansite.com’);
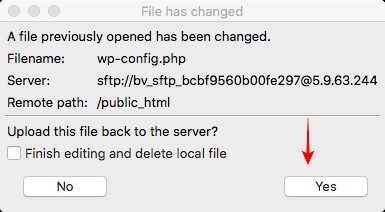
5) Save the file and then exit by clicking on the cross sign at the corner of the window. Filezilla will prompt you asking “A file previously opened has been changed. Upload this file back to the server?”. Select “Yes”.
And that’s it! To double-check, try to open your new domain from the address bar. If you’re facing any error, clear your cache and try again.
Change URL via the database –
Another way of changing your WordPress site URL is via phpMyAdmin database. Cautionary Warning: This method is highly risky and modifying the Database can cause errors or even break your site if it’s not done correctly. You are again advised to backup your WordPress site before changing WordPress URLs. In case something goes wrong, you can always restore your site back to normal.
1) To access your WordPress database, log in to your web host account and navigate to the cPanel.
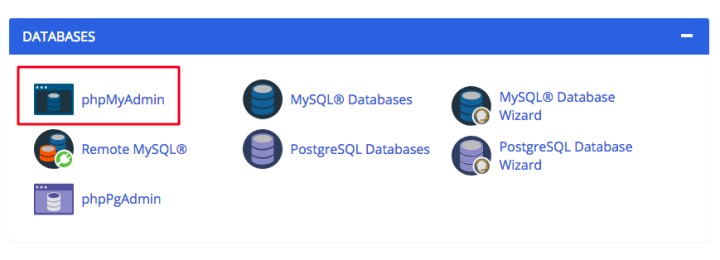
2) From the cPanel, select phpMyAdmin. When phpMyAdmin opens, it looks like this:
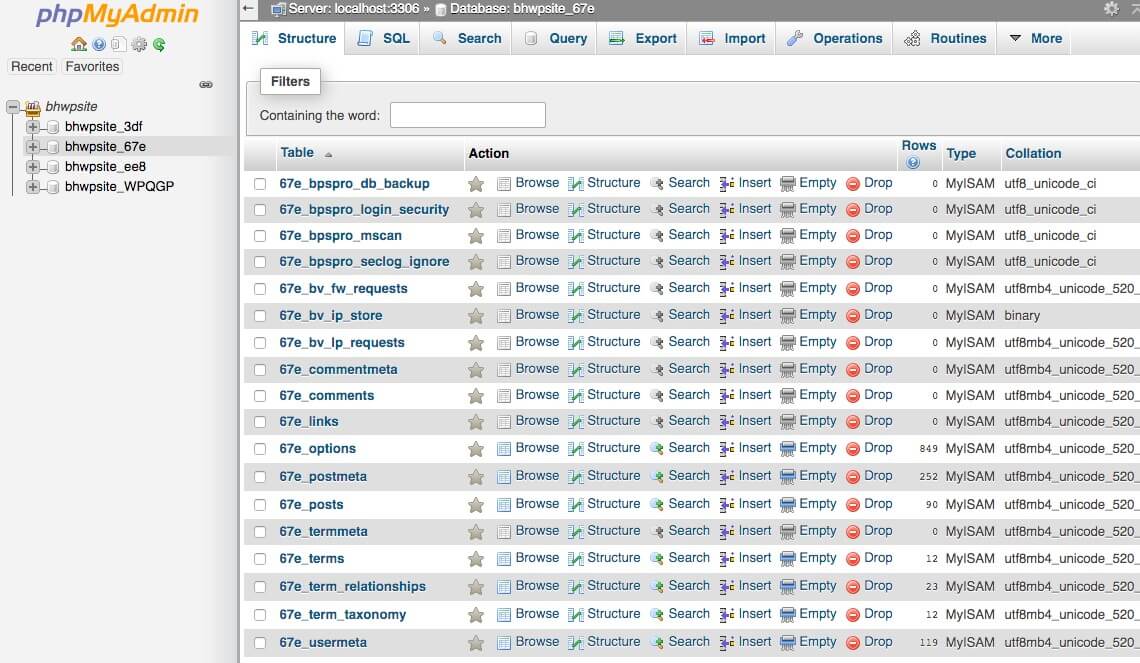
3) In the phpMyAdmin, select the database of your website from the left-hand side (You can find the name of your database listed in the wp-config file). Then scroll down and select the wp_options table. In this example, our database table prefixes have been changed from wp_ to 67e_. We’ll look for 67e_options.
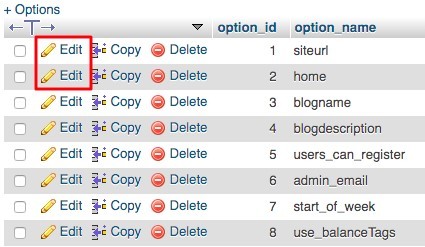
4) When you click on the options table, a new page appears. There you’ll find two options: siteurl and home.
5) To edit both home and siteurl, simply click on Edit. Then, replace the URLs and hit “Go” when you are done. Remember to replace your old site URL with the new site URL under both ‘site’ and ‘home’ url.
What to do next – The Aftermath
Once you’ve successfully changed your WordPress site URL, there are 2 crucial steps you should take as the finishing touches:
1. Redirect your URLs:
Despite the change, you’ll notice that most of the URL’s of your other posts and pages still show up as the old URL. You will need to redirect these URLs to your current Address to not lose traffic. There are 2 ways you can do this.
- Using a plugin:
Plugins like Better Search Replace have a unique feature- they can bulk update all your URLs across the site to your new URL. This can save you a lot of time and effort, especially if you’re maintaining multiple WordPress sites.
- Modifying your .htaccess file via FTP:
This method of updating URLs is more tricky and risky and not recommended to non-developers. However, it does a flawless job of redirecting all your old URLs and is not an added cost.
1. Open Filezilla, enter your FTP credentials and click on Quickconnect.
2. Once you’re connected to your Web host, locate the .htaccess file from your website’s files shown under Remote site.
3. Edit the .htaccess file and add the following code (replaced with your URL):
#Options +FollowSymLinks
RewriteEngine on
RewriteRule^(.*)$ https://westworldfansite.COM/$1 [R=301,L]
This automatically redirects all your links across your pages, posts and other content.
2. Inform Google:
It is important to keep Google updated on your site at all times so that you don’t lose your current SEO ranking. You can find the process of informing Google about your updated URL from the Google Search Console.
Over to you
We hope you have found this guide easy to follow and would love to hear from you if you have any suggestions. Before leaving we’d like to remind you that although changing the WordPress site URL is straight forward, one must exercise caution. Since some methods involve modifying important files, there is a high chance of your site breaking or glitches. You need a safety net to fall back on when things go south!
Make sure to Try BlogVault Backups now
Tags:
Share it:
You may also like

How to Limit Form Submissions with Droip in WordPress
Forms are an indispensable part of any website because of their versatility, letting you collect information for various purposes! However, people with ill intentions often attempt to exploit these forms…

How To Manage Multiple WordPress sites
Management tools help agencies become well-oiled machines. Each task is completed with the least amount of effort and highest rate of accuracy. For people managing multiple WordPress sites, the daily…

PHP 8.3 Support Added to Staging Feature
We’ve introduced PHP version 8.3 to our staging sites. Test out new features, code changes, and updates on the latest PHP version without affecting your live website. Update PHP confidently…
How do you update and backup your website?
Creating Backup and Updating website can be time consuming and error-prone. BlogVault will save you hours everyday while providing you complete peace of mind.

Updating Everything Manually?
But it’s too time consuming, complicated and stops you from achieving your full potential. You don’t want to put your business at risk with inefficient management.

Backup Your WordPress Site
Install the plugin on your website, let it sync and you’re done. Get automated, scheduled backups for your critical site data, and make sure your website never experiences downtime again.


