Guide on Moving WordPress Site To New Domain
Bulletproof Backups for Your WordPress Website
Fortify your business continuity with foolproof WordPress backups. No data loss, no downtime — just secure, seamless operation.
Want to change your WordPress domain name without affecting your existing site?
Migrating to a new domain can be a daunting task because multiple things can go wrong. You can lose content or you can even lose your entire site.
But if you have the right tools and follow the right steps, you can easily and safely make the switch.
In this guide, we give you step-by-step instructions on moving your WordPress site to a new domain.
TL;DR –
Migrating to a new domain doesn’t have to be a daunting task. You can use a reliable migration plugin such as BlogVault that automates the migration process for you. You can shift to a new domain in a few simple steps and let BlogVault handle the technical aspects for you.
Is Moving To A New Domain A Good Idea?
In our experience, site owners move to new domains for very different reasons. Some reasons are good and make the process worth it. But there are also times where it’s better not to move.
So when is it a good idea?
- You’re rebranding your business. You need to change the domain name of your website because you changed the name of your business.
- You’ve been able to purchase a much better domain name. For example, you want to change from a domain.net or a domain.co.uk to a domain.com. Or you found a shorter domain name such as thisismydomain.com to domain.com.
- There are also cases where the current domain name is too expensive to renew. Every year, the name provider increases the price, and it’s become difficult to afford it.
- You purchased your domain name from one provider and your hosting plan from a different provider. You want to move the domain name to your host to make it easier to manage.
- You’re moving a locally built WordPress site or a development site to the new domain.
When is it a bad idea?
- Switching domain names often every time you find a better sounding name. It’s important to find a name and stick with it for the long-term to build a brand name.
- You managed to find a sought-after domain name on sale that can increase your traffic and rankings. You need to ensure that the domain name wasn’t blacklisted by search engines, browsers, and email servers. Find out the history of why the owner gave up the domain name.
- Your website was hit by a search engine algorithm penalty and you want to switch domain names to overcome it. Even if you switch to a new domain if you don’t fix your content and the reason why you were penalized, the new domain will also get hit soon enough.
Make the shift if it’s a good reason and if you think it’s worth it. In the next sections, you’ll learn how to move to a new domain so that your website’s URL changes while your content remains the same. For example, www.domain.com to www.domain.net or www.domain.com to www.newdomainname.com.
How To Move Your WordPress Site To New Domain
There are two ways in which you can move your WordPress site to a new domain.
We’ve detailed the steps for both processes. Let’s begin.
1. Move Your Site To A New Domain Using A Plugin
If you’re shifting houses, you would need to pack up your belongings from the old house, move it to the new location, and then unpack and arrange it. You need to follow the same process to shift your website. When you use a plugin, it’s like using a packers & movers service that does the heavy lifting for you.
So if you’re looking for an easy and efficient way to move your site to a new domain, using a migration plugin is the way to go. There are many WordPress migration plugins available but not all of them are 100% successful at migration. Among the reliable plugins, BlogVault stands out for the features it offers. It eliminates the technical process and makes it as easy as clicking a few buttons.
Using BlogVault, you can shift your site to a new domain in under a few minutes. Before we get started with using the plugin, you need to keep a few things ready.
Things To Do Before Moving WordPress Site To New Domain Using A Plugin
- Set Up The New Domain And Hosting
If you haven’t already, purchase the new domain and keep it ready. You need to link it to your existing host or you would need to purchase a hosting plan.
- Install WordPress For The New Domain
Most web hosting companies provide an easy option to install WordPress directly from the dashboard.
If you don’t see an option on your dashboard, go to cPanel. You should see an option to install WordPress here.
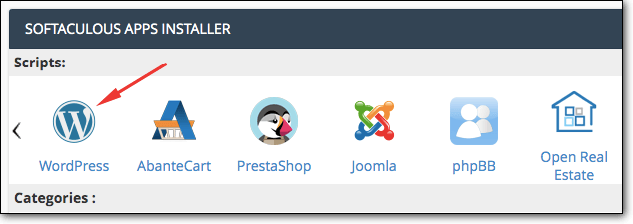
If you require more guidance, refer to our in-depth guide on Installing WordPress.
- Keep Your FTP credentials ready
FTP (File Transfer Protocol) facilitates a connection between your computer and your website’s server, or your old server and the new server. It basically enables the migration process from one location to another.
Since FTP grants access to sensitive information, it is protected with login credentials. So only authorized users can carry out tasks using FTP.
To migrate to a new domain, you need your FTP credentials – host name, username, password, and port number.
You can fetch them from your web hosting provider, or you can find them in cPanel > FTP users. We also have a guide to Finding your FTP credentials.
Now we can proceed with migrating to a new domain.
Migrate To A New Domain Using BlogVault
Step 1: On your existing WordPress site, install BlogVault. Next, enter your email address, select Migrate and Get Started.

Step 2: You’ll be redirected to BlogVault’s dashboard where it will create the first backup copy of your WordPress site. Under Backup, select Migrate.

Step 3: On the next page, enter your FTP credentials.
Note: If you don’t have your FTP credentials, use our guide to Finding Your FTP Credentials.

4. Next, you need to select the folder that has your WordPress installation. This folder is called public_html. But if you’ve created a separate folder for your website, then select that.
To illustrate, we’re moving our site called demo.com to westworldfansite.com. Our WordPress installation resides in a folder called demo. So we’ve selected the folder public_html/demo.
5. Finally, BlogVault gives you an option to select the backup copy you want to use. By default, it chooses the latest copy available so you can skip this step. Next, enter your destination URL – your new domain.
For us, westworldfansite.com is our destination URL.

If you are shifting to a new domain with the same hosting provider, BlogVault will automatically fetch your database details. You don’t have to worry about this step. Click on Continue and BlogVault will migrate your site.
If you are shifting to a new domain with a different hosting provider, you’ll need to perform an extra step here.
Go to Advanced Options. Enter your destination server name and IP here. You can get these details from your new hosting provider.
That’s it! You’ve successfully migrated your website from to a new domain.
Migrating a website between different domains and different web hosts is a major process. Once complete, we recommend testing your website to make sure it’s functioning perfectly fine. Check all main pages and ensure they bear the new domain name.
We have a detailed migration checklist of things you need to verify after moving your site to a new domain. Once you’re done, we recommend following a few more post-migration steps that we have detailed below. These steps will ensure you retain your SEO and your visitors are directed to the new site.
2. Move WordPress Site To A New Domain Manually
There are times when you may want to handle the process of shifting your house on your own. It may be due to budget constraints or you want to learn to do it on your own. There are plenty of reasons.
So we’ve detailed the manual process below but this method is risky. It entails moving your WordPress files and database. Any mistake here can lead to a broken website.
Before we begin the process, it’s important to address that there are two scenarios that can take place here:
- You are moving to a new domain with a new host
- You are moving to a new domain with your existing host.
The steps will vary slightly for each scenario but are more or less the same. The main difference is that when you move to a new host, you need to move your entire website, i.e., Files and Database. If you’re staying with the same host and only changing your domain name, then you only need to move your WordPress files.
If you want to learn more about WordPress files and databases, check out our guide on Structure of WordPress Files and Database.
That said, let’s begin migrating your site to a new domain. Here are the steps you need to take:
- Create a Copy of WordPress File
- Export Your WordPress Database
- Upload Your WordPress Files To The New Domain
- Import Your WordPress Database
- Configure Your New Domain In Database
- Configure Your wp-config File
- Disconnect Your Old Domain
- Set Up Redirects On Your Old Site
- Fix Your New Domain URLs
- Test Your New Domain
PRO TIP: The manual process takes time. During the process, if someone tries to visit your website, they will see a broken site or errors. We recommend that you put your website in maintenance mode before starting this process. You can use any maintenance mode plugin to help you do this with the click of a button.
1. Create a Copy of WordPress Files
Your WordPress files determine how your website appears to visitors and how it functions. The files contain settings and configurations, and also any media you upload to your site such as images and videos.
In this step, you’ll create a copy of your WordPress files that serves two purposes:
- It serves as a backup. As we mentioned, this process is risky. If you have a backup of your site, if things go wrong, you can quickly restore your site to normal.
- It serves as a package to easily move to the new domain. You’ll use it to set up your existing site under your new domain name.
There are two ways to copy your WordPress files manually:
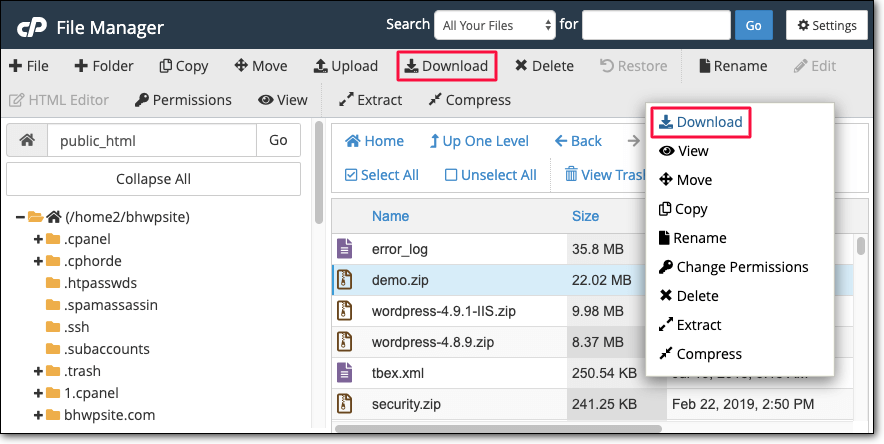
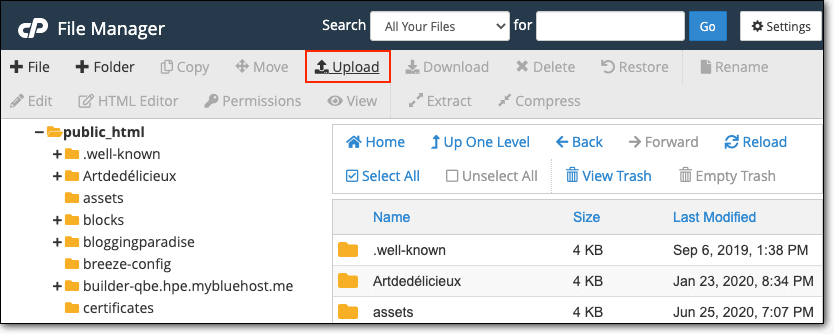
A. Copy Your WordPress Files Using cPanel
- In your web hosting account, access cPanel.
- Navigate to File Manager > public_html.
- Right-click on the public_html folder and select Compress. If your website resides in a separate folder, compress that particular folder. For us, our website’s folder name is Demo. We compressed the Demo folder to create a demo.zip file.
- Now, select the zip file and Download it.
B. Backup Your WordPress Files Without cPanel
Many managed WordPress web hosts do not provide access to cPanel. This is because they handle the technical processes for you and therefore, limit your access to the backend of WordPress.
If you don’t have access to cPanel, you can use FTP (File Transfer Protocol) to download files.
- Download an FTP client like FileZilla.
- Open FileZilla and enter your FTP credentials. If you can’t find your credentials, contact your web host for them. You can also follow our FTP guide or video on finding FTP credentials.

- FileZilla will establish a connection with your web server and populate your website’s directory on the right panel. Here, you’ll see the folder public_html.

- Right-click on this folder, compress it and then download the zip file.
Store this zip file safely in a separate folder that is easily accessible for the next steps. We created a folder called Backup on our desktop and placed the zip file here.
2. Export Your WordPress Database
If you are staying with your existing hosting provider, you don’t need to transfer your database. However, we still recommend exporting your database to create a backup copy of it.
The database contains your website’s content including posts, pages, and comments. It also contains certain site configurations and settings. WordPress by default uses a database management system called mySQL.
mySQL databases are managed by using a tool called phpMyAdmin which enables you to import, export, and modify your mySQL database. We’ll show you how to access phpMyAdmin and download your mySQL database.
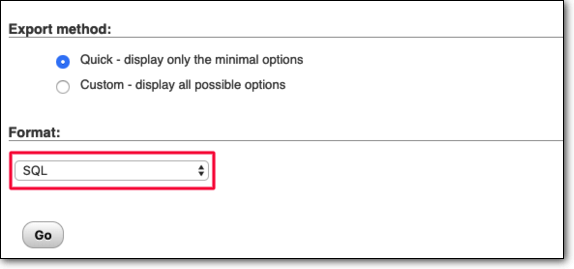
1. In cPanel, navigate to Databases > phpMyAdmin. Inside, you will see your website’s database.
2. Select the database and Export it.
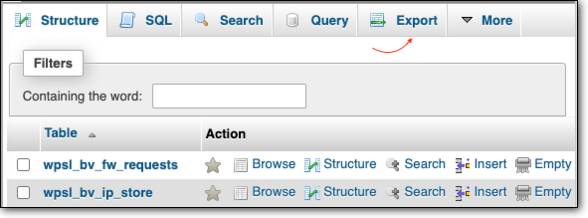
3. You will be presented with a few options, leave the default settings and click on Go.
A .mysql file will download to your local computer. Store it safely in a location that’s easily accessible.
PRO TIP: If you don’t know which is your database, in cPanel > File Manager > public_html, right-click and edit the wp-config file. Inside, you will find your database name.

If you don’t have access to cPanel, don’t worry, we’ve got your back. You can download your database using the phpMyAdmin software directly. We’ve detailed the steps you need to follow in this database backup guide.
Once you have a copy of your WordPress files and database ready, we can move on to the next step.
3. Upload Your WordPress Files To The New Domain
Similar to downloading your files, you can upload them to your new domain using either cPanel or FTP.
A. Use cPanel to Upload WordPress Files
- Go to cPanel > File Manager > public_html.
Note:
- If you’re moving to a new domain with a new host, log in to your new hosting account and select public_html, and follow the next steps.
- If you’re using your existing hosting plan and only switching to a new domain, you need to go to public_html and then select your new domain’s folder. If you don’t see a separate folder, create one for your new domain inside public_html and then follow the next steps.
- Select Upload.
- On the next page, choose the WordPress zip file that you downloaded earlier and upload it.
- Once uploaded, right-click on it and Extract it.
- You can delete the zip file once done.
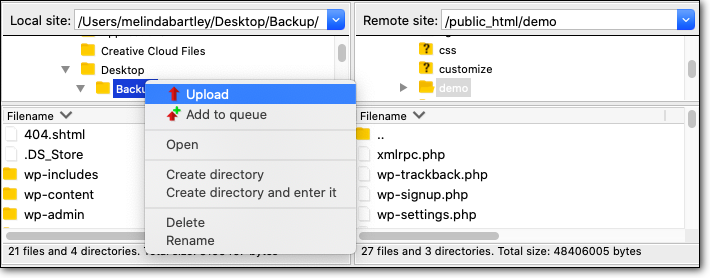
B. Use FTP to Upload WordPress Files
- Go to the backup folder you created and stored the zip file of your WordPress files. Right-click on it and extract the contents.
- Open your FileZilla. Establish a connection with your website using your FTP credentials.
- On the right-hand side, select the public_html folder or the designated folder of your new domain. On the left-hand side, go to the backup folder on your desktop, select all the contents, right-click and choose Upload.
4. Import Your WordPress Database
If you are moving to a new domain with a new host, you need to import your database. If you are moving to a new domain with your existing host, skip this step.
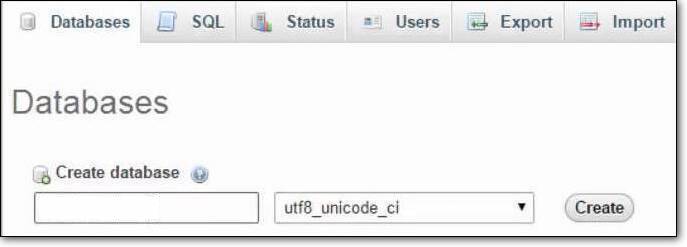
In cPanel, navigate to Databases > mySQL Databases. Here, create a new database.
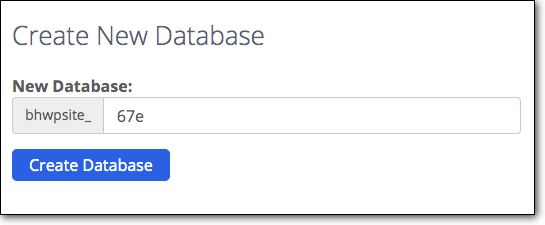
After this, scroll down on the same page and create a MySQL user for your database. Make a note of the details you enter here. You need it in a short while.
Now, go to cPanel > phpMyAdmin > Databases. Select the new database you just created and select Import. Next, choose the database file you downloaded earlier and upload it.
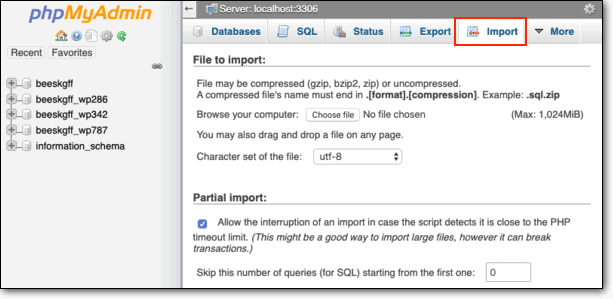
If you don’t have access to cPanel to create a new database, when you login to phpMyAdmin, you’ll see an option to create a new database on the dashboard.
After you create a database and a user, select the Import option and select your database file and upload it.
5. Configure Your New Domain In Database
Skip this step if you’re using the same hosting provider.
After you import your database, go to the wp_options table and select Edit. You need to change the location of your website in this table.
- Locate the words ‘siteurl’ and ‘home’.
- For siteurl, under option_value, replace the old domain name with the new one. Press enter to save.
- Next for home, repeat the same step. Replace the domain name with the new one and hit enter.
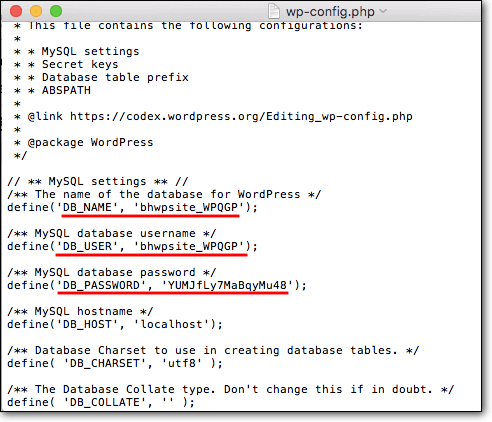
6. Configure Your wp-config File
You need to ensure that your website uses the new domain name and the new database you created. To do this, you need to edit your wp-config file.
- Go to cPanel public_html > wp-config.php. Right-click and edit this file. If you’re using FTP, you need to download the file, and open it in any text editor to make the changes.
- Find the following lines:
define(‘WP_SITEURL’, ‘https://www.example.com’);
define(‘WP_HOME’, ‘https://www.example.com’);
Replace example.com with your new domain name.
- For those who created a new database, remember, we told you to make a note of the database name and user details? Here’s where you need it. Inside the wp-config file, replace the old database details with the new details.
- In cPanel, close the file to save the edits. If you’re using FTP, re-upload the wp-config file and overwrite the old one.
7. Disconnect Your Old Domain
You need to ensure your old website is taken offline so that it doesn’t interfere with the new domain. If you activated maintenance mode on your old site, you can deactivate it now.
We recommend using cPanel or FTP to move your old WordPress site’s files and folders to a single folder called Backup Of Old Domain.
8. Set Up Redirects On Your Old Site
When visitors try to access your old domain, you can redirect them to your new domain. You can do this by setting up a 301 redirect or a wild card redirect on your old website.
There are various tools to do this or you can do it manually. May web hosts also offer the option of setting up redirects.
This will also ensure all your SEO efforts on your old site are not lost.
a. Go to public_html on your old site, locate your .htaccess file, right-click and select Edit.
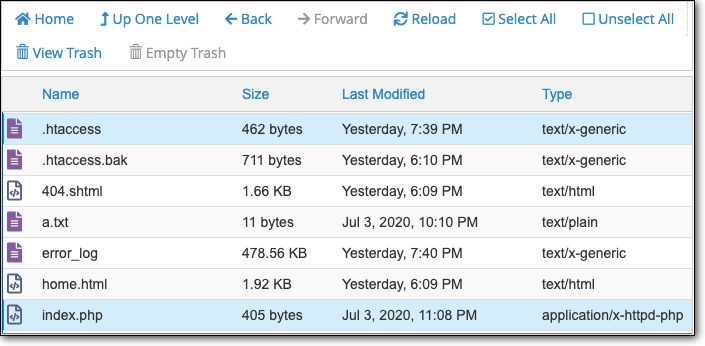
PRO TIP: If you can’t find your .htaccess file, go to settings, and select ‘Show hidden files’.

b. Insert this snippet of code into your .htaccess file:
RewriteEngine On
RewriteCond %{HTTP_HOST} ^domain.com$ [OR]
RewriteCond %{HTTP_HOST} ^www.domain.com$
RewriteRule (.*)$ http://www.mydomain.com/$1 [R=301,L]
c. Substitute domain.com with your new domain name. Maintain consistency with your website’s URL. If you use www in your URL in Setting > General, ensure the same is inserted here. If you don’t use www and use just domain.com, use the same here.
d. Once done, save the file and exit.
PRO TIP: The 301 redirect is a permanent change. To be on the safe side, set this to 302 which is a temporary change. Test your URLs to make sure everything is working correctly. When you’re confident, change 302 to 301 to make it a permanent change. Your visitors as well as any search engine bots will be redirected to the new domain.
If you need more guidance on this, here is an extensive guide on setting up redirects.
9. Fix Your New Domain URLs
When you manually move your site, often, there are errors when you try to open your website. You need to fix your URLs manually. You can do this by:
- Logging in to your WordPress dashboard. Navigate to Settings > General. Here, you’ll see two fields WordPress Address and Site Address. Both of these fields should bear your new domain name.

Ensure the URL doesn’t have a slash at the end. Both fields should end with .com or .co.uk or .org, whichever your domain type is.
Once done, Save Changes.
2. Using a plugin to Update your URLs. Install the Velvet Blues Update URLs on your new domain.

In the New URL field enter your new domain name. Make sure there is no trailing / at the end. Under Choose which URLs should be updated, select all boxes except the last one Update ALL GUIDs. Then select Update URLs NOW.
3. On your wp-admin panel, go to Settings > Permalinks. Select the URL structure you use, this is usually post-name. Select Save changes.
PRO TIP: If you’re seeing errors or old content, try clearing your browser cache and your website’s cache. This will delete any stored data and show you only fresh data.
10. Test Your New Domain
You need to test your website to ensure everything is functioning fine.
- Check all your main pages. Make sure none of them have errors or point to the old domain.
- You can use a tool like https://nibbler.silktide.com/ to check if there are any broken links and broken images, and other errors on your new domain.
- Check custom menu items that you can find under Appearance > Menu
- Ensure all Logos and Favicon files bear your new domain name. You can find these files under Appearance> Theme Options.
- Make sure all your button links or custom theme layouts work fine.
- If you’re running a WooCommerce site, ensure that your add to cart, checkout, payment gateway, and such are working properly.
PRO TIP: If you’re using third-party plugins and services, make sure you change the domain name with them as well.
With that, we’ve come to the end of our guide on how to move your WordPress site to a new domain.
What Next?
Now that your website is set up under your new domain name, you can go about business as usual. It’s always good to make it publicly known that you changed your domain name. This is of course unless you just started and it doesn’t matter.
If you get substantial traffic to your blog or have an email marketing list, you can publish a blog or send out a newsletter about the change.
This is helpful because your users and visitors will be informed and won’t be confused about being redirected to a new domain. And since they know you just made a switch, they’ll be more understanding about errors and bugs and may even inform you if they see any.
Moving to a new domain is a major change and it’s not unusual to see errors, especially if you do it manually. When you use a reliable plugin like BlogVault that automates the process, the process is faster and flawless.
Move Safely And Easily To A New Domain With BlogVault
Tags:
Share it:
You may also like

How to Limit Form Submissions with Droip in WordPress
Forms are an indispensable part of any website because of their versatility, letting you collect information for various purposes! However, people with ill intentions often attempt to exploit these forms…

How To Manage Multiple WordPress sites
Management tools help agencies become well-oiled machines. Each task is completed with the least amount of effort and highest rate of accuracy. For people managing multiple WordPress sites, the daily…

PHP 8.3 Support Added to Staging Feature
We’ve introduced PHP version 8.3 to our staging sites. Test out new features, code changes, and updates on the latest PHP version without affecting your live website. Update PHP confidently…
How do you update and backup your website?
Creating Backup and Updating website can be time consuming and error-prone. BlogVault will save you hours everyday while providing you complete peace of mind.

Updating Everything Manually?
But it’s too time consuming, complicated and stops you from achieving your full potential. You don’t want to put your business at risk with inefficient management.

Backup Your WordPress Site
Install the plugin on your website, let it sync and you’re done. Get automated, scheduled backups for your critical site data, and make sure your website never experiences downtime again.


