It’s incredibly frustrating when your website’s emails suddenly stop sending. Getting the PHPMailer SMTP error: could not authenticate means that while your site successfully connected to the mail server, the server flat-out rejected the username and password it received. It’s a login failure, not a connection failure, and the good news is that it’s usually simple to fix.
While WP SMTP plugins help prevent this, authentication issues can still arise, especially if you’ve recently changed your password. This guide provides clear, step-by-step solutions for any PHPMailer setup, from verifying your credentials to generating the required App Password for services like Gmail or Microsoft 365. Let’s get your emails flowing again.
The “could not authenticate” error is usually caused by incorrect login details. To fix it, double-check your username/password and use an App Password if you’re using services like Gmail, Yahoo, or Microsoft 365.
Before you begin troubleshooting, it’s always a good practice to take a full backup of your website. Since you might be editing important configuration files or plugin settings, a backup ensures you have a safe restore point if anything goes wrong.
What Does “SMTP Error: Could Not Authenticate” Really Mean?
Think of it like trying to log into your email account. Your PHPMailer script successfully found the right door (the SMTP server), and knocked. The server answered, confirming a connection was made. However, when your script provided the username and password, the server didn’t recognize them and refused entry.
In short, this WordPress error is a login problem. The server rejected the credentials your website provided.
Common Causes of the SMTP Authentication Error
The login can fail for several reasons, ranging from a simple typo to a modern security setting. Here are the most common culprits, starting with the most likely.
- Invalid Credentials: This is the biggest cause. A tiny typo in the username (which should almost always be the full email address, like you@example.com) or the password will cause an immediate authentication failure.
- Modern Security Restrictions (App Passwords): Email providers like Gmail, Yahoo, and Microsoft 365 often block login attempts from external applications that use a standard password, especially if Two-Factor Authentication (2FA/MFA) is active. To get around this, you must generate a unique, 16-character App Password from your email account settings and use that in your PHPMailer configuration instead of your regular password.
- Encryption Mismatch: Your mail server expects a specific combination of port and security protocol (SSL or TLS). If your PHPMailer settings don’t match what the server requires (e.g., using Port 587 but not enabling TLS), the authentication will be rejected.
- Server-Side Blocking: Some email providers have a “Less Secure Apps” setting that must be enabled to allow logins from scripts like PHPMailer. While this is being phased out in favor of App Passwords, it can still be a factor on older or private email servers.
- Email Account Status: The issue might be with the email account itself. It could be locked due to suspicious activity, disabled by an administrator, or have exceeded its daily email sending limit.
- SSL Certificate Issues: If the mail server’s SSL certificate is expired, self-signed, or improperly configured, PHPMailer may fail the security check and refuse to send your credentials, resulting in an authentication error.
- Server Environment Problems: The web server hosting your site might be missing a necessary PHP extension, like OpenSSL, which is required to make secure SSL/TLS connections. Without it, the encrypted login process cannot be completed.
Method 1: Using an SMTP Plugin
We tested WP Mail SMTP and other popular SMTP plugins. In our experience, it is one of the best ways to manage your site’s email delivery. These plugins provide a user-friendly interface to configure your settings, which helps avoid common mistakes found in custom code. They also often include built-in tools like email logging and testing features that make troubleshooting much easier.
Even with a plugin, the “could not authenticate” error can still occur. If you use Gmail, Outlook, or other popular SMTP mailers, you likely use a Client ID or secret key. However, if you used the “Other Mailer” option, the authentication is prone to this error. But fixing it is much more straightforward. Here’s how to do it:
- Navigate to Plugin Settings: From your WordPress dashboard, go to WP Mail SMTP > Settings. This is where all your email configuration is stored.
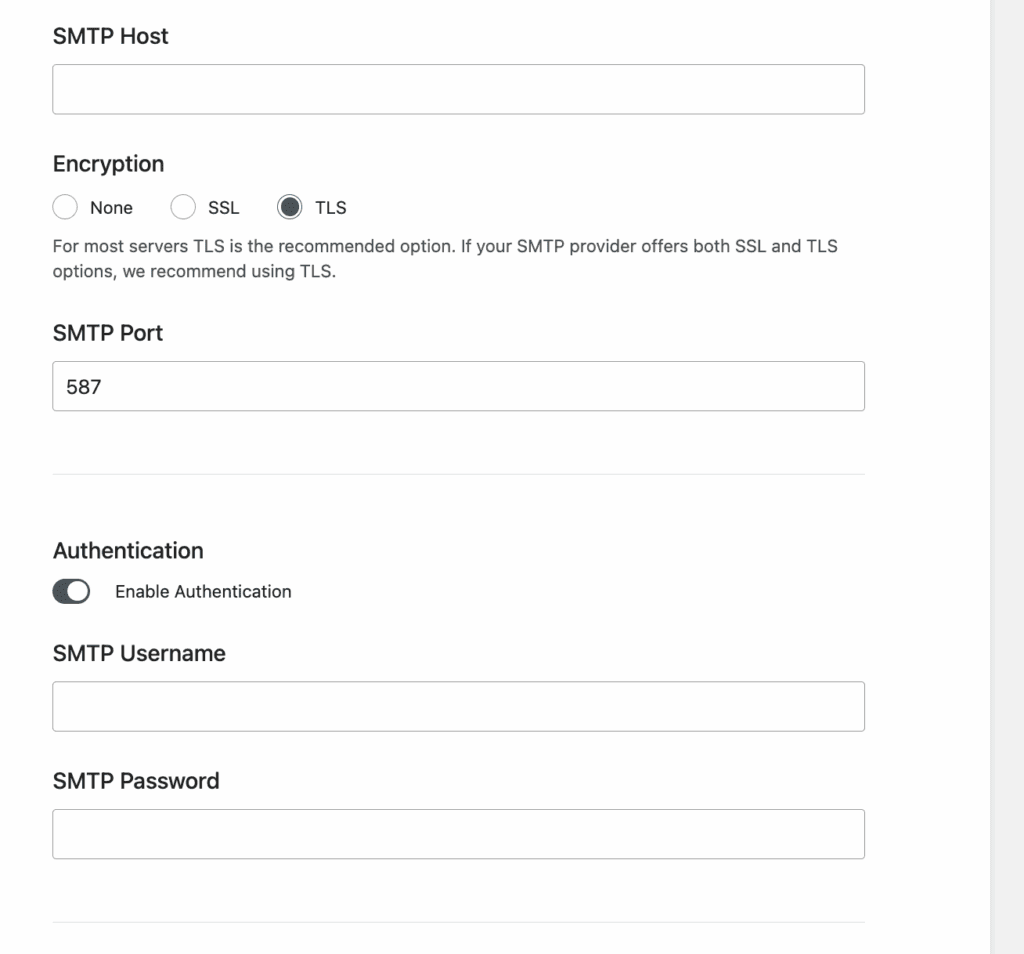
- Re-enter Your Credentials: The most common issue is a simple typo. In the settings for your chosen mailer. Carefully delete and re-type your SMTP username and password.
- Use an App Password: If you are using Gmail, Microsoft 365/Outlook, or Yahoo, you must use a service-specific App Password. Your regular account password will be rejected. Generate a new App Password from your email account’s security settings and paste that into the password field in the plugin.
- Verify Host and Port: Double-check that the SMTP Host and Port are correct for your email provider. For example, Gmail uses smtp.gmail.com and usually Port 587 with TLS encryption.
- Save and Send a Test Email: After re-entering and verifying your settings, click Save Settings. Then, navigate to the Email Test tab within the plugin. Send a test email to any address you can access. The plugin will provide immediate feedback, either confirming success or showing a more detailed error message that can help you pinpoint the exact problem.
Method 2: Fixing the Error in WordPress (Without a Plugin)
If you are not using an SMTP plugin like WP Mail SMTP, you have likely added custom PHP code to your theme’s functions.php file to handle email sending. This method requires you to edit that code directly.
Warning: Editing your theme’s functions.php file is risky. A single typo can cause a “White Screen of Death” and lock you out of your site. Always take a full backup of your website before proceeding. It is highly recommended to use a child theme for these customizations.
Here is a step-by-step process to diagnose and fix the authentication error in your WordPress functions.php file.
Step 1: Enable debug mode:
To see the server’s detailed response, you need to turn on PHPMailer’s built-in logging feature.
- Find the right file: From your WordPress dashboard, go to Appearance > Theme File Editor. Select your functions.php file: On the right side of the screen, under “Theme Files,” click on Theme Functions (functions.php) to open it.
- Find the PHPMailer code: Look for the section of code that configures PHPMailer. You will see lines like:
$mail = new PHPMailer(true); or $phpmailer->Host = 'smtp.example.com';- Insert the debug code: Enabling debug mode on your WordPress site is the first step to fixing any error. Add the following line immediately after the line that initializes the PHPMailer object (e.g., after global $phpmat iler; or similar).
$phpmailer->SMTPDebug = 2;- Trigger the email and read the log: Save your changes. Now, go to the part of your site that sends an email (like submitting a contact form). A detailed connection log will now appear on the page, likely at the very top. Look for the server’s response, which will contain the specific error code, such as 535 Authentication failed.
Step 2: Use an App Password
Services like Gmail or Outlook use OAuth2 these days. This is the gold standard for authentication. However, if you don’t use OAuth2, this method is for you:
- Log in to your email provider’s website and go to its security settings.
- Generate a new 16-character App Password.
- Go back to your functions.php file and replace your regular password with this new App Password.
$phpmailer->Password = 'your-16-character-app-password';Step 3: Verify Your Core SMTP Configuration
Before diving into passwords and ports, you must ensure the three foundational commands that initiate the SMTP login process are present and correct in your functions.php file. These settings tell WordPress how to connect and authenticate. If any of these are missing or wrong, the login will fail before it even starts.
$phpmailer->isSMTP();This is the master switch. It commands WordPress to stop using the basic, unreliable default mail function and instead use a dedicated external mail server (like Gmail or Microsoft 365) via the SMTP protocol. If this line is missing or commented out (e.g., // $phpmailer->isSMTP();), none of your other SMTP settings—host, username, password—will be used. The authentication process that is failing won’t even be attempted. Ensure this line is present and active.
$phpmailer->SMTPAuth = true;This setting explicitly tells PHPMailer that the server it’s connecting to requires a login. It enables the authentication process where your username and password are sent to the server for verification. The error is “could not authenticate.” If this setting is set to false or is missing, your site will connect to the mail server but will never actually send your login credentials. The server, which is expecting a login, will then reject the attempt to send an email, causing an authentication error. This must be set to true for virtually all modern email services.
$phpmailer->Username = 'your-full-email@example.com';This line sets the username for the SMTP login. This is one of the most common sources of errors. You must use the full email address as the username. A frequent mistake is using only the part before the ‘@’ symbol (e.g., myname instead of myname@example.com). An incomplete or misspelled username is the same as a wrong password and will cause an immediate authentication failure. Double-check this line for typos and ensure it contains your complete email address.
Step 4: Configure the Correct Port and Encryption
Think of the Port and SMTPSecure settings as a matched pair: a specific secure doorway and the secret handshake required to use it. Your website must use the exact combination your email provider expects. If you use the wrong handshake for a given door, the mail server will refuse to establish a secure connection, and it will not accept your login credentials, leading to an authentication error.
$phpmailer->SMTPSecure = 'tls'; and $phpmailer->Port = 587;This is the modern standard used by major providers like Gmail and Microsoft 365. If your provider recommends TLS, you must use it with Port 587. Using Port 465 with TLS will fail.
$phpmailer->SMTPSecure = 'ssl'; and $phpmailer->Port = 465;Some hosting providers or email services specifically require this method. If your provider’s documentation specifies SSL, you must use Port 465. Using Port 587 with SSL will also fail.
Check your email provider’s documentation for their required settings and ensure the SMTPSecure and Port values in your functions.php file match them precisely.
Step 5: Verify the Fix and Secure Your Site
This final step is a two-part process: first, you confirm the solution worked, and second, you remove the debugging tool to secure your website.
- Verify the Fix: After saving your changes to the functions.php file, go to your live website and perform the action that sends an email (e.g., submit your contact form). The debug log will appear on the screen. Read through it and look for a line that confirms success. This message is usually 235 2.7.0 Authentication successful. Once you see that message, check your email inbox to be certain the test email was delivered.
- Clean Up (Critical Security Step): The debug log publicly displays sensitive information about your server, your email username, and the entire login conversation. As soon as you’ve confirmed that emails are sending correctly, you must disable the debug line. The best way to do this is to “comment it out” by adding two slashes (//) in front of it. This deactivates the code but keeps it there in case you ever need to troubleshoot again.
// $phpmailer->SMTPDebug = 2;Your emails will now send correctly, and the sensitive debug information will no longer be visible on your site.
How to Prevent the “Could Not Authenticate” Error in the Future
Fixing an error is good, but preventing it from happening again is better. By adopting best practices for managing your email credentials and configuration, you can create a more stable and secure email system for your website.
- Always Use App Passwords: Avoid using your primary account password in any script or plugin. Instead, generate a unique, 16-character App Password from your email provider’s security settings. This bypasses issues with Two-Factor Authentication (2FA) and is more secure, as you can revoke it at any time without affecting your main account.
- Standardise on Port 587 with TLS: Whenever possible, configure your script to use Port 587 with TLS encryption (SMTPSecure = ‘tls’). This is the modern industry standard for secure email submission and is less likely to be blocked or flagged by hosting providers and email servers.
- Store Credentials Securely: Never hard-code your username and password directly into your functions.php or other publicly accessible files. A better practice is to use environment variables or a private .env file to hold your SMTP credentials, keeping them separate from your main codebase.
- Configure Your DNS Records: Set up SPF, DKIM, and DMARC records for your domain. These DNS records act like a digital passport for your emails, verifying to receiving servers that the emails are legitimately from you. This builds trust and prevents your mail provider from blocking your connection as suspicious.
- Use Transactional Email Services: For critical website emails (like password resets, order confirmations, etc.), switch from personal accounts like Gmail to a dedicated transactional email service. Providers like SendGrid, Postmark, or Amazon SES are built for high-volume, automated sending and have robust authentication systems.
- Keep PHPMailer Updated: If you are managing PHPMailer manually, ensure you are using the latest version. Updates often include important security patches and improved compatibility with modern server protocols, which can prevent authentication issues.
- Implement OAuth2 Authentication: This is standard when you use an SMTP plugin to setup GMail. This method uses secure tokens for authentication instead of a password. These tokens remain valid even if you change your main account password, making your connection more resilient.
Final Thoughts
The easiest and most common way to fix this is to carefully re-enter your credentials and, if you’re using a service like Gmail or Microsoft 365, to use a dedicated App Password instead of your regular one.
Remember to always use a backup plugin to take a full backup of your website before editing core files like functions.php. Having a safe restore point gives you the confidence to troubleshoot without the risk of breaking your site.
FAQs
How to fix SMTP error could not authenticate?
Double-check your SMTP username (use the full email address) and password for typos. If you use Gmail, Yahoo, or Microsoft 365, generate a 16-character App Password from your account’s security settings and use that in your configuration instead of your regular password. Ensure you are using the correct Port and Encryption combination, most commonly Port 587 with TLS encryption.
How to fix SMTP error in mail?
“SMTP error” is a general term, but if it relates to authentication, the fix is to resolve the login failure. Verify that your SMTP Host, Username, Password, Port, and Encryption settings are 100% correct according to your email provider’s documentation. Using an SMTP plugin like WP Mail SMTP can help manage these settings and provide clearer error logs.
How to fix “the server response was 5.7.0 authentication required”?
This is a more specific version of the same error. The 5.7.0 code from the server is explicitly telling you that login is mandatory. The fix is to ensure your configuration is actually attempting to log in. In your PHPMailer code, make sure $mail->SMTPAuth = true; is set and that the $mail->Username and $mail->Password you provide are correct.
How to fix 554 delivery errors?
Check your DNS records: Make sure you have valid SPF and DKIM records set up for your domain. Check blacklists: Use a tool like MXToolbox to see if your domain or server IP address is on any email blacklists. Review email content: Ensure the content of your email doesn’t contain spammy links or phrases.

Shreya has been a writer for as long as she can remember. Now, she writes articles that help WordPress users manage the sites that they're proud of, with little to no coding