WordPress Plugin Problems: How to Identify & Troubleshoot
Bulletproof Backups for Your WordPress Website
Fortify your business continuity with foolproof WordPress backups. No data loss, no downtime — just secure, seamless operation.
Are you encountering an error after installing a new plugin or updating a current one?
This is an extremely common issue that most website owners face sooner or later.
We understand that this is a stressful situation. So without any delay, let’s narrow down the issue to the exact plugin that is causing the problem.
After that, we will show you how you can resolve the issue and get your website up and running and no time.
Are the Plugins Actually the Reason Behind Your Problem?
Anyone who has spent time managing a WordPress website knows that identifying the source of a problem is a nightmare.
Holding plugins accountable is a general rule of thumb when something goes wrong. But plugins are not always the culprit.
Suppose a team of people is dedicated to managing a website. Some members are drafting articles, others are uploading media files. Some are improving the speed, others are keeping the site updated. Any of these activities could be the source of an error.
So how do you determine if the plugins are the culprit?
If you have experienced any of the scenarios below, your plugins are culpable –
i. You or your teammate install a plugin and immediately afterward you started seeing the error.
ii. You or your teammate updated a plugin or rolled out a bulk update and noticed problems with your website immediately.
iii. An error message appears on your website or dashboard telling you which file is causing the issue. If you are able to identify the file as associated with a plugin, then we rest the case.
But what if none of these happened!
Does it mean plugins are not causing the issue?
Not really!
Plugin problems can occur when you are installing a new theme or fiddling with the files on the backend.
If it’s not apparent that the cause of your website’s unfortunate state is a plugin then we suggest taking the following step.
How to Identify Which Plugin Is Actually Causing the Problem?
→ Install Query Monitor
An error message is not always visible on the dashboard. The message could be buried in the backend where WordPress files and folders are located. Query Monitor will uncover warnings from the backend and display it on the dashboard.
Here’s a good article on what sort of information you’ll get on with the Query Monitor plugin.
If you find that plugins are not the issue, then it’s possible that your site is misbehaving because it’s hacked. Scan your website. If it’s compromised then proceed to fix your hacked site.
How to Fix Plugin Problems?
There are two parts to fixing the plugin problem:
There are two solutions that you can implement –
- When You Know The Culprit Plugin
- When You Don’t Know The Culprit Plugin
Let’s dig right in.
1. When You Know The Culprit Plugin
If you know which plugin is the culprit, you need to take the following steps –
Step 1: Stage a Site
Have you ever tried to troubleshoot an issue on WordPress but ended up making things worse?
We don’t want that happening hence we will carry out the fix on a staging site (an exact duplicate of your live site) and then replicate it on the live site.
→ To stage your site, signup with BlogVault Staging and set up an account.
→ On your WordPress dashboard, select BlogVault from the menu. Then, you need to do the following – Enter your email address > Click on ‘looking for’ and from the drop-down > select Backup > Get Started.

→ BlogVault will start creating a backup of your site.
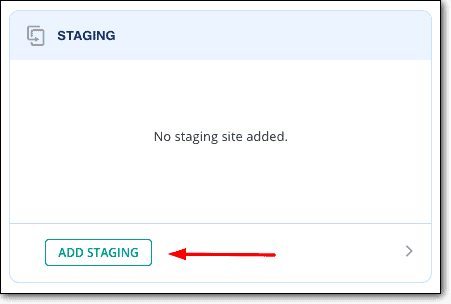
→ When the backup is ready, go to the BlogVault dashboard and navigate to the section – Staging and select Add Staging.
→ Once the staging site is ready, you can open it by clicking on the Visit Staging Site button.
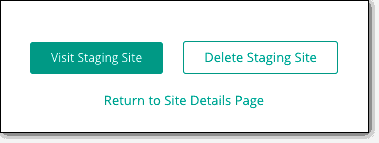
→ The website is password-protected so that only people you give permission can access it.
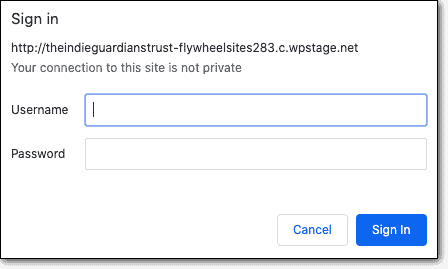
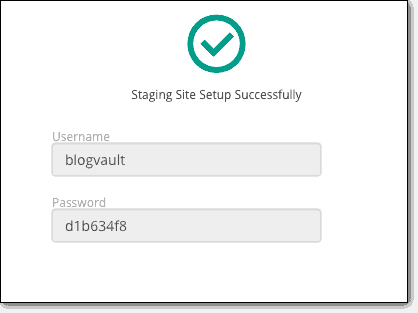
→ To access the site, you need to enter a username and password which you can find from the same page where you clicked on the link Visit Staging Site. If you have closed the page, just go to BlogVault dashboard > select the site > Staging > username & password.
Step 2: Deactivate the Plugin
→ If you can access the dashboard, then follow the steps below:
1. Open your WordPress website and navigate to Plugins > Installed Plugins.
2. Deactivate the plugin that was causing the issue.

3. Your website was already broken but there must be some pages like the login page, the WordPress dashboard which may break after the deactivation. Check the pages that were not broken to see if they are functioning fine.
4. If they are functioning as usual, then go ahead and deactivate the plugin from the live site.
→ in case you can’t access the dashboard, then follow the steps below:
1. Open your hosting account, navigate to the cPanel, and select File Manager.

2. From the next page, on the right-hand menu select public_html. Then select wp-content > plugins. This folder contains all the plugins installed on your site. Now, right-click on the culprit plugin and select Rename. Renaming the plugin will deactivate it.
After deactivating the plugin, check your website check if they have regained access, then check the website thoroughly. If deactivating the plugin causes some issue, then contact the developer of the plugin and ask for help. More information in contact with the developer section.
→ If you can’t access the cPanel, then follow these steps:
If your hosting does not offer a cPanel, we suggest taking a different route to deactivate the plugin –
1. Download and install Filezilla on your computer. Filezilla will connect your computer with your website’s server so that you can access your WordPress files.
2. Open Filezilla and connect it with your web server by inserting the FTP credentials which includes the Host, Username, Password, & Port. If you don’t know how to get this information, then talk to your hosting providers or check out these videos.

3. Filezilla has 4 panels. Once the connection is established, in the top right panel, select public_html > wp-content > plugins.
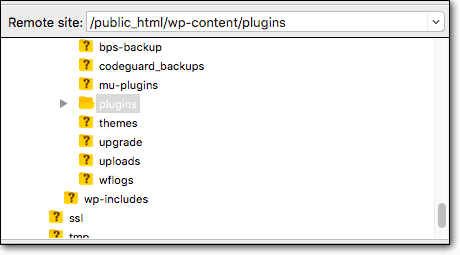
4. Then from the bottom-right panel, select the plugin and right-click, then select Rename to rename the plugin.
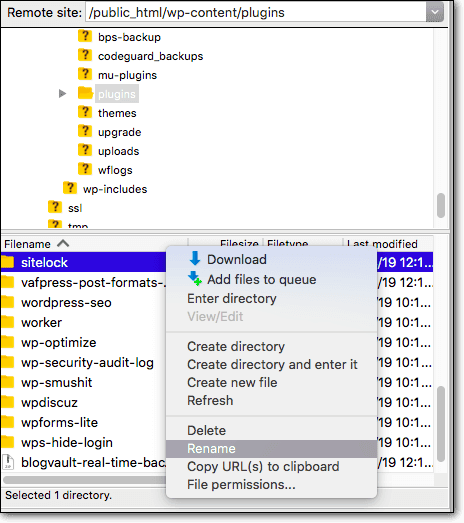
That’s it. Kindly check your website thoroughly. If deactivating the plugin causes some issue, then contact the developer of the plugin and ask for help. More information in contact with the developer section.
2. When You Don’t Know The Culprit Plugin
If you have managed WordPress websites for a while, then you know well the patience it requires to find the source of an issue.
Since you don’t know which plugin is causing the issue, you’ll need to deactivate all the plugins, reactivate them one by one, and check your website to find which plugin is the culprit.
Step 1: Stage a Site
Deactivating all plugins can cause your website to lose its functionality those plugins provide. This means your website will be unusable by your visitors.
To avoid this, it’s best to carry out this process in a safe staging environment that doesn’t affect your live site.
Once you figure out which plugin is causing the issue, you can deactivate it on your live site to resolve the issue.
Please follow the instructions from the previous section to create a staging site.
Step 2: Deactivate the Plugin
→ If you can access the dashboard, then follow the steps below:
1. Open your staging site and login to it. Whatever your staging URL is, add wp-admin at the end to access the login page. Then from the menu on the left, navigate to Plugins > Installed Plugins.
2. Click on Bulk Action and select deactivate. And then click on Apply.
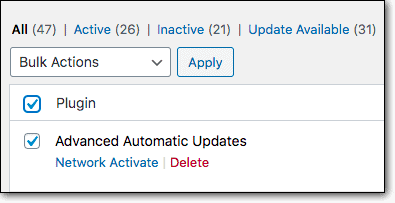
3. Check your website to see if the problem is fixed. If it is then a plugin was at fault. Now you need to find out which was the culprit.
4. Start activating the plugins one by one. Every time you activate a plugin you need to check the website. If the issue crops up after activating a specific plugin then, we know which plugin to blame. There can be more than one plugin at fault hence continue activating all the plugins until you have checked all the plugins installed on the site.
When you know which plugin was causing the issue, you need to login to your live site and deactivate it.
→ If you can’t access the site, then follow the steps below:
1. Open your hosting account, navigate to the cPanel, and select File Manager.
2. From the next page, on the right-hand menu select public_html > wp-content > plugins.
3. This folder contains all the plugins installed on your site. Right-click on the folder and select Rename. Renaming the folder will deactivate all the plugins inside the folder.
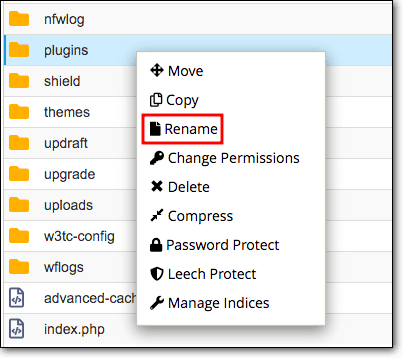
4. Now check your website. If you can access your website, then a plugin was causing the issue. You can log into your WordPress dashboard and start activating the plugins one by one. Check the website each time you activate a plugin. This will enable you to pinpoint which plugin is the culprit. Ensure that you keep that plugin deactivated on your WordPress site.
→ If you can’t access the cPanel, then follow these steps:
If you have read the previous section, i.e. When You Know The Culprit Plugin, you know that if you can’t use cPanel then Filezilla will help to access your plugins.
1. Download and install Filezilla on your computer.
2. Open Filezilla and connect it with your web server by inserting your FTP credentials. You can ask your hosting providers for your credentials or find them by watching these videos.

3. Filezilla has 4 panels. Once the connection is established, in the top right panel, select public_html > wp-content > plugins. Right-click on the plugins folder and select Rename.
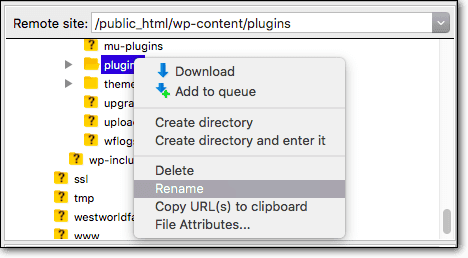
When you rename the folder, all the plugins within the folder will become deactivated.
4. Open your website and see if you can log into your site. If you can then conclude a plugin was causing the issue.
5. Open your WordPress dashboard and navigate to Installed Plugin and start activating your plugins one by one. Check your website every time you activate a plugin. If the site breaks, then you know that the last plugin you activated is the culprit. Ensure that you keep that plugin deactivated.
There can be more than one plugin causing the issue. Continue activating the plugins and observing the website.
PRO TIP: If deactivating the plugin did not fix the issue then, plugins are not the problem here. In such cases, more often than not websites are infected with malware. Scan your website and then take steps to fix the hacked site.
Found the Plugin is the Culprit, What Next?
Congratulations, you found the plugin that was causing all this trouble.
But now what?
There are 2 ways to proceed –
1. Contact the Developer to Fix the Flaw
Plugin problems occur when a plugin is poorly coded which causes conflict with another plugin or theme and causes the website to break. If you followed the guide and found which plugin is causing the issue, then contact the developers of the plugin explaining to them how the plugin is behaving on your site.
If you are using a premium plugin, you will have access to the plugin support. It could be via an instant chat or a ticket system. Log into the marketplace or websites from where you brought the plugin and look for support chats or forums.
If you downloaded the plugin for free from the WordPress plugin repository, you can start a support thread.
→ On the plugin’s repo page, select Support.
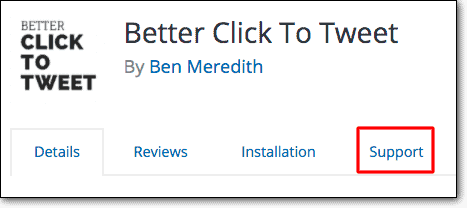
→ On the next page, select Log in to Create a Topic.

→ You’ll need to create an account to ask for help from the developers.
→ Explain the issue that you are facing in detail. Try answering some of these questions:
- When did you first see the issue cropping up on your website?
- How did you find out which plugin was causing the issue?
- What other plugins and themes have you got installed on your website?
2. Find a Replacement
It may turn out that the plugin is incompatible with the theme you’re using and the plugin developer can’t help you. Now, switching to a theme that’s compatible is a long and complex process.
It might be easier to replace the plugin with an alternative.
Replacement is the last resort when all else fails.
Remember, the function of the plugin is important and not the plugin itself. There are plenty of alternatives available out there.
PRO TIP: Plugins provide added functionality and enhance your website. While there are plenty of free plugins, they aren’t backed by good service or support. It’s free after all! This is why we encourage using premium plugins that provide you with the quality service and customer support you need.
Final Thoughts
Plugin problems are common issues that you’ll face one time or the other when you are managing your website.
It cannot be avoided but you can take precautions like buying plugins from well-known developers or marketplaces. Checking review about the tool online. Talking to people who are already using it. Going to the support forums on WordPress and checking about incompatibility issues.
Another important step is to update plugins on a staging site before doing it on the live site. If any issue occurs, you can iron them out (by reaching to the developers and support forums) before making the update on the live site.
Never Break Your Site Again, Use WordPress Staging
Tags:
Share it:
You may also like
How to Limit Form Submissions with Droip in WordPress
Forms are an indispensable part of any website because of their versatility, letting you collect information for various purposes! However, people with ill intentions often attempt to exploit these forms…
How To Manage Multiple WordPress sites
Management tools help agencies become well-oiled machines. Each task is completed with the least amount of effort and highest rate of accuracy. For people managing multiple WordPress sites, the daily…

PHP 8.3 Support Added to Staging Feature
We’ve introduced PHP version 8.3 to our staging sites. Test out new features, code changes, and updates on the latest PHP version without affecting your live website. Update PHP confidently…
How do you update and backup your website?
Creating Backup and Updating website can be time consuming and error-prone. BlogVault will save you hours everyday while providing you complete peace of mind.

Updating Everything Manually?
But it’s too time consuming, complicated and stops you from achieving your full potential. You don’t want to put your business at risk with inefficient management.

Backup Your WordPress Site
Install the plugin on your website, let it sync and you’re done. Get automated, scheduled backups for your critical site data, and make sure your website never experiences downtime again.


