

Troubleshooting WordPress errors can be scary and confusing.
You’ve crafted a stunning website, but now the hero image is missing, widgets and images have vanished, and instead of vibrant visuals, all you see are 404 error messages. It’s disruptive, and downright baffling.
Let me assure you that this common issue is fixable. I’ll walk you through the most effective strategies to restore your site.
Use a staging site to troubleshoot and make changes to your WordPress site. This way, you ensure your live site stays unaffected during the process.
What is the WordPress “Failed to load resource”?
The “WordPress failed to load resource” error is a signal that something isn’t loading correctly on your site. This commonly affects images, scripts, or styles. In simple terms, it means WordPress can’t find or access a specific piece of content necessary for your site to display properly.
When this error occurs, you might notice missing images or weird-looking pages where styles aren’t applied. If you inspect the problem using your browser’s developer tools, you might see console errors that show which resources failed to load. These errors are like little alerts telling you what exactly went wrong.
URLs play a big role. If the links to resources like images or CSS files are wrong or broken, WordPress won’t be able to find them. Permissions also matter. Files need the right settings so your server can access and display them.
Sometimes, the server itself is the problem. If it’s down or misconfigured, your resources won’t load. Plugin conflicts are another common culprit. They might not mesh well with other tools on your site, causing certain resources to fail. Lastly, cached data can trip you up. If the cache is old, your site might try to load outdated resources, leading to issues.
How to fix the WordPress “Failed to load resource” error?
Now that you understand what causes the “WordPress failed to load resource” error, it’s time to dive into solutions. Fixing this issue is like following a simple recipe. You identify the problem ingredients and mix in some strategic solutions to set things right. In this section, we will guide you through a step-by-step process to resolve these errors, ensuring that your site looks and functions as it should.
1.Reupload the image
One of the simplest solutions to fix a missing image in WordPress is to reupload it. Often, the image might have been moved or mistakenly deleted, leading to the failure in loading it correctly.
First, check your media library. You can find this by navigating to Media in your WordPress dashboard. Look through the library for the missing image. If you find it, note its URL to ensure it’s correctly linked in your post or page.
If the image isn’t there, you’ll need to reupload it. Click Add New in the media library of your admin panel. to upload your image again. Make sure the file is correctly named and placed where it needs to be. If the image is specifically missing from a post or page, you can reupload it directly there. In your WordPress editor, choose Add Media and select or upload the image from your computer.
Reuploading ensures that the image link is refreshed and available to your site. This simple step can resolve many loading issues quickly. So, take a moment to check and reupload your images. It’s a straightforward way to restore your site’s visual appeal.
2. Enabling debugging
Debugging is trying to see what’s happening under the hood. It involves examining how your WordPress site runs to find hidden errors or conflicts. When you enable debug mode, you’re telling your site to generate WordPress logs to show any mistakes or warnings that usually stay hidden. This can help you understand why certain parts of your site, like images or scripts, aren’t loading correctly.
- Use an FTP client or your hosting provider’s file manager.
- Navigate to the root directory of your WordPress installation.
- Find the file named wp-config.php.
- Open it with a text editor.
- Look for the following line
define('WP_DEBUG', false);.- Change false to true so it reads as:
define('WP_DEBUG', true);.With debug mode on, errors will display on your site, offering useful information. Here are some things you should check your server error logs. Access your hosting provider’s control panel. Locate the section labeled Logs or Error Logs. Review messages that relate to the failing resources.
3. Verify resource URLs:
Think of a URL as an address for a particular resource on your website, like an image, a script, or a style sheet. Each of these elements has its own unique address telling your website where to find it when needed.
If the URL is correct, your page will find the resource and display it. If the URL is wrong, your website gets lost. It can’t find what it’s supposed to show, so it ends up displaying errors or missing images.
To check if the URL is correct, look at the page where something is missing. You can use your web browser’s Inspect tool-this helps you see the URL your website is trying to use. If you paste this URL into the browser’s address bar and it doesn’t load, something’s wrong.
Correcting these URLs involves making sure that each address accurately points to where the resource is stored, like in your WordPress media library or on your server. It’s also important to check that each URL matches whether your site is using http or https. By ensuring these details, you help your website load everything it needs, just like following a reliable map.
4. Check file permissionsimage
WordPress file permissions are like a set of rules that decide who can see or change the files on your website. These permissions are crucial because they protect your files from unauthorized changes. If permissions are set too tightly, important parts of your site-like images or scripts – might not be seen or run, causing parts of your site to break or not display.

Here is how to do this with Cyberduck:
- Click on Open Connection.
- Select your connection type (usually SFTP or FTP).
- Enter your server’s IP address or domain name.
- Input your username and password.
- Click Connect to access your server files.
- Right-click on a folder (e.g., wp-content).
- Select Info or Get Info from the dropdown.
Pay special attention to folders like wp-content, wp-admin, and wp-includes. These contain the core files and resources for your site. For folders like wp-content, set permissions to 755. Within wp-content, inspect files like themes and plugins.
- Confirm and apply any changes you’ve made to ensure they’re saved on your server.
5. Clear cache
WordPress cache is like a temporary storage area for your website’s data. When someone visits your site, the browser holds onto a “snapshot” of the page. This snapshot includes images, scripts, and styles, allowing the site to load faster the next time it’s accessed. It’s almost like the site’s memory, remembering what it looked like so it doesn’t have to reload everything from scratch each time.
While caching speeds up loading times and improves user experience, it can sometimes lead to issues like the “failed to load resource” error. This occurs because the cache might hold an outdated version of your site. When you make changes, like updating an image or script, the browser might still use the old version stored in the cache. As a result, it tries to load resources that no longer exist or have been changed, leading to errors.
To resolve these conflicts, it’s important to clear or refresh your cache. This action forces the browser to fetch the latest version of your site, ensuring that all resources are up-to-date.
6. Solve plugin conflicts
Plugin conflicts occur when two or more plugins on your WordPress site don’t play well together. Each plugin is designed to add specific features or functionalities, but sometimes, their code can clash. This can lead to unexpected behavior, like resources failing to load. For example, one plugin might use a script that another plugin modifies or depends on differently, resulting in errors or missing parts on your page.
These conflicts can also stem from a recent WordPress update that failed because it isn’t compatible with the latest version of WordPress or with each other. Moreover, some plugins might have overlapping functions, causing confusion in the site’s code and leading to resource loading errors.
- Start by going to your WordPress dashboard and navigating to Plugins.
- Select all plugins and choose Deactivate from the bulk actions dropdown menu, then click Apply. This will turn off all plugins, allowing you to see if the problem resolves without them.
- Start by activating each plugin individually.
- After activating each plugin, check your site to see if the error reappears.
- When the issue returns, the last plugin activated is likely the one causing the conflict.
Once identified, you can decide to look for an alternative plugin, update it, or contact the plugin developer for support.
7. Check for theme conflicts
Theme conflicts happen when your WordPress theme interferes with the core functionality of your site or with plugins in a way that causes problems, such as resources failing to load. Themes control the appearance and layout of your site, but they also include scripts and styles that can clash with WordPress or plugin code. For instance, a custom theme might try to style elements in a way that blocks important scripts or overrides settings from a plugin, leading to errors.
Conflicts can arise from failed theme updates that don’t mesh with other plugins or custom themes with coding errors. Occasionally, a theme’s design or built-in features may not align well with certain plugins, causing disruptions like the “failed to load resource” error.
Here’s how to troubleshoot a theme conflict:
- First, from your WordPress dashboard, navigate to Appearance and then Themes.
- Switch to a default theme: Temporarily activate a default WordPress theme like Twenty Twenty-Three.
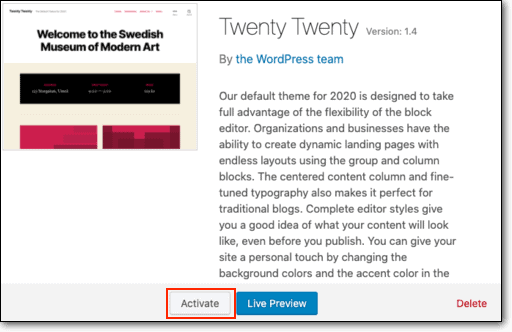
- After switching themes, check your site to see if the error persists.
- If the issue disappears with the default theme, then the theme you were using likely has a conflict.
Consider updating the theme if updates are available, or reach out to the theme’s support for help. If the problem resolves with a default theme, you might need to redesign your site using a more compatible theme or making adjustments to the current theme’s code.
8. Update everything
Keeping WordPress, plugins, and themes updated is crucial for maintaining a well-functioning website. Updates often include important security patches, bug fixes, and new features, all designed to improve performance and compatibility. When these elements are outdated, they can cause compatibility issues with other parts of your site. It can lead to errors like “failed to load resources.”
But, WordPress updates can also cause issues. Plugin updates fail all the time, because of incompatibilities with a theme or recently updated core. This is why we recommend you take the following precautions:
- Review update notes: Read the release notes or changelogs for each update to understand what changes or fixes are included.
- Check plugin compatibility: Ensure that plugins are compatible with the latest versions of WordPress and each other.
- Schedule updates: Choose a low-traffic time to perform updates, minimizing the impact on user.
- Use visual regression: It’s a great tool to make sure nothing has broken after an update on your site. It compares the visual elements of your site before and after a major update and alerts you to changes.
- Check server requirements: Confirm that your server meets the technical requirements for new updates.
- Deactivate caching plugins: Turn off caching plugins before updating to prevent conflicts or incomplete updates.
- Monitor site post-update: After updates, closely monitor your site’s performance to catch any new issues that may arise.
9. Check .htaccess rules
Reviewing .htaccess rules can sometimes resolve issues with resources failing to load on your WordPress site. This small, but powerful, configuration file manages how your server interacts with your site. It includes rules for things like permalinks, redirects, and access settings. However, errors or misconfigurations here can inadvertently block access to important resources, leading to errors like “failed to load resource.”
Checking the .htaccess file effectively requires some technical understanding, as making incorrect changes can disrupt your site. If you understand the rules in the file, this method might be for you. Here’s what you can do:
- First, access your site’s files using an FTP client or your hosting control panel.
- Locate the .htaccess file in your WordPress root directory.
Pro tip: Before making any changes, take a backup of this file, as you’ll want to revert to it if things go wrong.
- Open the .htaccess file in a text editor and carefully review the rules it contains. Look for any lines that might restrict resource access or seem out of place. If you’re unsure, compare it to a default WordPress .htaccess file to spot differences that may be causing issues.
If necessary, you can reset the .htaccess file to its default state. This often resolves issues caused by incorrect configurations. To do this, rename the existing .htaccess file to disable it, and then create a new one with default settings. Always remember to save and test your site after making changes to ensure everything functions correctly.
How to prevent the “Failed to load resources” error?
Troubleshooting the “WordPress failed to load resource” error can be both time-consuming and frustrating. You’ve put in the hours, sifting through lines of code, checking plugins, themes, and settings to get your site back to normal. It’s an experience that can feel like searching for a needle in a haystack. After all the effort to solve the issue, it’s only natural to wish to avoid such headaches in the future. Fortunately, there are strategies you can implement to prevent these problems from cropping up again. By taking proactive measures, you can protect your site from unnecessary downtime and keep it running smoothly.
- Keep backups: Maintain regular backups to easily restore your site if something goes wrong.
- Test before live changes: Always review changes on a test site before implementing them on your live site to spot any issues early.
- Use a page content monitor: This can help you monitor the content of your pages and make sure nothing is broken. You will be alerted to forms or images not loading correctly. You can fix it before your customers notice.
- Keep everything updated: Regularly update the WordPress core, themes, and plugins to avoid compatibility troubles.
- Use correct URLs: Ensure all URLs are absolute and accurate to prevent broken links.
- Set proper file permissions: Regularly review file permissions to confirm that necessary access is allowed without making the site vulnerable.
- Choose reliable hosting: Select a reputable hosting provider that offers good uptime and responsive support to minimize server-related issues.
- Utilize caching: Use caching plugins to serve cached pages and resources efficiently, which helps reduce load times.
- Deploy a CDN: Implement a Content Delivery Network to distribute resources globally, enhancing loading speeds everywhere.
- Monitor server health: Use monitoring tools to track server performance and resource usage to catch potential problems early.
- Limit plugins: Only install necessary plugins and keep them organized to minimize possible conflicts.
Final thoughts:
Encountering errors on your WordPress site can be incredibly disruptive. They can interrupt the flow of your work and frustrate your site’s visitors. However, with the right preventative measures in place, you can significantly reduce the risk and impact of these errors. By diligently using a staging site for testing changes and updates, you catch potential issues before they reach your live site. Taking WordPress backups also ensures that even if something does go wrong, you have a safety net to quickly restore your site to its former glory. Taking these precautions allows you to focus on what truly matters-creating compelling content and engaging with your audience without interruption.
FAQs
What does “failed to load resource” mean in WordPress?
The “failed to load resource” error in WordPress indicates that certain files, such as images, scripts, or stylesheets, could not be loaded properly on your site. This can cause parts of your site to appear broken or incomplete.
How can I identify which resources are causing the error?
You can use your browser’s developer tools to identify problematic resources. Right-click on your page and select Inspect. Navigate to the Console tab to see specific error messages and which resources are failing to load.
Can caching plugins cause this error?
Yes, caching plugins can sometimes lead to “failed to load resource” errors by serving outdated versions of a page. Clearing your cache or reconfiguring the plugin might resolve the issue.
How do file permissions affect resource loading?
Incorrect file permissions can prevent your server from accessing certain files. Properly setting permissions ensures your site’s files are accessible to the server and traffic, reducing errors.
What role do plugins play in this error?
Plugins can conflict with each other or with your theme, causing resources not to load. Deactivating plugins one by one can help pinpoint the conflicting source.
Why might theme conflicts lead to this error?
Themes might contain scripts or styles that interfere with WordPress or other plugins. Switching to a default theme temporarily can help determine if your theme is the issue.
Are broken URLs a common cause of this error?
Yes, wrong or outdated URLs for images, scripts, or styles can lead to missing resources. Ensure all URLs are correct and point to the right locations on your server.
What can I do if I’m unable to resolve the error on my own?
If troubleshooting steps don’t resolve the issue, consider reaching out to your hosting provider or a WordPress support forum for assistance. They can offer specialized help based on your site’s setup.
How often should I update WordPress to prevent these errors?
Regular updates are key to avoiding these errors. Check for updates at least once a month, and apply them in a timely manner to keep everything compatible and secure.
How important is my hosting provider in preventing this error?
A good hosting provider ensures reliable server performance and uptime. They also offer helpful support when something goes wrong, making them crucial in preventing and resolving errors.

Shreya has been a writer for as long as she can remember. Now, she writes articles that help WordPress users manage the sites that they're proud of, with little to no coding


