6 Ways To Fix WordPress HTTP Error For Image Upload
Bulletproof Backups for Your WordPress Website
Fortify your business continuity with foolproof WordPress backups. No data loss, no downtime — just secure, seamless operation.

Baffled with the HTTP error on your WordPress site?
It’s one of the most frustrating WordPress errors because it doesn’t tell you what’s wrong.
The causes are numerous and the solutions can be vague. By the time you’ve tried every solution, you’ve wasted time and effort that could be spent on other tasks.
Luckily, this error can be easily solved if you move in the right direction. In this guide, we’ll help you figure out why you’re facing this error and get you to the right solution fast.
What Causes The WordPress HTTP Error?
You’re likely facing the generic WordPress HTTP error while attempting to upload images or videos to your website.

WordPress has an in-built media library tool that makes it easy to access all your videos and images. This library has specific settings and rules.
When your image or video doesn’t meet these specifications, you’ll see the WordPress Upload HTTP error.
Seems simple enough, but unfortunately, the WordPress HTTP error can be vague and it’s hard to pinpoint what the problem is.
We’ve analyzed over 240,000 WordPress sites and we’ve seen this error pop up quite often. Over the years, we’ve been able to distill the most common causes and solutions, and the not-so-common ones that work sometimes!
Next, we’ve listed out four tips that you can try to resolve the error before you start troubleshooting the error.
4 Easy Steps To Resolve The WordPress HTTP Error
The WordPress HTTP error usually boils down to one of two problems:
a. A problem from the user’s end. It could be an incorrect file format, a large file size, a problem with a plugin, etc.
b. An issue with your WordPress host. They may have settings of their own that are interfering with the functioning of your website. This can include a server issue, a memory limit, and so on.
The steps below will not affect your website and carry no risk. They’re extremely easy to carry out and may seem too easy. But in most cases, these steps help get rid of the error.
1. Clear Your Browser And Refresh Your Page
Before you start, try clearing your browser cache and refreshing your page. Many times, WordPress HTTP errors could be caused by a temporary hiccup.
Clearing any stored data in your browser and on your site can help resolve the error.
You can do this by accessing Settings in your browser. Here, go to Clear History. Make sure you select clear cache and cookies.
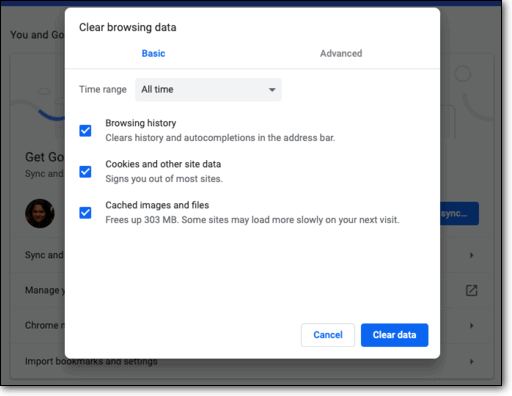
Refresh your page and try uploading your media files again.
2. Try A Different Browser
Sometimes, the issue is caused by conflicting settings in your browser. Try accessing the same page on a different browser and upload the file from there. In many cases, this works.
You can use alternative browsers such as Mozilla Firefox, Internet Explorer, Google Chrome, and Qwant.
3. Resize The File
Your webhost limits the file size you’re allowed to upload to your WordPress site. The acceptable file size can range anywhere from 2MB to 150 MB.
If your file size is greater than the set amount, it will lead to this error.
Compress your file and upload it again. There are plenty of tools online like tnypng.com that will shrink the file size for you. You can also use plugins like Imagify that will optimize images.
Compressing images in general is a good practice as it also speeds up page loading time and boosts your SEO.
We recommend keeping image sizes below 100KB. Unless you’re a photographer or need high-resolution images displayed on your site, it’s best to have smaller file sizes.
4. Contact Your Web Host
If compressing the file isn’t enough, you should contact your web hosting provider. Ask them what is the current maximum file size allowed on your site. You can request them to increase it or they will likely offer to increase it on their own.
Once they increase the limit, you should be able to upload your files without facing the error.
If these four steps didn’t resolve the error, you need to go deeper and make modifications on your site to fix the error.
Troubleshoot: 6 Ways To Fix The WordPress HTTP Error
We’ve listed the solutions to resolve the WordPress HTTP error from the most likely to the least likely.
If you are just starting your troubleshooting journey, we recommend working your way down the list. If you have already tried some of them, jump straight to the solution you want to try next.
Precautionary Measures
Most of the steps below require manual modifications to your WordPress site. There is a certain amount of risk involved and any mistakes could lead to more errors.
We strongly advise you to be prepared by taking these two steps:
A. Backup your WordPress site
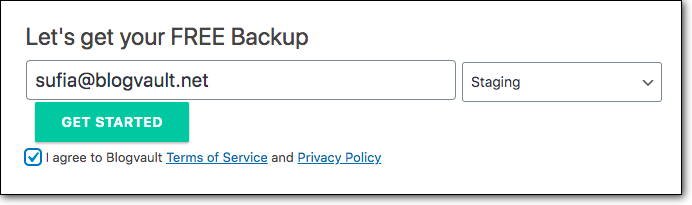
Using our BlogVault plugin, you can take a backup of your site in under a few minutes.
Once you install the plugin, you just need to enter your admin email address and the plugin takes care of everything else.
Now that you have a backup, if anything goes wrong, you can restore your website easily with just one click.
B. Use a staging site
A staging site is a clone of your WordPress site. You can make changes here that won’t affect your live site so it’s perfect for troubleshooting errors to find the right solution.
Use the BlogVault plugin to create a staging site in one click. On the BlogVault dashboard, you’ll see an option to Add Staging Site.
The plugin will automatically set up a staging site that is password-protected, so that it is hidden from visitors and search engines.
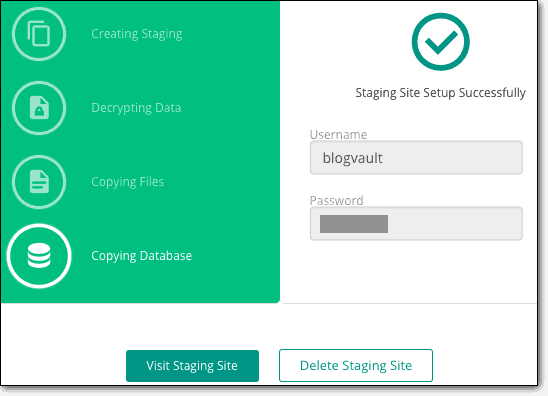
You can use these credentials to access the staging site. To log in, simply add /wp-admin to the end of your staging URL. Your wp-admin credentials are the same as those for your live WordPress site.
Now you can begin to resolve the error safely without any risk to your live website. Your visitors will remain unaffected while you carry out the steps below.
1. Increase file size limit
There are times when you may need to upload hi-res images or a video file that cannot be compressed.
We recommend contacting your web host and requesting them to increase the file size limit.
You can also increase the file size limit on your own. To do so, you need to modify the coding in your .htaccess file. Any time you meddle with the coding of your site, you risk breaking your live site. We recommend that you proceed with caution using a staging site.
Caution: If your web server is running PHP in CGI mode, this method will not work. You will get an internal server error.
1. Go to your web hosting account and access cPanel.
2. Here go to File Manager > public_html. Right-click on the .htacess file and Edit it.
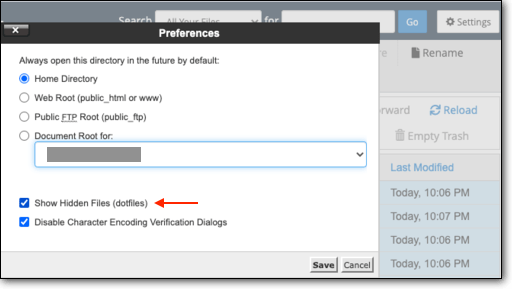
PRO TIP: If you don’t see the .htaccess file, go to Settings and check the box that says ‘Show hidden files’. Now, go back to the public_html folder and you should see the .htaccess file.
3. Next, to increase your file upload limit, add this snippet of code:
php_value upload_max_filesize 12M
php_value post_max_size 13M
php_value memory_limit 15M
4. Save and exit the file.
2. Deactivate your plugins
Most WordPress HTTP errors arise out of a conflict or incompatibility issue with a plugin. You can check if a plugin is causing the problem by deactivating all your plugins.
1. On your WordPress dashboard, go to Plugins.
2. Select All plugins and Deactivate them.
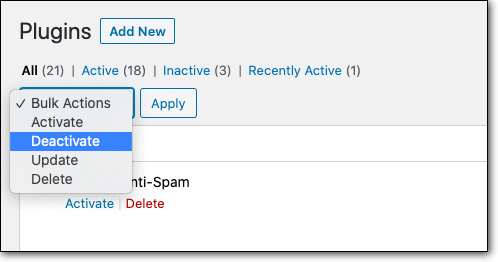
3. Now, try uploading the file and see if the error has gone. If the error has been resolved, reactivate your plugins one by one. Each time, upload the file and see if the error reappears.
This way, you’ll find the plugin that’s causing the error. You can either delete it or find an alternative. If it’s a premium plugin or one that you cannot delete, reach out to the developer for help.
If the error persists, the cause is not a plugin. Reactivate your plugins but we don’t recommend bulk activation; it can cause issues. Activate your plugins in batches of 3 or 4 at a time.
3. Check your theme
Similar to plugins, a theme could be causing the error on your site. Your theme may have its own settings that aren’t allowing you to upload the file you want.
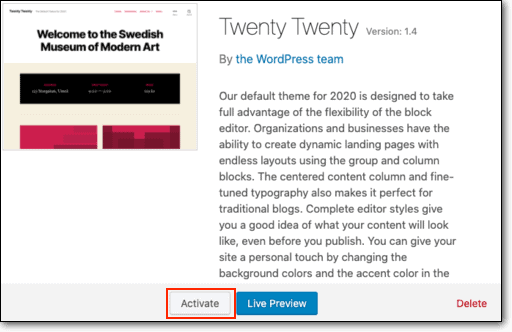
Switch to a default theme such as Twenty Twenty. Check if you’re able to upload the file using this theme.
If you have multiple themes installed on your site, we recommend deleting unused themes and only keeping the theme you are using. Even if a theme is not active, it can lead to compatibility and security issues.
4. Increase your PHP memory
Your WordPress site runs on a web server, and every server has limited resources. Your web host will allocate specific memory limits to different applications including PHP.
All WordPress sites have a limit of 64GB by default. If the file you’re uploading requires more memory space than available, it will cause the WordPress HTTP error.
To increase your PHP limit, you need to edit your wp-config.php file.
1. Log into your web hosting account and go to cPanel > File Manager > public_html.
2. Inside this folder, you’ll find the wp-config.php file. Right-click and Edit this file.
3. To edit the memory limit in your wp-config file, find this line of code:
define(‘WP_MEMORY_LIMIT’, ’64M’);
Change 64M to 128M, like so:
define(‘WP_MEMORY_LIMIT’, ‘128M’);
4. Save and exit the file.
You can learn more about PHP memory in our guide to increase your PHP limit through wp-config.
5. Update your PHP version
PHP is a programming language that powers most of your WordPress site. As the developers improve and enhance the language, they release new versions.
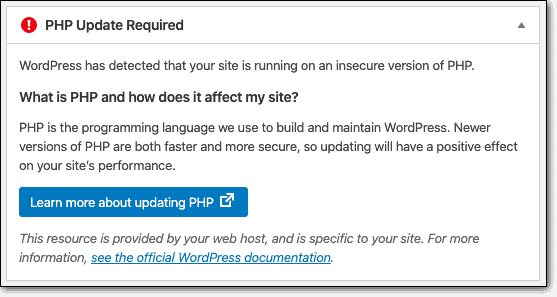
Sometimes, the WordPress HTTP error can be caused due to outdated PHP versions.
If you’re using an outdated PHP version, you should see a notification on your WordPress dashboard, like so:
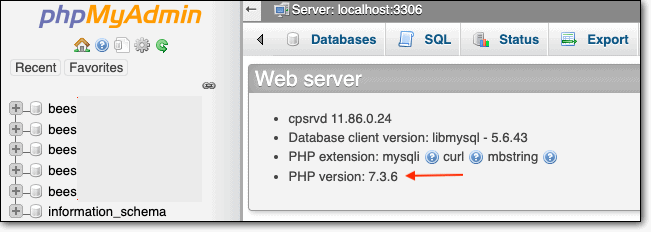
You can also check your PHP version on your own. Log in to your web hosting account. Go to cPanel > phpMyAdmin.
Here, you can view the PHP version of your WordPress site:
If you need to update your PHP version, follow our guide on How to Update the PHP Version on WordPress.
6. Check Imagick and GD Library
There are two default image editors to process images on your WordPress site – Imagick and GD Library.
WordPress selects the image editor depending on what’s installed on your web server. While both editors are great, Imagick is known to exhaust PHP limits. This is because web hosts usually allocate limited resources to Imagick in order to accommodate more websites on shared host servers.
When the PHP limit is exhausted, your site will display the WordPress HTTP error you’re currently facing.
There are two ways you can overcome this issue:
Caution: Any time you want to modify your WordPress files or edit the code of your website, first test it on a staging site.
1. Modify your .htaccess file
The default WordPress image editor Imagick uses multiple threads to make image processing more efficient. However, if you’re using a shared host, then this process is restricted and can lead to the WordPress HTTP error. You can overcome the error, by forcing Imagick to use a single thread for image processing. To do this, can add the following line of code in your .htaccess file.
MAGICK_THREAD_LIMIT 1
Once you save the file, try uploading your media file again.
2. Modify the functions.php file
If this doesn’t work, you can switch from Imagick to GD Library. To make GD Library your default editor, you need to edit the functions.php file.
You can find the functions.php file in the public_html folder.
function wpb_image_editor_default_to_gd( $editors ) {
$gd_editor = ‘WP_Image_Editor_GD’;
$editors = array_diff( $editors, array( $gd_editor ) );
array_unshift( $editors, $gd_editor );
return $editors;
}
add_filter( ‘wp_image_editors’, ‘wpb_image_editor_default_to_gd’ );
Save the file and reupload your media files to check if it works.
We’re confident that at least one of these measures has helped you resolve the WordPress HTTP error. This is a difficult error to fix and there are rare cases where it may still persist. If you’re still facing the error, you can get help from fellow WordPress users on the WordPress support forum.
What Next?
If you took our advice and used a staging site to safely troubleshoot the error, you can replicate the solution on your live site.
With our BlogVault plugin, there’s a handy feature called Merge to Source. This will merge the changes you made on your staging site with your live site so you don’t have to go through the entire process again.
That brings us to the end of our guide on fixing the WordPress HTTP error. Remember to always back up your website before you make any major changes to your site. If you’re modifying files or changing the code on your website, always create a staging site using web host or WP staging plugin and use the staging site to test the changes first.
Tags:
Share it:
You may also like

How to Limit Form Submissions with Droip in WordPress
Forms are an indispensable part of any website because of their versatility, letting you collect information for various purposes! However, people with ill intentions often attempt to exploit these forms…

How To Manage Multiple WordPress sites
Management tools help agencies become well-oiled machines. Each task is completed with the least amount of effort and highest rate of accuracy. For people managing multiple WordPress sites, the daily…

PHP 8.3 Support Added to Staging Feature
We’ve introduced PHP version 8.3 to our staging sites. Test out new features, code changes, and updates on the latest PHP version without affecting your live website. Update PHP confidently…
How do you update and backup your website?
Creating Backup and Updating website can be time consuming and error-prone. BlogVault will save you hours everyday while providing you complete peace of mind.

Updating Everything Manually?
But it’s too time consuming, complicated and stops you from achieving your full potential. You don’t want to put your business at risk with inefficient management.

Backup Your WordPress Site
Install the plugin on your website, let it sync and you’re done. Get automated, scheduled backups for your critical site data, and make sure your website never experiences downtime again.


