How to Build a New WordPress Site while the Old Site is Live
Bulletproof Backups for Your WordPress Website
Fortify your business continuity with foolproof WordPress backups. No data loss, no downtime — just secure, seamless operation.
Worried that shifting to a new WordPress site will disrupt your business and visitors?
Rehauling your website can take weeks. If you carry out the process on your existing website, it will lead to prolonged downtime. Your website’s traffic, SEO rankings, and revenue take a hit.
Luckily, there are ways to work around this. You can create and switch to a new WordPress site without facing any of these risks.
In this guide, you’ll learn how to set up your new WordPress site and how to move it to your live environment without downtime or enabling maintenance mode.
TL;DR –
Replace your old website with your new WordPress site using an efficient WordPress migration plugin. Install the BlogVault migration plugin on your site, select your new website, and migrate! The automated process will replace your old site with your new one in under a few minutes. No downtime or maintenance mode required!
Set Up A New WordPress Website Without Affecting Live Site
Having worked with WordPress for over a decade, we know how often WordPress site owners want to change the way their site looks. Maybe your current site looks outdated or maybe you found a better theme.
There are different ways to set up a new WordPress site and replace the old one. But there are a few factors that will affect the route you choose. Here are important questions to answer before we get started:
- Are you creating a new WordPress site from scratch?
- Are you going to switch web hosting providers?
- Are you going to revamp your existing WordPress website?
- Do you want an easy automated process?
- Do you have sufficient technical knowledge to do it manually?
Once you answer these questions, you can decide which method is best for you to use.
-
- Build A Fresh WordPress Site From Scratch
For those looking to build a WordPress site from scratch, you can build your WordPress site either on your local server, or your existing server, or with a new host. You can then migrate your site to replace the old one. If this matches what you require, you can jump to the migrate section.
-
- Build A New WordPress Site Using Existing Live Site
For those who are looking to revamp their existing WordPress website, it’s best to use a WordPress staging site. This is a secret environment that allows you to improve and enhance your existing site without affecting your live site. We cover in-depth details in the staging section.
We’ll show you the exact steps you need to take under both scenarios in order to migrate smoothly.
Build A Fresh WordPress Site From Scratch
There are times when you want to completely scrap your existing website and start fresh. But while you do this, you don’t want to take your website offline. This process will show you how to set up a brand new WordPress site and then replace your existing website. There are the steps you need to take to transition smoothly:
1. Set Up A New WordPress Installation
To build your new website, you need to first install WordPress. Now, you can do this in multiple ways and it all depends on what you’re comfortable with. You can set up your WordPress website in three different ways:
Note: You can use all three methods to set up a new WordPress site either on your existing web host or using a new web hosting provider.
A. Automated WordPress Installation On Your Web Host Server
B. Manual WordPress Installation On Your Web Host Server
C. WordPress Installation On A Local Server
A. Automated WordPress Installation On Your Web Host Server
The easiest way to install WordPress is to use an automated solution. Most hosting providers offer automated WordPress set up through apps like Softaculous.
The steps may vary between hosts, but it’s more or less like the process we’ve detailed below.
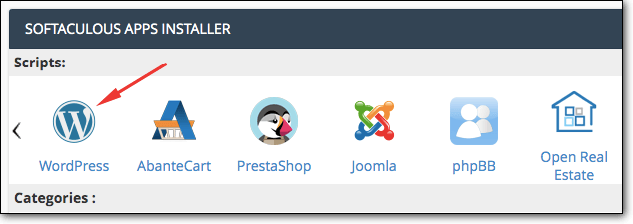
1. Log into your web hosting account and access cPanel.
2. Here, locate the Softaculous Apps Installer, and select WordPress.
3. Enter the details in the setup form provided. Under Choose Installation URL, choose your domain, and then enter a name for the folder in which WordPress will be installed. We’ll refer to this folder as a ‘sub directory’ in future steps.
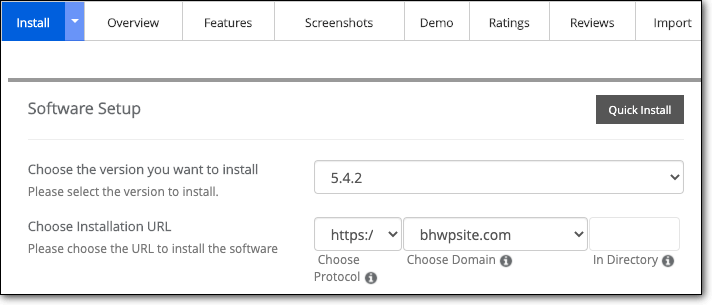
IMPORTANT: On this page, you can set your wp-admin username and password. Make note of these credentials in order to access your newly set up WordPress site.

4. Submit it to automatically install WordPress on your server.
To access your site, you’ll need to use the URL https://yourdomain/directory. Replace ‘your domain’ with the name of your website, and directory with the name you used for the folder you just created.
For example, we named our folder ‘NewTestSite’, so our new website’s URL is https://bhwpsite.com/NewTestSite.
To access your website’s dashboard, add ‘wp-admin’ to the end of the URL such as https://bhwpsite.com/NewTestSite/wp-admin/.
And that’s it! Your website is ready and you can start building your new website.
B. Manual WordPress Installation On Your Web Host Server
If you don’t have an automated installer on your web host dashboard, you can create a subdomain on your own and set up WordPress manually.
1. Download WordPress onto your computer and unzip it.
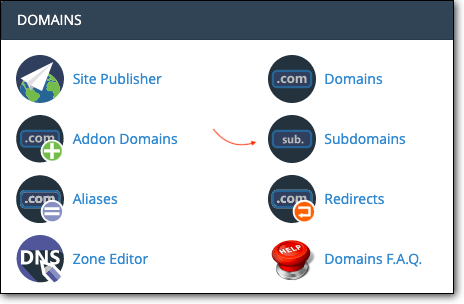
2. Log into your web hosting account and access cPanel > Subdomains.
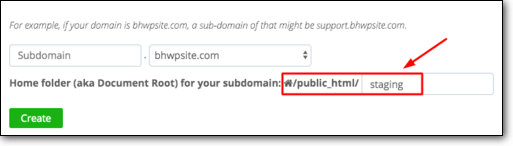
3. Here you can create a subdomain and name it anything of your choice. We’ve named our new subdomain ‘staging’. This name is important as you will need it in the following steps.
4. Next, you need to create a database for this site. Go back to cPanel > phpMyAdmin > Databases. Here, select Create A New Database.
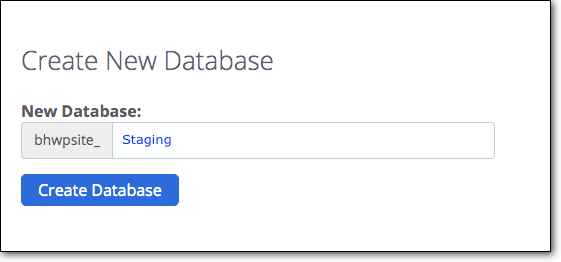
5. On the same page, scroll down and you’ll see an option to create a MySQL user for your database. Create a new user and keep a note of your database number and the MySQL user information.
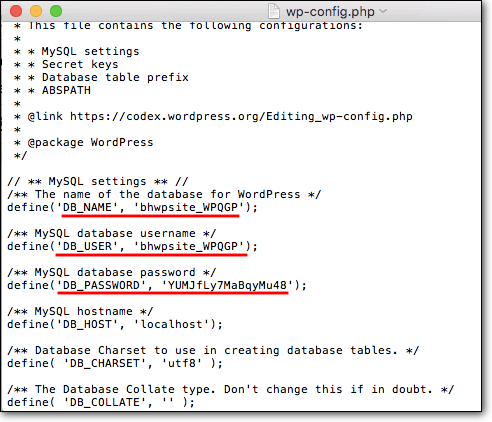
6. You need to update this database information in your wp-config file. This will ensure your website uses the designated database. On your local computer, open the WordPress installation folder you downloaded and unzipped. Open the wp-config file and here, edit the following lines and enter your new database details.
Go to cPanel > File Manager. Select the folder called public_html and find the name of your subdomain. Our subdomain’s name is ‘staging’, so we’ll select the folder named Staging.
Inside this folder, choose Upload. Select the WordPress installation folder from your local computer and upload it.
Here’s an article on How to Install WordPress manually that will be helpful if you need more detailed instructions.
To access your site, you need to use the URL staging.yourdomain.com. Replace ‘yourdomain’ with the name of your website and ‘staging’ with the name you chose for your subdomain. The login credentials to wp-admin panel will remain the same as your live website.
Now that your new subdomain is ready, you can begin to build your new WordPress site. Your live site will remain unaffected by the changes you make on this site.
PRO TIP: If you want to ensure that Google is not crawling your new site, you can use a plugin called Hide My Site. Once installed, go to Settings > Reading > Discourage search engines from indexing this site. For more information on this, follow our guide on how to block Google from indexing your website.
C. WordPress Installation On A Local Server
You can also host your new website locally so that it is accessible only by people on your network. This environment will not be connected to your live site until you make the connection.
To install WordPress on your local computer, you need a tool like XAMPP to act as a local server.
If you aren’t tech-savvy or familiar with WordPress, we don’t recommend this method. It’s more complex than the others.
To use this method:
1. Download and install XAMPP on your computer.
2. You need to configure your local environment.
3. Download and install WordPress.
Follow this comprehensive guide on how to use XAMPP to set up your WordPress environment locally.
2. Build Your New WordPress Website
You can use your newly setup WordPress installation to build your new website from scratch. We needn’t say more here. We’ll leave you to it to get your website looking and functioning just the way you want it.
Here are some resources you might be interested in:
Once your new site is ready and you’re happy with it, you can proceed to the next step.
3. Replace The Old Site WIth The New WordPress Site
Replacing your old website with your new one entails a very technical process. Even for the tech-savvy, there’s room for error.
Luckily, there are tools that automate the process for you so you don’t have to do the heavy lifting of picking up your new website and moving it over. But nonetheless, we’ll show you how to use these tools as well as do it manually. Next, we cover migration to the new site in two segments:
1. Migrate Subdomain or Subdirectory To Live
For those of you who have created a subdomain or subdirectory on your existing WordPress server, you can use either one of the following methods to migrate your site:
A. Using an automated tool or WordPress plugin (Reliable)
B. Manually (Not reliable)
The manual method is prone to errors and entails a long process. It’s much easier to use a plugin. Nonetheless, we’ve detailed both methods for you. You can select the one you’re comfortable with.
A. Migrate SubDomain or Subdirectory To Live Using An Automated Tool
There are a few migration plugins available in the market. Today, we’ll show you how to use BlogVault. The plugin simplifies the entire process by doing all the tech-heavy work for you. It’s as simple as clicking a few buttons. With BlogVault, the process of migration is smooth and seamless.
To illustrate this process, we set up a new WordPress site to revamp our own website.
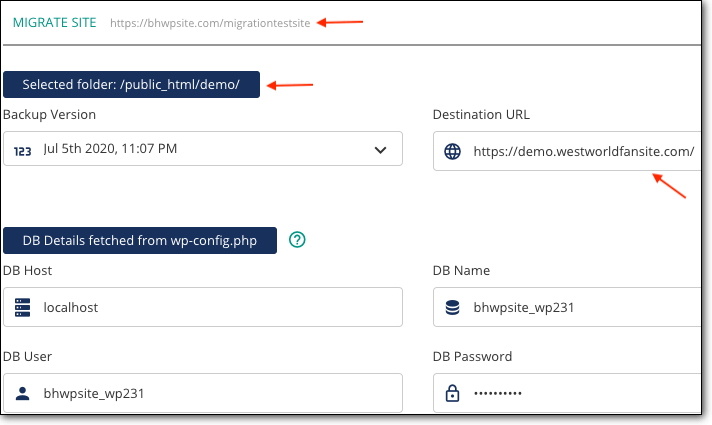
Existing site – demo.westworldfansite.com.
New site – bhwpsite.com/migrationtestsite.
Both websites are hosted on Bluehost in the same root directory public_html in subfolders named demo and migrationtestsite.
1. First, you need to install BlogVault on your new WordPress site. We installed it on bhwpsite.com/migrationtestsite. Select the plugin from your WordPress dashboard, enter your email address, select migrate, and Get Started.

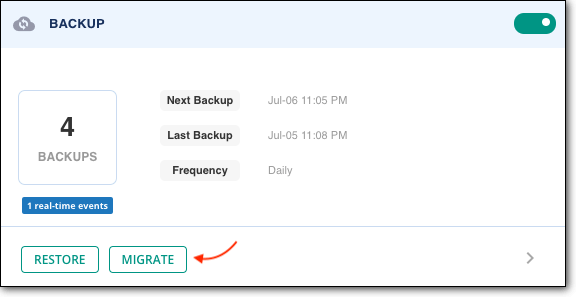
2. BlogVault will sync with your website and create a backup of your new site. After this, head over to the BlogVault dashboard, under Backup, select Migrate.
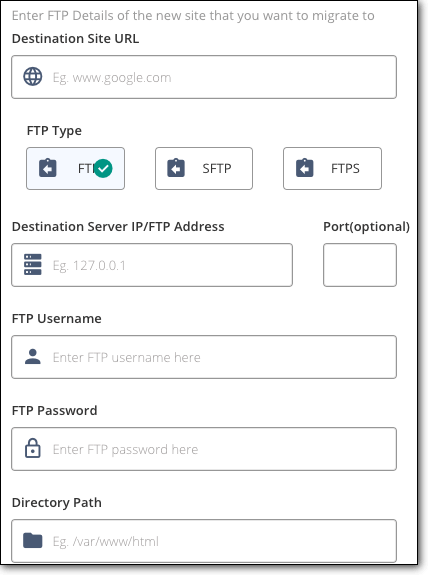
3. On the next page, you need to enter your FTP details. If you don’t have your FTP credentials, contact your web host and request for them. You might also find our guide to Finding Your FTP Credentials helpful.

4. Now, you can select the folder in which the WordPress installation of your live site resides. This folder is usually public_html. But in our case, as we mentioned, our live website has a separate folder named demo which resides inside public_html. So we’ve selected the folder public_html/demo.
5. Lastly, you can choose the backup you want to use to migrate to the existing site. By default, BlogVault chooses the latest version, so ideally you can leave this. Next, enter your destination URL – this is your live website. For us, our original live site is demo.westworldfansite.com. That’s where we want our new WordPress site to replace the old one. So we’ve entered demo.westworldfansite.com.
Here’s the great part about this tool. When you do this manually, you need to edit your WordPress files to point your old site to the new database. But BlogVault will fetch this data from your new site and automatically update it on your original site.
There are additional options here that you may find handy:
-
- Selective Merge – You can select the changes you want to push to your new site.
- Advanced Options – In case you are moving your site to a new server.
- HTTP Authentication – If your new website is password protected, you can enter the credentials here to grant BlogVault access to migrate your site.
That’s it. Click on Continue and BlogVault will do the rest. Once complete, you can check your WordPress website. Make sure all changes have been implemented and your website is performing fine. We have a migration checklist of things you need to check whenever you make major changes.
B. Manually Replace Your Old Site With The New One
We must caution you that this process is risky and prone to error. If you aren’t tech-savvy, we don’t recommend following through with this process.
IMPORTANT: We strongly recommend taking a backup of your new site as well as your live site. After spending time and effort on creating a new site, you can’t risk losing it. You can take a quick backup with a WordPress plugin like BlogVault. It will store your backup copy safely in case things don’t go as planned.
1. Login to your web hosting account and go to cPanel > File Manager > public_html.
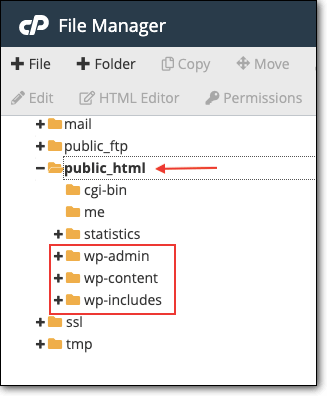
2. Here, your new website’s folder and copy two files index.php and .htaccess. Next, go to your root directory i.e., public_html. If there is an existing file called index.php or index.html, delete it. Then, paste the new files here.
3. At this point, we recommend clearing your website’s cache to get rid of any old information that’s stored on your server or browser. This will ensure that you and your visitors can see the new changes once you complete the process.
4. Next, you need to update your database information to ensure your website uses the new database you created. To do this, fetch your database details from your new site. Go to your new website’s folder, select the wp-config file, right-click and edit it. Here you’ll find your database details, take note of the database name, database user, and database password.

Now, go to public_html, select your live site’s wp-config file, and replace the same details in this file.
5. Now, you need to edit your index.php file. Find this line:
Require(‘./wp-blog-header.php’);
Replace this with your new website’s folder name, like so:
Require(‘./subdirectory/wp-site-header.php’);
Instead of ‘subdirectory’, insert the name of your new website’s folder.
6. Finally, edit your WordPress Address URL in your site settings. Go to your new site’s WordPress admin panel and head over to Settings > General.
Here, leave the first field WordPress Address (URL) as is. In the Site Address (URL) field, insert the name of your live domain.
For example, if the field reads as:
https://mydomain.com/subdirectoryname/
Replace it with:
Refresh your website and check that it’s working fine. Test all your important pages and functions on your site to make sure everything is working properly.
PRO TIP: To declutter your server, we recommend backing up all your old website’s files and storing a copy of it safely. You can then delete them from your server.
2. Migrate Local Website To Live
If you created your new WordPress website on a local server, you can move it to your existing server easily.
You can either use a plugin like MigrateGuru or you can do it manually. To use MigrateGuru, follow these very simple steps:
1. Install the plugin on your live website. Next, select the plugin, enter your email address and proceed to the next step.
2. You’ll be redirected to the MigrateGuru dashboard. Here, from the options provided, select FTP.
3. Next, enter your FTP credentials and select the folder in which your local WordPress installation resides.
Once done, select Migrate and the plugin will migrate your site to your live site.
If you want to do this manually, we have an extensive guide on Moving WordPress from Locahost to Server that you can refer to for detailed instructions on the process.
And there you have it. We’ve covered everything you need to know about building a new WordPress site from scratch while your existing site remains live at all times!
Build A New WordPress Site Using Existing Live Site
In our experience, we’ve seen many WordPress site owners looking to build a brand new website. But after analyzing their needs, they realized that renovating their existing one would be a better solution.
If your intention is a renovation, we’ll show you how to work in the background of your live site.
You need to follow two basic steps:
- Create a Staging Environment to renovate your site
- Merge your changes from staging to live
Context: What is Staging? You can think of a staging environment as a clone of your website that’s invisible to your visitors and customers. It is an exact copy for you to work on behind the scenes.
Now, there are multiple ways to carry out these two steps. Some are easier than others but as we mentioned, the route you choose greatly depends on factors such as your preference for an automated solution or wanting to try your technical skills. We’ve detailed three main ways in which you can build a new website using your existing live site:
A. Stage & Merge Using a WordPress Plugin
B. Stage & Merge Using your web host
C. Stage & Merge Manually
Depending on your preference, you can follow the steps below.
A. Stage & Merge Using a WordPress Plugin
There are plenty of WordPress plugins that can help you with this process. Today, we’ve selected the BlogVault backup plugin.
It uses an automated process that eliminates the need for technical knowledge. It’s designed for just about anyone to use. You can set up a staging site at the click of a button and it will be ready in under a few minutes.
1. Create a Staging Environment
To create your staging site, BlogVault will first take a backup of your website. Follow the steps below.
PRO TIP: As a general rule of thumb, whenever you’re making major changes to your existing site, it’s best to take a backup copy and store it safely. In case anything goes wrong during this process, you can restore your backup to get your site back to normal.
1. Install and Activate the BlogVault plugin on your WordPress site.
2. Select the plugin on your wp-admin panel, enter your email address, select staging, and Get Started.

3. BlogVault will sync with your website and take a backup automatically for you.
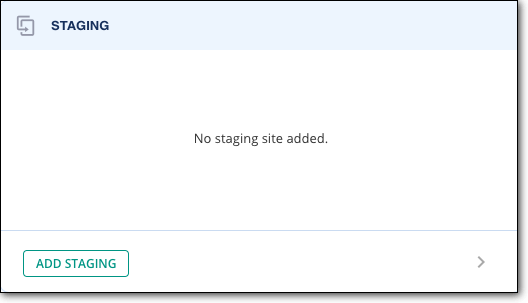
4. Next, on the BlogVault dashboard, under Staging, select Add Staging Site.
5. Next, BlogVault gives you an option to select the backup version and PHP version. By default, the latest version is already chosen, so we recommend that you leave this as it is.
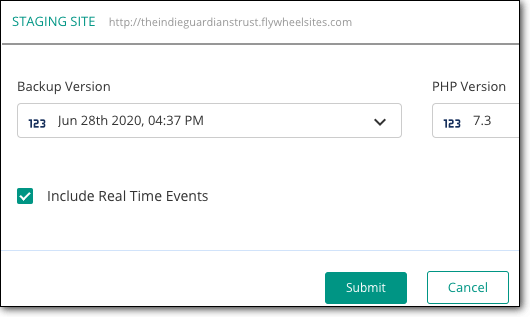
Once you hit Submit, BlogVault will take just a few minutes to create your staging environment.
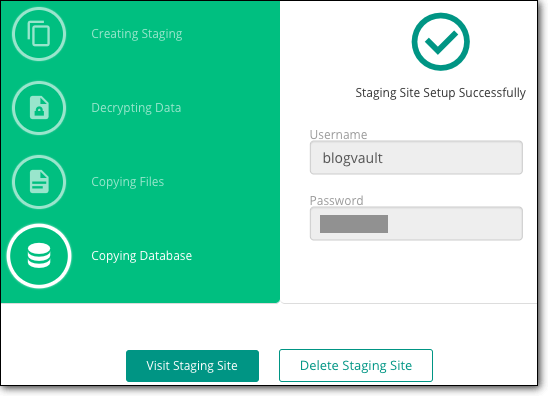
6. When the staging site is ready, you’ll get a username and password. Make note of this because you’ll need it in the next step. Click on Visit Staging Site.
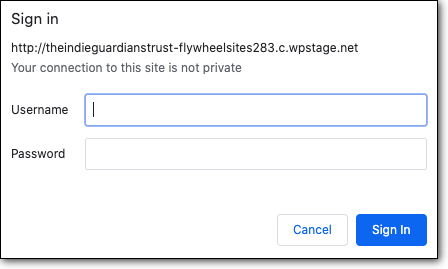
7. A new window will open requesting the username and password. Enter the credentials you noted down.
8. Access the staging site’s admin panel by adding ‘wp-admin’ at the end of the staging site URL.

Your staging site is ready for you to start renovating your site.
2. Merge Changes From Staging With Live
Once you are happy with your revamped WordPress site, you needn’t replicate the changes on your live site. There’s a convenient feature called ‘Merge’ that will push your changes to your existing site.
1. Go to the BlogVault dashboard, under Staging, select Merge to Source.
BlogVault will sync your staging site and your live site to determine the differences.
2. A list of changes will populate. You can choose to merge all changes you’ve made or select which changes you want to merge.
3. In the next step, you need to enter FTP credentials. This grants BlogVault access to your website’s server in order to merge your staging site with your live site. If you don’t have your FTP credentials, contact your web host and request for them. You might also find our guide to Finding Your FTP Credentials helpful.
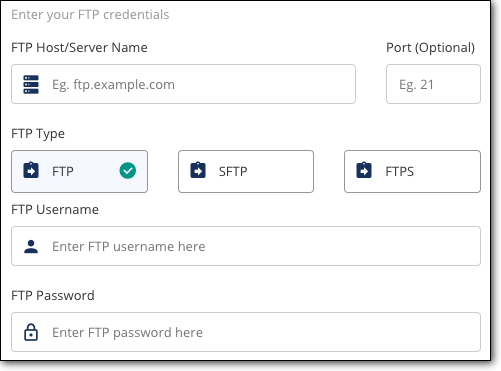
4. Choose the folder in which your live WordPress website resides. Unless you’ve created your own folder, choose public_html.
BlogVault will take a couple of minutes to merge your changes. Once complete, we recommend checking your website. Make sure all your changes have been merged and that your website is performing fine.
If a WordPress Staging plugin isn’t a solution for you, you can try your web host. We detail the steps next.
B. Stage & Merge Using Your Web Host
Some web hosts offer staging options. However, the staging feature might come as a premium add on or only with higher-end hosting plans.
1. Create a Staging Environment
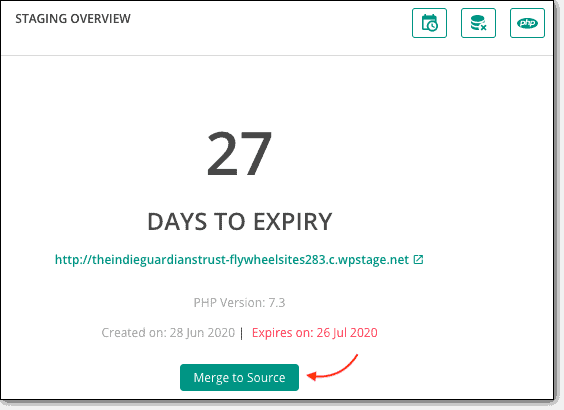
Managed WordPress hosts like FlyWheel, WP Engine, and Kinsta offer staging features on their dashboard. For example, on WP Engine’s dashboard, there is an option to stage a site, like so:
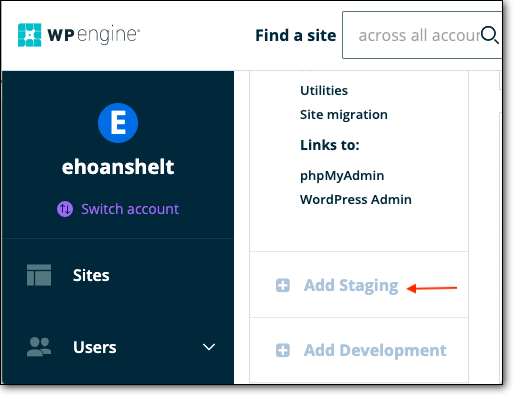
If you don’t see the option on your dashboard, contact your web host to find out the exact steps to staging your website.
When your staging site is ready, you can use it like you would your live site, except that any changes made here will not affect your live environment. You can carry out all your site renovations here.
2. Merge Changes From Staging With Live
Web hosts who offer the staging feature usually have the option to push the changes to the live site. Under your staging feature, you should see an option like this:
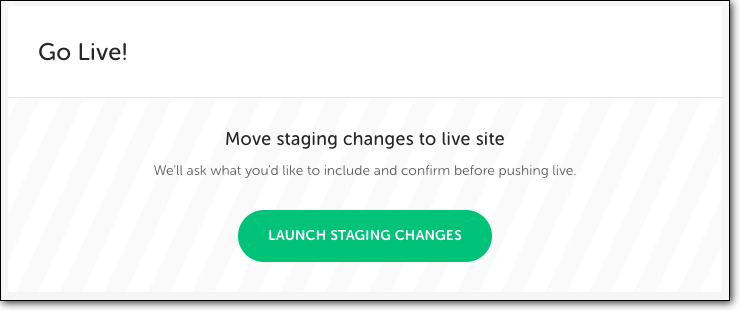
Staging with your web host usually takes a little longer. Many times changes don’t merge completely and some of the modifications get lost. After merging your changes, run a thorough check on your website to make sure all your changes have taken place.
C. Stage & Merge Manually
You can also create a staging environment on your own using cPanel.
We don’t recommend this method because it’s long and complex. It has the potential for errors. Plus, you will be duplicating your website on your server. This means your web server is now burdened with running two websites. It can slow down your live site and hamper its performance.
If you wish to proceed with the manual method, you can learn the exact steps to create WordPress staging site.
Once your new site is ready, there’s no way to merge the changes with your live site. You will need to recreate every step on your live site.
With that, we come to the end of this extensive guide on building a new WordPress site while the old site is live.
Final Thoughts
In this day and age, technology is rapidly advancing and trends are constantly changing. So when you run a WordPress website, you’ll know that there’s always room for improvement and change.
Change can either be a laborious process or it can be fast and easy depending on how you choose to implement change.
Manual processes require technical skill, a substantial amount of time and effort. But luckily, in the WordPress realm, you can find a reliable plugin for just about anything you require.
WordPress plugins like BlogVault cover many bases such as backup, staging, and migration. You can easily create a new staging environment as well as make your changes live. You can also migrate a completely new website over to replace your existing site or move WordPress site to root.
Renovate Your WordPress Website With Zero Downtime With BlogVault!
Tags:
Share it:
You may also like

How to Limit Form Submissions with Droip in WordPress
Forms are an indispensable part of any website because of their versatility, letting you collect information for various purposes! However, people with ill intentions often attempt to exploit these forms…

How To Manage Multiple WordPress sites
Management tools help agencies become well-oiled machines. Each task is completed with the least amount of effort and highest rate of accuracy. For people managing multiple WordPress sites, the daily…

PHP 8.3 Support Added to Staging Feature
We’ve introduced PHP version 8.3 to our staging sites. Test out new features, code changes, and updates on the latest PHP version without affecting your live website. Update PHP confidently…
How do you update and backup your website?
Creating Backup and Updating website can be time consuming and error-prone. BlogVault will save you hours everyday while providing you complete peace of mind.

Updating Everything Manually?
But it’s too time consuming, complicated and stops you from achieving your full potential. You don’t want to put your business at risk with inefficient management.

Backup Your WordPress Site
Install the plugin on your website, let it sync and you’re done. Get automated, scheduled backups for your critical site data, and make sure your website never experiences downtime again.


