How to Migrate a WooCommerce Site – The Complete Guide
Bulletproof Backups for Your WordPress Website
Fortify your business continuity with foolproof WordPress backups. No data loss, no downtime — just secure, seamless operation.
WooCommerce migration can be challenging because the data on the site changes in real-time as users sign up and make purchases. If you have a WooCommerce site, fear not. In this article, I’ll show you how you can migrate WooCommerce site to a new server or domain name in simple, easy-to-follow steps, without losing your orders, new customers, or changes in your inventory.
TL;DR: Migrating a WooCommerce to a new site can seem daunting as it’s changing in real-time. This is where the Migrate Guru plugin comes in. It can easily migrate WooCommerce sites of any size with a few clicks and with zero downtime. Moreover, Migrate Guru will fix any permalink issues after the migration automatically. It’s easy to use and works with any web hosting provider out there, so why choose anything else?
What to do before the WooCommerce migration
Before you start the WooCommerce migration process, I highly recommend doing the following:
- Back up your WooCommerce site. Although the processes that I’ll describe in this article are straightforward, something may still go wrong and lead to undesirable consequences. You’ve likely put a lot of time and effort into building your online store. You don’t want to lose all that customer and transactional data. Hence, I strongly recommend taking a backup of your WooCommerce site. If anything does go wrong during the migration, you’ll be able to restore a fully functional version of your site to start again. In this regard, I highly recommend using BlogVault. It can take real-time backups of your WooCommerce site, capturing every order as it takes place along with other critical events. It then stores encrypted copies of these backups across multiple data centers, giving you the ultimate peace of mind. And all this without slowing down your website.
- Set up WordPress and WooCommerce on the website/server you’ll be migrating to. Make sure the WordPress and WooCommerce versions are the same on both sites to avoid issues during the migration process. You can check the WordPress version on the homepage of your Dashboard under the “At a Glance” section. To check the WooCommerce version, go to Plugins, and under the description for the WooCommerce version, you’ll see its version number.
- Put your site in maintenance mode. This ensures that nobody would be able to make changes to your site during migration, as such real-time changes can cause issues. You can use Themeisle’s WP Maintenance Mode & Coming Soon plugin to put your site in maintenance mode.
How to migrate a WooCommerce site using a plugin
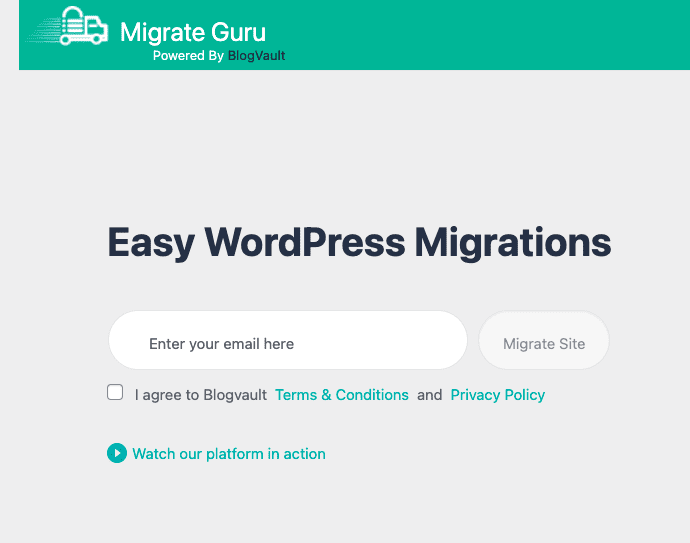
The easiest way to migrate a WooCommerce site is to use a migration plugin. I highly recommend using Migrate Guru. Built by the smart coders at BlogVault, it powers the migration feature of popular web hosts WP Engine and Flywheel. It can migrate the largest of websites easily and quickly to any web host or server for free.
- Install and activate Migrate Guru on your existing WooCommerce website.
- Enter your email address to create an account, and then click on Migrate Site.
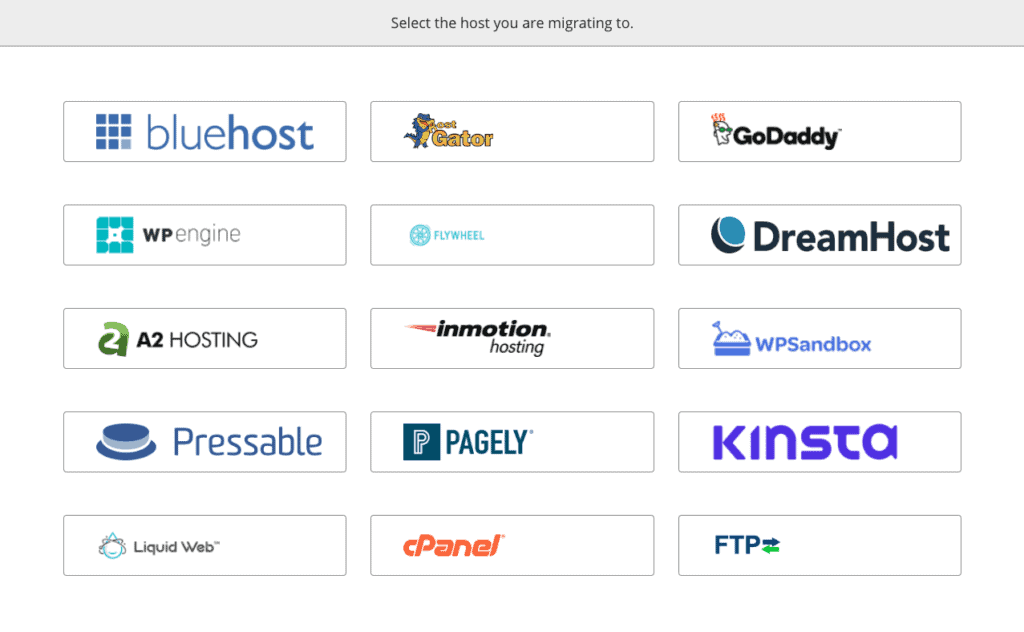
- You’ll be taken to your Migrate Guru dashboard where you’ll be asked to pick the host you want to migrate to. If your destination host isn’t listed, choose FTP to continue.
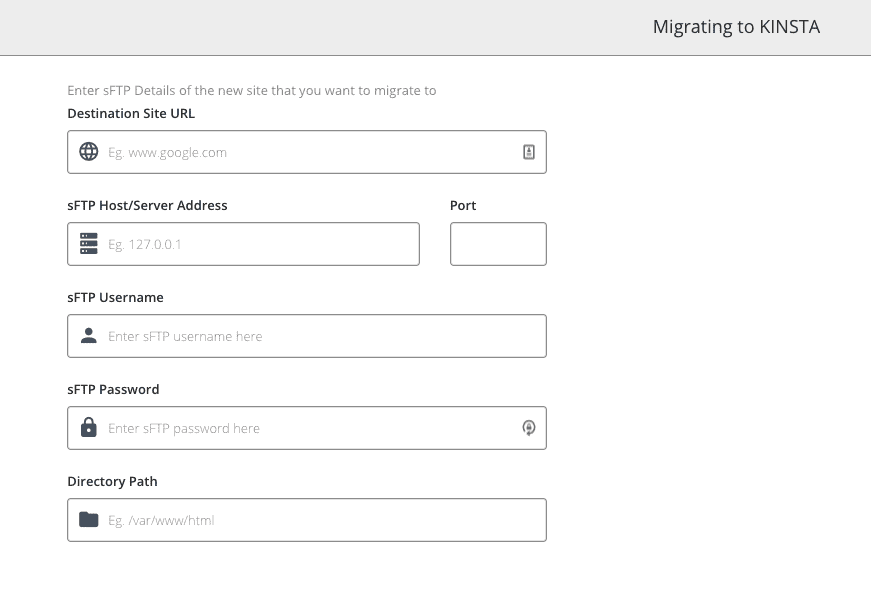
- On the next page, enter the FTP details of the server you’ll be migrating to and click Migrate to continue. Migrate Guru will now start the migration.
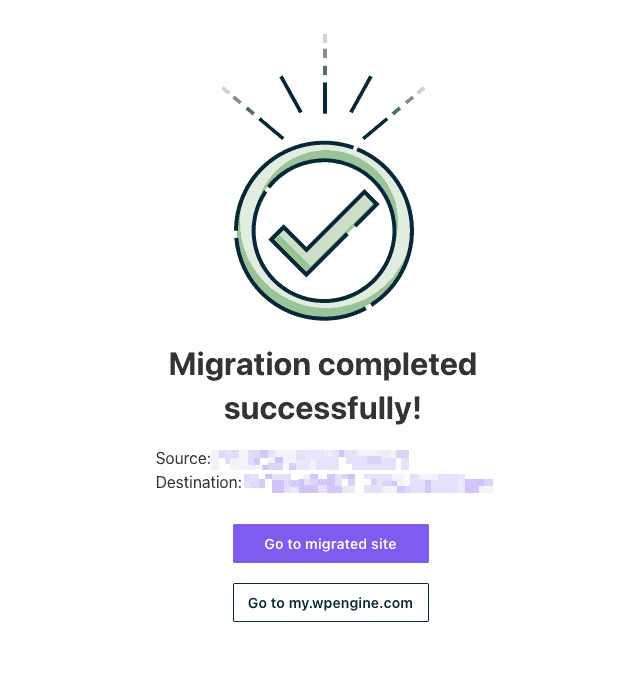
On the next page, you’ll be able to see the progress made during the migration process. When the process is complete, you’ll see a message confirming so.
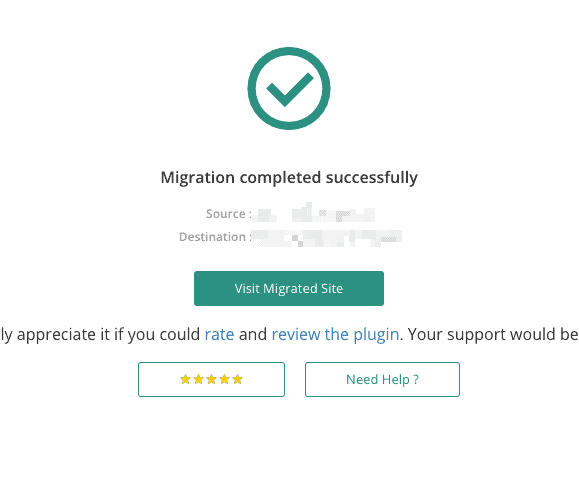
Congratulations! You’ve now migrated your WooCommerce site to its new home.
How to move a WooCommerce site manually
When trying to migrate a WooCommerce site to a new destination, you should try to minimize risks as much as you can. In that regard, always choose a popular plugin like Migrate Guru for the migration. Such plugins have been battle-tested for years and continually get better as more and more users use them and their developers incorporate their feedback and fix bugs.
Having said that, if you enjoy doing things yourself, then the manual method I describe below might be for you. I’ll be using FTP, a protocol for transferring files over the Internet, to illustrate the process. Still, I only recommend it as a last resort. You’ll need an FTP client. For this article, I’ll be using the popular FileZilla.
Step 1. Back up your website
The way we’ll back up our example website is to connect to its server in FileZilla and then download the root folder of our WordPress installation to our hard disk. The local copy will serve as a backup of your WordPress files.
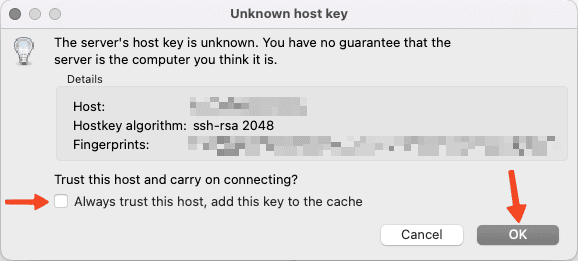
- Open FileZilla and enter the FTP credentials of your WooCommerce site at the top. Use 22 as the port number to connect via SFTP (a secure version of FTP) if your web host supports it. Click Quickconnect to connect to the server. You can also use Site Manager to connect to it.

- A popup will appear with the message that the server’s host key is unknown. Check the box to always trust the host and click OK.
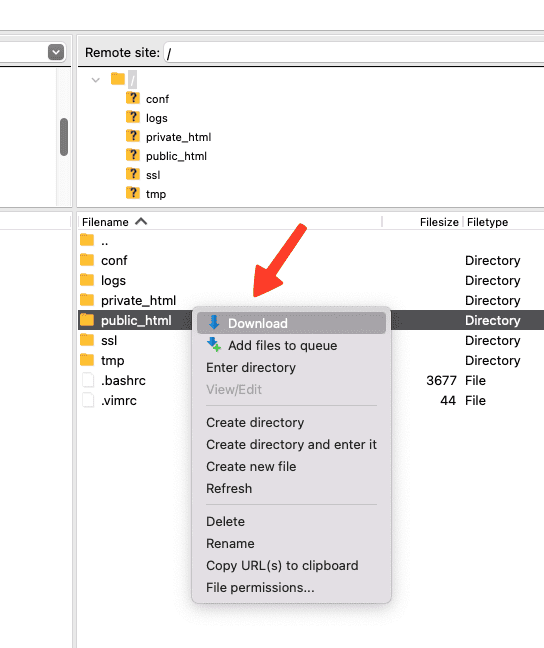
- If the connection is successful, you’ll see a confirmation in the messages area just below the FTP credentials. A directory listing of your site will appear in the right-hand area labeled “Remote site.” (In an FTP connection, your computer is called the local host/site while the other machine, which is usually a server, is called the remote host/site.)
- Next, navigate to the directory on your computer where you’d like to back up your WordPress files from the “Local site” area. Then, locate the directory where WordPress is installed on your site from the “Remote site” area, which is usually public_html. Download it to your local directory on your hard disk.
Step 2. Export your WordPress site database
Note: You don’t need to export your database if you’re staying with the same web host. However, we still recommend doing it as it creates a backup of your database, which is always nice.
Your site’s database is a critical component, containing everything from user data to settings. For a WooCommerce site, in particular, the database contains products, orders, refunds, coupons, and so on in addition to the usual stuff of posts, pages, comments, tags, etc. Hence, for a successful migration, you’ll have to export the database of your current WooCommerce site to the new site.
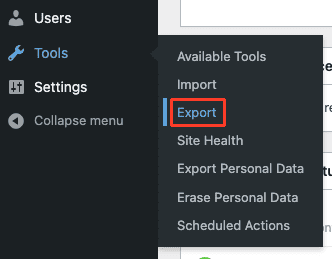
- In your WordPress dashboard, go to Tools > Export.
- Choose ‘All content’ and click on Download Export File. Choose a name for the XML file and download it to your machine.
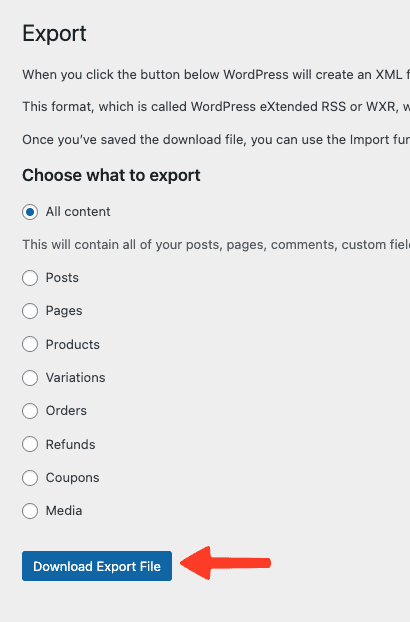
Note: You may be tempted to download a part of the database, but don’t do that. WooCommerce sites store their data across multiple tables in the database, and cherry-picking tables will cause the data migration to fail. Always backup and restore WooCommerce databases in full.
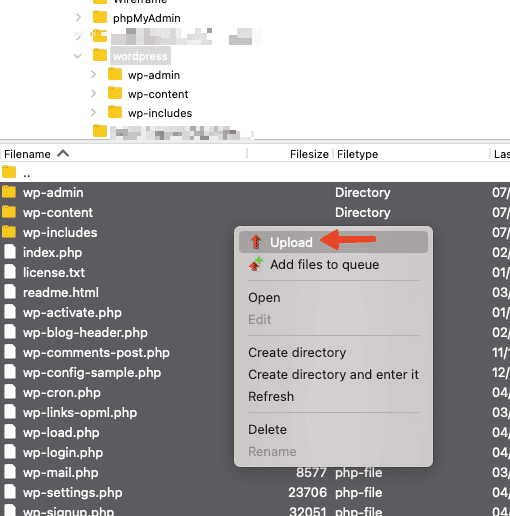
Step 3. Upload your WordPress files to your new server/domain
- Connect to your WooCommerce website via FTP.
- Navigate to the directory where you backed up your website in Step 1. Enter it, select all, and then upload them to the root directory of your new site.
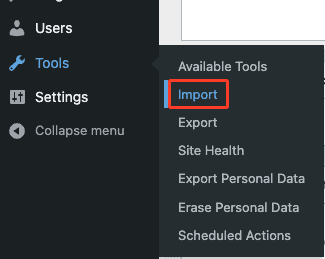
Step 4. Import your WordPress database
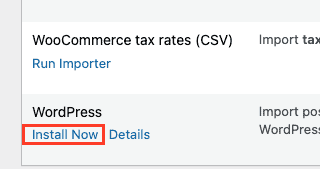
- Go to the dashboard of the site to which you are moving content and click on Tools > Import.
- Under WordPress, click on Install Now to install the WordPress importer.
- Run the importer you just installed by clicking on Run Importer.
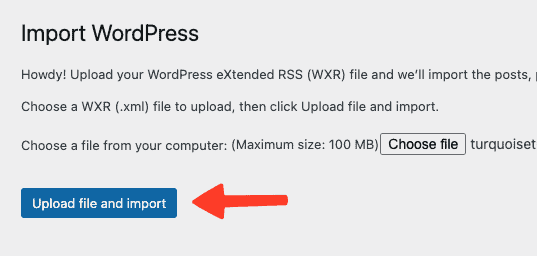
- On the next page, click on Choose File and select the XML file you downloaded in Step 2.
- Click Upload file and import to import the database.
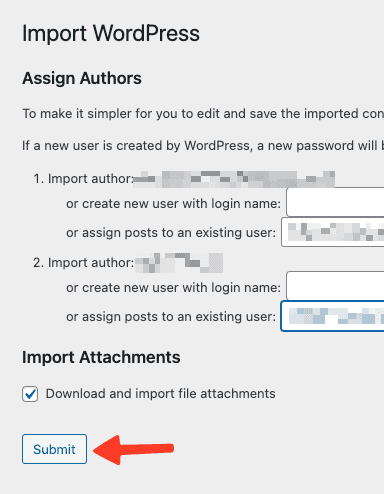
- On the next page, you’ll be asked to map the authors in the XML file to the current users of your new site. For each author, you can either choose to map to an existing user on the site or create a new user. When you’re done, click Submit.
Step 5. Make changes to your database to reflect your new URL
Although the WooCommerce migration process is technically complete, you have to make your database point to the new URL of your live site. This makes sure that your WooCommerce store actually shows up at the new URL. To illustrate this step, I’ll be using a popular database management tool called phpMyAdmin. The steps should largely be the same regardless of which database management tool you use.
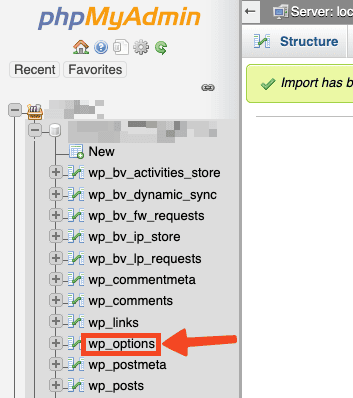
- Log in to the phpMyAdmin dashboard for your database and then select the wp-options table to view it.
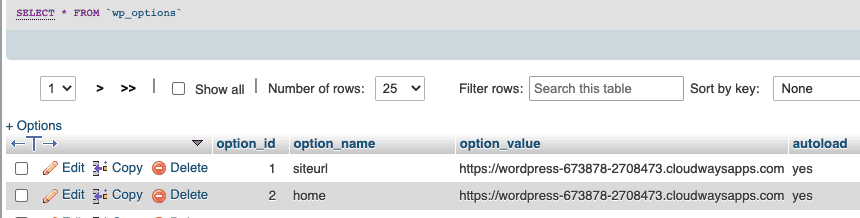
- On the following page, edit the option_value field of the siteurl and home options by replacing the old URL with the new one.
Step 6. Edit the wp-config.php file
The wp-config.php file is a critical file of your WordPress installation, and just like we did in the previous step, we need to make some changes that reflect the change of destination of our WooCommerce site.
Download the file from the ‘Remote site’ area of FileZilla. Modify the following lines of code with the new server’s MySQL database credentials:
define('DB_NAME', 'new database name here');
define('DB_USER', 'new MySQL database username');
define('DB_PASSWORD', 'password for the new database');
define('DB_HOST', 'new MySQL hostname');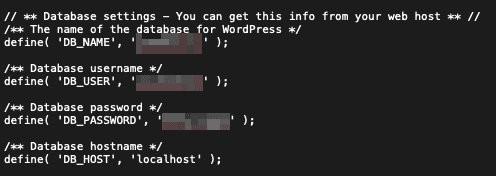
Next, add the following lines of code below the line that says “That’s all, stop editing! Happy publishing.”, replacing “newdomain.com” with the correct domain of your WooCommerce site:
define('WP_HOME', 'http://newdomain.com');
define('WP_SITEURL', 'http://newdomain.com');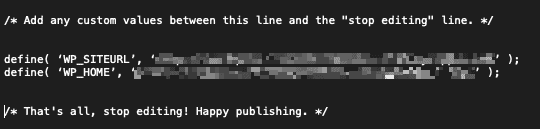
Save the file and re-upload it to the root directory of your remote site in FileZilla.
Step 7. Run a search-and-replace operation on your new database
Even after a successful migration, there might still be references to your WooCommerce site’s old domain name or server in the database. This can cause issues with links or how the theme is displayed. To rectify this, you have to carry out what’s called a search-and-replace operation on your database. If you do it manually, it can cause issues with data serialization, which is the process of converting data into a stream of bytes for easier storage or transmission.
It’s why I recommend using a plugin like Velvet Blues Update URLs or Better Search Replace. For the following example, I’ll be using Better Search Replace.
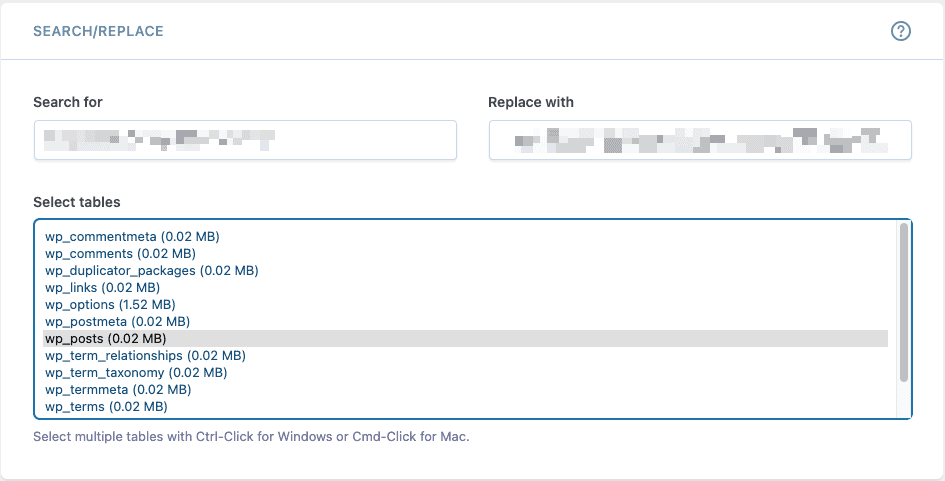
- Install and activate Better Search Replace at your new location.
- Under Tools, go to Better Search Replace.

- In the Search for field, put your old domain name. In the Replace with field, put your new domain name. Select wp_posts from the Select tables list.
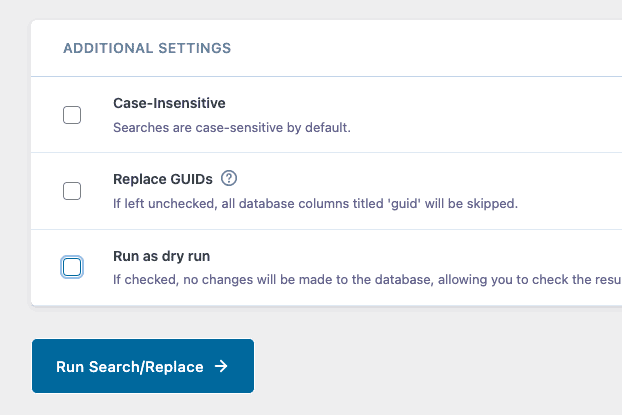
- Next, click on Run Search/Replace at the bottom. Check Run as dry run if you wish to verify the changes before the actual operation takes place. Once you’re happy with the suggested changes, you can uncheck it and run the operation again to make the changes final.
Step 8. Set up redirects on your old site
Now that you’ve migrated your WooCommerce site to its new location and performed a search-and-replace operation on the database, the only thing left to do is to make your old URL redirect to your new one. The most common way to do so is to set up a 301 redirect at your old URL. 301 redirects are essential for your SEO performance and your visitors’ experience. They ensure that when someone visits a page on your old URL, they’ll be redirected automatically to the same page on the new URL.
- Connect to your old domain via FTP.
- Download the .htaccess file to your hard drive. You can find it in the root directory of your WordPress installation.
- Open the .htaccess file in a text editor and add the following lines at the very top:
#Options +FollowSymLinks
RewriteEngine on
RewriteRule ^(.*)$ http://www.newsite.com/$1 [R=301,L]
Replace ‘www.newsite.com’ with your actual domain name. Save the changes.
That’s it! If you visit your old URL now, you should be automatically redirected to the new URL. 301 redirects are fascinating and if you wish to learn how they can help your website’s SEO performance, I suggest reading this article.
How to transfer a WooCommerce site via your web host
Plugins and FTP aren’t the only tools available to you for migrating your WooCommerce site. Did you know that most web hosting providers provide the feature to migrate to them for free? In this section, I’ll show you how you can perform WooCommerce migration using your existing web host. I’ll be covering three popular web hosts: WP Engine, Bluehost, and Dreamhost.
WP Engine
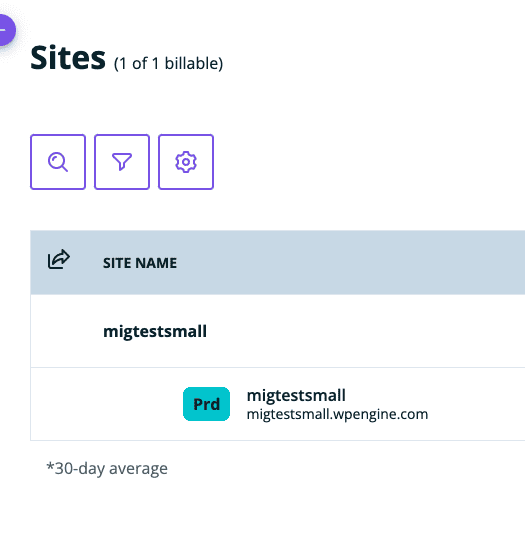
- Log into your WP Engine dashboard, then click on the site you want to migrate to under the Sites section.
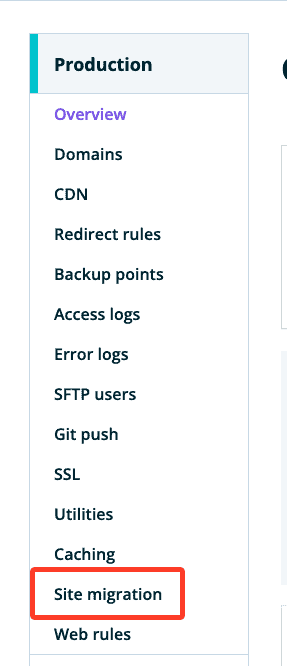
- Go to Production > Site Migration.
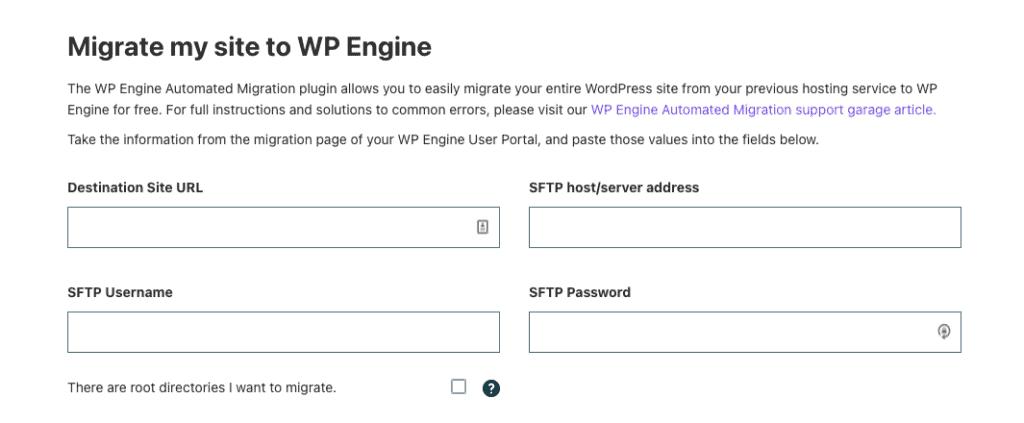
- Now, go to the admin panel of your WooCommerce site and install and activate the WP Engine Automated Migration plugin. You’ll be asked to log in to your WP Engine account. After logging in, you’ll be taken to the migration form.
- Go back to your WP Engine dashboard and click on Generate Password to generate the FTP credentials you’ll be using to migrate your site.
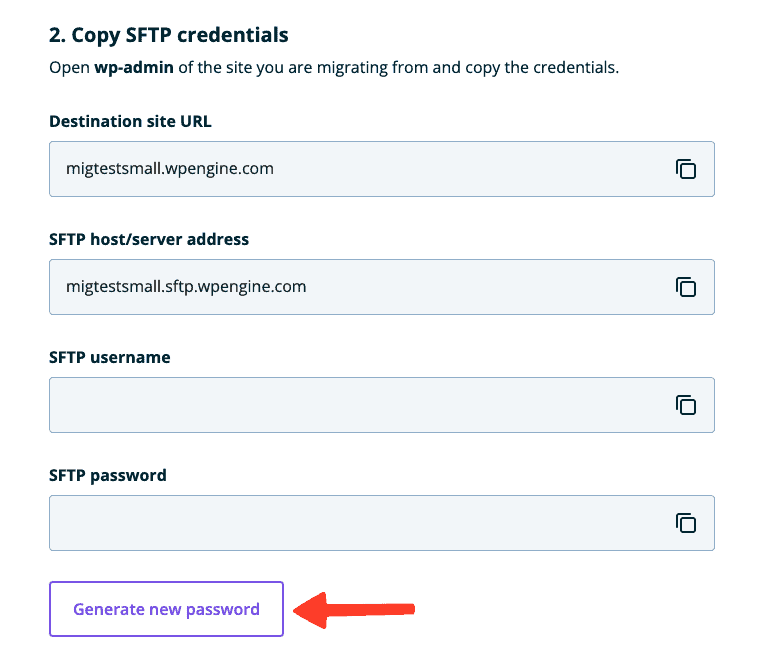
- Copy the FTP credentials and paste them as is on the migration form. Check the relevant boxes if there are additional root directories or database tables that you want to migrate.
- Click Migrate to begin the migration to WP Engine. The WP Engine Automated Migration plugin is powered by BlogVault. It will validate your details on the next page and then start the migration process.
Once the migration completes successfully, you’ll see a message confirming so.
Bluehost
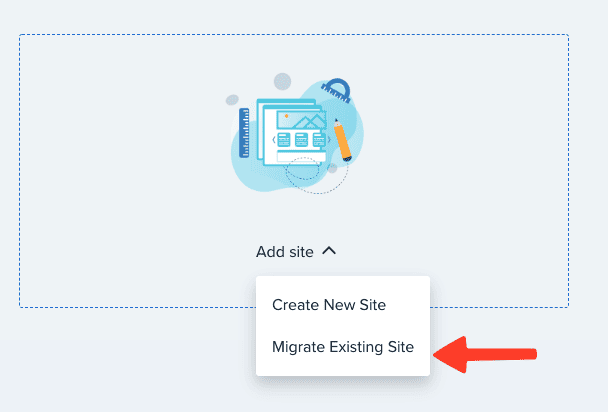
- Log into your Bluehost account. Go to My Sites from the navigation menu, then click on Add site > Migrate Existing Site.
- On the next screen, agree to the terms and click on Get Started Now.
- Next, enter the URL of your website and click on Check so that Bluehost can check for compatibility.
- Install the Bluehost Site Migrator plugin on your site and activate it.
- The plugin will recheck for compatibility. Once it confirms that the migration tool is compatible, click on Start Transfer to begin.
- The plugin will start the migration process. Once it’s complete, perform your post-migration tasks.
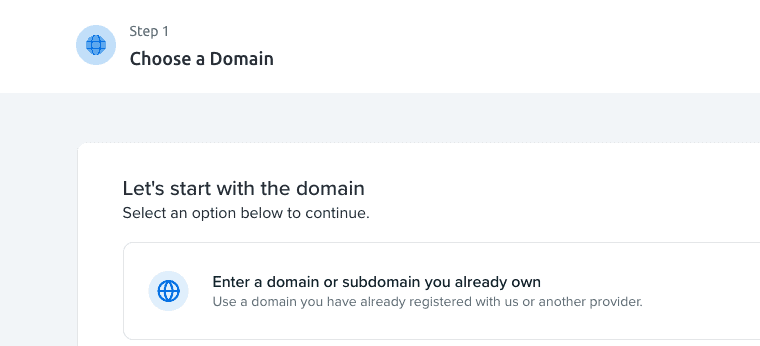
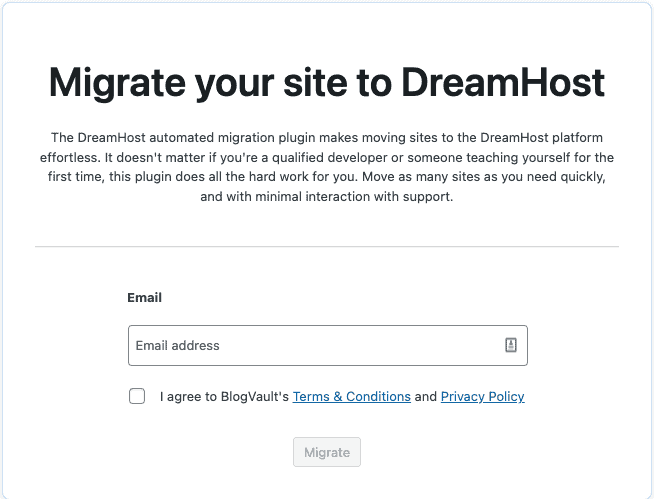
DreamHost
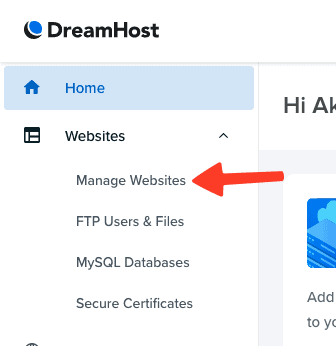
- Log into your DreamHost account and navigate to Websites > Manage Websites.
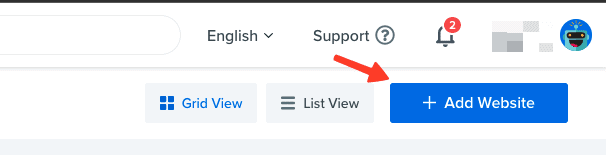
- Click on Add Website to proceed.
- Enter the domain of your site on the next screen.
- Next, choose the type of hosting per your desire, then click on Next: Options.
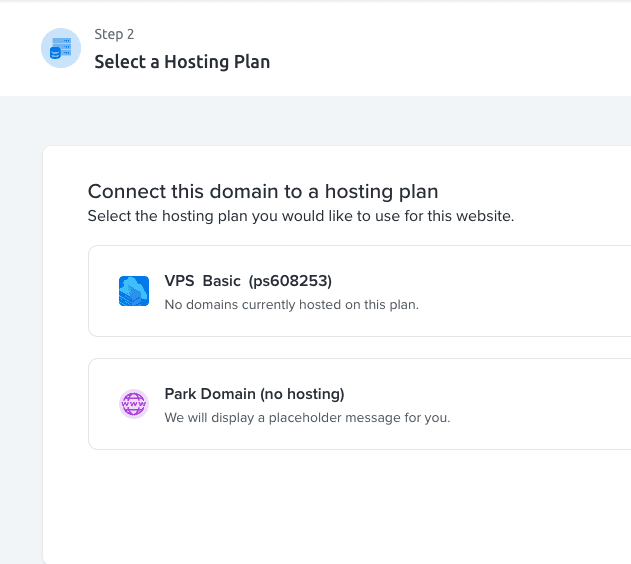
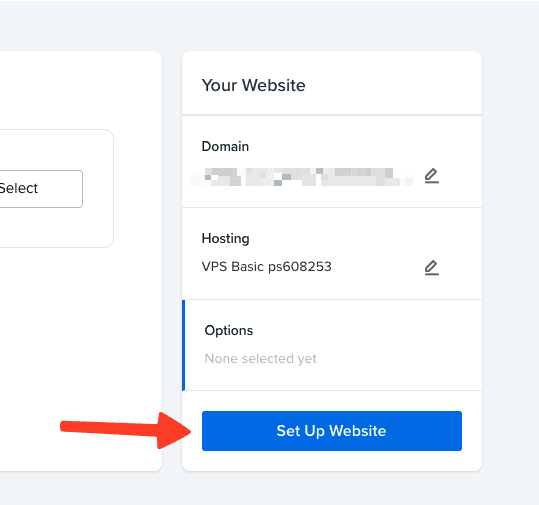
- Choose Install WordPress for Free so that DreamHost installs WordPress on this domain. Then, click on Set Up Website to proceed.
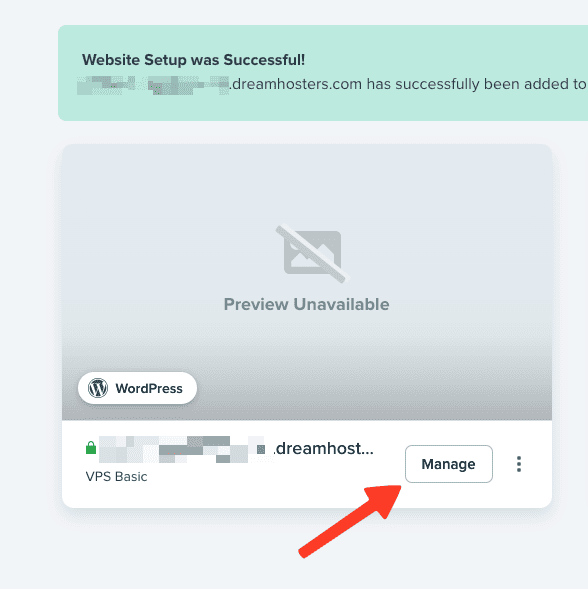
- After DreamHost has finished installing WordPress on your new website, it will take you back to the Manage Websites dashboard. Locate the new site and click on Manage.
- Scroll down to Migrating this site to DreamHost? and click on Get Key. Make a note of this key. You’ll need it soon.
- Install and activate the DreamHost Automated Migration plugin on the site you’re moving to. Enter your email address and click on Migrate to continue.
- Enter the key you received in Step 7 and click on Migrate to start the migration process.
What to do after moving a WooCommerce site
The WooCommerce migration may be complete, but there are still some things you need to do to ensure a smooth transition to a new domain. If you use Migrate Guru to migrate your site, then you don’t need to do the following steps. It will automatically take care of them for you.
- Disable maintenance mode if you enabled it before migrating.
- Log into your new site’s admin panel and resolve any conflicts regarding themes, plugins, etc.
- Clear all possible caches. This includes the caches of your WordPress installation, browser, and plugins. Caches store copies of your site so that it loads faster, but they may store copies of your old site, which could be a problem.
- Test every critical component of your site to make sure it’s functioning correctly. This includes pages, posts, hyperlinks, images, analytics code snippets, ads, and so on.
- Check theme and plugin licenses. Some licenses are tied to domain names. If that’s the case with you, then contact the respective customer support departments to get your licenses transferred to the new domain.
- Reactivate SSL on your new site to ensure a secure connection when someone visits your site. Use the Really Simple SSL plugin to do so quickly and easily.
- Set up 301 redirects from old URLs to new ones. This is critical for SEO. We covered this earlier in the article. For more information, read our guide on how to set up redirects on your old site.
- Delete your account from your old web host if you switched to a new one.
Phew! Finally, you’re done. You can now focus on managing your migrated site.
Troubleshooting WooCommerce migration issues
Migrating a WooCommece site requires a lot of steps, and there is always a possibility of things going wrong. In this section, I’ll outline some of the most common issues.
- The dreaded HTTP 500 ERROR: This error can be caused by several things and can be hard to diagnose and resolve. We advise people to disable caching and firewall plugins and make sure that the PHP versions on the source and destination sites match. If you get this error, head on over to our guide for troubleshooting it.
- Error establishing database connection: This error is usually caused by incorrect credentials in the wp-config.php file. Check the values for DB_NAME, DB_USER, DB_PASSWORD, DB_HOST, and table_prefix.
- SEO issues: If you see your search engine rankings fall, chances are you haven’t handled the redirects correctly. Read this article to learn how to fix these issues.
If you’re still pulling your hair out trying to troubleshoot any issues, I suggest taking the nuclear option: reinstall WordPress on your source and destination servers, restore a backup of your site, and use Migrate Guru to move it to a new domain. Trust me, it just works.
Reasons to migrate a WooCommerce site
There could be several reasons why you would want to move your WooCommerce site. I outline some of the most common ones below with regard to moving a WooCommerce site to a new domain:
- You want to rebrand your business and give it a new identity. In particular, if you changed the name of your business, it makes sense to change the domain name of your online store to reflect the rebranding.
- You want the new domain name to be more recognizable.
- You want to move your store to a highly sought-after top-level domain (TLD) such as .com.
- Your existing domain name is proving to be expensive to renew each year.
- You purchased your domain name and your hosting plan from different providers/organizations. You want to move the domain name to your existing web hosting provider to make it easier to manage.
Some other reasons for migrating a WooCommerce site could be:
- You built your WooCommerce site locally and are now ready to give it a home on the Internet.
- Your site is huge and you want to move to a faster web host to improve page load times.
Conclusion
WooCommerce migration is quite an undertaking and can be daunting, especially considering that it’s changing in real-time. It’s why we recommend the robust migration plugin Migrate Guru. It can move the largest of WooCommerce sites to another location easily, relatively quickly, for free, and with minimal effort from your side. Moreover, it works with any web host out of the box.
FAQs
Q – How can I move my WooCommerce site to a new domain?
A – There are three main ways:
- Use a dedicated migration plugin like Migrate Guru;
- Do it yourself; or
- Use your web host’s migration feature (provided it has one).
Q – What is the best way to migrate a WooCommerce site?
A – The best way to migrate a WooCommerce site is to use a dedicated migration plugin. We highly recommend Migrate Guru since it’s easy to use and works with any web host out of the box.
Tags:
Share it:
You may also like

How to Limit Form Submissions with Droip in WordPress
Forms are an indispensable part of any website because of their versatility, letting you collect information for various purposes! However, people with ill intentions often attempt to exploit these forms…

How To Manage Multiple WordPress sites
Management tools help agencies become well-oiled machines. Each task is completed with the least amount of effort and highest rate of accuracy. For people managing multiple WordPress sites, the daily…

PHP 8.3 Support Added to Staging Feature
We’ve introduced PHP version 8.3 to our staging sites. Test out new features, code changes, and updates on the latest PHP version without affecting your live website. Update PHP confidently…
How do you update and backup your website?
Creating Backup and Updating website can be time consuming and error-prone. BlogVault will save you hours everyday while providing you complete peace of mind.

Updating Everything Manually?
But it’s too time consuming, complicated and stops you from achieving your full potential. You don’t want to put your business at risk with inefficient management.

Backup Your WordPress Site
Install the plugin on your website, let it sync and you’re done. Get automated, scheduled backups for your critical site data, and make sure your website never experiences downtime again.


