How to Create a GoDaddy WordPress Staging Site? (Plus Pros & Cons)
Bulletproof Backups for Your WordPress Website
Fortify your business continuity with foolproof WordPress backups. No data loss, no downtime — just secure, seamless operation.
Have you ever updated a plugin or theme and saw the screen go white? Or add a CSS that broke the site?
It’s a common occurrence.
You had built your website around the version of the theme or plugin available at the time. A new version may cause conflict and break your site. Sometimes websites may break after you’ve made changes in the settings or you’ve been fiddling with the design of the site.
Whatever the cause, broken websites are bad for business, thats where GoDaddy WordPress Staging or any other staging platform comes into picture,
When visitors see your broken site, they’ll leave instantly.
They’re also likely to never return since they think your website doesn’t work. This can severely impact the revenue and growth of your business!
To protect your website from such disasters, you can use a staging site as a test site to test out things before making the changes on your live WordPress website.
Hosting providers like GoDaddy offer staging services which you can utilize if you are hosting your website with them. In this article, we’ll show you how you can use GoDaddy WordPress staging along with the drawbacks of the staging platform and a better alternative.
Why You Should Use a Staging Site?
A staging site is an exact replica of your live website. But unlike your live site, the staging site is hidden to public view. Once you’ve made changes on the staging site, you can push those changes into the live site with the click of a button. You don’t have to manually replicate the changes.
Major benefits of using a staging site are:
1. It enables you to add or remove or update a plugin and theme without worrying about crashing the website.
2. You can troubleshoot a problem without risking your live site. You don’t need to put your website on maintenance mode. Your site is always available to visitors which means your traffic and sales are not negatively affected.
3. You can experiment and test out new designs, plugins, themes at your own pace.
4. You can also build new site while the old site is live.
Staging environments certainly has advantages. But you need to choose your staging services carefully. Many staging services have drawbacks that can do more harm than good. Take for instance, the staging service that GoDaddy offers. It has many issues that we have discussed below:
GoDaddy WordPress Staging Service Issue
GoDaddy offers staging services for anyone who subscribes to its premium WordPress hosting packages that start at $7 per month.
However, when you use the staging service, you are going to face the following issues –
i. Your live site will become slow. GoDaddy stores the staging site on the same server which hosts your live site. This means your live server has to run its daily tasks for your live site along with shouldering the staging site. It takes up resources meant for your live site to run the staging site making your live site slow.
ii. Moreover, changes from the staging site don’t always reflect on the live site. For instance, users have found that when they delete files on the staging site, the files still appear on the live site after merging the staging site with the live one.
iii. Some users even complain that when a staging site is being merged with the live one, the latter appears broken or inoperable for a short time.
We recommend using a staging service that isn’t plagued with such issues. You can jump to the section A Better Way to Stage a Site to learn about a better staging service that comes free of cost.
If you still want to go ahead with GoDaddy staging, we have the steps listed in the next section.
How to Create a Staging Site on GoDaddy?
The steps below will show you not just how to create a staging site but also how to merge your staging site with your live one.
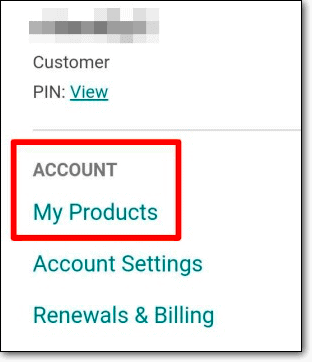
1. Log into your GoDaddy account and open the page My Products.
2. Then navigate to Managed WordPress and select Manage All.
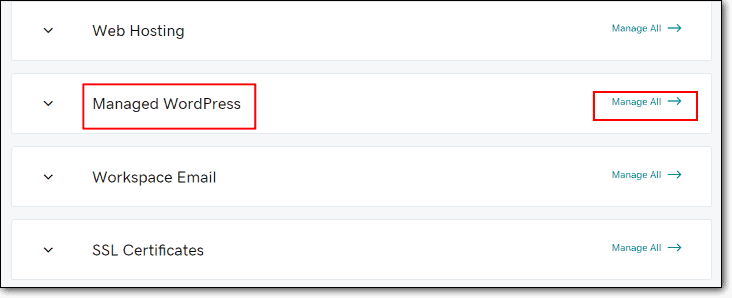
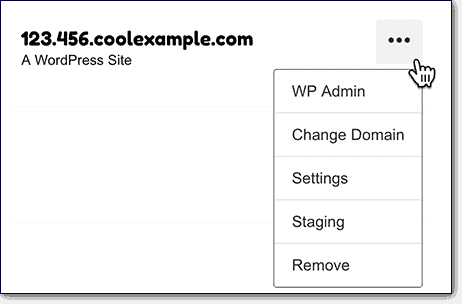
3. On this page, you’ll find all your WordPress websites that GoDaddy is hosting. All the sites will have three dots icons on the far right of the screen. The site that you want to stage, select the three dots icons of that site and a drop-down menu will appear.
4. From the drop-down menu, select Staging.
(Important: If you are on the Basic GoDaddy Managed WordPress Hosting Plan, GoDaddy will go ahead and create a staging site for you after step 4. If you are subscribed to Deluxe, Ultimate, and Ecommerce plan, you need to follow the steps below.)
5. Next, you will be given two options:
i. Create a replica of the entire site by selecting Clone production environment, or
ii. Replicate only the WordPress themes and the plugins installed on your live site by selecting Copy production theme and plugin (no content)
6. Then select Create.

It’ll take GoDaddy a few minutes to create the site.
8. Next, to access your staging site, you need to go back to the Manage All page from step 2.
9. Select the three dots icons of the site that you just staged and from the drop-down menu select Staging.
10. From the next page, you need to select the option Staging WP Admin and your GoDaddy WordPress staging site will open.
11. You can log into the staging site using the same user credentials that you use on your live site.
Merging the GoDaddy WordPress Staging Site to the Live Site
Once you have made changes on the staging, you’d want to push those changes to the live site. Here’s how you can do that –
1. Log into your GoDaddy account and navigate to My Products > Managed WordPress > Manage All.
2. Then navigate to Managed WordPress and select Manage All.
3. Select the three dots icon of the site that you had staged, and then from the drop-down menu, select Staging.
4. Next, select Sync Options.
5. After that, depending on the plan that you are on, you’ll see different options –
i. Basic WordPress Managed Hosting Plan subscribers need to select Copy staging to production > Theme and plugin files or All files and database.
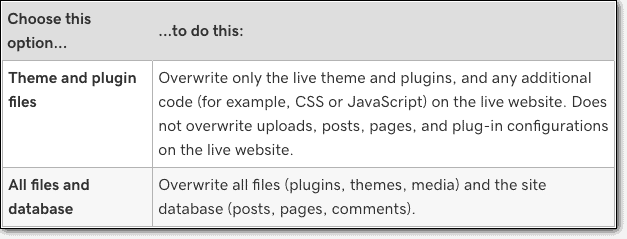
IMPORTANT: If you select theme and plugin files, only themes and plugins from your staging site will be moved to the live one. However, if you select all file and database, it’ll merge your entire website including themes, plugins, posts, pages, comments, media files, settings, etc.
ii. Deluxe, Ultimate, and Ecommerce users will have a single option to Overwrite content. Selecting it will merge your entire staging site with the live site.
6. In the next page, you need to select Sync.

With that, we come to the end of how to create a staging site on GoDaddy’s website hosting platform.
Also Read: How to Replace Old WordPress Site With New WordPress Site?
A Better Way to Stage a Site – BlogVault Staging
Earlier in the articles, we spoke about the many drawbacks of GoDaddy staging. If you want to avoid those pitfalls, we suggest staging with BlogVault.
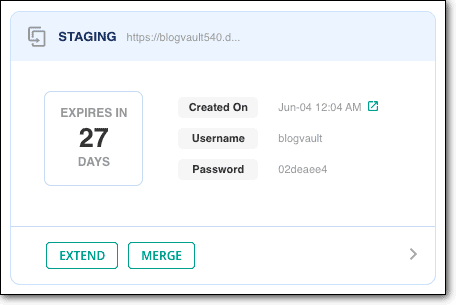
Benefits of BlogVault’s Staging Services
1. BlogVault stages your website on its own server which means it does not impact your website’s performance and does not slow down your live site.
2. It completely overwrites your website. If you deleted some files from your staging site, BlogVault ensures that the files don’t appear on your live site after merging.
3. Besides these, there are few extra benefits of using BlogVault staging. It supports multisite WordPress installations. And it does not cause any conflict with caching plugins which is an issue with a lot other staging plugins out there.
4. Moreover, using BlogVault is much easier. The steps involved in creating as well as pushing changes from the staging site to the live site are few and easy to implement.
Here’s a guide using which you can stage your website with BlogVault immediately.
Final Thoughts
If your website is hosted on GoDaddy, it’s natural to want to create a staging site using their hosting platforms but it comes at a cost. Using staging services from hosting providers can be a frustrating experience.
An alternative method is to create a staging site on your own using cPanel in your web hosting account. But this is an extremely technical and time-consuming process. Hence, WordPress staging plugins like BlogVault are the best way to go about creating a staging site.
Try BlogVault’s Staging Right Now!
Tags:
Share it:
You may also like
How to Limit Form Submissions with Droip in WordPress
Forms are an indispensable part of any website because of their versatility, letting you collect information for various purposes! However, people with ill intentions often attempt to exploit these forms…
How To Manage Multiple WordPress sites
Management tools help agencies become well-oiled machines. Each task is completed with the least amount of effort and highest rate of accuracy. For people managing multiple WordPress sites, the daily…

PHP 8.3 Support Added to Staging Feature
We’ve introduced PHP version 8.3 to our staging sites. Test out new features, code changes, and updates on the latest PHP version without affecting your live website. Update PHP confidently…
How do you update and backup your website?
Creating Backup and Updating website can be time consuming and error-prone. BlogVault will save you hours everyday while providing you complete peace of mind.

Updating Everything Manually?
But it’s too time consuming, complicated and stops you from achieving your full potential. You don’t want to put your business at risk with inefficient management.

Backup Your WordPress Site
Install the plugin on your website, let it sync and you’re done. Get automated, scheduled backups for your critical site data, and make sure your website never experiences downtime again.


