WordPress File Permissions: Complete Beginner’s Guide
Bulletproof Backups for Your WordPress Website
Fortify your business continuity with foolproof WordPress backups. No data loss, no downtime — just secure, seamless operation.
On every computer filesystem, whether on your local computer or a server in the cloud, the various files and directories have permissions that dictate who and what can access, read, write, or modify them. These permissions are critical because there could be certain files and directories that you’d want to access but would never want anyone else to, or else bad things may happen, like you being blocked from accessing the said filesystem.
You may have stumbled upon these permissions somewhere, and you wish to understand what they mean. Well, you’ve come to the right place. This article serves as a comprehensive guide to WordPress file permissions. In this article, you’ll learn:
- What do the various WordPress permissions mean;
- Correct WordPress file permissions;
- How to change WordPress file and folder permissions;
- When to change WordPress file and directory permissions; and
- And much more.
TL;DR: WordPress permissions prevent unauthorized access to your WordPress files and folders. While your web host will likely set these permissions for you when you install WordPress, it helps to have a solid understanding of them so you’ll be able to change them in certain scenarios. Before making any changes to files, make sure to take a full backup of your site with BlogVault.
What are WordPress file permissions?
I explained what file permissions are in general in the introduction. WordPress file permissions, in particular, impose rules that govern who and what can read, write, modify or execute the files and directories that make up your WordPress installation.
Why are these needed? Think about it. Just like you wouldn’t want anybody else apart from your family to have access to your safes, you don’t want every Tom, Dick, and Harry to have access to critical WordPress files like the wp-config.php and .htaccess files. Only you and a few folks that you trust with your heart should. Otherwise, it’s a security hazard. WordPress folder permissions exist to serve as security measures for systems that have multiple users, like servers.
Roles
Before learning what WordPress permissions are, it helps to know what kinds of users can interact with the files and folders of a WordPress installation. WordPress categorizes these “users” into roles, and there are three of them:
- User: A user is an individual account on the web server. An example of such an account would be the account that you use to log in to your web server remotely via FTP. Web servers use such accounts to determine access to the files and directories on the system. As you can imagine, there can be several users on the same web server. Having said that, all your WordPress files should be owned by YOUR user (FTP) account.
- Group: A group refers to a set of users. Having a group is a convenient way to assign ownership of your WordPress files and directories to several users.
- World: Everyone else has the “world” role.
Note that the owner of the WordPress files and directories on the server has the ‘user’ role and that there need not be actual people behind the user accounts on the server.
Permissions
File permissions in WordPress are identical to UNIX file permissions. There are three permissions in total: read, write, and execute. Here’s a handy table that shows what privileges each permission allows as well as their alphabetical and numerical symbols:
| Permission | Privileges | Alphabetical symbol | Numerical symbol |
|---|---|---|---|
| Read | reading, opening, viewing, and copying files | r | 4 |
| Write | writing to, changing, deleting, and saving files | w | 2 |
| Execute | executing and invoking files or scripts (required for directories to allow searching and access) | x | 1 |
Since there are three roles and each can have up to three permissions, we can represent a complete set of permissions for a filesystem using a string of nine characters that could be either of the alphabetical symbols representing permission. Such a string is called a permission string, and here’s how they’re written:
- Every permission string starts with either a dash (-) or the lowercase letter ‘d,’ representing permissions for a file or directory, respectively.
- The permissions are arranged in sets of three letters each in the order of user, group, and world from left to right. After the initial ‘-’ or ‘d,’ the first set of three letters represents the permissions for the user, the next set for group, and the last set for the world.
- Each set of letters is arranged in the order of read, write, and execute permissions from left to right.
- A dash in the place of a letter means the role doesn’t have the corresponding permission.
Examples:
- -rwxr-xr-x: The user has read, write, and execute permissions, while group and world have read and execute permissions only for the file in question.
- drw-r–r–: The user has read and write permissions, while group and world have read-only permissions for the directory in question.
Well, alphabetical permission strings aren’t the only way to denote permissions on a filesystem. From the table above, you can see that each of the three permissions has a numeric value associated with it. If you add the three numbers corresponding to each permission that a user has in a permission string, you’ll get a sum that is seven or less. Arranging these sums in the order of user, group, and world yields a unique total value that represents a specific combination of permissions associated with the three user types. A permission that is denied is represented by zero.
Consider the permission string -rwxr-xr-x that I mentioned earlier. Here’s how it can be represented as a numerical string:
| user | group | world | |
| read (r) | 4 | 4 | 4 |
| write (w) | 2 | 0 | 0 |
| execute (x) | 1 | 1 | 1 |
| TOTAL VALUE | 7 | 5 | 5 |
Here are some more examples:
| Permission string | Numerical representation |
| drw-r–r– | 644 |
| -rwxr–r– | 744 |
| -r–r–r– | 444 |
| -rw- r– — | 640 |
Note that whatever combination of permissions you create, the numerical representation will always be unique for that particular combination.
Recommended file permissions in WordPress
While it can be tempting to set the strictest permissions possible, say, only allowing yourself to read, write and execute files, it’s not a good idea to do so. The way WordPress works–or any filesystem for that matter–is that files access each other to perform various tasks. So, permissions like 700 or 440 are infeasible. Conversely, allowing free access to your WordPress files and folders is asking for trouble. For example, granting write access to your files in a shared hosting environment could be dangerous.
WordPress recommends setting the tightest permissions possible from a practical perspective and loosening those restrictions on occasions when you need to enable access.
Correct or recommended WordPress file permissions you can use for your WordPress files and folders:
- Root directory (/):
755 - /wp-admin/:
755 - /wp-includes/:
755 - /wp-content/:
755 - /wp-content/themes/:
755 - /wp-content/plugins/:
755 - /wp-content/uploads/:
755 - .htaccess:
644 - index.php:
644 - wp-config.php:
640
Note that these permissions aren’t set in stone. You can modify them to suit your needs but always keep security in mind.
While these are the default WordPress permissions we recommend, in practice, their configuration depends heavily on how your web host has set up the servers.
How to change or fix WordPress file permissions
Changing WordPress file and directory permissions is quite simple, but there will always be a possibility that you could make a mistake and lock yourself out of your site. That is why I recommend taking a backup of your site. It’s like a safety net; should anything go wrong you would be able to restore a fully functional version of your site.
Before you start, note that when you change the WordPress file permissions for a directory, the corresponding permissions for the directories and files inside that directory also change recursively.
Change WordPress file permissions using cPanel
cPanel is a file manager-like control panel that many web hosts have. It allows you to make changes to your WordPress files, set permissions, etc. as you would do for the Windows or Mac operating systems. cPanel is probably the most popular control panel software among web hosts but yours might use a different one like Plesk or Webmin. I’ll use cPanel inside Bluehost for this section, but the steps should largely be the same for whatever control panel software your web host uses. The difference mostly lies in the UI.
- Log into your cPanel account. There should be a link to access cPanel from your web hosting account’s dashboard. If there isn’t, you can append /cpanel after your site URL to access it.
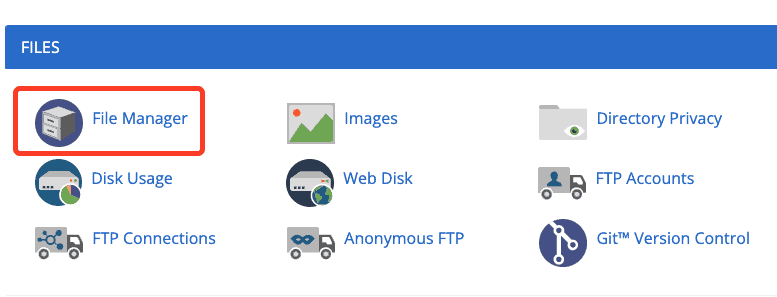
- After logging in, open File Manager in the Files section.
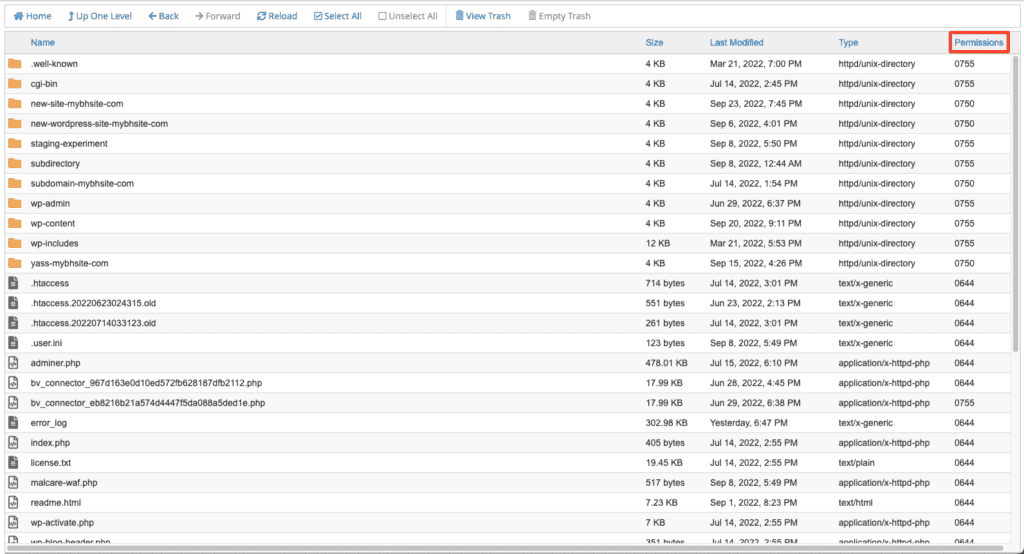
- Click on the root directory, which is public_html by default. You should now see all your WordPress files and folders on the right-hand pane. The last column displays the permissions associated with each file and directory.
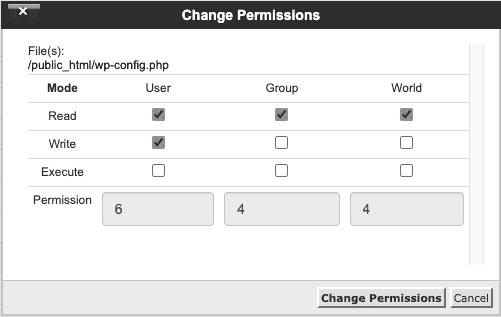
- To change the permissions for a specific file or directory, right-click on it and select Change Permissions from the menu.
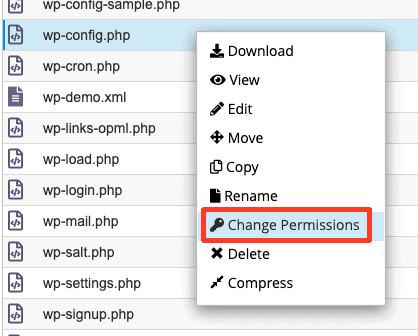
- A dialog box should open where you can change the permissions of that particular file or directory. Once you’ve granted permissions per your requirements, click on Change Permissions to save and exit.
Pro tip: you can select multiple files and directories to change their permissions at once, saving you a lot of time. Use Cmd on macOS (or Ctrl on Windows) to select multiple items at once. You can also use Shift to select all the items between any two items inclusive.
Change WordPress permissions using FTP
Using File Transfer Protocol (FTP) is another way to change or fix WordPress file permissions. FTP is a common way to transfer files over the Internet, but you can also use it to edit files and set permissions remotely. For this method, you’ll need an FTP client and the FTP credentials to access your site’s server remotely. You can obtain these credentials from your web host. I’m going to use the popular FileZilla client to illustrate the process. All FTP clients work in the same way with the primary difference being the UI.
- Log in to your site’s server on FileZilla.

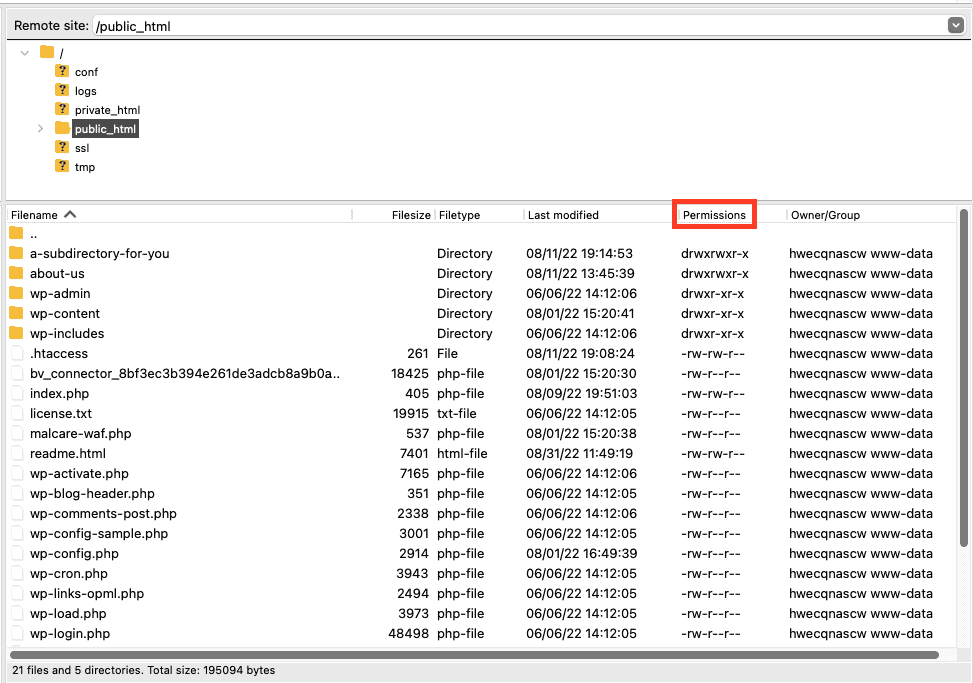
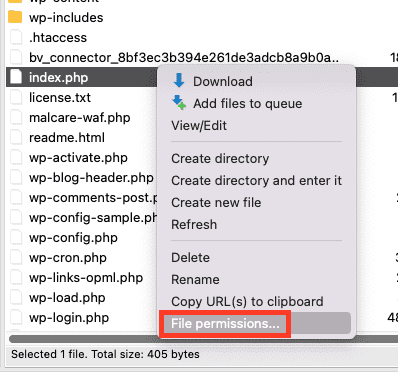
- After logging in, you should see a directory listing of your site in the right-hand area of the UI labeled ‘Remote site.’ Here, you can see the permissions associated with each file and directory under the column titled “Permissions.” To change the permissions associated with a file or directory, right-click on the item and select “File permissions…”
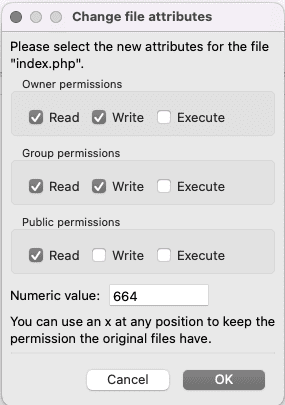
- A dialog box should open where you can change the permissions by either selecting the checkbox pertaining to specific permission or by entering the numeric value for your desired set of permissions. Once you’ve set the permissions, click OK to save the changes.
Fix WordPress permissions using a plugin
If you’re not comfortable using cPanel or FTP to change WordPress file permissions, you can use a plugin instead. You can use All in One WP Security & Firewall, although it has constraints. Let’s see how it works.
- Install and activate the plugin on your WordPress website.
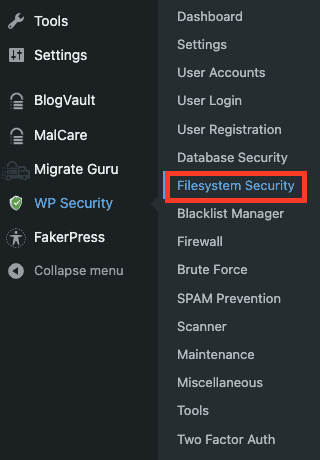
- You should see a sub-menu corresponding to the plugin now. Go to WP Security > Filesystem Security.
- You should see a table containing the most critical WordPress files and folders along with the current and recommended permissions. For any file or directory that doesn’t have the recommended permissions, you can change them by clicking on “Set Recommended Permissions” corresponding to the file or directory.
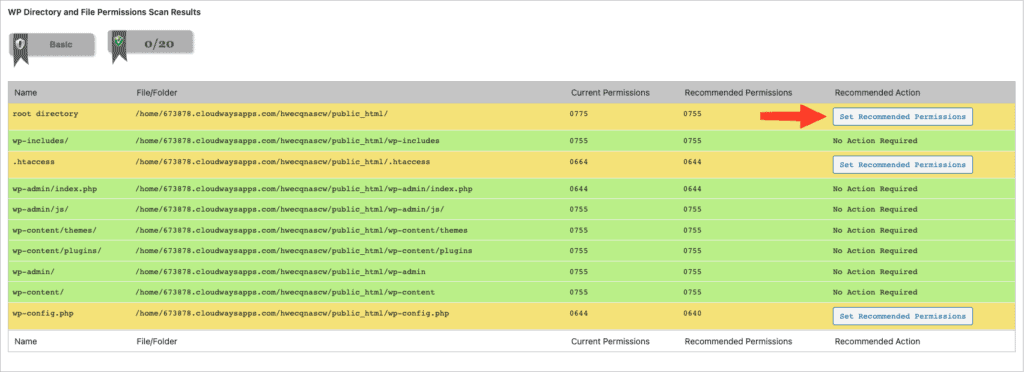
Note that when it comes to assigning permissions for your WordPress files and folders, this plugin isn’t adequate as it only allows you to change the permissions for a handful of files and folders only, and only to the permissions recommended by the plugin.
Change WordPress file permissions using SSH (chmod)
Finally, we come to the most difficult method to change file permissions in WordPress – using SSH. I only recommend this method to power users. Secure Shell (SSH) is a network protocol that allows you to log into a computer/server remotely over the Internet. It’s secure because it provides strong authentication and encrypts all communications between the two parties so that no 3rd party can deduce what is being sent even if they manage to get hold of the data.
If you’re using Windows, you’ll need a 3rd party SSH application like PuTTY. If you’re on Linux or macOS, you can use the terminal. The following instructions are for Linux/macOS, but they should work for any SSH application too.
- Open your terminal and execute the following command:
ssh username@host
username is the username given to you by your web host while host refers to your server’s public IP address. When prompted, type yes to make this a trusted host for future connections.

- Next, enter your password. It will not be visible due to security reasons.
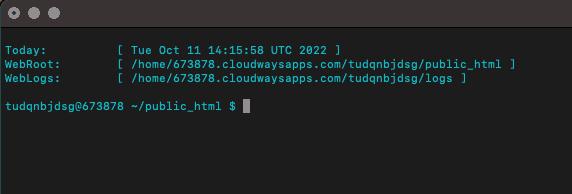
- On a successful connection, you’ll enter the root directory of your website. From here, you can navigate to the file or folder you want and change its permissions using the chmod command.
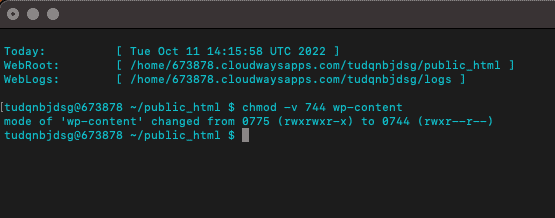
For example, if you want to change the wp-content directory’s permissions to 744 recursively, enter the following command:
chmod -v 744 wp-content
When to change WordPress file and folder permissions
Although changing the WordPress file permissions may seem like an attractive prospect, you shouldn’t play with them just for the sake of it. If your web host installed WordPress for you, or an experienced developer set it up, you can leave the permissions as they are. You can trust them since they want the best possible security for your website, just like you do. If you installed WordPress manually, then it makes sense to change the file permissions to our recommended ones. Two other scenarios where you might need to tinker with file permissions are as follows:
- You’re trying to debug a particular problem/error;
- You migrated a site from a local development environment to a live server.
Anyway, like I mentioned earlier, always take a backup of your website before altering file permissions. And when it comes to backups, BlogVault is the best plugin for the job. Why? Because it:
- takes backups incrementally, only backing up any changes you made since the last backup;
- can back up sites as large as 500 GB in size; and
- works with any web host in the world.
Troubleshooting file and folder permission errors
Even if you set the permissions of your WordPress files and folders to our recommended ones, you might still run into some issues or errors. This is because not every permission configuration will suit every hosting setup. In some cases, you’ll have to deviate from the recommended settings so that your site can function properly. Below I enumerate some common issues and problems you can run into because of WordPress file permissions.
Website crashes
If you’re trying to set your file permissions to enhance the security of your site, be careful not to go overboard. If you restrict access to, say, the group owner, your site can crash.
This situation can arise because the web server process needs a user account to execute code on your site. Generally, the user account on your web host isn’t the owner account, it’s often a part of the group owner. If the group owner doesn’t have sufficient permissions, then the web server process is stymied and will fail. Thus, your site crashes.
The best thing to do if your site is crashing is to set file permissions to the recommended ones mentioned above.
Failed auto-updates
When WordPress tries to perform an automatic update, it carries out all the file operations as the user that owns the files, not as the web server’s user. So, if the permissions are too restrictive, the auto-updates may fail.
403 Forbidden Error
This error occurs when the server forbids access to whatever you’re trying to access via your web browser. If you think you should be able to access the resource, it might be because the resource is set to be accessible only by user and group, and not by the world, which is the web browser.
Conclusion
WordPress file permissions are an important part of your website’s security. They help prevent unauthorized access to your files and content. If your web host installed WordPress for you, then you can leave the permissions as they are. However, if you installed WordPress on your own, then I would suggest assigning the proper WordPress file permissions I’ve described in this article.
Having said that, setting the recommended permissions isn’t enough for security. The best form of security you can grant your site is a top-notch security plugin like MalCare. With features such as daily automatic malware scanning, one-click malware removal, a state-of-the-art integrated firewall, IP address blocking, real-time security alerts, and more, MalCare is the best security solution out there for WordPress websites.
Lastly, back up your site before making any changes to your WordPress file and directory permissions. Although file permissions are technically simple, there is always a possibility of making a mistake that you’ll regret later. If you accidentally break your site or lock yourself out of certain files, you’ll be able to restore an earlier version. BlogVault is my recommended plugin for back-ups since it’s fast, takes incremental backups, and can back up huge sites.
FAQs
Q – How can I change file permissions for a WordPress site?
A – You can change your WordPress file and folder permissions either via cPanel (or any other web hosting control panel software), FTP, or using certain plugins. Plugins can be restrictive, so I highly recommend using either cPanel or FTP. Simply right-click on the file or directory and select the option to set file permissions.
Q – What dangers does a 777 permission setting pose?
A – Setting a file or directory’s permissions to 777 provides a way for anyone to access that file or directory by hijacking basically any process on your server. In the worst-case scenario, a malicious entity could upload a harmful file or modify an existing file to execute code to take complete control over your website, including having your database information and password.
Tags:
Share it:
You may also like

How to Limit Form Submissions with Droip in WordPress
Forms are an indispensable part of any website because of their versatility, letting you collect information for various purposes! However, people with ill intentions often attempt to exploit these forms…

How To Manage Multiple WordPress sites
Management tools help agencies become well-oiled machines. Each task is completed with the least amount of effort and highest rate of accuracy. For people managing multiple WordPress sites, the daily…

PHP 8.3 Support Added to Staging Feature
We’ve introduced PHP version 8.3 to our staging sites. Test out new features, code changes, and updates on the latest PHP version without affecting your live website. Update PHP confidently…
How do you update and backup your website?
Creating Backup and Updating website can be time consuming and error-prone. BlogVault will save you hours everyday while providing you complete peace of mind.

Updating Everything Manually?
But it’s too time consuming, complicated and stops you from achieving your full potential. You don’t want to put your business at risk with inefficient management.

Backup Your WordPress Site
Install the plugin on your website, let it sync and you’re done. Get automated, scheduled backups for your critical site data, and make sure your website never experiences downtime again.


