How to Use FTP to Upload & Manage Files on WordPress Site?
Bulletproof Backups for Your WordPress Website
Fortify your business continuity with foolproof WordPress backups. No data loss, no downtime — just secure, seamless operation.
Do you want to make changes to your WordPress files but don’t know how to find them? Or do you want to access these files because you’re locked out of your WordPress dashboard? Sometimes, you may want to add certain functionality, tighten security, or customize your site and find that these options are not available on the dashboard. In cases like this, you need to use WordPress FTP to connect to your website’s files. You might’ve noticed that when you look for WordPress tutorials on these topics, almost all of them talk about using FTP.
So what is it? Why do you need it? How does it work? How to use it?
We aim to answer all these questions in this article. We’ll discuss what it is and guide you on how to perform tasks using a popular FTP client called Filezilla.
[lwptoc skipHeadingLevel=”h1,h3,h4,h5,h6″ skipHeadingText=”Conclusion”]
What is FTP?
To understand what FTP is, you need to know what makes a WordPress website. On the frontend, i.e., the dashboard, you see tabs and buttons.
Behind this, your website comprises files and folders. These could be codes, media files, and settings and configurations.
If you want to learn more about the backend of your WordPress site – we recommend reading our Beginner’s Guide to Understanding WordPress File Structure & Database.
These files are stored on your hosting company provider’s web server. To access them, we need FTP. Let’s take a closer look.
FTP stands for File Transfer Protocol. It enables you to connect to your host’s web server and access your website’s files from your computer. Once connected, it is possible, not only to transferring files, but also to download, edit, delete or upload files. Changes you make will automatically be implemented on the server.
Why Do You Need To Use FTP?
Under normal circumstances, you should never need to use FTP. But there are quite a few instances where FTP comes in handy. You can use FTP in the following instances:
- You’re locked out of your wp-admin dashboard due to an error or a hack. You could try to access your files through FTP to fix it and regain access.
- Install plugins and themes directly when they cannot be uploaded from the dashboard.
- Manually deactivate plugins and themes if they’ve caused trouble on your site and you’re unable to deactivate them from the dashboard.
- Upload media files in bulk rather than one at a time.
- Backup WordPress theme.
- Make changes to the WordPress core files such as the .htaccess or wp-config file.
- Diagnose and fix common errors such as internal server error, compatibility issues, etc.
- Find out your database username and password.
- Take a manual backup of your installed WordPress site.
- Activate or deactivate WordPress features like XML-RPC.
- Move WordPress site to root manually
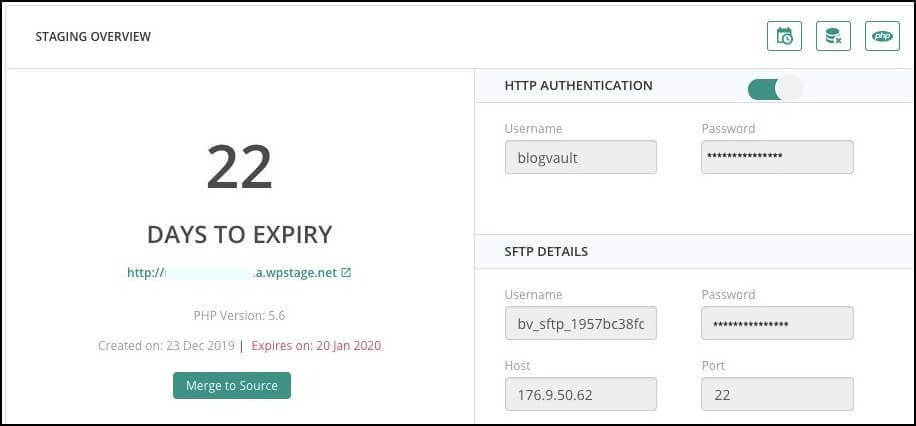
Note: If you want to experiment with FTP to learn more about it, we suggest using a staging site. This is a replica of your website where you can make any changes you want without affecting your live site. You can create a staging site with the help of WP staging plugin like BlogVault. Activate the plugin, access the BlogVault dashboard and create the staging site in one click.
What You Need To Use FTP?
To use FTP, we need two things:
- FTP Client – FTP client is a software that enables you to connect to the server. We recommend downloading FileZilla. It’s free and easy to use.
You can choose any other software too like CyberDuck, the basic steps will be almost the same. So, you can continue to follow this guide. - FTP Credentials – This consists of a hostname, FTP username, password, and a port number. You can find these credentials in the following ways:
- In the email sent to you when you created your WordPress hosting account.
- Contact your host’s customer support and they’ll help you out.
- Create your own FTP account. We recommend following our guide to Managing FTP Accounts.
- If you’re using a staging site with BlogVault, the credentials will be provided to you when it’s created.
Once you have these two things, we can start working with FTP.
How To Use FTP in WordPress website?
Using FTP is simple and easy. Here, we’ll guide you through it step by step.
Step 1: Take A Backup
When you use FTP, there is a certain amount of risk associated. When you modify, delete, or upload new files, these are permanent changes. A small mistake could lead to your site malfunctioning, showing errors or even crashing completely. This is why we strongly advise taking a full backup of your website before launching the FTP client. If anything goes wrong, you have a safety net to fall back on.
You can take a backup with our BlogVault plugin. It’s quick and easy to use. Activate the plugin on your site and it will automatically take a backup of your entire site. In case you make any mistakes, you can simply click a button to restore your site back to its previous state.
Step 2: Launch FileZilla FTP Client
Open the FileZilla app on your computer. You will see four panels like so:
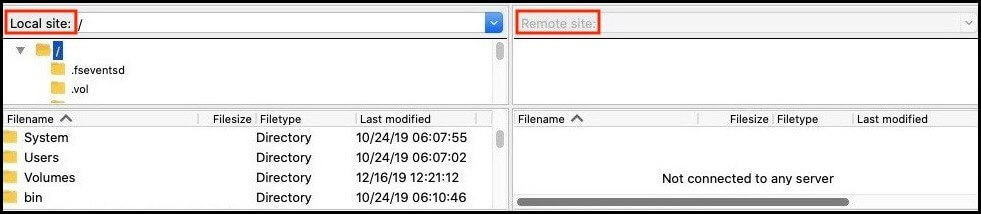
‘Local site’ on the left panel represents your own computer. You will see the folders and files of your website here. In the panel beneath that, you can see the details of the folders and files.
On the right panel, you will see ‘Remote Site’. This will represent your website’s folders and files. For now, it is greyed out and blank. We need to connect to the server first.
Step 3: Connect To Your Web Host
To connect to your host’s server, you can enter your FTP credentials and click on ‘QuickConnect’.

It will begin to establish a connection. Give it a few moments and you’ll see a message that the connection has been established.

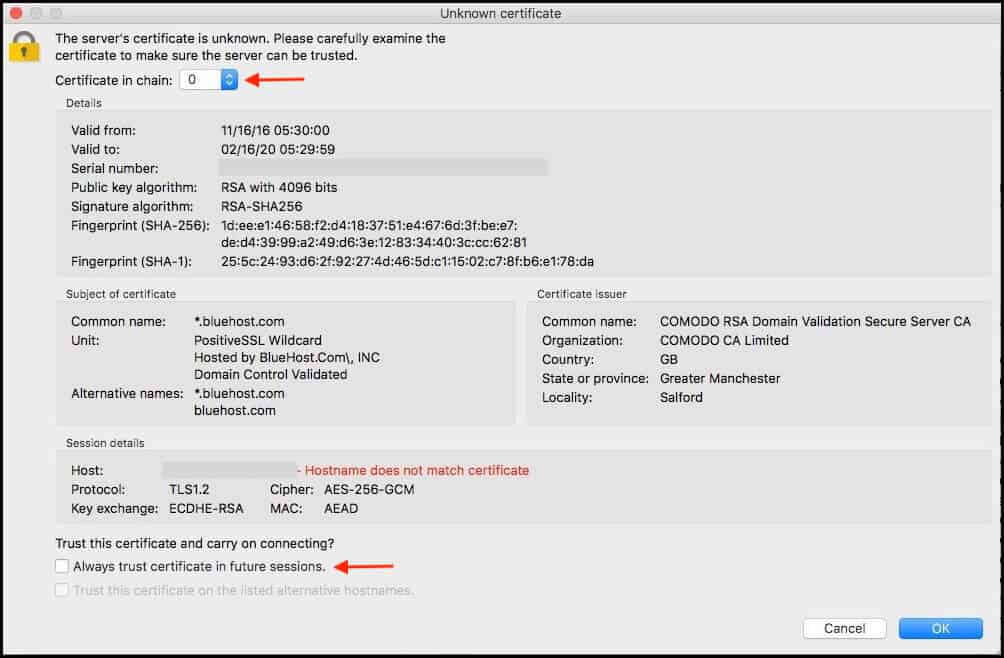
If you’re connecting to your site via FTP for the first time, you might see a pop-up to verify the certificate. In case it gives you a prompt that the certificate doesn’t match, try changing the certificate chain from 0 to 1 or 2. If you trust the certificate, you can check the box ‘Always trust certificate for future sessions’ at the bottom of the page.
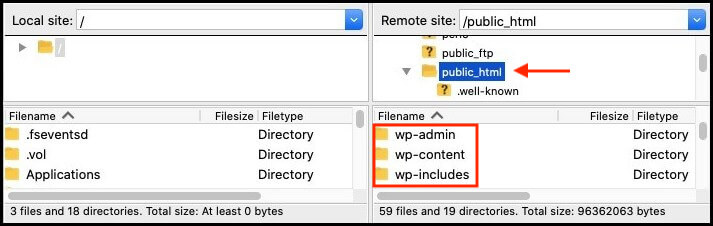
Step 4: Find Your WordPress Website Folder
Once you connect to your server, a number of folders and files will populate on the ‘Remote Site’ panel. Your website’s files will be in a folder called ‘Public_html’. When you click on this folder, it will reveal a few more files and three folders called wp-admin, wp-content, and wp-includes.
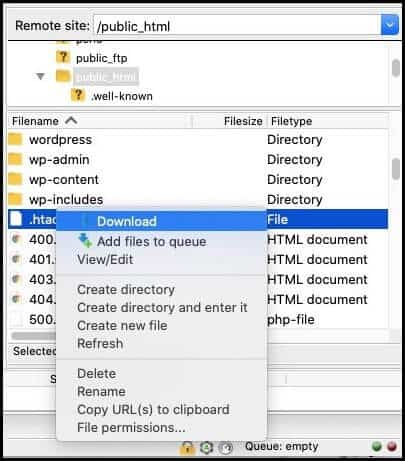
Step 5: Manage Your WordPress Files via FTP Protocol
Now that you’ve accessed your files, you can begin to make changes. Here are some modifications you can make:
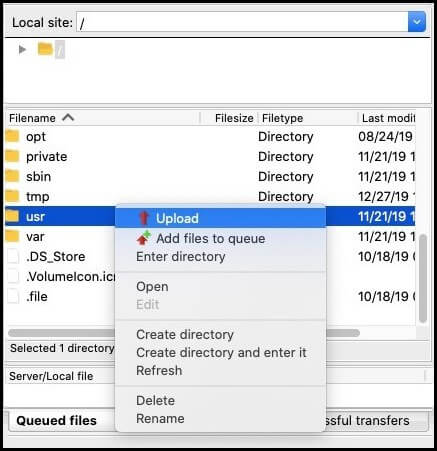
1. You can drag and drop files from your computer on the left panel to your website on the right panel.
2. By right-clicking on any file under ‘Remote Site,’ you’ll get options to download files, view and edit, delete, rename, and more.
3. By right-clicking on any file under ‘Local Site’, you’ll get the options to upload, delete, rename, and more.
4. To edit a file, you can download it and open it in any text editor. Make the changes you want and upload it back to your website.
That’s it! You’ve learned how to use FTP in WordPress. You should be able to locate and navigate through your website’s files.
Conclusion
WordPress FTP comes in handy when you need to make changes to your site that you can’t do from your dashboard like adding custom code.
Plus, to become an experienced WordPress user, it’s good to learn how the platform works and what your website is made up of. This is where FTP can be put to good use.
Whichever be the reason for you to use FTP, remember to always take a backup of your WordPress website before you begin. The risk of damaging your site is high when using FTP and it’s best to take precautions. If anything goes wrong, you can restore your backup and get your site back to normal.
For a quick, easy and reliable backup for your website, try BlogVault’s Backup Solution. Your backups are taken automatically and stored safely. More importantly, restoring your backup is a breeze and it’s guaranteed to work!
Try BlogVault’s Backup Plugin Now
Tags:
Share it:
You may also like

How to Limit Form Submissions with Droip in WordPress
Forms are an indispensable part of any website because of their versatility, letting you collect information for various purposes! However, people with ill intentions often attempt to exploit these forms…

How To Manage Multiple WordPress sites
Management tools help agencies become well-oiled machines. Each task is completed with the least amount of effort and highest rate of accuracy. For people managing multiple WordPress sites, the daily…

PHP 8.3 Support Added to Staging Feature
We’ve introduced PHP version 8.3 to our staging sites. Test out new features, code changes, and updates on the latest PHP version without affecting your live website. Update PHP confidently…
How do you update and backup your website?
Creating Backup and Updating website can be time consuming and error-prone. BlogVault will save you hours everyday while providing you complete peace of mind.

Updating Everything Manually?
But it’s too time consuming, complicated and stops you from achieving your full potential. You don’t want to put your business at risk with inefficient management.

Backup Your WordPress Site
Install the plugin on your website, let it sync and you’re done. Get automated, scheduled backups for your critical site data, and make sure your website never experiences downtime again.


