How to Migrate WordPress Site (Step-by-Step Guide)
Bulletproof Backups for Your WordPress Website
Fortify your business continuity with foolproof WordPress backups. No data loss, no downtime — just secure, seamless operation.
If you’ve used a WordPress hosting before, then you’ve probably faced some issues such as:
- Your web host is so slow that it turns off your users and your SEO is taking a severe hit because of it
- You just got hacked again and you have zero confidence in the level of security that your hosting service has to offer
- The hosting package does not offer the right resources that you need to scale and your business growth is stuck because of that
- The hosting provider is too expensive and you don’t understand why they are charging you so much
And it’s highly likely that you are frustrated enough to want to get yourself a new hosting service.
The only problem is you will need to migrate WordPress site to the new hosting service. But migration can be a daunting task. We know, we’ve been there. Over the course of several migrations, we made many mistakes. From our learnings, we’ve created this step-by-step guide to help you migrate your WordPress website without any mistakes.
TL;DR
To migrate a website you need to download your WordPress site (which includes files and database) and then upload them to a new server. You can do this manually or with the help of the new hosting provider or using a tool. We recommend our simple and easy migration tool – WordPress Migration. It offers fast migration, promises zero downtime for large websites, and supports WooCommerce and multisite migration.
If you just want to learn how to migrate a WordPress website, you can jump ahead by clicking this link.
But how sure are you that you absolutely need to migrate?
Are you 100% sure you understand what it means for your business?
If the answer to either of those questions is “No,” then you really should keep reading on.
Let’s dive in.
1. What is Migration?
Migration is the process of moving from one location to another. In the context of websites, it would mean moving WordPress site from one server to a different server. For instance, if your site is hosted on Bluehost, you may want to migrate it to Siteground.
On certain occasions, you may want to change your domain name (from https://olddomain.com to https://newdomain.com).
It’s not usual for people to want to migrate to both domain and server to a new hosting provider.
But what really happens during migration?
The contents of your website (which are files and databases) are copied to a new server. The content of the old server remains unchanged. You can manually delete them post-migration or else the hosting providers will remove them after your subscription expires.
2. Reasons to Migrate Websites
There are many reasons why people choose to migrate their sites. You know why you want to migrate. Still, check out the following reasons. They should tell you about all the benefits you might be unconsciously reaping by migrating your site.
i. Performance
Websites are hosted on different types of hosting plans. In cheap hosting plans, the server is shared between hundreds of thousands of websites.
When one or two sites start hogging more resources, others suffer.
In simple words: Websites on shared hosting experience major downtime.
So, many websites opt for higher hosting plans such as cloud servers or managed hostings.
Your hosting provider may offer higher hosting plans but many site owners prefer moving to providers who specialize in cloud servers or managed hosting or VPS hosting.
ii. Cost-Cutting
While some want to move to better hosting companies to scale their businesses, others need to cut back.
If your business is going through a rough patch, you may want to look at cost-cutting.
Websites that are not performing often bear the brunt of a hard business decision. In your case, you may want to migrate to a lower hosting plan.
Pro Tip: Migration is not needed if you are just downgrading or even upgrading with the same hosting provider. Only when you change your hosting provider do you need to migrate.
iii. Domain Name Change
People change domain names on various occasions.
Businesses evolve and you need the domain name to reflect what your business stands for.
You may have started off with a very long domain name and you want something easy to remember and catchy for your domain name. Whatever the reason, if you decide to change the domain name, migration comes into the picture.
iv. Support Issues
One of the most important pillars of businesses online is the support they offer to the customer.
Bad customer experiences can force users to look for alternatives.
In fact, this PwC report says that 73% of consumers say a good experience is key in influencing their brand loyalties.
Agencies running dozens of websites experience consistent bad support would migrate client sites to better hosting providers.
v. Launching New Sites
When it comes to building new websites, businesses take two routes. They quickly launch a website with a basic design and minimal text or they built a full-blown website locally and then migrate it to an online server.
This is a type of migration but it’s beyond the scope of this article. But, don’t worry, we’ve got your back. Here’s a guide that’ll help you migrate a site from localhost to live server.
vi. Moving Test Sites
Test sites are made to carry out experiments on websites but without jeopardizing the live site. Test sites are a copy of the live site made on a subdomain or subdirectory or a staging server, created using web host or WP staging plugin or manually. When site owners are happy with the changes they make on the test site, they want to migrate the test site to the live site.
That sort of migration is not something we’ll cover in this article. However, we have guides that’ll help you migrate a subdomain or subdirectory to the main site and create & move staging site to the live server.
BONUS: Before you start the process, it will be a good idea to take a look at this migration checklist. It’ll tell you about the things it needs at different stages of migration.
3. How to Migrate WordPress Site?
There are different ways to move WordPress websites. The method you select depends on how much involvement or time you want to spend on the process. You can:
ii. Migrate With Your New Hosting
Most hosting providers require minimal involvement from the site owner but take one business day to a whole week to migrate. Plugins are required to be installed and initiated but they are far less time-consuming. The manual process does not just require time and involvement but also knowledge about WordPress.
CAUTION: Migration should be carried out when your website is receiving the least number of traffic. You can use Google Analytics to figure that out. Just open Google Analytics and from the dashboard, you can look at the ‘When do your users visit?’ metric. It tells you the number of users visited your site during which time of day.
i. Migrate With a Plugin
There are many WordPress migration plugins to choose from. Migration being a complicated process, not all plugins can perform it seamlessly. So choosing a reliable plugin with a record of successful migrations is the key.
Some of the challenges that you can face with an unreliable migration plugin are as follows:
- It may not support migration to the web host of your choice.
- It causes downtime during the migration process.
- Migration fails.
Our migration plugin BlogVault is not plagued with those challenges.
- It supports over 5,000 hosting providers.
- Ensures that there’s no downtime when you are migrating.
- It migrates your complete website without any broken links or missing content.
Learn more about BlogVault’s WordPress Migration.
Here’s a video on how to migrate your site with BlogVault –
Below are the steps you need to take to migrate using BlogVault –
Step 1: Install and activate the BlogVault plugin on your website. From the left-hand menu of your WordPress dashboard, select BlogVault.
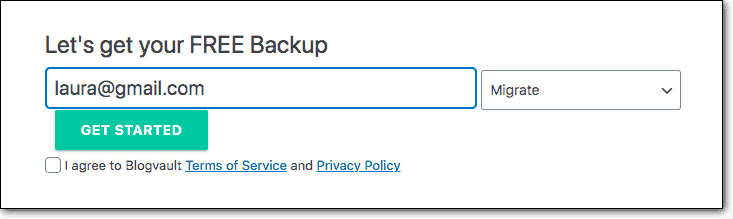
Step 2: On the next page, you’ll be prompted to sign in by inserting your email address. Just enter your email address, select Migrate from the dropdown menu and then click on Get Started.
BlogVault will start taking a backup of your website.
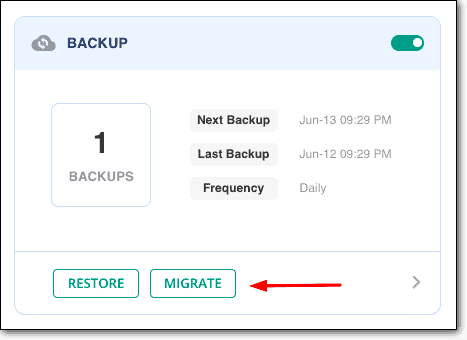
Step 3: Once the backup is ready, open BlogVault’s dashboard, and from the Backup section, select Migrate.
Step 4: Now there are three steps that you need to take.
The first one is to enter the FTP credentials of your CURRENT hosting. You can find your FTP credentials by following this guide or these videos.
No luck?
Don’t worry. Just reach out to your hosting provider and ask them.
After entering your FTP credentials, scroll down and click on Continue.
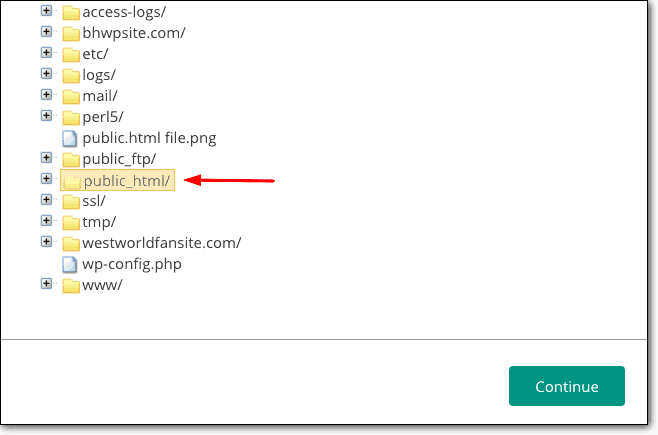
Step 5: Next, you need to select the folder where your WordPress website is located. The default location is the public_html folder.
Select the public_html folder and click on Continue.
If it gives you an error, this means the website is located in a different folder. Sometimes the website is moved to a different location for security reasons. To find the real location, consult with your website owner, or take the help of your hosting provider. When you find the correct folder, select it, and then click on Continue.
Step 6: On the next page, you need to insert the URL of the website in the Destination URL.
If you are changing the domain name, then you need to insert the new URL. If not then you need to insert the same URL, i.e. the URL of the website that you are moving from one server to the next.
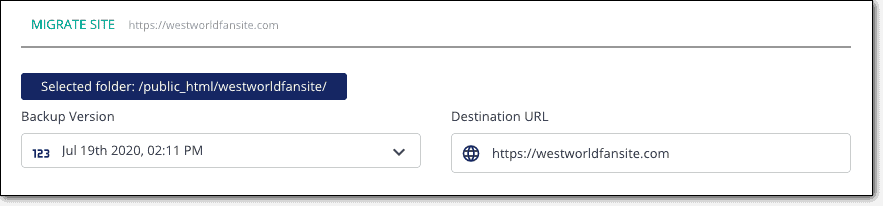
Step 7: If you scroll down on the same page and toggle open the Advanced Option, you will find an option to change your Name Server and IP.

Once done, scroll down and click on Continue.
BlogVault will start migrating your WordPress site.
The time it takes to migrate the website will depend on the size of the website. But you shouldn’t have to wait for more than a few minutes for the process to complete.
Next up are post-migration measures. You can jump straight to the section by clicking here.
ii. Migrate With Your New Hosting
Hosting providers offer migration services.
If you talk to your new hosting service about migration, they will give you one of the following options:
- They’ll migrate the site for you free of costs like Bluehost or FlyWheel.
- Others like Hostgator will give you a free tool that you can use to migrate on your own.
- If you want the provider to do it for you, you’ll need to pay extra charges for a concierge service.
In almost all cases, you’ll be asked to point the name server and IP (about which we spoke in the section above) to the new server where you just moved.
You typically make these changes at the registrar where you bought your domain name. If you bought the domain name from the previous hosting provider, then you need to change your name servers and IP from that account. But if you bought it from an independent vendor like NameSilo, then that’s where you need to go.
Your hosting provider will walk you through the process so don’t worry.
Migrating with your hosting provider can take something between one business day to a whole week.
iii. Migrate Manually
Manual migration is ideal for people who know the inner workings of WordPress.
This method deals with WordPress files and databases and therefore it’s very risky. Smallest of mistakes can end up breaking your live website. Failed migration is also a common issue.
OUR RECOMMENDATION: If you don’t have enough experience of working with WordPress files and database then go for the two previous methods. But if you are confident about your expertise with WordPress, take the following steps:
Step 1: Download WordPress files
There are two ways of doing this:
- Through your cPanel
- Through an FTP client
- cPanel
- Log into your old hosting provider (not the new one) and go to cPanel. Open File Manager and then find the public_html folder. This is where your WordPress files are stored.
- Right-click on the folder and select Compress.
- Now right click on the compressed folder and select Download.
That’s it.
- FTP Client
- Download the install and FTP client like Filezilla on your computer. It’ll help you access your public_html folder right from your desktop.
- But first, you need to enter your FTP credentials into Filezilla. You can find your FTP credentials by following this guide or these videos. Or just ask for it from your hosting provider.

After you enter the credentials, Filezilla makes a connection with your current hosting server. Now you can download the public_html folder.
- It should appear under the top-right panel under the Remote site section. Just right click and select Download.
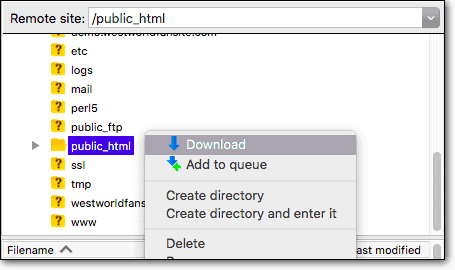
Your WordPress files will be downloaded on your local computer.
CAUTION: There’s one caveat though. The public_html folder is the default location of WordPress files but some site owners change this location due to security issues. We suggest clarifying this with the site owner beforehand.
Step 2: Download WordPress Database
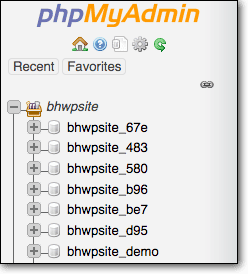
- Log into your current hosting account and open phpMyAdmin.
- On the next page on the left side panel, you should be able to see your WordPress databases. If there is one database then move on to the next step. If there are multiple databases, reach out to your hosting provider to learn which database should you download.
- Then click on the database to select it and from the bar at the top of the page select Export > Quick > Go.
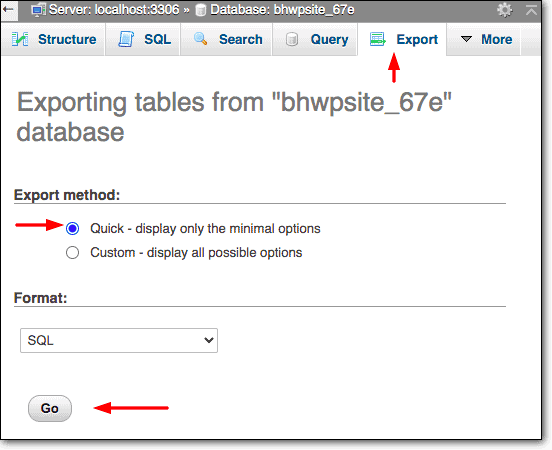
Your database will be downloaded and stored on your computer.
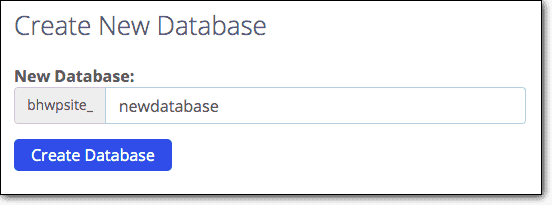
Step 3: Create Space For New Database Plus Create A New Database Users
Now that you have your WordPress files and database with you let’s prepare to upload them to the new hosting provider.
- Login to the new hosting account, go to cPanel and select MySQL Databases.
- Then add a new database like this –
- On the same page, scroll down and create a new user.
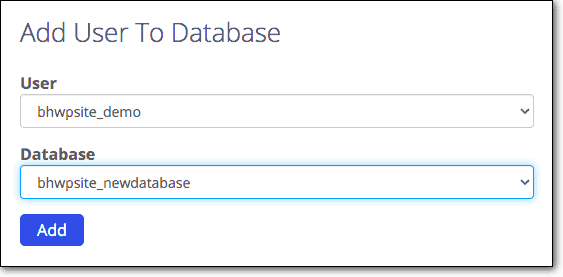
- Again on the same page scroll down and link the new database with the new user.
- Note down the database name, username, and password. You’ll need it in the next step.
This is an empty database. It’s just creating a space for the old database that we are going to upload in one of the later steps.
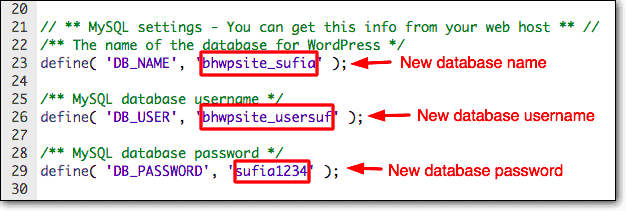
Step 4: Point Config File to New Database Space
Before you start uploading the old files and database to the new hosting provider, you need to edit your config file. Why?
Well right now, your WordPress files are connected with your old database which is located on your old hosting account. You need to point them to the new database (or space) that we created in the above step.
- Open the public_html folder you had downloaded.
- Locate the config.php file and open it.
- In the config file, you’ll find the old database name, user, and password. Replace them with the new ones that you have noted down in the previous step.
- Save the changes on the file and exit.
Step 5: Upload the Old Database In The New Database Space
- Login to your new hosting account and open phpMyAdmin.
- On the left-hand side of the screen, you should be able to see the new database you created in step 3. Select it.
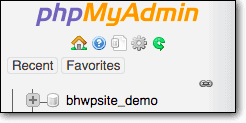
- Then from the top of the database, select Import and upload the old database that is stored on your computer.
That’s it. We are done with dealing with databases. Time to upload the WordPress files.
Step 6: Upload the Old WordPress Files To The New Hosting Server
There are two ways of doing this:
- Through your cPanel
- Through an FTP client
CAUTION: Before we upload the WordPress files, i.e. public_html folder, you need to ensure that there is no public_html folder already present in your File Manager. Just login to your hosting account, go to cPanel > File Manager, and check. If there is a public_html folder then delete it. You may have installed WordPress when you purchased the account or else your hosting provider had auto-installed it.
- cPanel
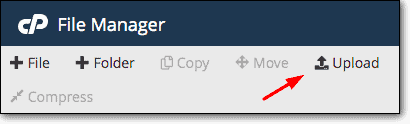
- Login to your new hosting account. Go to cPanel and open File Manager.
- On the next page, click on the Upload option that appears on the top of the page. And then upload the WordPress files, i.e. public_html folder (which includes the config file you edited in one of the previous steps) from your computer.
- FTP Client
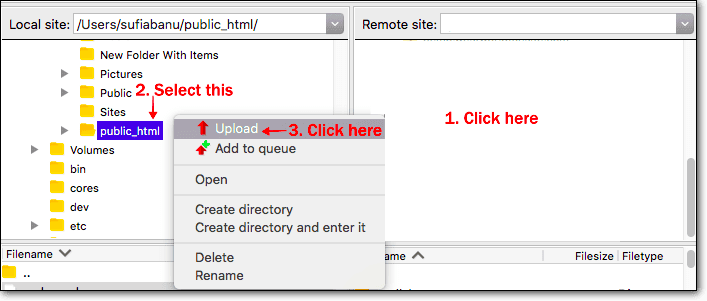
- Open Filezilla and connect it with your NEW hosting provider just like we did in step 1.
- Once the connection has been made, the top right panel should appear empty. You need to upload your public_html folder in here.
- Click on the empty space > then select the public_html folder > right-click and select upload.
Content of your public_html folder / WordPress folder will be uploaded to the new server.
That’s it. You have now uploaded your WordPress files.
Step 7: Change Old URL to The New One (Optional)
Many of you are moving not just to a new hosting provider but a new domain name.
Up until the 6th step, we showed you how to migrate to a new server. Now, we’ll show you how to change the old URL to the new one.
- Open your website (which you will be doing with your old URL) and download and install this plugin called Better Search and Replace.
- From the left-hand menu of the dashboard, select Tools > Better Search and Replace.
- Next, in the ‘Search for’ option, write down the old URL.
- And in the ‘Replace with’ option write down the new URL.
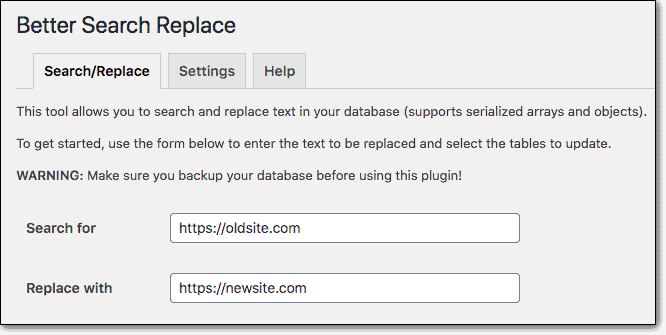
- Scroll down and click on Run Search/Replace.
That’s it, folks. You have successfully migrated your WordPress sites to a new hosting account and you have moved your old domain to a new one.
4. How to Migrate WooCommerce Sites
If you want to move your WooCommerce site to a new hosting provider, you can use our Blogvault migration Service to do that. The step is the same.
You can talk to your hosting provider and see if they can help move your WooCommerce site. You can ask them the following questions –
- Hi, I have a WooCommerce website which I want to move to this hosting service. Can you help me with the migration?
- Is it a free or paid service?
How long does it take to migrate?
- And what sort of involvement will you need from my end in the migration process? I’m a noob.
We will not recommend migrating WordPress manually. WooCommerce websites store a ton of information and there are too many functions on the site. Dealing with that much data manually is not recommended.
5. How to Migrate Multisite Networks
Multisite setups are excellent for those who run separate websites but want to manage them all under one dashboard. The sheer volume of content on a multisite makes migration a daunting task.
But if you are equipped with the right tools and armed with the right instructions, you can move even a mammoth size multisite to a new location without a single hiccup.
We are going to help to achieve just that. Simply follow our guide on multisite migration to move your network from one server to another.
6. Post-Migration Measures
Congratulations, that’s a complicated process that you just successfully completed. But your work isn’t over yet. There is one very important step that you need to take. That is, checking your website to see if everything’s working thoroughly.
- First off clear your cache using a cache plugin. If you don’t have a cache plugin installed, you can clear your browser cache.
- Then, if the site has a few dozens of pages, you can open them all and see if there’s anything missing or if anything is malfunctioning. Check if your images and ads are appearing. Check if all the forms on your website are working properly.
If your site is too big, we suggest inspecting the most important pages, like the home page, product pages, important landing pages, about and contact pages – you get the idea.
If you find any issues like missing content, broken images, we suggest reaching out to the hosting provider to figure out what happened and how you can fix your site.
What Next?
Migrating a website is a daunting task made easy by WordPress hosts and tools like BlogVault.
Speaking of BlogVault many small business owners consider BlogVault as “the industry standard for migration.”
Recommended read: Move WordPress site to root.
If you’ve used BlogVault to seamlessly migrate your site, then we’d love to hear about your experience. Give us a shoutout on Twitter. Tag us with @blogvault.
Alternately, if you need any help with migration, reach out to us.
Tags:
Share it:
You may also like

How to Limit Form Submissions with Droip in WordPress
Forms are an indispensable part of any website because of their versatility, letting you collect information for various purposes! However, people with ill intentions often attempt to exploit these forms…

How To Manage Multiple WordPress sites
Management tools help agencies become well-oiled machines. Each task is completed with the least amount of effort and highest rate of accuracy. For people managing multiple WordPress sites, the daily…

PHP 8.3 Support Added to Staging Feature
We’ve introduced PHP version 8.3 to our staging sites. Test out new features, code changes, and updates on the latest PHP version without affecting your live website. Update PHP confidently…
How do you update and backup your website?
Creating Backup and Updating website can be time consuming and error-prone. BlogVault will save you hours everyday while providing you complete peace of mind.

Updating Everything Manually?
But it’s too time consuming, complicated and stops you from achieving your full potential. You don’t want to put your business at risk with inefficient management.

Backup Your WordPress Site
Install the plugin on your website, let it sync and you’re done. Get automated, scheduled backups for your critical site data, and make sure your website never experiences downtime again.


