Where is WP-Config.php file located & How to Edit it?
Bulletproof Backups for Your WordPress Website
Fortify your business continuity with foolproof WordPress backups. No data loss, no downtime — just secure, seamless operation.
Is your boss breathing down your neck, telling you to edit the wp-config.php file for “security reasons”?
Is editing wp-config.php turning out to be way too complicated without a security team?
We’ve all been there.
You’ve probably heard that it can be dangerous to edit a WordPress core file too.
So, how do you edit the wp-config file safely?
This article is all about:
- How to find the wp-config.php file;
- How to edit it;
- And what kind of edits you can make…
To level up your WordPress website’s security.
Also, there’s going to be a section on all the different things you can do to improve your website security by editing one PHP file.
This is going to be super actionable, so let’s dive right into it.

Where is WP-Config.php Located?
The wp-config.php file is located in the root folder of your WordPress website. You can find it using two different methods:
- Using cPanel
- Using an FTP Client
Once you locate the file in the root directory, you can download wp-config and edit it using a text editor like Notepad. Or you can right-click the file and edit the file inside cPanel directly.
If you have access to the cPanel directly, then it’s a good idea to use that approach. But, if you are working on a client’s website and:
- You only have access to the FTP credentials
- Or the managed WordPress hosting that you are using doesn’t provide cPanel,
Then that works just as well.
> Pro Tip: Before we start editing the wp-config.php file, you should know that this is a core WordPress file. In other words, if you mess something up, you will end up breaking your site. So, just take the time to use a WordPress backup plugin first. We highly recommend using BlogVault to take a backup.
Let’s give you a walkthrough of how you can find the wp-config file:
Note: Neither of these methods is totally safe. We recommend using a precaution before doing this, but we’ll talk more about that later.
Method 1: How do I access WP-Config.php without FTP?
The cPanel is your website’s control panel that you can access through your web hosting dashboard.
Step 1: Log into your hosting account.
Step 2: Go to cPanel.
Step 3: Choose, ‘File Manager.’
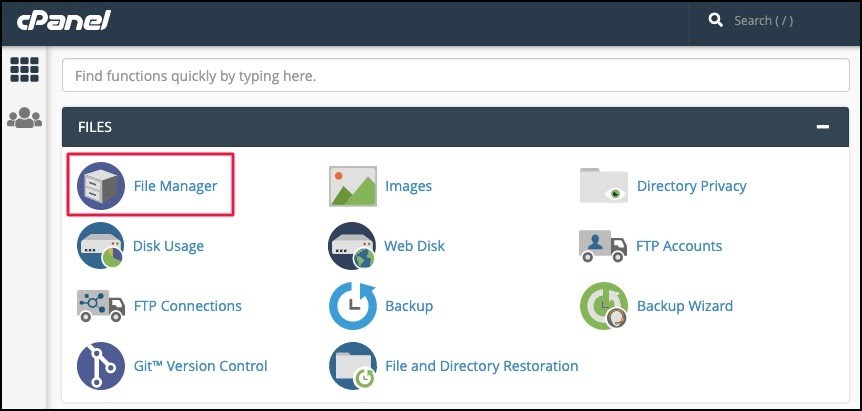
You will see a number of files and folders populated on the page.
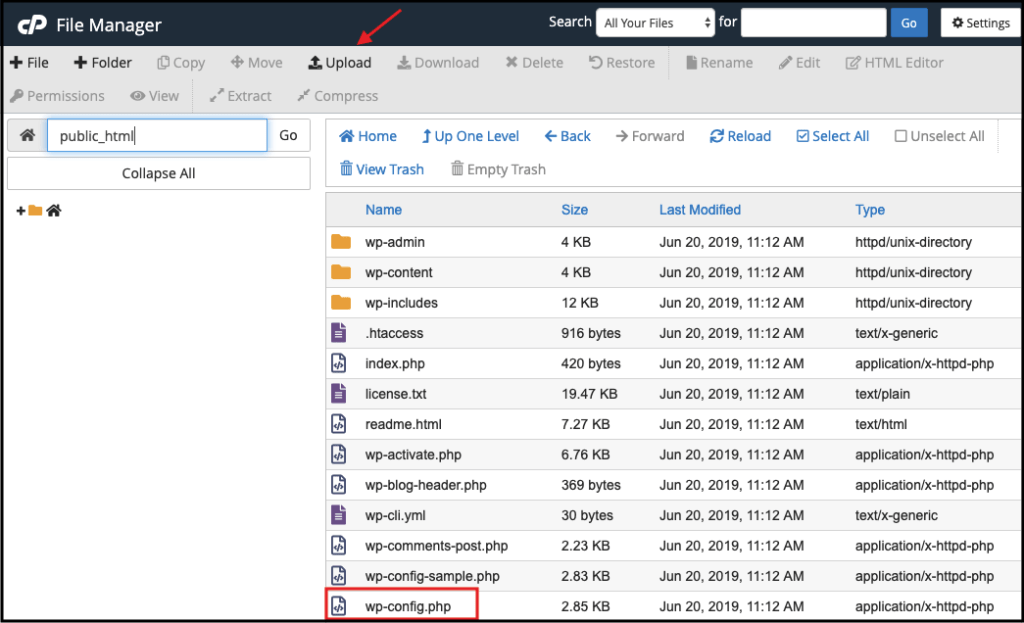
Step 4: Head over to the ‘public_html’ folder:
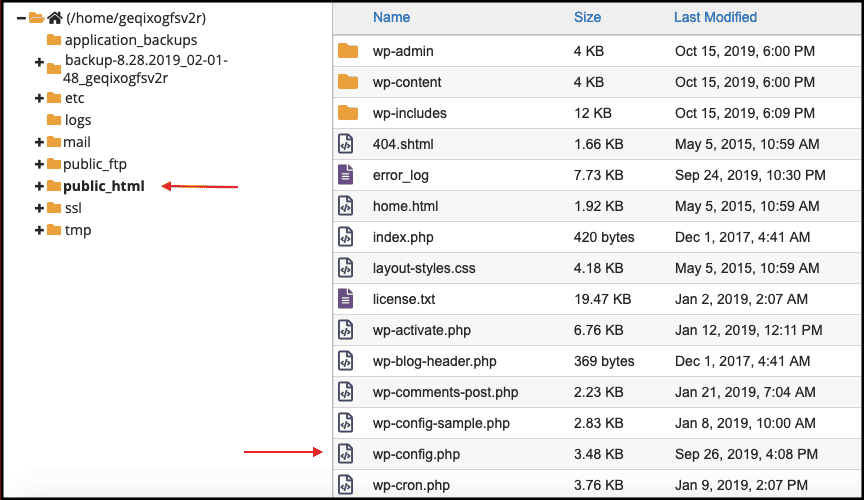
You will find the wp-config.php in this folder.
Method 2: How do I Use FTP to find wp-config.php
If you don’t have access to cPanel you can use an FTP client to do it instead.
We recommend using FileZilla.
Time to use FTP and get down to business:
Step1: Find your FTP credentials. You can find your FTP credentials in your web host dashboard. If you can’t find it, contact your web host and request for your credentials.
Step 2: Launch Filezilla and enter your FTP credentials – the hostname, username, and password – and click on Connect.

Step 3: Once a connection is successfully established, you should see the folder ‘public_html’. Go inside the folder.

You will find the wp-config file in this root folder.
And there you have it! You have found the wp-config.php file.
Time for the much-awaited wp-config.php download!
P.S. – In case you don’t find your wp-config file, don’t worry! You can create one. Let’s take a look at how to do this.
Pro Tip: How Do I Create a WP-Config.php File?
Is the wp-config.php missing from your WordPress installation?
It’s quite possible that you might not find a wp-config.php file at all.
No need to stress.
Just in case you don’t see the wp-config.php file, just rename the “wp-config-sample.php” file to “wp-config” and that will serve the same purpose.
You can do this right inside cPanel.
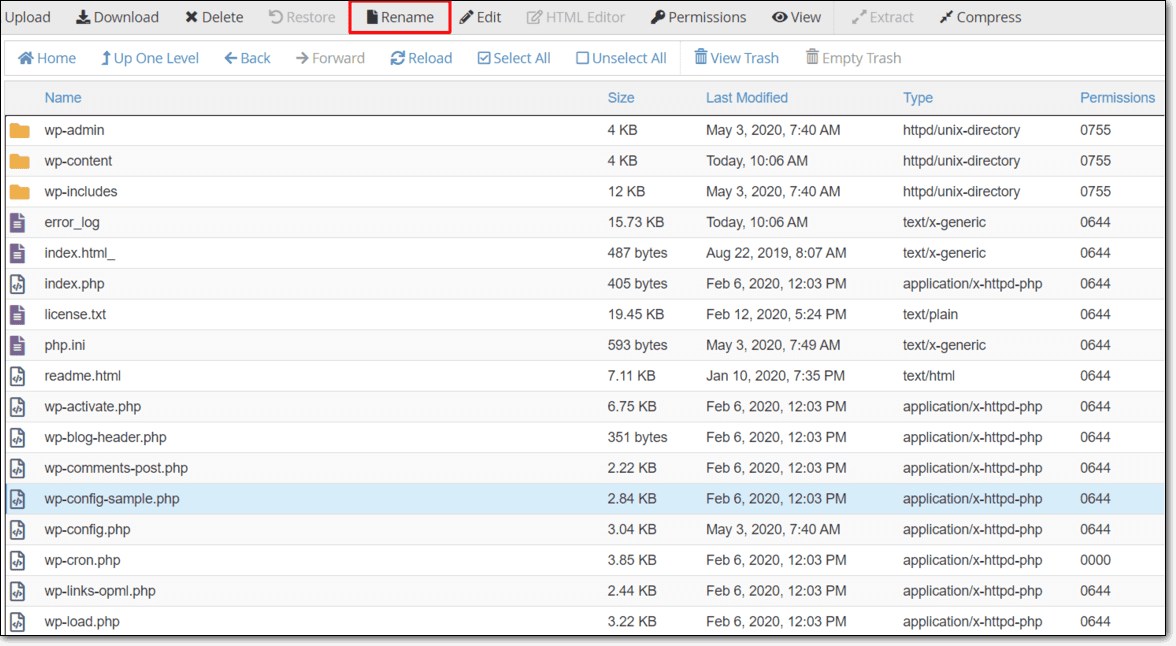
Just click the file to select it and then click on ‘Rename’ in the toolbar to edit the file name.
You can also download the file, edit in on your PC, change the name when you save it, and then upload the new file.
Warning: Remember how we said that editing it directly in cPanel or using FTP on your live site is a very bad idea? Unless you know exactly what you are doing, editing a core file can completely wreck your site.
What can you do to edit the wp-config.php file safely?
First of all, take a backup of your entire site. This way, if things go south, you can just hit restore. Even so, we highly recommend using a staging site for any changes that you might make here.
Our backup plugin BlogVault gives you an easy way to backup your site. You also get a FREE staging site to experiment with your WordPress files.
Once you are done, you can click one button and merge the staging site with the live site for instant results.
We’ll dive into editing the wp-config file’s PHP code soon, but first:
What is wp-config.php?
If you want to jump right into editing the code, then click here.
Or, you can read on and learn a lot more about the WordPress file than you originally signed up for!
What is the WP-Config.php file?
The wp-config.php is a configuration file that stores some of your website’s most important settings and configurations. It also contains your website’s database information.
In short: If you don’t have the wp-config file, then your WordPress site won’t be able to establish a database connection.
If there is anything wrong with this WordPress configuration file, WordPress flags the error message:
‘Error in Establishing Database Connection’
This error will show up whenever someone tries to access the site.
A WordPress website is made up of files and a database. WordPress files mostly contain settings and configurations, while the database contains your posts, comments, users, etc.
The wp-config.php file essentially connects the files with the database.
Now, you don’t have to touch this file so long as you are fine with the wp-config.php default settings.
But your wp-config file can come in handy if you want to:
- Find your database name and database password;
- Change the database prefix;
- Move from one web server to another;
- Switch domain names;
- Change database settings;
- Apply WordPress security precautions;
- Customize functionality and improve performance;
And a LOT more.
We already know where the wp-config file is located. So, let’s go and edit the file!
How to Edit wp-config.php?
WP-config.php location – Discovered? Check!
PHP file – Downloaded? Nope. That’s up next:
Step 1: Select the file and click on download.
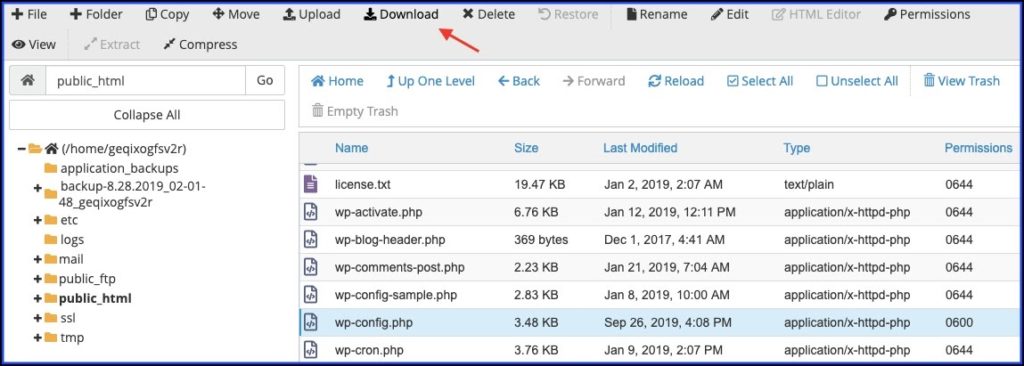
Step 2: Open it in a text editor like Notepad. Here, you’ll be able to edit it. To edit the file, simply make the changes you require.
This means you can add your own code, edit the existing code, or even delete some of it.
Step 3: Save the changes.
Then, head back to the File Manager and upload it to the public_html folder. You can just overwrite the old file.
Boom!
You just learned how to edit wp-config.php.
Now that you know how to download, edit, and re-upload your wp-config file, we can show you what kind of edits to make.
This is serious stuff, here.
Again, we can’t stress enough that doing this without a backup and a staging site is downright dangerous. Do NOT do that under any circumstances.
What Edits Can You Make to the wp-config File?
When you open a wp-config.php file, you will see something like this:
By the way, if you want to skip the default code and move on with the rest of the article, just click here.
<?php
/**

* The base configuration for WordPress

*

* The wp-config.php creation script uses this file during the

* installation. You don't have to use the web site, you can

* copy this file to "wp-config.php" and fill in the values.

*

* This file contains the following configurations:

*

* * MySQL settings

* * Secret keys

* * Database table prefix

* * ABSPATH

*

* @link https://codex.wordpress.org/Editing_wp-config.php

*

* @package WordPress

*/

// ** MySQL settings ** //

/** The name of the database for WordPress */

define('DB_NAME', 'Database_SAMPLE');

/** MySQL database username */

define('DB_USER', 'Username_SAMPLE');

/** MySQL database password */

define('DB_PASSWORD', 'sample_password');

/** MySQL hostname */

define('DB_HOST', 'localhost');

/** Database Charset to use in creating database tables. */

define( 'DB_CHARSET', 'utf8' );

/** The Database Collate type. Don't change this if in doubt. */

define( 'DB_COLLATE', '' );

/**

* Authentication Unique Keys and Salts.

*

* Change these to different unique phrases!

* You can generate these using the {@link https://api.wordpress.org/secret-key/1.1/salt/ WordPress.org secret-key service}

* You can change these at any point in time to invalidate all existing cookies. This will force all users to have to log in again.

*

* @since 2.6.0

*/

define('AUTH_KEY',                'sample authentication key');

define('SECURE_AUTH_KEY',     'sample authentication key');

define('LOGGED_IN_KEY',           'sample authentication key');

define('NONCE_KEY',               'sample authentication key');

define('AUTH_SALT',               'sample authentication key');

define('SECURE_AUTH_SALT',    'sample authentication key');

define('LOGGED_IN_SALT',      'sample authentication key');

define('NONCE_SALT',              'sample authentication key');

/**

* WordPress Database Table prefix.

*

* You can have multiple installations in one database if you give each

* a unique prefix. Only numbers, letters, and underscores please!

*/

$table_prefix = 'wp_';

/**

* For developers: WordPress debugging mode.

*

* Change this to true to enable the display of notices during development.

* It is strongly recommended that plugin and theme developers use WP_DEBUG

* in their development environments.

*

* For information on other constants that can be used for debugging,

* visit the Codex.

*

* @link https://codex.wordpress.org/Debugging_in_WordPress

*/

define('WP_DEBUG', false);

/* That's all, stop editing! Happy blogging. */

/** Absolute path to the WordPress directory. */

if ( ! defined( 'ABSPATH' ) )

define( 'ABSPATH', dirname( __FILE__ ) . '/' );

/** Sets up WordPress vars and included files. */

require_once ABSPATH . 'wp-settings.php';
Holy cow!
Unless you’re a pro WordPress developer, you’re probably very lost right now.
That’s OK.
The only people who fully understand what all of this means are developers who are familiar with the WordPress codex.
Fun Fact: The WordPress codex is a repository of tags and functions in WordPress used frequently by developers.
Don’t worry if you’re not a pro yet. We’ll help you get through this yet!
Let’s take a look at each element and understand what it means and how you can edit it:
Checkout our latest guide on WordPress Troubleshooting
Moving WP-Content folder
Ever since WordPress version 2.6 you can move your wp-content directory to a different location. The wp-content directory stores all your theme files, plugin files, and images.
So, why would you want to move your wp-content folder?
Hackers target this folder often to inject malware.
By default, this WordPress folder is in the public_html folder, and hackers are well aware of the default settings. If you move this folder to another location, it makes it hard for hackers to find it.
You can change the location of wp-content from the wp-config.php file.
NOTE: Add these new constants above the line where WordPress includes the wp-settings.php:
// Add constant variables above this line

/** Sets up WordPress vars and included files. */

require_once(ABSPATH . 'wp-settings.php');

All you have to do is add a new variable:

Define WP_CONTENT_DIR and change the location of your wp-content folder. Here’s how you can do it:

define( 'WP_CONTENT_DIR', $_SERVER['DOCUMENT_ROOT'] . '/blog/content/wp-content' );

To change the location of the wp-content URL there is another variable you need to define in the wp-config.

define( 'WP_CONTENT_URL', 'http://blogvault.net/blog/content/wp-content' );
By the way, you need to replace the above URL with your own URL. Swap out blogvault.net with your siteurl.
Moving the Plugin Folder
If you don’t want to change the location of the entire wp-content folder but just want to move the plugins folder then you can do that too.
It’s easy – you do it pretty much the same way as moving the wp-content folder.
For the plugin folder location, you need to define the variable WP_PLUGIN_DIR:
define( ‘WP_PLUGIN_DIR’, $_SERVER[‘DOCUMENT_ROOT’] . ‘/blog/content/wp-content/plugins’ );
You can also change the URL of the plugins folder for the variable WP_PLUGIN_URL using this piece of code:
define( ‘WP_PLUGIN_URL’, ‘http://example/blog/content/wp-content/plugins’);
The problem with changing the location of the plugins folder is that there is another variable that can be used by some plugin developers called PLUGINDIR. You need to change this too. Otherwise, you might end up with some nasty plugin conflicts.
Here’s how you do it:
define( 'PLUGINDIR', $_SERVER['DOCUMENT_ROOT'] . '/blog/content/wp-content/plugins' );
Moving Themes Folder
You can’t move the themes folder in WordPress. Doing so can cause several problems with installed plugins and some plugins may not even work after this change.
This is the default code that defines the path for the themes folder.
$theme_root = WP_CONTENT_DIR . ‘/themes’;
As a workaround, you can register an additional theme directory using register_theme_directory.
NOTE: This is NOT recommended by WordPress experts because changing the theme directory may cause plugin conflicts that are very difficult to resolve.
Moving the Uploads Folder
Any media uploaded to your website is stored in the wp-content/uploads folder by default. You can choose to store it elsewhere by adding this line:
define(‘UPLOADS’, ‘wp-content/myfolder’);
Replace ‘myfolder’ with the name of the folder you want to use.
Add the following lines in the wp-config.php file and save your changes. The first line is a comment line for future reference.
/** Change Media Upload Directory */

define('UPLOADS', ".'media');
Of course, here we are using a folder called “media” to upload our WordPress files. If you want to name it something else, just give it a different name.
WordPress Debug Mode
The next modification you can make to the wp-config file is useful for developers who want to experiment with features and learn about the WordPress software.
You will learn that the default wp-config.php debug settings are disabled on a WordPress site:
define(‘WP_DEBUG’, false);
This means error notifications will not be displayed. If you want to see these errors and debugging messages, you need to change this line to:
define(‘WP_DEBUG’, true);
This is helpful for developers who want to find and fix bugs. (Recommended read: Debugging WordPress)
Configure Error Logging
In the last segment, we learned how to turn on debugging mode.
WP_DEBUG flags errors in the WordPress backend. But the downside is that it also flags errors on the frontend.
If you want errors to be logged, then you will also need to add the following code in your wp-config.php file just below the WP_DEBUG line:
define( ‘WP_DEBUG_LOG’, true );
Change URLs
When you migrate to a new domain or web server, you may need to change your WordPress URLs. You can do this on the dashboard by going to Settings >> General.

You can also make the change in the wp-config file by adding these two lines:
define(‘WP_HOME’,’http://example.com’);
define(‘WP_SITEURL’,’http://example.com‘);
You can also use a migration plugin to do this on autopilot.
This can come in handy in case you don’t have access to your wp-admin.
Limit and Specify the Number of Post Revisions
WordPress maintains all revisions made to your posts. This can increase the amount of data on your website.
It can eat up web server resources, slow down your website’s speed, and also increase the size of your backup.
Enter in the following code towards the top of the wp-config.php file to limit the number of post revisions:
define(‘WP_POST_REVISIONS’,5 );
This means only up to the last 5 revisions will be stored. The rest will be discarded. You can change ‘5’ to any number you prefer.
Disable the Plugin and Theme Editor
Every office has that one hyper, bubbly coder who likes to fiddle with everything.
No, really. They like to play around with everything.
Disable the plugin and theme editors. You’ll thank us for this later!
Disabling these also extends an additional layer of security if a hacker gains access to a well-privileged user account.
define( ‘DISALLOW_FILE_EDIT’, true );
Heads Up: This is great for security, but make sure that this does not cause any plugins to stop working.
Disable Plugin and Theme Update and Installation
Sometimes, updates can break your site or cause incompatibility issues.
In some cases, plugins and themes may not be compatible with the WordPress version running on your website.
By letting WordPress install them without checking the compatibility, your website could crash.
In cases where there are multiple users working on a site, you might want to disable the option to update or install themes and plugins.
This is also useful for developers and WordPress experts who want to disable file permission for their clients so that they don’t install something without checking if it’s trusted and compatible.
You can disable this feature from appearing on your dashboard by adding this line:
define(‘DISALLOW_FILE_MODS’, true);
To enable the function, you need to change ‘true’ to ‘false’.
You can also enable and disable updates and installs on your website using a security plugin like MalCare. Its website hardening features enable you to do this with just a few clicks. Also you can check out our guide on rollback WordPress plugin.
Modify AutoSave Interval
As you create and revise documents, WordPress automatically saves your edits at regular intervals.
The default interval is 60 seconds.
You can increase or decrease this time by adding this line of code:
define(‘AUTOSAVE_INTERNAL’, 160); //seconds
Disable Post Revisions
In the steps below we’ll show you how to completely turn off WordPress revisions for your pages and posts. Again we’ll be using the WP_POST_REVISIONS setting in your wp-config.php file to make these changes.
Enter in the following code towards the top of the wp-config.php file:
define(‘WP_POST_REVISIONS’, false);
By setting the parameter to ‘false,’ we have effectively disabled post revisions.
Disable Automatic Updates
You can disable automatic updates by adding this line to your wp-config file:
define(‘WP_AUTO_UPDATE_CORE’, false );
To enable it again, you can simply delete this line or change ‘false’ to ‘true’.
Since version 3.7 of WordPress, minor updates were made automatically. Minor updates usually carry security patches that would fix any vulnerabilities present in the WordPress software.
We recommended keeping auto-updates turned on for the minor ones. You can do so by adding this line:
define ( ‘WP_AUTO_UPDATE_CORE’, ‘minor’ );
(Recommended Read: How to Safely Update Your WordPress Site)
Set the Cookie Domain
Cookies are plain text files that are created and stored in the users’ browsers when they visit a website.
Cookies store analytical information on visitor interactions.
Take an ecommerce site for instance – you would definitely want to track a customer’s journey, wouldn’t you?
That’s only one use of a cookie. You can also use cookies for advertising and remarketing.
By default, WordPress uses cookies to manage logged-in user sessions and authentication. It also uses cookies to remember a user’s name and email address if they fill out a comment form. If the cookies get hacked, then essentially, your access credentials could get leaked.
WordPress allows you to set the cookie domain for your WordPress site so that you can set up cookies across domains and subdomains as required.
Here’s the code:
define( ‘COOKIE_DOMAIN’, ‘www.blogvault.net’ );
Enable Multisite / Network Ability
WordPress multisite enables you to create multiple WordPress sites on a single installation of WordPress.
To create a network of sites, you need to add the following line:
define(‘WP_ALLOW_MULTISITE’, true);
That’s pretty much all you need.
Increase the Maximum Upload and PHP Memory Limit
You can increase the maximum upload size and PHP memory limit in WordPress from the wp-config PHP file so that you can upload large files to WordPress.
To edit the memory limit find this line of code:
define(‘WP_MEMORY_LIMIT’, ’32M’);
A PHP memory limit of 128M should be more than enough. So, increase the limit from 32M to 128M using the following line of code:
define(‘WP_MEMORY_LIMIT’, ‘128M’);
Remember to save the file and don’t go overboard with this limit or you may end up crashing your server.
Security Keys
/**
* Authentication Unique Keys and Salts.
*
* Change these to different unique phrases!
* You can generate these using the {@link https://api.wordpress.org/secret-key/1.1/salt/ WordPress.org secret-key service}
* You can change these at any point in time to invalidate all existing cookies. This will force all users to have to log in again.
*
* @since 2.6.0
*/
define('AUTH_KEY',                 'sample authentication key');

define('SECURE_AUTH_KEY',  'sample authentication key');

define('LOGGED_IN_KEY',            'sample authentication key');

define('NONCE_KEY',                'sample authentication key');

define('AUTH_SALT',                'sample authentication key');

define('SECURE_AUTH_SALT','sample authentication key');

define('LOGGED_IN_SALT',      'sample authentication key');

define('NONCE_SALT',               'sample authentication key');
Here, WordPress tells you that you can change these keys to different unique phrases of your own.
Why would you ever need to change these keys?
Let’s take a step back.
Once you login to your WordPress account, you don’t have to keep logging in every time, right? This is because of browser cookies. It stores information needed to log you in automatically.
If stored in plain text, in the event hackers get their hands on this information, they can read it. To safeguard this data, we encrypt it using security keys and salts.
A WordPress Security Key is a password that is made up of random elements. It’s created to be long and complex so that it’s almost impossible for any hacker to figure it out.
Salts add an extra layer of protection to the cookies and security keys. So, even your security key is protected.
In the wp-config file, there are 4 security keys used to sign the cookies for your WordPress site. There are four corresponding salts for each key.
If your WordPress account has been compromised, you need to change these keys.
To do this, you can generate new keys using the online WordPress security key generator. Copy the entire thing and replace the same in your wp-config file.
This will invalidate all cookies stored and force all users to be logged out. They will need to log in again. So anyone logged in to WordPress including a hacker will be logged out.
Security keys and salts don’t need to be remembered. You should just never disclose them or post them online. It’s recommended you change these keys if you suspect a hack or are recovering from one.
Disable Javascript Concatenation
Javascript concatenation combines multiple Javascript files into one. While this is a good thing, the WordPress defaults for JS concatenation are rarely used.
Instead, a speed optimization plugin such as WP Rocket is used to combine multiple JS and CSS scripts to decrease load time.
Now, having multiple scripts working on the same thing can lead to a bunch of errors.
So, here’s how you can disable Javascript concatenation in wp-config.php:
Define CONCATENATE_SCRIPTS constant to false. In wp-config. php use the code:
define(‘CONCATENATE_SCRIPTS’, false);
Simple!
Understand Database Configuration Settings
As you create new users, and publish posts and comments, all the data is stored in your database.
As a site owner, you would normally never need to access this. But there are times where you would need to know your database name, database username, and password.
This information is contained in the wp-config.php file under ‘MySQL settings’:
// ** MySQL settings ** //

/** The name of the database for WordPress */

define('DB_NAME', 'Database_SAMPLE');

/** MySQL database username */

define('DB_USER', 'Username_SAMPLE');

/** MySQL database password */

define('DB_PASSWORD', 'sample_password');

/** MySQL hostname */

define('DB_HOST', 'localhost');

Set DB_Name: The name of your database

Set DB_User: The user who has access to the database

Set DB_Password: Security passcode required to access the database

Set DB_Host: Your database server’s hosting name. In most cases, it’s left as ‘localhost’
This information doesn’t need to be changed in most cases. In the rare event that your WordPress host provider uses alternate ports, you would need to specify it here.
For example, if the port number is 654321, you need to change to:
define(‘DB_HOST’, ‘localhost:654321’);
MySQL Alternate Port
If your host uses an alternate port number for your database you’ll need to change the DB_HOST value in the wp-config.php file to reflect the alternate port provided by your host.
This can happen in a bunch of different ways.
For localhost:
define( ‘DB_HOST’, ‘127.0.0.1:3107’ );
or in some cases:
define( ‘DB_HOST’, ‘localhost:3107’ );
For specified server:
define( ‘DB_HOST’, ‘mysql.example.com:3107’ );
Replace 3107 with whatever port number your host gives you.
MySQL Sockets or Pipes
If your host uses UNIX sockets or pipes, you have to adjust the DB_HOST value in the wp-config.php file accordingly.
This is rare, but here you go:
define( ‘DB_HOST’, ‘127.0.0.1:/var/run/mysqld/mysqld.sock’ );
// or define( ‘DB_HOST’, ‘localhost:/var/run/mysqld/mysqld.sock’ );
// or define( ‘DB_HOST’, ‘example.tld:/var/run/mysqld/mysqld.sock’ );
P.S. – Replace /var/run/mysqld/mysqld.sock with the socket or pipe information provided by your host.
Character Set and Collation
Take a quick look at these next few lines now:
/** Database Charset to use in creating database tables. */

define( 'DB_CHARSET', 'utf8' );

/** The Database Collate type. Don't change this if in doubt. */

define( 'DB_COLLATE', '' );

DB_Charset - A character set (charset) is a collection of characters that might be used by multiple languages.
Consider it a form of coding in which every character of a language (letters, numbers, and symbols) is assigned a unique code or numerical value.
Why is it needed?
The WordPress platform is used all over the world and in various languages. So it needs a character encoding system that can be used to display different languages.
Unicode is one such encoding system wherein every letter, digit or symbol is assigned a numeric value that applies across different languages, programs, and platforms.
The default WordPress settings assign the character set to Unicode (UTF-8) as it supports almost all languages.
You can disable the character set or change it to an encoding system of your choice, but that’s not a very popular choice.
DB_COLLATE – In order for the character set to work, it needs rules for comparing and sorting called collations.
If you leave the settings as NULL or empty, WordPress will automatically fetch the correct collation as assigned by your server.
Many WordPress users choose to enter the default Unicode collation:
define(‘DB_COLLATE’, ‘utf8_general_ci’); // general collation
Change WordPress Database Table Prefix
$table_prefix = ‘wp_’;
Every WordPress website stores the majority of its data in a database such as pages, posts, comments, tags, etc.
There are 11 default database tables, and each one stores different kinds of data. When you install WordPress, the 11 core tables are prefixed by default with ‘wp_’ like wp_comments, wp_posts, wp_options, etc.
Hackers know the default database prefix and this makes it easier for them to locate and break into databases.
To improve the security of your WordPress database, you can change this prefix to something of your choice. It will make it harder for hackers to guess the name of your WordPress database and its tables.
You needn’t edit the wp-config.php file. You can install a plugin like Change DB Prefix to create unpredictable, random table prefixes.
If you wish to edit the WordPress configuration, replace ‘wp_’ with something of your choice:
$table_prefix = ‘tra_’;
Custom User and User Meta Tables
WordPress uses some default tables to store user data and user metadata. Now, the simplest way to set up custom tables is to do it during installation.
You can change the default settings in wp-config.php using the following code:
define( ‘CUSTOM_USER_TABLE’, $table_prefix.’my_users’ );
define( ‘CUSTOM_USER_META_TABLE’, $table_prefix.’my_usermeta’ );
You can use any prefix you want for them.
But here’s the deal: WordPress will still have the original User and User Meta Tables.
Language and Language Directory
The default language for any WordPress installation is English.
Good news, though: WordPress comes with 65 other languages preinstalled!
WordPress v4.0 allows you to change the language from the Admin Dashboard:
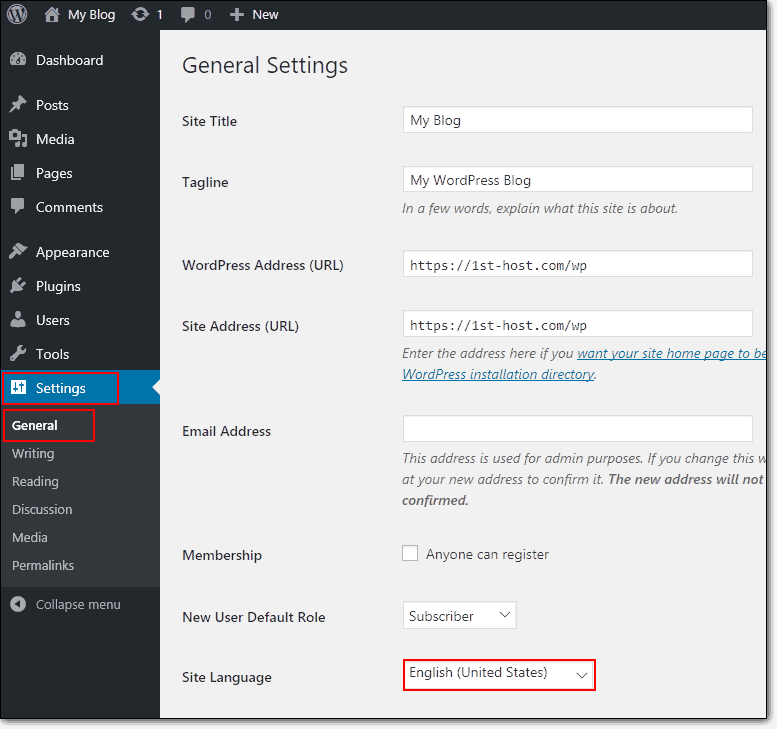
For WordPress v3.96 and other lower versions, you can change the language file and its location from the wp-config.php file.
Just include these two lines of code:
define( ‘WPLANG’, ‘de_DE’ );
define( ‘WP_LANG_DIR’, dirname(__FILE__) . ‘wordpress/languages’ );
If you don’t have the WP_LANG_DIR defined, then WordPress will look at the wp-content/languages and wp-include/languages for the language (.mo) file.
Save Queries for Analysis
You can save database queries in an array and display that array later on for analyzing.
HEADS UP: This is really advanced stuff. Unless you are a database administrator, do not use this function. Also, even if you are going to use this, make sure that you turn it off after debugging. If you keep this function active throughout, it will slow down your server speed.
Add this line to the wp-config:
define( ‘SAVEQUERIES’, true );
Doing this will create an array of all the database queries executed, what functions they called, and how long they took to execute.
But the catch is:
You will also need to add some code to your theme footer:
<?php

if ( current_user_can( 'administrator' ) ) {

global $wpdb;

echo "<pre>";

print_r( $wpdb->queries );

echo "</pre>";

}

?>
Happy debugging!
Override of Default File Permissions
This is a pretty important one. Once you have your WordPress website installed, you don’t want just anyone editing your files and uploading random files, themes, and plugins.
That is a surefire way to increase your chances of getting hacked.
At the same time, you don’t want to completely shut down your website from being able to write anything new to its files.
You can do this the manual way and keep reading, but there is an easier way to set up the right WordPress file permissions.
Best practices for file permissions (CHMOD or Change Mode permissions) for:
- .htaccess and wp-config.php: change to 444 (Anyone can read it, but no one can edit it)
- All other files: change to 644 (Editable only by the owner, but visible to all)
- WordPress directories and sub-directories: change to 755 (Editable only by the owner, but visible to all)
Add this code to your wp-config.php file:
define( 'FS_CHMOD_DIR', ( 0755 & ~ umask() ) );

define( 'FS_CHMOD_FILE', ( 0644 & ~ umask() ) );

chmod 644 wp-config.php

chmod 644 .htaccess
That should do it!
WordPress Upgrade Constants
WordPress constants are some unique identifiers that help you take action from the backend.
In short: they are PHP constants that help you modify your WordPress website without any input fields.
A typical use for PHP constants is to make WordPress updates more secure. This is usually done so that your site download the update files over a secure connection.
If you want to that’s what you’re looking for, then there are two ways to do it:
- Use FTP
- Use SSH
The best part?
You can use WordPress constants in wp-config to resolve any update issues that you might have and do it in a secure way.
Drop this code in your wp-config.php file and replace the default values with whatever you need it to be:
define('FS_METHOD', 'ftpext');

define('FTP_BASE', '/path/to/wordpress/');

define('FTP_CONTENT_DIR', '/path/to/wordpress/wp-content/');

define('FTP_PLUGIN_DIR ', '/path/to/wordpress/wp-content/plugins/');

define('FTP_PUBKEY', '/home/username/.ssh/id_rsa.pub');

define('FTP_PRIKEY', '/home/username/.ssh/id_rsa');

define('FTP_USER', 'username');

define('FTP_PASS', 'password');

define('FTP_HOST', 'ftp.example.org');

define('FTP_SSL', false);
This method is way better than setting auto-upgrades to your WordPress files. Auto-updates sound really nice, but they can completely expose your website.
Not cool!
Using WordPress Crons the Right Way
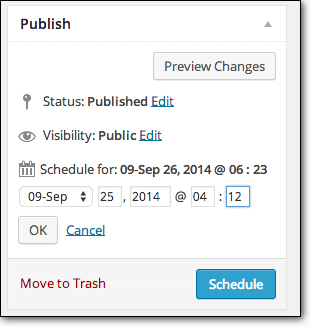
Cron helps you to keep publishing your posts on a schedule. You can do this even within the WordPress admin dashboard:
But here’s the problem:
Cron in WordPress is not like a typical Linux Cron. WordPress checks for scheduled events each time there is a new page visitor.
So, if you have little website traffic, the cron may never get launched and if your traffic is too high, the cron gets triggered way too often and hogs your server resources.
So, you can do one of three things:
- Define alternate crons
- Disable cron altogether
- Set a cron timeout limit
Using an Alternate Cron
The user’s browser gets a redirect when the cron needs to run, so that they come back to the site immediately. Meanwhile, the cron continues to run in the connection they just dropped.
Using this code will do the trick here:
define( ‘ALTERNATE_WP_CRON’, true );
This is a risky method, though.
Using an alternate cron requires a non-WordPress solution inside WordPress.
But this is a pretty common method to resolve publishing issues with scheduled posts.
Disable Cron Completely
As we said, the WordPress cron can be really unpredictable. There’s no way to tell how it will react when your website traffic surges.
So, disabling it altogether is also a pretty common practice.
Use this code to do it:
define( ‘DISABLE_WP_CRON’, true );
Setting a Cron Timeout Limit
Another way to handle issues with a cron getting triggered too often is to set a timeout limit.
In other words, a cron cannot run more than once in a certain span of time.
For instance:
define( ‘WP_CRON_LOCK_TIMEOUT’, 60 );
This code restricts a cron from running more than once every minute.
Empty Trash
Every time you delete something in WordPress, it doesn’t get automatically deleted. Instead, it gets moved to the Trash Bin.
Now, the Trash Bin will automatically clean itself after a set period of days.
You can change this period in wp-config.php using this code:
define( ‘EMPTY_TRASH_DAYS’, 30 ); // 30 days
You could get rid of the Trash Bin altogether by setting that number to zero.
That way, if you delete something in WordPress – comments, posts, pages, and attachments – it will get deleted permanently without confirmation.
Automatic Database Optimizing
WordPress offers a database repair option. This is amazing news for semi-pro developers – especially if you’ve got little experience handling databases.
The best part?
All you have to do to enable it is to drop one line of code in the wp-config.php file:
define( ‘WP_ALLOW_REPAIR’, true );
Heads Up: Don’t leave this option turned on forever. Only use this to recover or repair a corrupted database and then remove this code. This tiny bit of code can allow users to get access to the backend without having to log in. If there was ever a bait for hackers to rush in – that would be it.
View All Defined Constants
PHP has a function that returns an array of all the currently defined constants with their values.
print_r( @get_defined_constants() );
This is not a super-popular option with most users, but it’s a nice way for database admins to understand what’s going on at a glance.
Require SSL for Admin and Logins
There are cookies that store passwords whenever a WordPress admin tries to log in.
Using FORCE_SSL_ADMIN forces secure logins. Normally, login credentials are communicated in a plaintext file. Forcing the use of SSL for Admin and Logins will encrypt this information so that no one can eavesdrop on it. This way, the admin area is always protected.
define( ‘FORCE_SSL_ADMIN’, true );
This is a very simple way to harden your WordPress security.
Block External URL Requests
You can block external URL requests by defining WP_HTTP_BLOCK_EXTERNAL as true.
This option is immensely helpful for developers as it only allows the localhost and your blog to make requests.
The constant WP_ACCESSIBLE_HOSTS will allow additional hosts to go through for requests.
The format of the WP_ACCESSIBLE_HOSTS constant is a CSV of hostnames to allow and wildcard domains that are supported.
For instance: *github.com will allow for all subdomains of wordpress.org to be contacted.
Edit wp-config to include this code:
define( 'WP_HTTP_BLOCK_EXTERNAL', true );

define( 'WP_ACCESSIBLE_HOSTS', 'api.wordpress.org,*.github.com' );
That’s all!
Disable WordPress Auto Updates
How often do you click on the checkbox “Auto-Update WordPress” during the WordPress installation?
Yeah, that’s not a good idea – especially if you have a custom theme installed.
Think about it:
The new update could potentially wreck your site with even a small change in the WordPress core files.
The general rule of thumb is to test it out on a WordPress test site before uploading it to the production site.
Drop this code in the wp- config.php file:
define( ‘AUTOMATIC_UPDATER_DISABLED’, true );
That’ll shut down the auto-update feature.
Disable WordPress Core Updates
You can disable core updates by adding this line to your wp-config file:
define(‘WP_AUTO_UPDATE_CORE’, false );
To enable it again, you can simply delete this line or change ‘false’ to ‘true’.
Since version 3.7 of WordPress, minor updates were made automatically. Minor updates usually carry security patches that would fix any vulnerabilities present in the WordPress software.
We recommended keeping auto-updates turned on for the minor ones. You can do so by adding this line:
define ( ‘WP_AUTO_UPDATE_CORE’, ‘minor’ );
(Recommended Read: How to Safely Update Your WordPress Site)
Clean up Image Edits
You can edit images in WordPress. But every time you edit an image, WordPress saves a copy of the original and the edited version separately.
The result?
Too many copies of the same image on the server.
Edit wp-config and add this line of code:
define( ‘IMAGE_EDIT_OVERWRITE’, true );
This way, only one set of image edits are ever created and when you restore the original, the edits are removed from the server.
Stop Editing
If you see this line of code:
/* That’s all, stop editing! Happy blogging. */
STOP EDITING.
We can’t tell you how many times coders ignore this simple instruction.
You don’t want to go there.
Ever.
This line is crucial to the proper functioning of the wp-config file. Any changes you want to make or add to the file should be done above this line.
The final section of the wp-config file is:
/** Absolute path to the WordPress directory. */
if ( ! defined( ‘ABSPATH’ ) )
define( ‘ABSPATH’, dirname( __FILE__ ) . ‘/’ );
/** Sets up WordPress vars and included files. */
require_once ABSPATH . ‘wp-settings.php’;
It defines an absolute path that is used to set up WordPress vars and included files.
An absolute path is the location of a directory or a file on a computer. So, again, for the love of God – do NOT edit anything here.
What’s Next?
The wp-config file controls critical elements of your WordPress website. So, always remember to take a backup before you edit this file.
While you can make changes and improve your site, you can also make errors and break your site. We suggest editing the file on a staging site. This will ensure any errors you make will not affect your live site.
Even so, as far as possible, we advise configuring settings from the WordPress dashboard.
One of the simplest ways to do this is to use a WordPress staging plugin to set up a staging site and a backup. This is where the BlogVault WordPress Plugin can come in handy.
Try it out now for one-click solutions on:
- Migration and Staging
- Effective Backups
- WordPress security hardening
Phew!
That was a lot of info for one blog post, wasn’t it?
Is there anything that you would like to ask us? Send us a quick tweet and our WordPress experts will help you in any way that we can.
Tags:
Share it:
You may also like

How to Limit Form Submissions with Droip in WordPress
Forms are an indispensable part of any website because of their versatility, letting you collect information for various purposes! However, people with ill intentions often attempt to exploit these forms…

How To Manage Multiple WordPress sites
Management tools help agencies become well-oiled machines. Each task is completed with the least amount of effort and highest rate of accuracy. For people managing multiple WordPress sites, the daily…

PHP 8.3 Support Added to Staging Feature
We’ve introduced PHP version 8.3 to our staging sites. Test out new features, code changes, and updates on the latest PHP version without affecting your live website. Update PHP confidently…
How do you update and backup your website?
Creating Backup and Updating website can be time consuming and error-prone. BlogVault will save you hours everyday while providing you complete peace of mind.

Updating Everything Manually?
But it’s too time consuming, complicated and stops you from achieving your full potential. You don’t want to put your business at risk with inefficient management.

Backup Your WordPress Site
Install the plugin on your website, let it sync and you’re done. Get automated, scheduled backups for your critical site data, and make sure your website never experiences downtime again.


