Fixed: This Site is Experiencing Technical Difficulties
Bulletproof Backups for Your WordPress Website
Fortify your business continuity with foolproof WordPress backups. No data loss, no downtime — just secure, seamless operation.
Frustrated by the error ‘This Site is Experiencing Technical Difficulties’ on your WordPress site? We’ve been there too.
Considering this error doesn’t give you details of what’s wrong, it becomes difficult to pinpoint the cause and fix it.
In the meantime, your visitors see the error and you stand to lose traffic and revenue.
But don’t worry, you can easily fix this error if you follow the right steps. We’ve analyzed over 240,000 sites and have distilled the most likely reasons and solutions for this error.
In this guide, you’ll learn:
Let’s begin.
IMPORTANT NOTE: If you have lost access to wp-admin, you’ll need to manually fix this error. Skip ahead to the manual method.
Why Does This Error ‘This Site Is Experiencing Technical Difficulties’ Occur On WordPress?
This error has a number of root causes behind it. So, it’s important to understand why this error occurs in order to detect the source of the problem. This will make finding the right solution faster and easier. So let’s dive in:
1. Plugin/Theme Conflict Or Incompatibility
WordPress is continuously improving with new features and bug fixes released quite often.
Developers of plugins and themes also update their software to ensure all the elements of their software remain compatible with the latest version of WordPress.
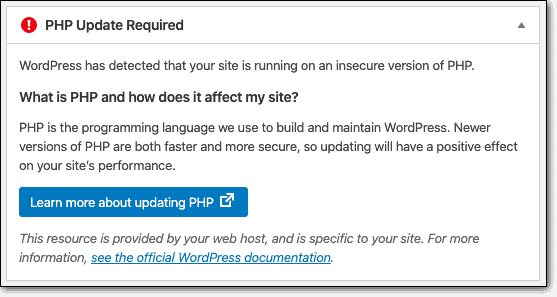
If you’re using outdated versions of WordPress, or any theme or plugin, conflicts and incompatibility issues can arise. You may even see notifications like this on your WordPress dashboard:

Also, if you recently updated plugins, themes, or your WordPress core and you saw the error ‘This Site is Experiencing Technical Difficulties’, it’s likely an incompatibility issue.
So you can almost be certain that the error is related to the update.
2. Botched Update
Sometimes, updates may fail or stall midway. If an update was running in the background and it timed out, your site can get stuck in maintenance mode. Further, you may also see the error ‘This Site is Experiencing Technical Difficulties’.
PRO TIP: Sometimes, the error may occur only for you but the site probably looks fine for everyone else. You can check your site’s status using downforeveryoneorjustme.com.
3. PHP Error
PHP is a computer language that WordPress uses. Similar to themes and plugins, PHP receives updates regularly. If your website is running on an old version of PHP, it could cause errors like this:
Further, every website has a limited amount of resources to function. When you reach or exceed this limit, your site can experience technical difficulties.
This can happen if there is a heavy load on your site, such as a surge in traffic requests or if you’ve uploaded media files that are too large.
4. Server Issue
Sometimes, there could be nothing wrong with your website. The error can be caused due to a problem with your web hosting server.
5. Malware
Lastly, if a hacker managed to break into your site and install malware, it can cause errors like this. You’ll need to scan your site to detect and clean the hack.
How To Get Your Site Back To Normal Immediately?
PRO TIP: Clear your cache and refresh your website’s page. This is the easiest solution but sometimes it does work. You can clear your browser cache easily using the settings option in your browser. To clear your website’s cache, you can use any one of the caching plugins available in the WordPress repository.
Troubleshooting this error can take time. You need to figure out what is causing the problem and then resolve it. In the meantime, you need to get your site back to normal so that your visitors don’t see a broken website or an error message.
Step 1: Restore Your Backup
If you have a backup copy of your website – either with a plugin or your web host – we recommend restoring your backup first. About 90% of the time, restoring your site’s backup copy helps get rid of the error and restores your site to normal.
However, you still need to troubleshoot and find out what caused the error to make sure that the issue is fixed.
But with your site restored to normal, you can stop worrying and take your time in fixing the issue.
PRO TIP: If you don’t have a backup of your site, we strongly suggest you take one now. You can install our BlogVault plugin to take an automated backup in under a few minutes. The plugin will also come in handy in the next step.
You may find our guides on Manual WordPress backups and choosing the best WordPress backup plugin for your WordPress site helpful.
Step 2: Create a staging site
Troubleshooting the error requires you to fiddle with your WordPress site. You need to try different solutions and make modifications. This carries a certain amount of risk of breaking your site and making the situation worse.
We recommend setting up a staging site which is a clone of your live website. You can use this test site to troubleshoot the error. Any changes you make here won’t affect your live site.
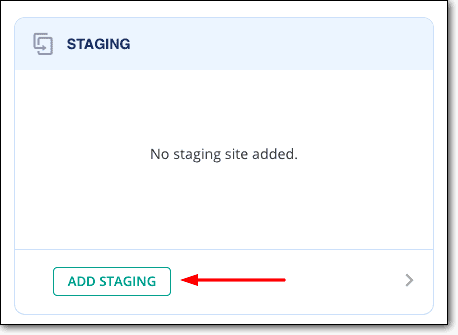
To create a staging site, you can use any WordPress staging plugin or your web host if they have this feature. Our BlogVault Staging plugin enables you to create a staging site easily in under a minute. Follow these steps:
1. Activate the plugin on your site and access the BlogVault dashboard. Here, click on Add Staging.
2. BlogVault will set up a staging site that is password-protected to keep it private and hidden from search engines and visitors.
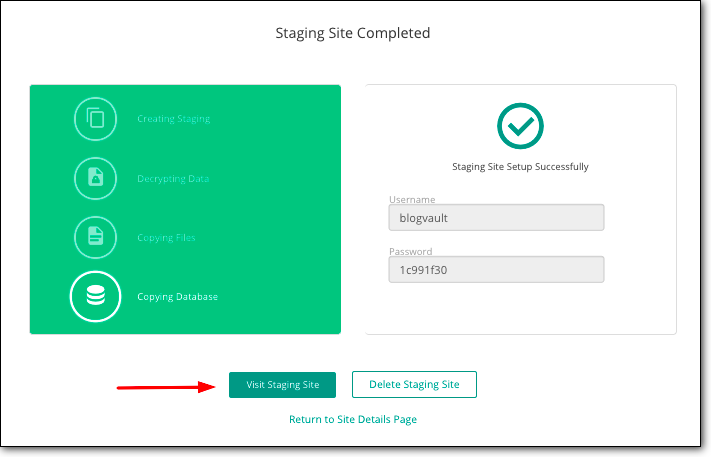
Once it’s ready, note down the staging site’s username and password. After you select Visit Staging Site, enter these credentials on the next page to access the site.
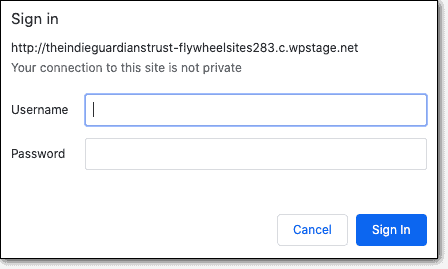
3. To access wp-admin of this staging site, just add the words ‘wp-admin’ to the URL, like so:
That’s it. Your staging site is ready. You can begin to safely troubleshoot the error ‘This site is facing technical difficulties.’
How to Fix ‘This Site Is Experiencing Technical Difficulties’ Error
To resolve the error you’re seeing on your WordPress site, you need to:
Step 1: Detect The Source Of The Problem
Step 1: Detect The Source Of The Problem
1. Check Your Admin Email
With this particular error, sometimes, you may receive an email detailing the causes of the error. It will also give you a link to put your site into recovery mode.
The email will be sent to your registered admin email address on WordPress. If you haven’t received it, check your spam folder.
If you haven’t received this email, don’t worry. You can still detect the problem. Read on.
2. Enable Debugging
Errors like ‘This site is experiencing technical difficulties’ are hard to diagnose because the error message doesn’t say much.
WordPress has a handy feature called Debug which you can enable when you need to troubleshoot errors and problems on your site.
To enable debugging, you can use a WordPress debugging plugin that will automate the process for you. You can also enable debugging mode on your site manually by adding a line of code to your wp-config file:
- Log into your web hosting account. Navigate to cPanel > File Manager > public_html. Here, locate and open the wp-config file and find the line
define( ‘WP DEBUG’, false )
- Change ‘false’ to ‘true’. If the line doesn’t exist in your wp-config file, add it to the top of the file.
- Save and exit the file.
Now, when you check your wp-admin panel, you should see an error message at the top that will indicate which file has the problem, such as:
stdClass::$plugin in /www/WordPress/public_html/wp-contents/plugins/talk/class-wp.php on line 152.
From this, you can determine that the problem lies on line 152 of the Talk plugin.
3. Check Activity Log
If you’ve enabled an activity or audit log on your WordPress site, referring to this log should be your first step to figure out what went wrong.
You can check if there were any changes recently made.
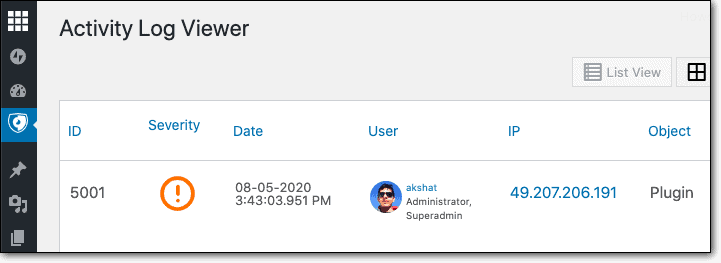
PRO TIP: In case you don’t have an activity log, enable one on your site using a plugin like WP Activity Log. You can also check with your web host if they can provide you with a server log.
Once you’ve narrowed down the cause of the problem, you can move onto the next section where we detail how to fix the error.
Step 2: Troubleshoot The Error
We’ve established by now that there are multiple solutions to this error and it can get confusing. The more options you try, the more frustrating it gets!
If you’ve determined the root cause of the problem, you can skip ahead to the specific solution listed below.
If you still don’t know what’s causing it, we’ve listed the possible solutions starting with the ones that are most likely to work. Depending on whether you have access to wp-admin or not, you can use the menu below to navigate directly to what will most likely work for you:
1. Troubleshooting when you have access to wp-admin
2. Troubleshooting when you don’t have access to wp-admin
1. Troubleshooting when you access to wp-admin
If you have access to wp-admin, solutions are a whole lot easier. You can troubleshoot directly from the dashboard.
Caution: We advise you to take a backup and use a staging site to troubleshoot the error ‘This site is experiencing technical difficulties.’
That said, let’s begin. There are three main areas you need to look at:
A. Check Your WordPress Plugins
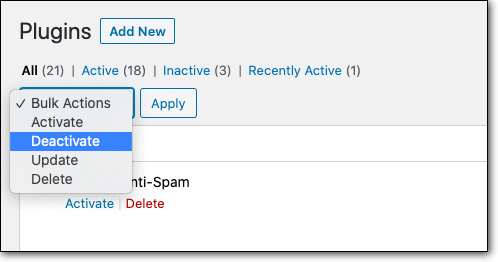
Plugins are the most likely cause of errors like the one you’re facing. To check if a plugin is the culprit behind this error, go to your wp-admin dashboard.
Access Plugins, select all the plugins, and then Deactivate them.
Now, clear your cache and check your website in incognito mode. If it’s displaying fine, then it’s a plugin that caused the issue.
Reactivate your plugins one by one, each time checking if your site is fine or displaying the plugin. Once you detect the culprit plugin, you will need to figure out whether you need to update it or rollback a recent update.
If you don’t need the plugin, we suggest deactivating and deleting the plugin from your dashboard.
PRO TIP: You can also install a cool plugin called Plugin Detective. It helps you troubleshoot issues on your site quickly to find culprit plugins.
B. Check Your WordPress Themes
If plugins aren’t a problem, you can check if your theme is causing a conflict on your site. On your WordPress dashboard, go to Appearance, and activate a default WordPress theme like Twenty Twenty.
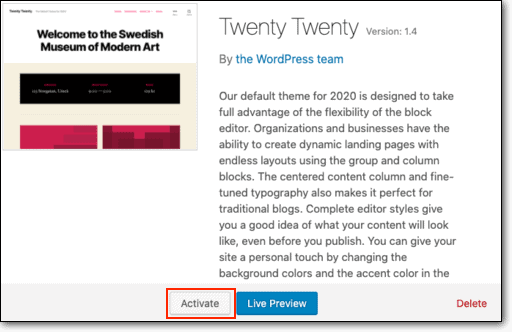
Now, clear your cache and visit your site in incognito mode. If the error has disappeared, then your theme was causing the issue.
PRO TIP: If you have multiple themes installed, even if you aren’t using them, they could still cause conflicts and incompatibility issues. We recommend deleting all extra themes and only keeping the one you’re using.
C. Undo Any Recent Updates
To check if an update is causing the error, you can rollback the update:
i) To downgrade a WordPress core update, you can use WP Downgrade.
ii) To undo an update to a theme or plugin, use WP Rollback.
Our guides on rolling back the core update , rolling back a plugin/theme update and switch theme provide more detailed information.
D. Scan Your Site For Malware
To check if this error is caused by malware on your site, you can scan your site using a security plugin. Hackers usually disguise their malware and hide it in spots that make it hard to detect. So while scanning your site, be sure to use a plugin that is equipped to comb through your site and sniff out any trace of malware.
MalCare is one such plugin that can find any kind of malware – new or old, hidden or disguised, and simple or complex.
Using MalCare to scan your site is easy. Install the security plugin on your site, enter your email address, and MalCare will automatically run the scan.
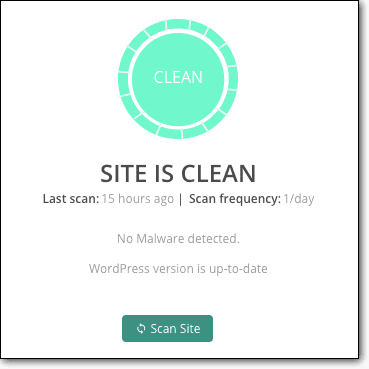
Once complete, MalCare will tell you if your site is clean or if it has found hacked files.
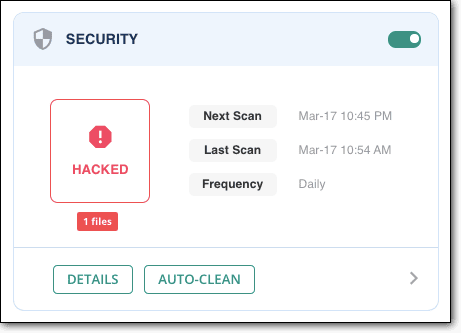
In case your site is hacked, you can clean it up instantly with one click using the Auto Clean option. This will resolve the error on your site and you can get back to business.
If you’re still facing the error, it could be a PHP error. Jump ahead to how to resolve PHP issues.
Next, we detail the steps you need to take in case you don’t have access to wp-admin.
2. Troubleshooting when you don’t have access to wp-admin
If you’ve lost access to your wp-admin panel, troubleshooting becomes a bit more technical. But don’t worry. We’ve got you covered. We’ll show you how to do this without breaking your site.
Caution: We strongly advise you to take a backup. Since you don’t have access to wp-admin, you won’t be able to install a backup plugin. You can attempt taking a backup manually or using cPanel or through your web host.
Next, create a staging site. If your web host allows access to cPanel, look for the Softaculous app installer. You can use this to create a staging site. We’ve covered the steps for Softacuous staging here. Alternatively, check with your web host if they have a staging option.
Next, we detail the steps you need to take to troubleshoot the error ‘This site is experiencing difficulties.’
A. Disable Plugins Folder
Plugins are usually the root cause of this error. To determine if a plugin is causing the issue:
- Go to your web host account and access cPanel > File Manager. Alternatively, you can use an FTP client like FileZilla to access your website’s files. You’ll need your FTP credentials for this.
- Open the public_html folder and go to wp-contents.
- Find the folder called Plugins and rename it to Plugins_Disable.
Next, clear your cache and visit your site in incognito mode. If the error is gone and your site is back to normal, it’s clear that a plugin is causing the issue.
Next, you need to figure out which plugin is the problem. If you’ve regained access to wp-admin, you can log in and reactivate your plugins one by one, each time checking if the error appears on your site.
In case you still don’t have access to wp-admin, use cPanel or FTP to rename the folder back to Plugins. Next, rename each plugin folder inside with the suffix _disable, such as blogvault_disable.
Now, rename each plugin folder back to its original name, and keep checking your site to detect which plugin is causing the issue.
Once you find the culprit, delete the folder to remove the plugin from your site. You should have access to wp-admin now and the error would’ve disappeared.
B. Disable Themes Folder
If it’s not a plugin conflict, you need to disable your theme. You can access your theme folder using cPanel > File Manager or FTP. Open the folder called public_html. Next, open wp-contents > Themes folder. Inside, find your active theme’s folder and rename it with the suffix _disable. For example, rename it to mytheme_disable.
Now, clear your cache and visit your site in incognito mode. If the error has disappeared, you can be sure your theme is causing the problem. Access wp-admin and activate a default WordPress theme like Twenty Twenty.
To resolve the issue with your theme, contact the developer and update them with the trouble you’re facing. They will help you fix it.
C. Reinstall WordPress Manually
There are instances where WordPress files get corrupted or modified along the way. This can cause the error you’re seeing.
You can replace old WordPress files with a fresh WordPress installation. Reinstalling WordPress is a delicate process that needs detailed steps. We’ve penned down an in depth guide to reinstalling WordPress that you can follow.
D. Manually Scan Your Site For Malware
Right off the bat, we can tell you that manually scanning for malware is not effective. If you don’t have access to wp-admin, you can request for a manual clean up from MalCare.
However, if you still want to attempt to manually look for malware on your site. We’ve created a guide that can help you run a manual malware scan.
You can also use online tools that can help you determine if your site has malware:
- Enter your website’s URL in Virus Total to run an online scan
- Check your website’s status on Google Safe Browsing
- Check the Security tab in your Google Analytics account
If none of these measures have worked so far, you can try upgrading your PHP version and PHP memory limit.
3. Check PHP Version and Memory Limit
PHP powers the majority of the appearance and functionality of your WordPress website. So if things go wrong with PHP, it can cause errors like ‘This site is experiencing technical difficulties.’
To resolve PHP errors on your site, you need to check two things:
A. Check PHP version
If you’re running an old version of PHP, you most likely will see a notification on your WordPress dashboard.
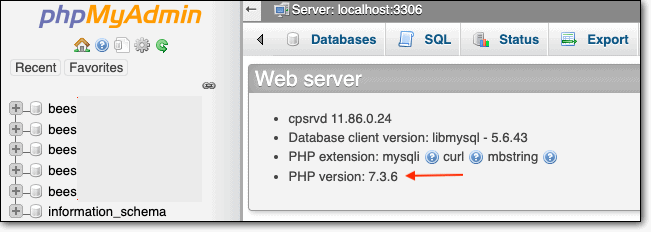
Even if this message is not displayed on your dashboard, we still recommend checking the version on your own. Log in to your web hosting account. Go to cPanel > phpMyAdmin.
Here, you can view the PHP version of your WordPress site:
If your site is running on an old version, updating it can resolve the error. Follow our guide on How to Update the PHP Version on WordPress.
B. Increase PHP limit
Your website has a PHP memory limit that is set by default when you create a WordPress site. When your site is overloaded by a heavy process or large media files, it can exceed the PHP memory limit and cause errors.
To increase your PHP limit, you need to edit your wp-config.php file.
To access your wp-config file, log into your web hosting account and use cPanel > File Manager. You can also use FTP to access your website’s files.
Next, open the public_html folder and find the wp-config.php file. Right-click and edit this file. If you’re using FTP, you need to download the file, and open it in any text editor. You can then reupload the file to save your changes.
To edit the memory limit in your wp-config file, find this line of code:
define(‘WP_MEMORY_LIMIT’, ’32M’);
Change 32M to 128M, like so:
define(‘WP_MEMORY_LIMIT’, ‘128M’);
Save and exit the file. 128M is more than enough for a WordPress site. If you increase this to a higher number, you can cause your site to crash.
If you need more information on PHP limits, follow our guide on how to increase your PHP limit through wp-config file.
We hope one of these measures worked in resolving the error you’re facing on your WordPress site. Unfortunately, this error can be a troublesome one. In the rare case that you’re still facing this issue, we have a few more steps you can try.
What To Do If You Can’t Fix ‘This Site Is Experiencing Technical Difficulties’?
There are four main ways you can seek help for your specific problem related to ‘This Site Is Experiencing Technical Difficulties’.
- Contact your web host – As we mentioned, sometimes there may be no issue with your site and it might be stemming from your web hosting server. Contact the customer support of your web host. Provide them with details of the error and what steps you took to resolve the issue. Request them to check if it’s an issue on their end.
- Check the WordPress Support Forum – WordPress has a Support Forum where you can ask for help from fellow WordPress users. Search for your query or post a question. You should get a response that will help you find and fix the error. WordPress has a very supportive community that is ever ready to help out their fellow users.
- Check popular forums – Many WordPress users are active on popular forums like Reddit, StackExchange, Quora, and StackOverflow. You can check these forums for more solutions to this error.
- Hire professional help – Finally, if you feel this is all too much to handle, you can approach a WordPress developer or expert to take over. A seasoned developer should be able to detect and fix the error. You can hire a developer using one of these platforms: WordPress Jobs, Codeable.io, Smashing Jobs, and WPMU Dev Pros.
With that, we’ve come to the end of our guide to ‘This site is experiencing technical difficulties.’
Concluding Thoughts: How To Be Prepared For Next Time
In our experience working with WordPress, errors like this can pop up on your WordPress site from time to time. So it’s best to be prepared and know how to deal with it fast. Here’s what we recommend:
1. Always – we stress on this – always take a backup of your WordPress website. Things can and will go wrong, and a backup is your safety net. You can restore it and get your site back to normal in no time. We recommend using a plugin like BlogVault that lets you restore your site, even if you have lost access to wp-admin.
2. Whenever you’re making major changes on your site or troubleshooting errors, use a staging site.
3. Lastly, bookmark this article so that you can come back to it and use it as a checklist of measures to take to resolve the error fast.
With these three measures in place, you’ll be prepared not just for this error, but any problems that might arise on your site.
Tags:
Share it:
You may also like

How to Limit Form Submissions with Droip in WordPress
Forms are an indispensable part of any website because of their versatility, letting you collect information for various purposes! However, people with ill intentions often attempt to exploit these forms…

How To Manage Multiple WordPress sites
Management tools help agencies become well-oiled machines. Each task is completed with the least amount of effort and highest rate of accuracy. For people managing multiple WordPress sites, the daily…

PHP 8.3 Support Added to Staging Feature
We’ve introduced PHP version 8.3 to our staging sites. Test out new features, code changes, and updates on the latest PHP version without affecting your live website. Update PHP confidently…
How do you update and backup your website?
Creating Backup and Updating website can be time consuming and error-prone. BlogVault will save you hours everyday while providing you complete peace of mind.

Updating Everything Manually?
But it’s too time consuming, complicated and stops you from achieving your full potential. You don’t want to put your business at risk with inefficient management.

Backup Your WordPress Site
Install the plugin on your website, let it sync and you’re done. Get automated, scheduled backups for your critical site data, and make sure your website never experiences downtime again.


